LaserFOCUS VLF-250 Product Guide - Pertronic Industries Ltd
LaserFOCUS VLF-250 Product Guide - Pertronic Industries Ltd
LaserFOCUS VLF-250 Product Guide - Pertronic Industries Ltd

You also want an ePaper? Increase the reach of your titles
YUMPU automatically turns print PDFs into web optimized ePapers that Google loves.
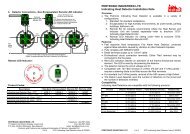
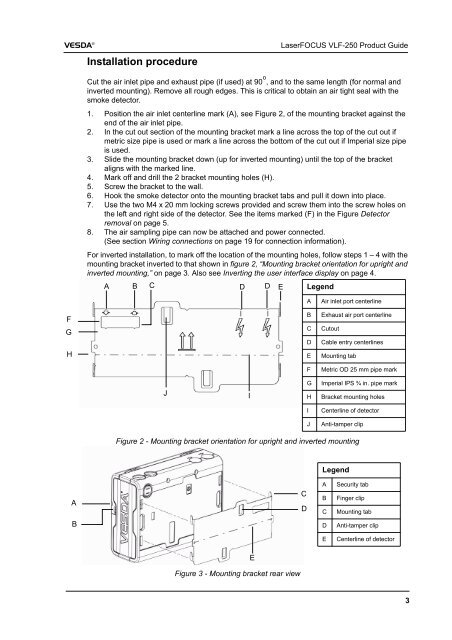
VESDA ®Installation procedure<strong>LaserFOCUS</strong> <strong>VLF</strong>-<strong>250</strong> <strong>Product</strong> <strong>Guide</strong>Cut the air inlet pipe and exhaust pipe (if used) at 90 o , and to the same length (for normal andinverted mounting). Remove all rough edges. This is critical to obtain an air tight seal with thesmoke detector.1. Position the air inlet centerline mark (A), see Figure 2, of the mounting bracket against theend of the air inlet pipe.2. In the cut out section of the mounting bracket mark a line across the top of the cut out ifmetric size pipe is used or mark a line across the bottom of the cut out if Imperial size pipeis used.3. Slide the mounting bracket down (up for inverted mounting) until the top of the bracketaligns with the marked line.4. Mark off and drill the 2 bracket mounting holes (H).5. Screw the bracket to the wall.6. Hook the smoke detector onto the mounting bracket tabs and pull it down into place.7. Use the two M4 x 20 mm locking screws provided and screw them into the screw holes onthe left and right side of the detector. See the items marked (F) in the Figure Detectorremoval on page 5.8. The air sampling pipe can now be attached and power connected.(See section Wiring connections on page 19 for connection information).For inverted installation, to mark off the location of the mounting holes, follow steps 1 – 4 with themounting bracket inverted to that shown in figure 2, “Mounting bracket orientation for upright andinverted mounting,” on page 3. Also see Inverting the user interface display on page 4.ABCDDELegendFGHABCDEFAir inlet port centerlineExhaust air port centerlineCutoutCable entry centerlinesMounting tabMetric OD 25 mm pipe markJIGHImperial IPS ¾ in. pipe markBracket mounting holesICenterline of detectorJAnti-tamper clipFigure 2 - Mounting bracket orientation for upright and inverted mountingLegendACDABCSecurity tabFinger clipMounting tabBDAnti-tamper clipECenterline of detectorFigure 3 - Mounting bracket rear viewE3