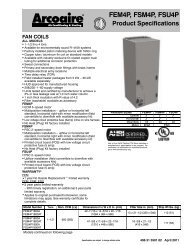
INSTALLATION INSTRUCTIONS Fan Coils FEM4P ... - PROFLO
INSTALLATION INSTRUCTIONS Fan Coils FEM4P ... - PROFLO
INSTALLATION INSTRUCTIONS Fan Coils FEM4P ... - PROFLO

You also want an ePaper? Increase the reach of your titles
YUMPU automatically turns print PDFs into web optimized ePapers that Google loves.
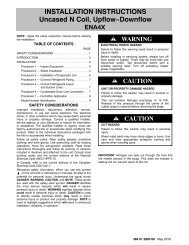
<strong>INSTALLATION</strong> <strong>INSTRUCTIONS</strong>REFRIGERANT TUBINGRefrigerant Tubing Connection and EvacuationUse accessory tubing package or field--supplied tubing ofrefrigerant grade. Suction tube must be insulated. Do notuse damaged, dirty, or contaminated tubing because itmay plug refrigerant flow--control device. ALWAYSevacuate the coil and field--supplied tubing to 500microns before opening outdoor unit servicevalves.!CAUTIONPRODUCT DAMAGE HAZARDFailure to follow this caution may result in product orproperty damage.A brazing shield MUST be used when tubing sets arebeing brazed to the unit connections to prevent damageto the unit surface and condensate pan fitting caps.<strong>Fan</strong> <strong>Coils</strong>: <strong>FEM4P</strong>, FSM4P, FSU4PUnits have sweat suction and liquid tube connections.Make suction tube connection first.1. Cut tubing to correct length.2. Insert tube into sweat connection on unit until itbottoms.3. Braze connection using silver bearing or non--silverbearing brazing materials. Do not use solder(materials which melt below 800_F / 427_C).Consult local code requirements.4. Evacuate coil and tubing system to 500 micronsusing deep vacuum method.!CAUTIONPRODUCT DAMAGE HAZARDFailure to follow this caution may result in product orproperty damage.Wrap a wet cloth around rear of fitting to preventdamage to piston assembly or TXV and factory--madejoints.REFRIGERANT FLOW -CONTROL DEVICE<strong>FEM4P</strong>, FSM4P, and FSU4P Models:These units come equipped with a factory installed Pistonmetering device with Teflon ring. If a piston replacement ifrequired, check piston size shown on indoor unit ratingplate to see if it matches required piston shown onoutdoor unit rating plate. If it does not match, replaceindoor piston with piston shipped with outdoor unit. Thepiston shipped with outdoor unit is correct for anyapproved indoor coil combination (See Figure 20).When changing piston, use a back--up wrench. Handtighten hex nut, then tighten with wrench 1/2 turn. Do notexceed 30 ft--lbs.The indoor piston contains a Teflon ring(or seal) which is used to seat against the inside ofdistributor body, and must be installed properly to ensureproper seating in the direction for cooling operation.Figure 20BRASSHEX NUTRefrigerant Flow -Control DeviceTEFLON SEALPISTONRETAINERTEFLON RINGPISTONFLOW INCOOLINGDISTRIBUTORBRASSHEX BODY! CAUTIONSTRAINERPRODUCT OPERATION HAZARDFailure to follow this caution may result in improper productoperation.If using a TXV in conjunction with a single--phase reciprocatingcompressor, a compressor start capacitor and relay arerequired. Consult outdoor unit pre--sale literature for start assistkit part number.14 496 01 5501 00