INSTALLATION INSTRUCTIONS Fan Coils FEM4P ... - PROFLO
INSTALLATION INSTRUCTIONS Fan Coils FEM4P ... - PROFLO
INSTALLATION INSTRUCTIONS Fan Coils FEM4P ... - PROFLO

Create successful ePaper yourself
Turn your PDF publications into a flip-book with our unique Google optimized e-Paper software.
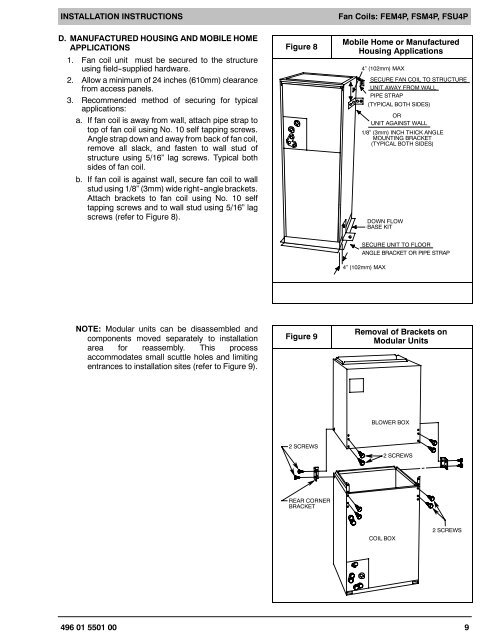
<strong>INSTALLATION</strong> <strong>INSTRUCTIONS</strong><strong>Fan</strong> <strong>Coils</strong>: <strong>FEM4P</strong>, FSM4P, FSU4PD. MANUFACTURED HOUSING AND MOBILE HOMEAPPLICATIONS1. <strong>Fan</strong> coil unit must be secured to the structureusing field--supplied hardware.2. Allow a minimum of 24 inches (610mm) clearancefrom access panels.3. Recommended method of securing for typicalapplications:a. If fan coil is away from wall, attach pipe strap totop of fan coil using No. 10 self tapping screws.Angle strap down and away from back of fan coil,remove all slack, and fasten to wall stud ofstructure using 5/16” lag screws. Typical bothsides of fan coil.b. If fan coil is against wall, secure fan coil to wallstud using 1/8” (3mm) wide right--angle brackets.Attach brackets to fan coil using No. 10 selftapping screws and to wall stud using 5/16” lagscrews (refer to Figure 8).Figure 8Mobile Home or ManufacturedHousing Applications4” (102mm) MAXSECURE FAN COIL TO STRUCTUREUNIT AWAY FROM WALLPIPE STRAP(TYPICAL BOTH SIDES)ORUNIT AGAINST WALL1/8” (3mm) INCH THICK ANGLEMOUNTING BRACKET(TYPICAL BOTH SIDES)DOWN FLOWBASE KITSECURE UNIT TO FLOORANGLE BRACKET OR PIPE STRAP4” (102mm) MAXNOTE: Modular units can be disassembled andcomponents moved separately to installationarea for reassembly. This processaccommodates small scuttle holes and limitingentrances to installation sites (refer to Figure 9).Figure 9Removal of Brackets onModular UnitsBLOWER BOX2 SCREWS2 SCREWSREAR CORNERBRACKETCOIL BOX2 SCREWS496 01 5501 00 9