INSTALLATION INSTRUCTIONS Fan Coils FEM4P ... - PROFLO
INSTALLATION INSTRUCTIONS Fan Coils FEM4P ... - PROFLO
INSTALLATION INSTRUCTIONS Fan Coils FEM4P ... - PROFLO

Create successful ePaper yourself
Turn your PDF publications into a flip-book with our unique Google optimized e-Paper software.
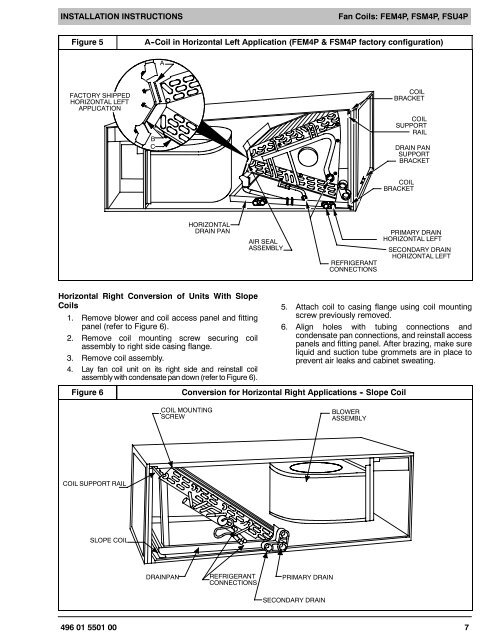
<strong>INSTALLATION</strong> <strong>INSTRUCTIONS</strong><strong>Fan</strong> <strong>Coils</strong>: <strong>FEM4P</strong>, FSM4P, FSU4PFigure 5A -Coil in Horizontal Left Application (<strong>FEM4P</strong> & FSM4P factory configuration)AFACTORY SHIPPEDHORIZONTAL LEFTAPPLICATIONBCCOILBRACKETCOILSUPPORTRAILDRAIN PANSUPPORTBRACKETCOILBRACKETHORIZONTALDRAIN PANAIR SEALASSEMBLYREFRIGERANTCONNECTIONSPRIMARY DRAINHORIZONTAL LEFTSECONDARY DRAINHORIZONTAL LEFTHorizontal Right Conversion of Units With Slope<strong>Coils</strong>1. Remove blower and coil access panel and fittingpanel (refer to Figure 6).2. Remove coil mounting screw securing coilassembly to right side casing flange.3. Remove coil assembly.4. Lay fan coil unit on its right side and reinstall coilassembly with condensate pan down (refer to Figure 6).5. Attach coil to casing flange using coil mountingscrew previously removed.6. Align holes with tubing connections andcondensate pan connections, and reinstall accesspanels and fitting panel. After brazing, make sureliquid and suction tube grommets are in place toprevent air leaks and cabinet sweating.Figure 6Conversion for Horizontal Right Applications - Slope CoilCOIL MOUNTINGSCREWBLOWERASSEMBLYCOIL SUPPORT RAILSLOPE COILDRAINPANREFRIGERANTCONNECTIONSPRIMARY DRAINSECONDARY DRAIN496 01 5501 00 7