BCP-8 Hydronic Manual - Weil-McLain
BCP-8 Hydronic Manual - Weil-McLain
BCP-8 Hydronic Manual - Weil-McLain
- No tags were found...

Create successful ePaper yourself
Turn your PDF publications into a flip-book with our unique Google optimized e-Paper software.
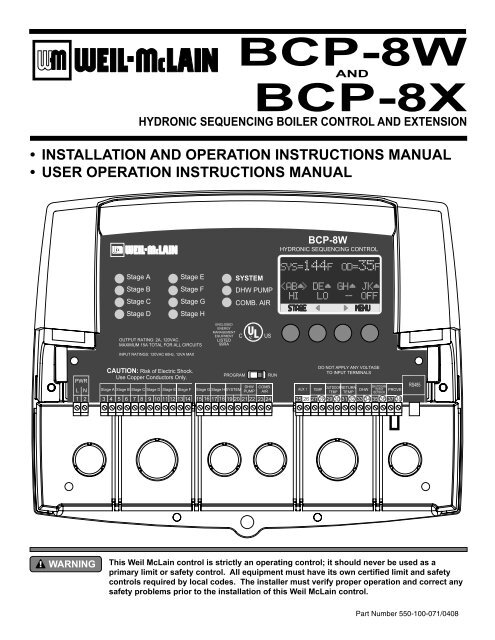
LEDs indicateassociated relay’s statusProgram Switch to restrict accessto function changes. This Switch iscovered with Enclosure Wiring Cover.Button function is presented onbottom row of the display.<strong>BCP</strong>-8WHYDRONIC SEQUENCING CONTROLStage AStage BStage CStage DStage EStage FStage GStage HSYSTEMDHW PUMPCOMB. AIRC USSYS=144FOD=35F DE GH JKHI LO -- OFFSTAGEMENUOUTPUT RATING: 2A, 120VAC.MAXIMUM 15A TOTAL FOR ALL CIRCUITSINPUT RATINGS: 120VAC 60Hz, 12VA MAXENCLOSEDENERGYMANAGEMENTEQUIPMENTLISTED99RAPWRL N1 2CAUTION: Risk of Electric Shock.Use Copper Conductors Only.PROGRAMStage A Stage B Stage C Stage D Stage E Stage F Stage G Stage H SYSTEMDHW COMB.PRESSOUTDOOR RETURNPUMP AIRTEMP+ -TEMP TEMPDHWPROVESHUTDOWN/TSTAT/SETBACK3 4 5 6 7 8 9 10 11 12 13 14 15 16 17 18 19 20 21 22 23 2425 26 27 28 29 30 31 32 33 34 35 36 37 38RUNDO NOT APPLY ANY VOLTAGETO INPUT TERMINALSRS485Output Relays to manage the stages.When connecting Temperature Sensors, noPolarity is observed. Prove terminalsmust be connected for <strong>BCP</strong>-8 tooperate stages.System Output controls pumps,valves, or other system components.DHW Pump and Comb. Air relays arecontrolled when configured.Connect to Extension panels toadd additional stages or connectto 420MOD Interface forexternal set point.3
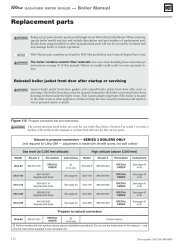
The <strong>BCP</strong>-8W is the perfect control whenever multiple boiler stages are required for <strong>Hydronic</strong> heating applications. The <strong>BCP</strong>-8W controlsthe stages and their pumps or valves to maintain a precise system set point.The <strong>BCP</strong>-8W’s control algorithm allows it to look at the rate of change in the system. If the load is changing quickly, the <strong>BCP</strong>-8W canbe set to OSS sequencing where it will react based on load changes. If the system oscillation is minimal as in heating applications, theoscillation around the set point.The <strong>BCP</strong>-8W’s alphanumeric digital display names each system parameter in simple English and shows its precise value. The easy tocommands.<strong>Manual</strong>, First-On/First-Off (FOFO), or Time. The Time rotates the lead stage every selected period from every hour to every 41 days.With its Outdoor reset feature, the <strong>BCP</strong>-8W is capable of changing its temperature target based on the outdoor temperature. It offersOffset, Minimum, and Maximum Targets, and Night Setback Scheduleor Setback using an External Signal. work in standby mode will remove it from the rotation. In this mode, the boiler will be used for backup in large demand periods whereThese outputs work with the control logic to operate a primary system pump and a combustion air damper. In addition, a System ProveThe <strong>BCP</strong>-8W can sequence boilers as neededother types of boilers, using the Normal Sequencing option brings the lower operating stage followed by the higher one of the lead boiler.That will be repeated for each of the lag boilers.require that the operation of the higher stages turn off the lower operating stages. This can be achieved by selecting Single from theStartup Staging menu.As a stand-alone, the <strong>BCP</strong>-8W-8 is designed to control eight stages. However, it has the capability of expanding its control to twoextension panels (<strong>BCP</strong>-8X) each with eight stages. Thus, the <strong>BCP</strong>-8W can control a total of up to 24 stages.Using a smart algorithm, the <strong>BCP</strong>-8W can monitor the boiler return temperature using an optional return sensor mounted on the returnline. Then, sequence the boilers to raise the return temperature above an adjustable Minimum Return.Having a DHW input either as a dry contact to be used with an external aquastat or as a temperature sensor that can be ordered separately,the <strong>BCP</strong>-8W can control a DHW pump using its built-in DHW Pump output relay. The user will have different priority options thatvaries based on the DHW piping design.4
The <strong>BCP</strong>-8W has multiple operating modes that satisfy most hydronic systems. When theOutdoor Reset is selected, it can change the System Set Point based on outdoor temperature.Or, it can be set to Set Point and sequence stages to achieve a manually adjusted Set Point.In Outdoor Reset, the <strong>BCP</strong>-8W controls a hot water heating system to provide a building withcomfortable and even heat levels. The <strong>BCP</strong>-8W varies the Target temperature of the circulatingheating water in response to changes in the outdoor temperature.The <strong>BCP</strong>-8W also controls the system circulating pump with an adjustable Outdoor Cutoff.When the outdoor temperature is above the Outdoor Cutoff, the System Pump will be offand no heating water is circulated through the system. When the outdoor temperature dropscirculate through the system. The temperature of the heating water is controlled by the ResetRatio parameters or the Set Point.When a building is being heated, heat escapes through the walls, doors, and windows tothe colder outside air. The colder the outside temperature, the more heat escapes. If youcan input heat into the building at the same rate that it is lost out of the building, then thebuilding temperatures will remain constant. The Reset Ratio is an adjustment that letsyou achieve this equilibrium between heat input and heat loss.temperature drops, the temperature of the heating water will increase one degree. Thestarting point of the curves is adjustable, but comes factory selected at 70°F OutdoorTemp. and 100°outdoor temperature is 50°F, this means the temperature has fallen 20° from the startingpoint of 70°F. Therefore, the heating water temperature will increase 20° to 120°F.Each building has different heat loss characteristics. A very well insulated building willdegrees to increase the water temperature 1 degree. On the other hand, a poorly insulatedThis means that for each degree the outdoor temperature dropped the water temperaturewill increase 2 degrees. The <strong>BCP</strong>-8W has a full range of Reset Ratios to match anybuildings heat loss characteristics.A heating curve that relies not only on Outdoor temperature but also on the type ofradiation will improve heat comfort. The following are suggested initial settings fordifferent types of radiation based on average building insulation and heat loss. The Radiators (Steel & Cast Iron) 1.00 (OD) : 1.00 (SYS) Baseboard (Finned copper tube& Cast Iron) 1.00 (OD) : 1.00 (SYS) Radiant (High Mass/Concrete) 4.00 (OD) : 1.00 (SYS) Radiant (Low Mass/Joists) 2.00 (OD) : 1.00 (SYS) Fan Coils & Air Handlers 1.00 (OD) : 1.00 (SYS) (S) Water Temperature (in °F)220210200190180170160150140130120110With a 0° Offset, theratio curves begin at100° Water Temperature.With a -20° Offset, theratio curves begin at80° Water Temperature.With a +20° Offset, theratio curves begin at120° Water Temperature.1:410070 60 50 40 30 20 10 0 -10 -20(O) Outdoor Temperature (in °F)Reset Ratio is Presented asOutdoor Temp.(O) : Water Temp.(S) RatioWater TemperatureWater TemperatureWater Temperature13012011010011010090801501401301201:3 1:2 1:1.5Reset Ratio Curves901:4 1:170 60 50 40Outdoor Temperature1:470 60 50 40Outdoor Temperature1:4-20 Offset+20 Offset1:1.251:11.25:11.5:12:13:14:18:11:14:11:110070 60 50 40Outdoor Temperature4:14:15
The <strong>BCP</strong>-8W has multiple operating modes that satisfy most hydronic systems. It can sequence stages to achieve an adjustable Set Pointor an Outdoor Reset Ratio. Moreover, when used with the 420MOD Interface it can accept a 4-20mA signal as a set point. The 420MODInterface must be purchased separately. This gives the <strong>BCP</strong>-8W the capability of being controlled remotely.by either closing the TSTAT input or opening the SHUTDOWN input, and when the outdoor temperature is below the Outdoor Cutoff, the<strong>BCP</strong>-8W will start calculating the Reaction Period. If after a full Reaction Time the control logic foresee additional stages are needed,When the <strong>BCP</strong>-8W PID logic foresees that the system will overshoot, regardless of the current system and target values, it will make suresatisfying the Minimum Runtime condition. That is, if the Set Point was 150°°F, the lead stage°F and a full Minimum Runtime elapses. This is useful in protecting the lead stagesfrom short cycling.setting, as a mean to calculate the number of stages the <strong>BCP</strong>-8W shall have on at any point. For every Throttle Range below the set°F and the Throttle setting was 5°F, if the Systemdropped below 175°F (180°F - 5°°F (180°F - 5°F - 5°F),As the system temperature rises towards the set point, stages will turn off. Using the previous example, when the system rise to 175°Fpoint. This will leave the lead boiler A on until the temperature rises to 185°° ° 185°F 180 + (1)THR --- None A None180°F 180 - (0)THR --- None --- A175°F 180 - (1)THR A A B A171 to 174°F --- --- A --- A,B170°F 180 - (2)THR B A,B C A,B166 to 169°F --- --- A,B --- A,B,C165°F 180 - (3)THR C A,B,C D A,B,C161 to 165°F --- --- A,B,C --- A,B,C,D160°F 180 - (4)THR D A,B,C,D --- A,B,C,D6
saving features and give more comfortable heat when needed.The <strong>BCP</strong>-8W has been designed with <strong>Hydronic</strong> heating as the primary purpose. With this in mind, many of the <strong>BCP</strong>-8W features can 8W versatile for many industries. Reset) or by maintaining an adjustable Set Point. The Outdoor Reset option uses an Outdoor Sensor (supplied with the control) andachieves better fuel savings in addition to better comfort. is slow and requires a long period to achieve or measure theresults. However, OSS, can be used for applications where the load changes frequently and the sequencing must match the load andits immediate change. Extension Panels, each with eight stages. boiler pumps or valves. The control of the DHW is based on either a temperature sensor, can be purchased separately, on the DHW source or using a drycontact from an aquastat. The <strong>BCP</strong>-8W provides multiple DHW Priority options based on the DHW piping. The Combustion AirDamper output can be used in conjunction with the PROVE input to check the status of the Combustion Air Damper's End Switch, The optional return line sensor, is purchased separately, can be connected to monitor and help protect the boilers from thermalshock and condensation caused by cool returns.7
one hour to every 41 days (999 hours). The Day/Night Scheduling provides an adjustable time-based schedule for the Setback. It will be available when Shutdown or Tstatis selected from the External Input Startup menu options. hen Setback is selected from the External Input Startup menu options, an external signal can be used to switch the operation ofthe <strong>BCP</strong>-8W in and out of setback mode increasing the target temperature for an adjustable period that follows the setback.Each of the <strong>BCP</strong>-8W and <strong>BCP</strong>-8X consists of three primary enclosurecomponents. and electric wiring terminals. It has two screws to hold it to the base. Aabove the terminals. This switch is enclosed with the Enclosure WiringCover for security. The wiring terminals are of the plug-in type to easeinstallation and removal. contains the holes to mount and hold the controlon the base. The bottom section of the Enclosure Base contains the wiringchamber with knockouts on the bottom to ease installation. seals the wires from the externalenvironment. It has two screws to hold it to the base and a hole to securea lock on the wiring enclosure. A plastic web that separates the wiringchamber into high and low volt sections has been provided.8W or <strong>BCP</strong>-8X.operating temperature is from 20 to 120°F.removing the two bottom screws.mounting holes on the back of the enclosure.should not exceed ¼"Enclosure Display ModuleEnclosure Wiring CoverEnclosure BaseHole for optionalPadlock (not supplied)Mounting BaseDisplay Mounting Scr ewsWiring Cover Mounting Scr ews8
Immersion Heating System SensorImmersion Well3/8" ID 1/2" NPTCommon Supply Pipe common supply header but before any takeoffs. boiler is piped so that the sensor does not see its output, the <strong>BCP</strong>-8W will notsequence the boilers correctly. (#18/2)). Do not ground the shield at thesensor but at the panel using one of the terminals marked with an “O”. clamp. The sensors's concave surface must be facing the pipe for bettertemperature reading. ShieldHeating SystemSensorCommon Supply PipeSensor ProbeStrap-On Heating System SensorShieldPipe InsulationSensor ProbeIf the System Sensor can not sense thecorrect system water temperature beingsupplied to the building, the <strong>BCP</strong>-8W willnot provide comfortable heat levels. Besure that it is located on the main supplypipe which can not easily be isolatedfrom the system. should never be in direct sunlight. other possible heat sources. hold the conduit and enclosure base together. Screw the cover to the base. the sensor and wall except from the bottom. (#18/2). Do not ground the shield at the sensor but at the control using theterminal marked with an “O”. Seal aroundsensor and wallMountingscrewslocationOutdoor SensorOutdoordrip-holeOutdoorSensorsnap-inlocationShieldnot connectedConduitOutdoor Labelon back of Sensor 9
Return SensorSensor ShiledOutdoor SensorSensor ShiledSystem SensorSensor ShiledLineNeutral PWRL N1 2120VACPower SourceTEMPOUTDOORTEMP25 26 27 28 29 30 located on the common header. Contact the factory for additional temperature sensor options. equivalent (#18/2)). SYSTEM TEMP 27, 28. sensor end. 8W will disable all Boilers when the outdoor temperature is above the adjustable Outdoor Cutoff temperature.This feature will automatically be activated when an outdoor sensor is connected. (#18/2)). marked OUTDOOR TEMP - 29, 30. Connect the shield to the circled terminal 30 with one of the sensor wires.Do not connect the shield at the sensor end. temperature on the display with the Target temperature. If the Return is below the Minimum Return, the <strong>BCP</strong>-8W will sequence stages based on the Return Sensor, Minimum Return, Calculated Target, and the actual SystemTemperature. (#18/2)). marked OUTDOOR TEMP - 31, 32. 32 with one of the sensor wires. Do not connect it to the sensor.MPOUTDOOR RETURNTEMP TEMPD28 29 30 31 32 3DOOR RETURNDHWMP TEMP30 31 32 33 3410
ProveDry ContactSetbackDry ContactT-StatDry ContactShutdownDry ContactDHW SensorSensor Shiled DHW Piping on page 18 must be selected from the Startup Menu to determine the DHW Priority options. DHW Call terminals can be connected to either a dry-contact or a temperature sensor that can be purchased DHW terminals. equivalent (#18/2)). marked DHW - 33, 34. Connect the sensor shield to the circled terminal 34 with one of the sensor wires. Do notconnect the shield to the sensor. 18. another controller (i.e. EMS input). SHUTDOWN terminals. SHUTDOWN- 35,36 terminals. EMS input or thermostat). It will only be available when Tstat is selected as the External Input Mode optionfrom the Startup menu on page 18. TSTAT terminals. TSTAT- 35,36 terminals. Tstat signal. Day/Night schedule. location (i.e. EMS input or external time clock). It will only be available when Setback is selected as theExternal Input Mode option from the Startup menu. See page 18. Target will be reduced by the Setback value. SETBACK terminals. SETBACK- 35,36 terminals. RNPDHWSHUTDOWN/TSTAT/SETBACKP32 33 34 35 36 3DHWSHUTDOWN/TSTAT PROVE/SETBACK3 34 35 36 37 38AuxiliarySHUTDOWN/TSTATPROVEInput3 /SETBACK33 34 35 36 37 38DHWSHUTDOWN/TSTAT/SETBACKPROVE3 34 35 36 37 38 used to check on the Combustion Air Damper by connecting it to the end switch of the damper. In this case,the Comb. Air Output option must be activated from the Startup Menu on page 18. PROVE input can be used to check on the PROVE input is open on a call, the <strong>BCP</strong>-8W will enable only the System Output. All stage outputs willbe off when the PROVE input is open. replaced by a System Prove signal. PROVE - 37, 38 terminals. No voltage can be placed across thePROVE terminalsDOWNTAT PROVEBACK36 37 38RS48511
controls as required by local codes. No boiler stage will start unless the Prove terminals are shorted. DO NOTremove the PROVE jumper supplied unless replacing it with a Prove signal. ge G Stage H SYSTEMDHWPUMP16 17 18 19 20 21 22 PROVEIf a Prove is not required, the factory-installed jumper must remain connected for proper operation. LNSystemPump by the System Run-On.The <strong>BCP</strong>-8W can control the DHW Pump when the DHW Pump Output option is activated from the Startup Menu.See page 18. DHW temperature falls below the DHW Set Point and DHW Differential when using a DHW sensor. relay is a Normally Open (N.O.) dry contact. It does not source any power.18), The <strong>BCP</strong>-8W will ignore a DHW call when theShutdown is active.The <strong>BCP</strong>-8W can control the Combustion Air Damper when the Comb. Air Output option is activated in the StartupMenu (Page 18). In addition, the PROVE input will function as the Combustion Air Damper status checker. boiler stages. relay is a Normally Open (N.O.) dry contact. It does not source any power. DHW COMage HSYSTEMPUMP AI7 18 19 20 21 22 23LNDHWPumpDHW COMB.EMPUMP AIR0 21 22 23 24LNoperate the boiler pumps or valves in addition to the boiler stages. N.O. dry contacts only. They do not source any voltage.wiring. Output A, followed by the higher stage of the same boiler and wire it to Stage B.Comb.AirDamperStage A Stage B Stage C Stage D Stage3 4 5 6 7 8 9 10 11 1Lo Hi Lo HiUnit1StagesUnit2Stages12
ENCLOSEDENERGYMANAGEMENTEQUIPMENTEXTENSIONMODULERS-485EXTENSIONMODULERS-485 connected to A and the higher stage of the same boiler must be connected to Stage B. The boilervalve or pump for the same boiler must be connected to Stage C.N Stage A Stage B Stage C Stage D Stage E Stage F2 3 4 5 6 7 8 9 10 11 12 13 14LNLo HiUnit1StagesUnit1PumpLo HiUnit2StagesUnit2Pump connect to the second extension or the 420MOD Interface. communication problem. (Switch is set to "B") will operate stages "Q" through "X".Connecting <strong>BCP</strong>-8 to Two Extension Panelsand 420MOD Interface using RS485Ext AExt B<strong>BCP</strong>-8<strong>BCP</strong>-8X A<strong>BCP</strong>-8WHYDRONIC SEQUENCING CONTROL<strong>BCP</strong>-8XSEQUENCING CONTROL EXTENSIONStage AStage BStage CStage DStage EStage FStage GStage HSYS=144F OD=35FSYSTEMDHW PUMP DE GH JKHI LO -- OFFCOMB. AIRSTAGE MENUI QJ RK SL TM UN VCommO WP XPowerOUTPUT RATINGS:120VAC, 6A RESISTIVE1A PILOT DUTY, 15A TOTALFOR ALL CIRCUITSINPUT RATINGS:115VAC 60Hz, 12VA MAXINPUT RATINGS:115VAC 60Hz, 12VA MAXLISTED99RACUSPWRL N1 2DO NOT APPLY ANY VOLTAGE TO INPUT TERMINALSCAUTION: Risk of Electric Shock.SENSORS MUST BE GOLD SERIESUse Copper Conductors Only.PROGRAM RUNDHW COMB.SHUTDOWNRS485Stage A Stage B Stage C Stage D Stage E Stage F Stage G Stage H SYSTEMPRESSOUTDOOR RETURNPUMPDHW /TSTATAIRTEMPPROVE+ -TEMP TEMP/SETBACK3 4 5 6 7 8 9 10 11 12 13 14 15 16 17 18 19 20 21 22 23 24 25 26 27 28 29 30 31 32 33 34 35 36 37 38PWRL N1 2CAUTION: Risk of Electric Shock.Use Copper Conductors Only.Ext AI Q J R K S L T M U N V O W P X3 4 5 6 7 8 9 10 11 12 13 14 15 16 17 18Ext B6 Pin Phone Cable (provided with Extension)<strong>BCP</strong>-8X B<strong>BCP</strong>-8XSEQUENCING CONTROL EXTENSION420MOD EMS InterfaceI QJ RK SL TM UN VCommO WP XPowerOUTPUT RATINGS:120VAC, 6A RESISTIVE1A PILOT DUTY, 15A TOTALFOR ALL CIRCUITSINPUT RATINGS:115VAC 60Hz, 12VA MAX4-20 mA EMS4-20mA INPUTRS485+ Signal GNDEXTENSION1 2 3CONNECTORSPWRCAUTION: Risk of Electric Shock.Use Copper Conductors Only.I Q J R K S L T M U N V O W P XExt AExt BL N1 23 4 5 6 7 8 9 10 11 12 13 14 15 16 17 184-20mA (+)EMS Signal (-)6 Pin Phone Cable (provided with 420MOD EMS Interface)13
14SYS=168 F OD=45 FTGT=172 FABC ---- LOBOILERMENU------ SETTINGS ------Season Winter 135 FSet Point 135 FEMS Set Point135 FMin Return 110 FBACK SELECT---- MAINTENANCE ----UnitFPresent Time12:30PBACK SELECT<strong>BCP</strong>-8W V1.00Outdoor resetDay/Night ScheduleDHW ParallelBACK SELECTSys=120 F10:00AMBACK NEXT--- SENSOR TRIM ----System Trim +0 FOutdoor Trim +0 FReturn Trim +0 FDHW Trim +0 FBACK SELECTARE YOU SURE?NoYesBACK SAVEdown the Menu button for overthree seconds.settings the Program/Run Switchmust be set to Program.--- SENSOR FAULT ---Stages OnStages OffBACK SAVE--- CONTROL LOGIC---PIDOSSBACK SAVE------ SEQUENCE -------Lo/Hi/Lo/HiLo/Lo/Hi/HiBACK SAVE------ STAGING ------Multiple OutputsSingle OutputBACK SAVE-- TOTAL BOILERS --8[ ]BACK SAVE-- BOILER OUTPUT --NonePumpValveBACK SAVE--- BURNER TYPE ----On/Off2-Stage3-Stage4-StageBACK SAVE---- CONTROL MODE ---Outdoor ResetSet PointEMS 4-20mABACK SAVE---- DISPLAY UNIT ---FCBACK SAVE EMS 4mA SET POINT100 F[ ]BACK SAVEEMS 20mA SET POINT170 F[ ]BACK SAVE---- DHW PIPING ---ParallelPrimary/SecondaryBACK SAVE--DHW PUMP OUTPUT--NoYesBACK SAVE--COMB. AIR OUTPUT--NoYesBACK SAVE-- EXTERNAL INPUT -ShutdownTstatSetbackBACK SAVE
-- EMS SET POINT --140 FBACK SAVE----- SET POINT -----140 F[ ]BACK SAVESYS=168 F OD=45 FTGT=172 FABC ---- LOBOILERMENU----- SETTINGS ------Season Winter 135 FSet Point 135 FEMS Set Point135 FMin Return 110 FBACK SELECT---- MIN RETURN ----120 F[ ]BACK SAVE---- RETURN LAG ----2min[ ]BACK SAVE- SYSTEM SETTINGS -Setback0 FRun-On2minPump Exercise OffBACK SELECT--- PUMP EXERCISE --OffOnBACK SAVE---- SEASON ---WinterSummerBACK SAVE-- OUTDOOR RESET -Reset Ratio 7Target Offset +0 FOutdoor Cutoff 65 FMin.Target 120 FMax.Target 120 FBACK SELECT---- MAX TARGET ----200 F[ ]BACK SAVE---- MIN TARGET ----140 F[ ]BACK SAVE-- OUTDOOR CUTOFF --60 F[ ]BACK SAVE-- TARGET OFFSET ---+0 F[ ]BACK SAVE -- DHW SETTINGS ---DHW Temp. 120 FDHW Prior Tmr 60minDHW Set Point120 FDHW Diff. 5 FBACK SELECT------ SETBACK -------0 F[ ]BACK SAVE------- RUN-ON -------2min[ ]BACK SAVE---- RESET RATIO ---Custom1(8.00 OD:1.00 SYS)2(4.00 OD:1.00 SYS)3(3.00 OD:1.00 SYS)4(2.00 OD:1.00 SYS)5(1.50 OD:1.00 SYS)6(1.25 OD:1.00 SYS)7(1.00 OD:1.00 SYS)8(1.00 OD:1.25 SYS)9(1.00 OD:1.50 SYS)10(1.00 OD:2.00 SYS)11(1.00 OD:3.00 SYS)12(1.00 OD:4.00 SYS)BACK SAVE-- SET SYS TEMP.1 -100 F[] BACK SAVE-- AT OD TEMP.1 ---70 F[] BACK SAVE-- SET SYS TEMP.2 -170 F[ ]BACK SAVE-- AT OD TEMP.2 ---0 F[ ]BACK SAVEDHW PRIORITY TIMER2min[ ]BACK SAVE-- DHW SET POINT --140 F[ ]BACK SAVEDHW DIFFERENTIAL10 F[] BACK SAVE15
- SYSTEM SETTINGS -Setback0 FRun-On2minPump Exercise OffBACK SELECT----- SETTINGS ------Season Winter 135 FSet Point 135 FEMS Set Point 135 FMin Return 110 FBACK SELECT -- STAGE SETTINGS --Reaction Time 1minPurge Delay 0.0minMin Runtime 2minStandby Delay 10minLast Stage Hold 5 FThrottle2 FBACK SELECT-- LEAD SETTINGS --Lead Boiler ABRotate Mode TimeBACK SELECT-- LEAD ROTATION --Time<strong>Manual</strong>FOFOBACK SELECTAUTO ROTATE PERIOD24hrs[ ]BACK SAVE-- REACTION TIME --1min[] BACK SAVE--- PURGE DELAY ----1.0min[ ]BACK SAVE- MINIMUM RUNTIME -2min[] BACK SAVE-- STANDBY DELAY --10min[] BACK SAVELAST STAGE HOLD0 F[ ]BACK SAVE SETBACK SCHEDULESetback0 FPresent Time **:**Day Schdul 7:00AmNight Schdul 7:00PmBACK SELECT-- NIGHT SCHEDULE --07:**PmBACK SAVE-- DAY SCHEDULE ----07:**AmBACK SAVE- SET PRESENT TIME**:**BACK SAVESAVE-- LEAD BOILER ---- THROTTLE RANGE --AB2 FCD[ ]] BACK BACK SAVEBACK SELECTBACK SAVESYS=168 F OD=45 FTGT=172 FABC ---- LO BOILERMENU-- BOILER AB MODE -AutoStandbyOffOnBACK SAVE----- BOILER AB -----ModeAuto------ BOOST PERIOD---Runtime 58Hrs30min[16------ SETBACK -------0 F[ ]BACK SAVE-------- BOOST ---------0 F[ ]BACK SAVEBOILER AB RUNTIME58hrsBACK CLEAR OK
Can be accessed by holding down the Menubutton for over three seconds.check all operating settings and adjustments to match the new settings.To be able to change the <strong>BCP</strong>-8W settings the Program/Run Switch must be set to Program.The switch is located under the Enclosure Wiring Cover for security. The Enclosure WiringCover can be securely closed using a padlock.PROGRAMRUNARE YOUHold Button: MENU/NoSURE? Yes BACK SAVE described in this section. ---- CONTROL MODE --- Outdoor ResetHold Button: MENU//..../Control ModeSet Point EMS 4-20mA Reset without an outdoor sensor.BACK SAVE an Outdoor Cutoff point. That is, to turn the stages, system, and Comb. Air relays off. ºººFHold Button: MENU//..../Display Unit the critical factor. It allows the user to display temperature information and settings ineither ºF (Fahrenheit) or ºC (Celsius). Select the display unit that is best suited for yourapplication.---- DISPLAY UNIT ---FCBACK SAVEEMS 4mA SET POINT100 FHold Button: MENU//..../EMS 4mA Set Point/EMS 20mA Set Point [ ] BACK SAVEaccept the 4-20mA signal and transmit it to the <strong>BCP</strong>-8W.temperature set point, then the 20mA temperature set point.2-22mA range. The display will show the message "Shutdown by EMS" and allEMS 20mA SET POINT170 F[ ]BACK SAVE17
---- DHW PIPING --- ParallelHold Button: MENU//..../DHW PipingPrimary/Secondary priority will only take place during heating periods. See the DHW Priority Timer onBACK SAVEpage 28. DHW even during the Summer or when outdoor temperature is above the Outdoor Cutoff. No priority will be available.A DHW call can be initiated by either a dry contact or using a <strong>Weil</strong> <strong>McLain</strong> Sensor (389-900-230)for immersion in a 3/8ID well (592-300-023). The use of a sensor will allow the adjustment of theDHW Set Point and DHW Differential.Hold Button: MENU//..../DHW Pump Output to select if the <strong>BCP</strong>-8W should be controlling the DHW Pump or not.--DHW PUMP OUTPUT--NoYesBACK SAVE- COMB. AIR OUTPUT- NoHold Button: MENU//..../Comb. Air Output allows the user to select if the <strong>BCP</strong>-8W should be controlling the Combustion AirYesBACK SAVEDamper or not. PROVE On a prove failure situation, the message "Wait for Comb. Prove". No boiler stages will be active until the Proveinput is Shorted. Comb. ProveFailure PROVE input will be used to check System status instead of the Combustion Air Damper.-- EXTERNAL INPUT - ShutdownHold Button: MENU//..../External InputTstat SetbackBACK SAVE Shutdown. 35 and 36 the capability of functioning as a heat-call. That is, when terminals 35 and 36 areshorted, the <strong>BCP</strong>-8W will sequence the stages. However, when they are opened, all stages will turn off. Thus, do not removethe factory installed jumper unless it was replaced with a Tstat signal.the External Input, or an external dry contact signal to switch to setback by selecting Setback from this menu.18
Hold Button: MENU//..../Burner Type the option based on your boiler number of stages.--- BURNER TYPE ----On/Off2-Stage3-Stage4-StageBACK SAVE-- BOILER OUTPUT -- NoneHold Button: MENU//..../Boiler OutputPump Valveadditional boiler pumps or valves.BACK SAVE pumps. The pump stage will run for the Run-On delay after the lower stage of that boiler Hold Button: MENU//..../Boiler Output determine the total number of outputs the <strong>BCP</strong>-8W will need to control. control and extension stages, the additional boilers containing these stages will have CEHold Button: MENU//..../Staging stages. These boilers will need to select the Multiple Output option. That means, both option.-- TOTAL BOILERS --8[ ]BACK SAVE------ STAGING ------Multiple OutputsSingle OutputBACK SAVE------ SEQUENCE ------- Lo/Hi/Lo/HiHold Button: MENU//..../Sequencing Lo/Lo/Hi/HiBACK SAVEsequence the lower stages of all Automatic boilers before sequencing the higher stages. higher stage of the lag boiler.Hold Button: MENU//..../Sequencing and the Boiler Minimum Run Time. The PID relies on the rate of change in the SystemTemperature. The PID logarithmic calculations foresee changes and sequence stages--- CONTROL LOGIC---PIDOSSBACK SAVE19
the Target Temperature. At one Throttling range below the Set Point, only one stage will be on. For each additional Throttlingrange below the Set Point, an additional stage will be activated. The last stage on will be allowed to exceed the Set Point by oneThrottling range before turning off that stage. This helps to prevent the last stage from short cycling. 24 Settings/System Settings/Stage Settings/Reaction Time (pg 24) Settings/System Settings/Stage Settings/Purge Delay (pg 24) Settings/System Settings/Stage Settings/Min Runtime (pg 25) Settings/System Settings/Stage Settings/Standby Delay (pg 25) Settings/System Settings/Stage Settings/Last Stage Hold (pg 25) Settings/System Settings/Stage Settings/Throttle--- SENSOR FAULT --- Stages OnHold Button: MENU//..../Sensor Fault The Sensor Fault will determine the operating status of all output stages set to Auto orStandby when a sensor reads Short or Open.Stages OffBACK SAVE the Shutdown was active, all stages will be Off on a sensor fault.Short or Open and theoutdoor is below the Outdoor Cutoff. When the Outdoor reads Short or Open, the <strong>BCP</strong>-8W will change the Target to theMaximum Target. Short or Open. However, whenthe Outdoor reads Short or Open, the <strong>BCP</strong>-8W will change the Target to the Minimum Target.Short or Open. Short or Open.To Reset the <strong>BCP</strong>-8W control to its original factory defaults, power down the control. Holddown the two right most buttons while powering the control back up until the TotalClear Started screen appears. The Display will direct you to the Startup menu toprogram the control after the defaults are loaded.TOTAL CLEAR STARTEDRelease buttonsandPlease WaitDo not turn off power to control until all Startup settings have been made. Otherwise, the nextTo be able to change the <strong>BCP</strong>-8W settings the Program/Run Switch must be set to Program.The switch is located under the Enclosure Wiring Cover for security. The Enclosure WiringCover can be securely closed using a padlock.PROGRAMRUN20
Button: MENU/Season The MessageSummer to show status. However, a DHW call will bring theboilers back on if needed. When in Winter, the <strong>BCP</strong>-8W will activate the System relaywhenever the Outdoor temperature falls to or below the Outdoor Cutoff setting. Inaddition, it will begin heating whenever the System temperature falls below the Set Point will allow DHW calls to operate the boilers when needed.Hold Button: MENU//Reset Ratio outdoor temperature. With any of the ratios, the colder it becomes outside, the hotter thetemperature of the system water. (See Understanding Operation Concept on page 5) only be 125°F, and at 22°F outside, the system water will be 112°F. Such a low Reset ) setting is a good) ratio, for every degree the outsidetemperature falls, the system water temperature is increased one degree. If the ambient buildingtemperature are cold in cold weather, move the ratio to a higher selection. That is, if(). If the building temperature are too warm in cold weather, move the ratio to a) was initially selected, change it to 1.25). SAVE button will switch to the OutdoorCutoff setting option.DO NOT turn power off to the<strong>BCP</strong>-8W when in off-season.If you do so, the battery willrun down and have to bereplaced. Instead, switchSeason to Summer.---- SEASON ---WinterSummerBACK SAVE---- RESET RATIO ---Custom1(8.00 OD:1.00 SYS)2(4.00 OD:1.00 SYS)3(3.00 OD:1.00 SYS)4(2.00 OD:1.00 SYS)5(1.50 OD:1.00 SYS)6(1.25 OD:1.00 SYS)7(1.00 OD:1.00 SYS)8(1.00 OD:1.25 SYS)9(1.00 OD:1.50 SYS)10(1.00 OD:2.00 SYS)11(1.00 OD:3.00 SYS)12(1.00 OD:4.00 SYS)BACK SAVEWater Temperature1301201101001:4 1:1WarmerColder70 60 50 40Outdoor Temperature4:1Hold Button: MENU//Reset Ratio/Custom can be used by selecting Custom from the Reset Ratio menu option. identify it on the diagram. on the curve. The two points can be anywhere on the line, not necessarily at the ends. 21
-- SET SYS TEMP.1 -120 F[ ]BACK SAVE-- AT OD TEMP.1 ---60 F[ ]BACK SAVE-- SET SYS TEMP.2 -170 F[ ]BACK SAVE-- AT OD TEMP.2 ---0 F[ ]BACK SAVEWater Temperature (in °F)Point1: System=120°F Point2: System=170°FOudoor=60°FOudoor=0°F180Max Target170160150140130120110Point1Customized Reset RatioMin TargetPoint210070 60 50 40 30 20 10 0 -10 -20Outdoor Temperature (in °F)Custom Reset Ratio----- SET POINT -----ººººCºº70 FButton: MENU/Set Point [ ] BACK SAVEsystem temperature around the Set point. Stage Settings. SAVE button will continue to the Outdoor Cutoff setting option. Shutdown by EMS-- OUTDOOR CUTOFF --ºººº70 FHold Button: MENU/Set Point/Outdoor Cutoff [ ]Hold Button: MENU//Outdoor Cutoff BACK SAVEif the outdoor sensor is installed, the Outdoor Cutoff screen will automatically appearafter the temperature Set Point has been selected. boiler stages to hold the calculated temperature. delay. temperature and the burner stages will be active to hold the target water temperature. ººººººHold Button: MENU//Offset of the Outdoor temperature, or the Reset Ratio that has been selected, when the Offsetsetting is changed, that change is directly added to or subtracted from the calculatedchanged from 0° to 10° (an increase of 10°), the Set Point would increase to 140°F.-- TARGET OFFSET ---+0 F[ ]BACK SAVE22
every 1.5 degree change in the Outdoor temperature. What the Offset does is add orsubtract a constant temperature value. (See Understanding Operation Concept on page 5)the new calculated set point based with the Offset should be 175°F. However, it will notexceed 170°F due to the Maximum Target setting.. If the ambient buildingtemperatures are too warm in the mild weather, decrease the Target Offset. If theambient building temperatures are too cold in the mild weather, increase the TargetOffset. The rule of thumb for baseboard radiation is to change the Offset 4°F for every1°F you wish to change the building temperatures. In radiant heat applications, changethe Offset 1°F or 2°F for every 1°F you wish to change the building temperature.Water Temperature (in °F)180170160150140130120110Offset=10°FReset Ratio=1.5 : 1.0Min TargetMax TargetReset Ratio + 10F OffsetMin Target=120°FMax Target=170°FReset Ratio10070 60 50 40 30 20 10 0 -10 -20Outdoor Temperature (in °F)Target Offset---- MIN TARGET ----ºººººº140 FHold Button: MENU//Min. Target [ ] 8W will calculate the Set Point based on the Outdoor temperature, the Reset Ratio, andBACK SAVEthe Offset value. The <strong>BCP</strong>-8W will control all boilers to hold either the Set Pointtemperature, or the Minimum Target, whichever is higher. ººººººHold Button: MENU//Max. Target previous setting)..---- MAX TARGET ----200 F[ ]BACK SAVEWhen a return sensor is connected to the <strong>BCP</strong>-8W, it will monitor and control the boiler return. It does that by monitoring the Targetreturn will occur, it will increase the Target automatically as an effort to increase the return temperature. See Return Sensor Wiring onpage 10.---- MIN RETURN ----ººººOFFHold Button: MENU/Min. Return[ ] BACK SAVENormally, this setting is provided by the boiler manufacturer or the system engineer. drop below the Min. Return. During that period, it will display "Hold Return at 120 F" in the Display Message Minimum Return to allow the monitoring of the return on the display without sequencing the boiler stages.23
Hold Button: MENU/Min. Return/Return Lag monitor the return making sure it is about 10°F above the Minimum Return setting andadjust it if needed.---- RETURN LAG ----2min[ ]BACK SAVEHold Button: MENU/comfort and better fuel savings. The <strong>BCP</strong>-8W behaves differently based on the selected ControlModes (see Startup Settings 17).To be able to change the <strong>BCP</strong>-8W settings the Program/Run Switch must be set to Program.The switch is located under the Enclosure Wiring Cover for security. The Enclosure WiringCover can be securely closed using a padlock.- SYSTEM SETTINGS -Setback0 FRun-On2minPump Exercise OffBACK SELECTPROGRAMRUNButton: MENU//Hold Button: MENU///Reaction Time stage until the Reaction Time has elapsed. a single stage and calculate how long it takes until the system begins to respond to thatstage. That period should be set as the Reaction Time (See PID operation ).-- STAGE SETTINGS --Reaction Time 1minPurge Delay 0.0minMin Runtime 2minStandby Delay 10minLast Stage Hold5 FThrottle2 FBACK SELECT-- REACTION TIME --2min[ ]BACK SAVE--- PURGE DELAY ----1.0minHold Button: MENU///Purge Delay [ ] BACK SAVEcalculate its output until the Purge Delay is over. This allows the boiler to fully come online and to begin producing output. through the entire Purge Delay period (See PID operation on page ). - MINIMUM RUNTIME -1minHold Button: MENU///Min Runtime [ ] (See PID operation on page ). BACK SAVE Minimum Runtime to half the Reaction Time. Minimum Runtime. If boilers tend to short cycle, increase Minimum Runtime.24
-- STANDBY DELAY --10minHold Button: MENU///Standby Delay [ ] 2. BACK SAVEtheir stages on running for the full Standby Time. from starting if the other boilers can eventually meet the load or if the load decreases. boiler. The following stages start time will rely on Pre-Purge and Reaction Time only.LAST STAGEºººººº5 FHOLDHold Button: MENU///Lst Stg Hld [ ] BACK SAVE Stage is turned off. (See PID operation ). Point reaches 170°F. During that period, the display will show "Hold Until 170F" then, the lead stage will turn off-- THROTTLE RANGE --ºººººº2 FHold Button: MENU///Throttle [ ] BACK SAVEstages will be turned on or off. Set Point. A second stage will be activated when the temperature falls to two full Throttling Ranges below the Set Point, and soon, with one extra stage being turned on for every throttling range below the Set Point the System temperature reaches.stages. (See OSS operation ).° ° 185°F 180 + (1)THR --- None A None180°F 180 - (0)THR --- None --- A175°F 180 - (1)THR A A B A171 to 174°F --- --- A --- A,B170°F 180 - (2)THR B A,B C A,B166 to 169°F --- --- A,B --- A,B,C165°F 180 - (3)THR C A,B,C D A,B,C161 to 165°F --- --- A,B,C --- A,B,C,D160°F 180 - (4)THR D A,B,C,D --- A,B,C,DHold Button: MENU///the system.-- LEAD SETTINGS --Lead Boiler ABRotate Mode TimeBACK SELECT25
Hold Button: MENU////Rotate Mode call for output. As more output is needed, additional stages are added. 19), the display willshow the 19),the pump or valve letter will be skipped from the number os stages. See example to the Hold Button: MENU////Rotate Mode (FOFO). The automatic rotation is recommended for most applications. if the Time was not set. However, if the Time was set, the rotation will always take moment the setting is changed. of the stages starts, it will turn off A, B, Then C. Then, stage D will be the new lead forthe next load.No Pump or Valve stages-- LEAD BOILER --ABCDEFBACK SELECTWith Pump or Valve stages-- LEAD BOILER --ABDEBACK SELECT-- LEAD ROTATION --Time<strong>Manual</strong>FOFOBACK SELECTIf Time Rotation is selectedAUTO ROTATE PERIOD24hrs[ ]BACK SAVESETBACK SCHEDULESetback0 FPresent Time **:**Day Schdule 7:00AmNight Schdul 7:00PmBACK SELECTHold Button: MENU///This menu provides the Setback and Boost based on Day/Night Schedule. It will only beavailable when Shutdown or Tstat are selected as the Startup External Input option.------ SETBACK -------°°°°0 FHold Button: MENU///Setback [ ]Hold Button: MENU//Setback BACK SAVEPoint when less load is required during the night or on the weekends when the buildingis not occupied, but heat is still required. Setback to 160 F". 180°F - 20°F). °°Hold Button: MENU//Setback/Boost the building to the desired temperature faster.-------- BOOST ---------0 F[ ]BACK SAVE26
Boost to 190 F". ------ BOOST PERIOD---30minHold Button: MENU//Setback/Boost/Boost Period[ ] BACK SAVEswitch from Setback to normal operation takes place and will continue for the full Boost Period. An example would be if <strong>BCP</strong>-8W’s Set Point for the reasons detailed below.The temperature limits set on the boilers must be higher thanthe temperature rises in the header and before reaching the sensor location, energy is the <strong>BCP</strong>-8W Set Point. Readdissipated. Therefore, the temperature in the header could be lower than that registered the section at left for detailsby boiler sensors.that will prevent erratic system operation. to prevent the boilers’ internal limits being reached. In this situation, the boiler high limit should be set at approximately 180°Fto prevent the difference in boiler temperature vs. header temperature from causing erratic operation.-- DAY SCHEDULE ----Hold Button: MENU///Day Schedules07:**Am and people are active.BACK SAVE -- NIGHT SCHEDULE --sleeping. This setting reduces the calculated temperature by the Setback setting based10:**Pm BACK SAVE temperature of 150F.Hold Button: MENU///Present TimeHold Button: MENU//Present Timefollowed by the minutes. If hours are to be set to PM, scroll through the AM hours toreach the PM hours.- SET PRESENT TIME**:**BACK SAVERemember that the battery is used as a time backup. If no power is supplied to the <strong>BCP</strong>-8W, the battery will die inthree months and time clock values will be lost. Thus, DO NOT power down the control during off-season.27
-- DHW SETTINGS ---Hold Button: MENU//DHW Temp. 140 F 33 and 34. InDHW Prior Tmr 60minDHW Set Point120 FDHW Diff. 5 Fdry-contact input will add the DHW Set Point and Differential control capability. On a DHW call, the <strong>BCP</strong>-8W will raise the Target to either 200ºF or the Maximum BACK SELECTTarget, which ever is lower. The <strong>BCP</strong>-8W provides three levels of DHW pump operation. The Secondary is selected as the DHW Piping from the Startup Menu on page 18. Thisoption will provide no DHW Priority. And, if there was a DHW call during the Summeror when the outdoor temperature is above the Outdoor Cutoff, both the DHW Pump and 18 and the Season was set to Winter while the DHW terminates, whichever is sooner. If the DHW call was still active after the DHW Priority Timer elapses, the System relay willDHW PRIORITY TIMERHold Button: MENU///DHW Prior. Timer 2min [ ]18). It provides the user with the capability of selecting the DHW Priority period. IfBACK SAVESystem Pump operation. That is, when in Summer or Outdoor Cutoff, a DHW call will Priority Timer or until the DHW call expertise, whichever happens sooner. If the DHW call did not expire within the Priority°°°°Hold Button: MENU///DHW Set Point-- DHW SET POINT -- 140 F[ ] BACK SAVE (See page 28). In addition to being able to view and log DHW temperature history.°°°°Hold Button: MENU///DHW Diff. small DHW Differential will have a tighter control over the DHW temperature but mightresult in boilers coming on frequently for short periods to satisfy the DHW Set Point andDifferential settings.DHW DIFFERENTIAL10 F[ ]BACK SAVE28
can control the primary system pump, boiler pumps or valves, a DHW pump, and a combustion air damper. The operation ofthose relays depends on the Startup and System Settings.------- RUN-ON -------2minHold Button: MENU//Run-On[ ] valve, or a combustion air damper relay will run after the output boiler relays has de-BACK SAVEheating system into the building. For a combustion air damper, it brings in enough fresh Run-On than a boiler with more water content.Hold Button: MENU//Pump Exercise seven days. This option reduces pumps' impellers locking after a long off-season period.--- PUMP EXERCISE --OffOnBACK SAVE29
Hold Button: MENU/The Maintenance menu gives access to sensor and output trimmings in addition to viewingTo be able to change the <strong>BCP</strong>-8W settings the Program/Run Switch must be setto Program. The switch is located under the Enclosure Wiring Cover for security.The Enclosure Wiring Cover can be securely closed using a padlock.---- MAINTENANCE ----UnitFPresent Time12:30PBACK SELECT°°°°°FHold Button: MENU//System TrimHold Button: MENU//Outdoor TrimHold Button: MENU//Return TrimHold Button: MENU//DHW Trim calibration. However, sometimes it may be desirable to make small adjustments to thedisplayed value. Hold Button: MENU/The <strong>BCP</strong>-8W provides users with a graphical history of the System, Outdoor, DHW, and Returnsensors for the previous 24 hours. The temperatures are sampled every 12 minutes. That is,readings of temperatures are recorded and stored every 12 minutes for the last 24 hours. and read the upper left temperature. you will be able to view the Outdoor Temperature History, then, the Return Historyfollowed by the DHW History.Hold Button: The <strong>BCP</strong>-8W display layout provides a variety of information that gives an immediatepicture of the operation status. The display shows four heating boilers at a time. Thetwo middle buttons scrolls the screen to view any additional boilers. Moreover, all theinformation is brightly displayed. It can be viewed in brightly or dimly lit rooms. functionality is displayed on a dark background on the screen's bottom line. displays the Target Set Point. If a Return sensor was connected, the Target display willbe alternating its value with the Return temperature. When the control is to display astatus message, the message will replace Target and Return temperatures. See DisplayMessages on page 1.--- SENSOR TRIM ----System Trim +0 FOutdoor Trim +0 FReturn Trim +0 FDHW Trim +0 FBACK SELECTSys=120 F10:00AMBACK NEXT<strong>BCP</strong>-8W V1.00Outdoor resetHeating-BreakOnRiseDay/Night ScheduleDHW ParallelBACKNEXT8 X On/OffPID,Fault Stgs OffBACKNEXT30
System Temp Outdoor Temp Sys=155 F OD=58 F Message Display LineDHW all (200 F) DE GH JK Units and theirHI HI LO ----StatusBOILERMENUButton functions Standby. Standby. Boiler Pumps are being controlled by the <strong>BCP</strong>-8W. The <strong>BCP</strong>-8W normal display layout reserved the second line for message indications. The following is a list of the most common whichever is lower. 31
----- BOILER AB -----Button: BOILER/ModeAuto Runtime 58Hrs BACK SAVE 19). until all boilers have been set. <strong>BCP</strong>-8X stages as well.To be able to change the <strong>BCP</strong>-8W settings, the Program/Run Switch must be setto Program. The switch is located under the Enclosure Wiring Cover for security.The Enclosure Wiring Cover can be securely closed using a padlock. PROGRAM RUN-- BOILER AB MODE - AutoButton: BOILER/ModeStandby Off On BACK SAVE - The <strong>BCP</strong>-8W will control the boiler’s operation to maintain the desired Set Point. Only boilers set to Auto can be leadboiler. These boilers can only be activated when all boilers in Auto have been at HI for an adjustable Standby delay period.Standby boilers are generally used as a backup in extreme load conditions. Note that, a Standby boiler cannot be a leadboiler. Standby Delay is only available in PID mode. Any output boiler not connected to a physical boiler should be set to Off. The Off Mode can also be used to disableboilers that are being serviced. The On Mode should only be used when testing a boiler. The On Mode overrides the PROVE and SHUTDOWN inputs.Once set to On the boiler will immediately start all of its stages.Button: BOILER/RunTimebuttons.BOILER AB RUNTIME58hrsBACK CLEAR OK32
Check the sensor is connected and the wires are continuous to the <strong>BCP</strong>-8W. Finally follow the procedure for IncorrectTemperature Display.The <strong>BCP</strong>-8W sees a short across the input terminals. Remove the wires from the the sensor terminals. The display should changeto read OPEN. If it doesn’t, the <strong>BCP</strong>-8W may be damaged.Remove the wires from the sensor terminals. The display should change to read OPEN. If it doesn’t, the <strong>BCP</strong>-8W may bedamaged. Take an ohm reading across the detached sensor wires. Take an ohm reading across the detached sensor wires. Theohm reading should correspond to the Temperature sensor Table. If it does not, the sensor may be damaged.Check the sensor is connected and the wires are continuous to the <strong>BCP</strong>-8W. Finally follow theprocedure for Incorrect temperature display. - The <strong>BCP</strong>-8W will raise the temperature of the system to either - If excessive heat occurs only in certain weather conditions, adjustthe Reset Ratio and Offset (See Understanding Operating Concept on page 5). If excessiveheat occurs year round, reduce the Offset. - The <strong>BCP</strong>-8W will only sequence boilers with a Mode set to Auto orStandby. Check to if any boiler stage is set to On. - If reduced heat occurs only in certain weather conditions, adjust theReset Ratio and Offset (See Understanding Operating Concept on page 5). If reduced heatoccurs year round, increase the Offset. the Day/Night Schedule and the Setback, Boost, and Boost Period values. Either reduce theSetback or Boost settings or change the Day and Night Schedules. - The <strong>BCP</strong>-8W will only modulate boilers their mode is set to Auto orStandby. Check if any boiler stage is set to <strong>Manual</strong>, Off, or Standby. - Increase the Minimum Runtime only if all boilers tend to short-cycle. - If the system is overshooting or undershooting,adjust Minimum Runtime or the Reaction Time. That depends on if the stages are brought onfast and were not allowed to turn off until the Minimum Runtime elapsed. Or, the stages werebrought on slowly, however, were allowed to turn off quickly. - If the application the system is used on requires fast response that the normalPID mode cannot provide, try using the OSS mode and adjust the Throttle Range according tothe system requirements.°-30 117720-20 82823-10 590760 4268310 3121520 2308925 1993930 1726435 1498540 1304045 1137450 994455 871460 765370 594180 464990 3667100 2914110 2332120 1879130 1524140 1243150 1021160 842170 699180 583190 489200 412210 349220 297230 253240 217250 18733
PWRL N1 2INPUT RATINGS:115VAC 60Hz, 12VA MAXENCLOSEDENERGYMANAGEMENTEQUIPMENT CLISTED99RADO NOT APPLY ANY VOLTAGE TO INPUT TERMINALSSENSORS MUST BE GOLD SERIESUse Copper Conductors Only.PROGRAM RUNSYSTEMDHW COMB.RS485Stage A Stage B Stage C Stage D Stage E Stage F Stage G Stage HSYSTEMPRESSOUTDOORRETURNSHUTDOWNPUMP AIRTEMPDHWPROVE+ -TEMP TEMP/SETBACK3 4 5 7 9 11 13 15 17 19 20 21 22 23 24 25 26 27 28 29 30 31 32 33 34 35 36 37 38USSystem SensorSensor ShiledShutdownDry ContactProveDry ContactThe <strong>BCP</strong>-8W sequencing 4 singlestageboilers and their boiler pumps.The boilers are piped in ReverseReturn on the primary loop. TheSystem output is controlling theSystem Pump.Stage AStage BStage CStage DStage EStage FStage GStage HCAUTION: Risk of Electric Shock.6 8 10 12 14 16 18SQ-EliteSYSTEMDHW PUMPCOMB. AIRSQ-Elite-8SEQUENCING CONTROLSYS=144F OD=35FE G CHI HI -- OFFSTAGEMENUOutdoorSensor120VACBoiler 1 Boiler 2 Boiler 3 Boiler 4SystemPumpSystemSensorBuilding Heating LoopSQ-Elite-8SEQUENCING CONTROLStage AStage BStage CStage DStage EStage FStage GStage HSYSTEMDHW PUMPCOMB. AIRSYS=144FOD=35F C E GHI LO -- OFFSTAGEMENUINPUT RATINGS:115VAC 60Hz, 12VA MAXENCLOSEDENERGYMANAGEMENTEQUIPMENTLISTED99RACUSPWRL N1 2CAUTION: Risk of Electric Shock.Use Copper Conductors Only.DO NOT APPLY ANY VOLTAGE TO INPUT TERMINALSSENSORS MUST BE GOLD SERIESPROGRAM RUNSYSTEMDHW COMB.SHUTDOWNStage A Stage B Stage C Stage D Stage E Stage F Stage G Stage HSYSTEMPRESSOUTDOORRETURNPUMPDHW /TSTATAIRTEMPPROVE+ -TEMP TEMP/SETBACK3 4 5 6 7 8 9 10 11 12 13 14 15 16 17 18 19 20 21 22 23 24 25 26 27 28 29 30 31 32 33 34 35 36 37 38RS485LNLNUnit1Pump1Unit2Pump2Unit3Pump3Unit4Pump434
SYS=168 F OD=45 FTGT=172 FABC ---- LOBOILERMENU---- SEASON ---WinterSummerBACK SAVE--- TARGET OFFSET --+0 F[ ]BACK SAVE---- SETBACK -------20 F[ ]BACK SAVE-- DAY SCHEDULE ----07:**AmBACK SAVE------ SETTINGS ------Season WinterSet Point 170 FEMS StPont 170 FOutdoor Reset 170 FTarget Offset +0 FOutdoor Cutoff 70 FSetback20 FBACK SELECTDO NOT turn power off to the<strong>BCP</strong>-8W when in off-seasonIf you do so, the battery willrun down and will have tobe replaced. Instead, switchSeason to Summer.- NIGHT SCHEDULE --07:**PmBACK SAVE----- SET POINT -----140 F[ ]BACK SAVE-- EMS SET POINT --170 FBACKSAVE---- RESET RATIO ---Custom1(8.00 OD:1.00 SYS)2(4.00 OD:1.00 SYS)3(3.00 OD:1.00 SYS)4(2.00 OD:1.00 SYS)5(1.50 OD:1.00 SYS)6(1.25 OD:1.00 SYS)7(1.00 OD:1.00 SYS)8(1.00 OD:1.25 SYS)9(1.00 OD:1.50 SYS)10(1.00 OD:2.00 SYS)11(1.00 OD:3.00 SYS)12(1.00 OD:4.00 SYS)BACK SAVE- OUTDOOR CUTOFF -70 F[ ]BACK SAVEsettings in addition to Startup and more advanced operation settings. The installer menu can be access by holding down the Menubutton for three seconds or more. To be able to change the <strong>BCP</strong>-8W settings the Program/Run Switch must be set to Program.The switch is located under the Enclosure Wiring Cover for security. The Enclosure WiringCover can be securely closed using a padlock.PROGRAMRUNButton: MENU/Season ---- SEASON ---WinterSummerBACK SAVESummer to show status.setting. In addition, it will begin heating whenever the System temperature falls below the Set Point. The Message Display35
----- SET POINT -----ººººCºº140 FButton: MENU/Set Point [ ] BACK SAVEtemperature around the Set point. Settings and Stage Settings. Shutdown by EMSButton: MENU/Outdoor Reset/Reset Ratio outside temperature. With any of the ratios, the colder it becomes outside, the hotter thetemperature of the system water. (See Understanding Operation Concept on page 5) will only be 125°F, and at 22°F outside, the system water will be 112°F. Such a low temperature falls, the system water temperature is increased one degree. If the ambient buildingtemperatures are too cold in cold weather, move the ratio to a higher selection. That is,---- RESET RATIO ---Custom1(8.00 OD:1.00 SYS)2(4.00 OD:1.00 SYS)3(3.00 OD:1.00 SYS)4(2.00 OD:1.00 SYS)5(1.50 OD:1.00 SYS)6(1.25 OD:1.00 SYS)7(1.00 OD:1.00 SYS)8(1.00 OD:1.25 SYS)9(1.00 OD:1.50 SYS)10(1.00 OD:2.00 SYS)11(1.00 OD:3.00 SYS)12(1.00 OD:4.00 SYS)BACK SAVEWater Temperature1301201101001:4 1:1WarmerColder70 60 50 40Outdoor Temperature4:1Button: MENU/Outdoor Reset/Reset Ratio/Custom can be used by selecting Custom from the Reset Ratio menu option. identify it on the diagram. on the curve. The two points can be anywhere on the line, not necessarily at the ends. 36
-- SET SYS TEMP.1 - -- SET SYS TEMP.2 -120 F170 F[[] BACK SAVE ] BACK SAVE-- AT OD TEMP.1 --- -- AT OD TEMP.2 ---60 F0 F[[ ]] BACK SAVE BACK SAVEWater Temperature (in °F)Point1: System=120°F Point2: System=170°FOudoor=60°FOudoor=0°F180Max Target170160150140130120110Point1Customized Reset RatioMin TargetPoint210070 60 50 40 30 20 10 0 -10 -20Outdoor Temperature (in °F)Custom Reset Ratio- OUTDOOR CUTOFF -ºººº70 FButton: MENU/Outdoor Cutoff [ ] if the outdoor sensor is installed, the Outdoor Cutoff screen will automatically appearBACK SAVEafter the temperature Set Point has been selected. temperature and the burner stages will be active to hold the set point. ---- SETBACK -------°°°°0 FButton: MENU/Setback[ ] less load is required.BACK SAVE boiler stages to hold the calculated temperature. temperature and the burner stages will be active to hold the target water temperature. -- DAY SCHEDULE ----Button: MENU/Setback/Day Schedules/Night Schedule07:**Am and people are active.BACK SAVE -- NIGHT SCHEDULE -sleeping. This setting reduces the calculated temperature by the Setback setting based10:**Pm BACK SAVE 37
. . . . . . . . . . . . . . . . . . . . . . . . . . . . . . . . . . . . . . . . . . . . . . . . . . . .................................................. . . . . . . . . . . . . . . . . . . . . . . . . . . . . . . . . . . . . . . . 20F/-7C to 120F/49C .................................................20% to 80% ................................................... . . . . . . . . . . . . . . . . . . . . . . . . . . . . . . . . . . . . . . . . . . . . . . . . . . . . . . . . . . 2.5 pounds .......................Time ( 1 to 999 Hours (41 days)), <strong>Manual</strong>, First-On/First-Off . . . . . . . . . . 11 N.O. S.P.S.T (8 Stages, 1 System, 1 DHW Pump, 1 Combustion Air) . . . . . . . . . . . . 1 Sys(Temp), 1 Outdoor, Return Temp, DHW Temp, Ext Setback/Shutdown, Prove . . . . . . . . . . . . . . . . . . . . . . . . . . . . . . . . . . . . . . . . . . . . . . . . Auto, Standby, Off, On ............................................ . . . . . . . . . . . . . . . . . 2 Amp inductive (Maximum of 1/4 HP) . . . . . . . . . . . . . . . . . . . . . . . . . . . . . . . . . up two <strong>BCP</strong>-8X Panels using RS485 . . . . . . . . . . . . . . . . . . . . . . . . . . . . . . . . . . . . . . . . . . . Fahrenheit or Celsius. . . . . . . . . . . . . . . . . . . . . . . . . . . . . . . . . . . . . . Graphical Alphanumeric (7 rows x 21 char. each) . . . . . . . . . . . . . . . . . . . . . . . . . . . . . . . . . . . . . . . . . . F to 250F . . . . . . . . . . . . . . . . . . . . . . . . . . . . . . . . . . . . . . . . . . . . . . . . . . . . . . . . . . . . . . . . . . .................. using 420MOD Interface (optional) . . . . . . ( . . . . . . . . . . . . . . . . . . . . . .minus -40°F/-22°C to plus 40°F/22°C. ....................... 70F/21C to 170F/77C . . . . . . . . . . . . . . . . . . . . . . . 90C to 240 . . . . . . . . . . . . . . . . . . . . . . . . . . . . . . . . . . . . 1 to 10 minutes . . . . . . . . . . . . . . . . . . . . . . . . . . . . . . . . . ........................................... 0.0 to 10.0 minutes . . . . . . . . . . . . . . . . . . . . . . . . . . . . . . . . . . . . . . . . . . . . . . . . . . . . . . . . . . . . . . . . . . . . . . . 2°F/1°C to 20°F/11°C . . . . . .Parallel Piping with Priority or without Priority and Primary Secondary ................................................... . . . . . . . . . . . . . . . . . . . . . . . . . . . . . . . . . . . . . . . . . . . . . . . . . . . . . . . . . . . . . . . . . . . . . . . . . . . . . . . . . . . . . . . . . . . . 1 Day and 1 Night (Setback) settings per day ................................................0°F/0°C to 80°F/44°C ........ . . . . . . . . . . . . . . . . . . . . . . . . . . . . . Shutdown Input, and Prove Input. (Dry Contacts Only) . . . . . . . . . . . . . . . . . . . . . . . . . . . . . . . . . . . . . . . . . . . . . . . . . . . . . . Winter and Summer. ...........................................Toggle Switch A or B . . . 1 Power (Dual Color Green (A)/Red (B)), 1 Communication, 8 Stage Output relays (Dual Color Green (A)/Red (B)) . . . . . . . . . . . . . . . . . . . . . . . . . . . . . . . . . . . . . . . . . . . . . . . . . . . 8 N.O. S.P.S.T. . . . . . . . . . . . . . . . . . 2 Amp inductive (Maximum of 1/4 HP) ................................ Two RS485HT #059072-00 A40500 Blaine StreetMichigan City, Indiana 46360219-879-6561http://www.weil-mclain.comPart Number 550-100-071/0408