THE SMILE PULLOVER - Authentic Knitting board
THE SMILE PULLOVER - Authentic Knitting board
THE SMILE PULLOVER - Authentic Knitting board

Create successful ePaper yourself
Turn your PDF publications into a flip-book with our unique Google optimized e-Paper software.
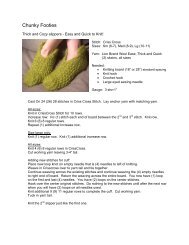
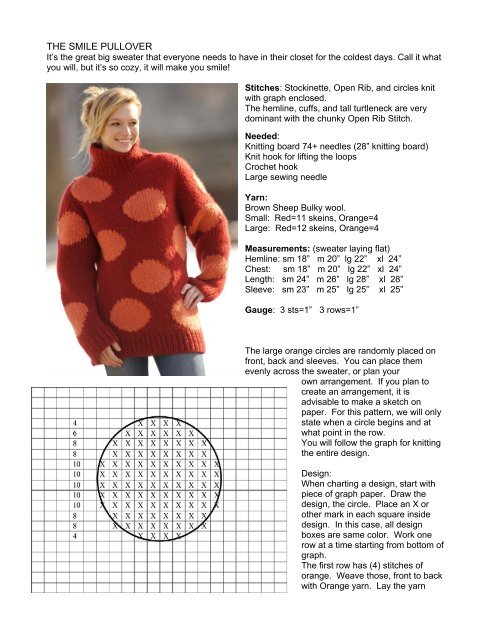
<strong>THE</strong> <strong>SMILE</strong> <strong>PULLOVER</strong>It’s the great big sweater that everyone needs to have in their closet for the coldest days. Call it whatyou will, but it’s so cozy, it will make you smile!Stitches: Stockinette, Open Rib, and circles knitwith graph enclosed.The hemline, cuffs, and tall turtleneck are verydominant with the chunky Open Rib Stitch.Needed:<strong>Knitting</strong> <strong>board</strong> 74+ needles (28” knitting <strong>board</strong>)Knit hook for lifting the loopsCrochet hookLarge sewing needleYarn:Brown Sheep Bulky wool.Small: Red=11 skeins, Orange=4Large: Red=12 skeins, Orange=4Measurements: (sweater laying flat)Hemline: sm 18” m 20” lg 22” xl 24”Chest: sm 18” m 20” lg 22” xl 24”Length: sm 24” m 26” lg 28” xl 28”Sleeve: sm 23” m 25” lg 25” xl 25”Gauge: 3 sts=1” 3 rows=1”The large orange circles are randomly placed onfront, back and sleeves. You can place themevenly across the sweater, or plan yourown arrangement. If you plan tocreate an arrangement, it isadvisable to make a sketch onpaper. For this pattern, we will onlystate when a circle begins and atwhat point in the row.You will follow the graph for knittingthe entire design.Design:When charting a design, start withpiece of graph paper. Draw thedesign, the circle. Place an X orother mark in each square insidedesign. In this case, all designboxes are same color. Work onerow at a time starting from bottom ofgraph.The first row has (4) stitches oforange. Weave those, front to backwith Orange yarn. Lay the yarn
down. Weave the row in stockinette st with red yarn, skipping the orange needles. Hook over allneedles.Next row of design has 8 stitches of orange. Pick up the orange yarn, weave the (8) stitches, front toback. Lay the orange down. Pick up the red yarn and weave the row skipping the orange stitches.Hook over that row. Continue up the graph with each new row until the circle is complete. Cut andknot the orange yarn. If another circle is working in different area, you will have a different skein oforange yarn working for that circle. Your red yarn will just continue throughout the entire sweaterpiece.Note: Since you are working the orange from front to back of needles, you will have only one passdown the <strong>board</strong>. The next row will go from the opposite direction.When you work with the red yarn, you are working a full circular down one direction, everyotherneedle, and then back to starting point. Be sure to stay in the stockinette stitch so that all needlesreceive the 2 nd loop.Sweater Front: (knit 2, front and back are the same)Cast On 54, (60), 66, (72) Stitches in Stockinette stitch at hemline.Lay anchor yarn. This will be removed and can be any yarn.Adjust stitches for the Open Rib StitchWork in Open rib for 11 rows.Change to Stockinette Stitch by moving the loops over to cover all needles.Decrease 1 stitch at each end of <strong>board</strong>. Work row in stockinette.Work 1 row in stockinette.Next row: Start 1 st design by tying in orange yarn at 20 th needle from right end of <strong>board</strong>. Weave the 4stitches in orange, front to back, covering 4 needles on each <strong>board</strong>. Lay the orange yarn aside. Donot cut. Weave row in Stockinette with Red yarn, skipping the 4 needles wrapped in orange. (fullcircular to cover all needles) Hook over all.Continue the circle design in orange, as you work the rows in stockinette.2 nd circle starts at needle #14 from left side after knitting a total of 4 rows in Stockinette.Work a total of 40, (46), 52, (52) rows from the ribbed hemline at the decrease, to the underarmsleeve shaping. This is all straight Stockinette knitting, so all you need to be concerned about are thecircles. Our sample shows 4 full circles and 2 half circles competed at the sleeve shaping. When youdo the half circle, just fold the graph in half, vertically, and follow the graph from the outer edge of thesweater front. You will need to do the other half when knitting the back of the sweater. Otherwise,keep all circles in between the side seams.Sizes sml will have 3 full circles, and medium will have 3 or 4 full circles before arm shaping.Arm Shaping:*Decrease 1 stitch at each end of <strong>board</strong>. Work row.*Work 2 regular rows without decrease.Continue with these 3 *rows for a total of 7, (8), 8, (8) times.End with 2 rows of regular knitting w/o decrease.Shoulders:Bind Off at both ends of <strong>board</strong>. Lay the working yarn across the stitches before bind off.Small-bind off 4 stitches at each end.Medium, Lg, X-Lg-Bind off (6) stitches each end of <strong>board</strong>.Place the last loop on crochet hook onto the next needle. That end needle will have 2 loops. You willlift them both next time you hook over.Work 1 row in stockinette stitch.The remaining stitches on the <strong>board</strong> will be the turtleneck. Remember that this will be knit with OpenRib Stitch. Adjust one side of <strong>board</strong> for open rib. This needs to be the side opposite the open rib sidein the hemline. This means: one side of each piece has the open rib in hemline and the open rib ofthe turtleneck is on the opposite side. This will place the Open Rib to outside when you roll theturtleneck over.
If you plan to wear the sweater with a mock turtle (not rolled) keep the Open Rib on same side as thehemline. (as in photo)Work in Open Rib Stitch for a total of 16, (18), 18, (18) rows or until the collar is as high as you desire.Bind Off loosely in pattern pulling 1 thru 1 with crochet hook.Sleeves: (knit 2)Cast On 28, (30), 32, (32) Stitches in Stockinette stitch. Lay anchor yarn.Shift the loops on one side of <strong>board</strong> for Open Rib Stitch.Work in Open Rib for 11 rows.Change to Stockinette Stitch.All sizes sleeve have 3 circle designs.You will only need to work one design at a time as you work up the sleeve.Put 2 designs in main part of sleeve, and 1 design in upper sleeve.Place 1 st design in center of sleeve.Place 2 nd design on left side of center, and 3 rd to right of center. Do this to both sleeves.Start the 1 st design in orange yarn with the first row of Stockinette.*Increase 1 stitch at beginning and end of row. Work row.*Work 3, (4), 4, (4) rows without increase.Repeat these *rows for total of 11 times. This will complete the sleeve up to the underarm.Decrease to shoulder:*Decrease 1 stitch at beginning and end of row. Work row.*Work 1 row without the decrease.*Repeat the decrease row 2 times.*Work 1 row without the decrease.Repeat these 5 rows for a total of 7 times (all sizes)Bind Off.Bind Off at all anchor yarns with loose bind off for stretchy edges.Sewing the sweater together:Lay the pieces together. Place the front and back so that the open rib is facing on both pieces atcollar. You want to see the chunky rib when the turtleneck is rolled down. The open rib will be to theoutside at hemline. Or both will be to the outside if you are not rolling the collar.Sew the side seams with invisible inside stitch.Sew the shoulder and turtleneck with invisible inside stitch.Lay each of the sleeves folded matching the side seams. If you plan to roll the cuff, the open ribshould be to the inside of sleeve. If you prefer no cuff, have the open rib to outside of sleeve.Lay the sleeves into the armhole opening of sweater. Match the side seams with underarm of sleeve.Match the shoulder seam of sweater with center of sleeve at bind off. Ease the 2 pieces together anddo inside stitch. The bind Off of the sleeve will create a nice accent touch to the sewing. Be sure tosew with just the edge stitches.Tuck all tails of yarn into knitting.Do reinforcement stitches to underarms of sleeves.<strong>Authentic</strong> <strong>Knitting</strong> BoardCopyright 2007 Revised 2009All rights reserved