Tree of Life Christmas Stocking - Authentic Knitting board
Tree of Life Christmas Stocking - Authentic Knitting board
Tree of Life Christmas Stocking - Authentic Knitting board

Create successful ePaper yourself
Turn your PDF publications into a flip-book with our unique Google optimized e-Paper software.
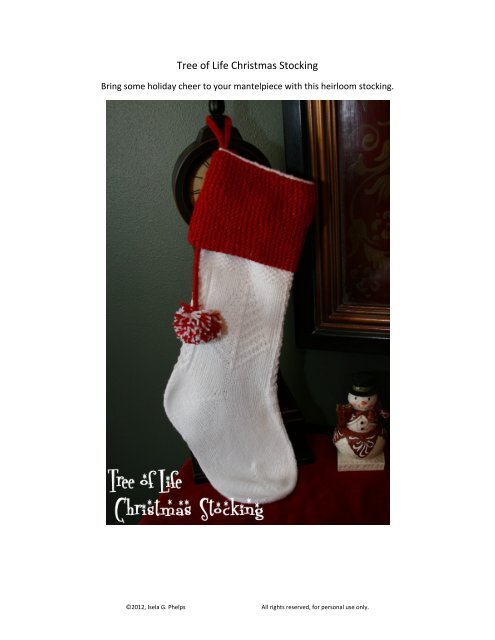
<strong>Tree</strong> <strong>of</strong> <strong>Life</strong> <strong>Christmas</strong> <strong>Stocking</strong>Bring some holiday cheer to your mantelpiece with this heirloom stocking.©2012, Isela G. Phelps All rights reserved, for personal use only.
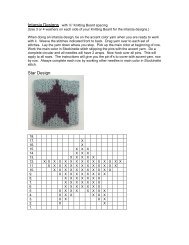
Decorative Trim PanelWorked as a flat panelUsing CC, CO 24 stsRows: 1‐120: Work in Garter Stitch (60 Garter stitch ridges).BO, leaving a 15 inch yarn tail.<strong>Stocking</strong>Worked in the round, set knitting loom in the round to 60 pegs.Using MC, CO 60 sts, to work in the roundRnd 1: kRep Rnd 1 until item measure 5.5” from CO edge.**Next rnd: *k1, p1; rep from * to end <strong>of</strong> rnd.Next rnd: *p1, k1; rep from * to end <strong>of</strong> rnd.Rep from ** to ** 2 more times.Next 42 rnds: work <strong>Tree</strong> <strong>of</strong> <strong>Life</strong> ChartCut yarn leaving a 5” yarn tail. Attach yarn at peg 16 cont to heel instructionsHeelWorked in short‐rows over 30 stitches (over pegs 16‐45, re‐number the pegs so they are 1 to 30instead <strong>of</strong> 16 to 45; peg 16 is peg 1 from this point forward).Knit from peg 1 to 29. Wrap and turn on peg 30.Knit from peg 29 to 2. Wrap and turn on peg 1.Knit from peg 2 to 28. Wrap and turn on peg 29.Knit from peg 28 to 3. Wrap and turn on peg 2.Knit from peg 3 to 27. Wrap and turn on peg 28.Knit from peg 27 to 4. Wrap and turn on peg 3.Knit from peg 4 to 26. Wrap and turn on peg 27.Knit from peg 26 to 5. Wrap and turn on peg 4.Knit from peg 5 to 25. Wrap and turn on peg 26.Knit from peg 25 to 6. Wrap and turn on peg 5.©2012, Isela G. Phelps All rights reserved, for personal use only.
Knit from peg 6 to 24. Wrap and turn on peg 25.Knit from peg 24 to 7. Wrap and turn on peg 6.Knit from peg 7 to 23. Wrap and turn on peg 24.Knit from peg 23 to 8. Wrap and turn on peg 7.Knit from peg 8 to 22. Wrap and turn on peg 23.Knit from peg 22 to 9. Wrap and turn on peg 8.Knit from peg 9 to 23; lift the wrap(s) together with the stitch on the peg. Wrap and turn on peg24.Knit from peg 23 to peg 8, lift the wrap(s) together with the stitch on the peg. Wrap and turn onpeg 7.Knit from peg 8 to 24; lift the wrap(s) together with the stitch on the peg. Wrap and turn on peg25.Knit from peg 24 to peg 7; lift the wrap(s) together with the stitch on the peg. Wrap and turn onpeg 6.Knit from peg 7 to 25; lift the wrap(s) together with the stitch on the peg. Wrap and turn on peg26.Knit from peg 25 to peg 6; lift the wrap(s) together with the stitch on the peg. Wrap and turn onpeg 5.Knit from peg 6 to 26; lift the wrap(s) together with the stitch on the peg. Wrap and turn on peg27Knit from peg 26 to 5; lift the wrap(s) together with the stitch on the peg. Wrap and turn on peg4Knit from peg 5 to 27; lift the wrap(s) together with the stitch on the peg. Wrap and turn on peg28Knit from peg 27 to 4; lift the wrap(s) together with the stitch on the peg. Wrap and turn on peg3Knit from peg 4 to 28; lift the wrap(s) together with the stitch on the peg. Wrap and turn on peg29Knit from peg 28 to 3; lift the wrap(s) together with the stitch on the peg. Wrap and turn on peg2©2012, Isela G. Phelps All rights reserved, for personal use only.
Knit from peg 3 to 29; lift the wrap(s) together with the stitch on the peg. Wrap and turn on peg30Knit from peg 29 to 2; lift the wrap(s) together with the stitch on the peg. Wrap and turn on peg1*Pegs 1 and 30 have wraps on them, when working the first round <strong>of</strong> the foot, lift both wraps onthese pegs along with the stitch (treat all 3 loops on the peg as 1 loop).Cont to Foot instructions.FootWorked in the roundNext rnd: k (On the very first round, pick up the extra wraps from pegs 1 and 30)Rep last rnd until foot measures 5 inches from end <strong>of</strong> heel. Cont with ToeToeWorked in short‐rows over 30 stitches. Follow same instructions as for Heel to the *.Pegs 1 and 30 have wraps. Knit 1 row from peg 1 to 30, lifting the extra wraps. Cut yarn leavinga 15” yarn tail.Graft the ToePlace stitches 1‐30 on one double pointed needle. Place remaining 30 stitches on seconddouble pointed needle.Stitches are ready to be grafted.Follow grafting instructions belowThread tapestry needle with yarn tail coming from the toe area.Hold knitting needles parallel to each other, wrong sides <strong>of</strong> the knitted fabric together. Insertthe tip <strong>of</strong> the tapestry needle (tn) through the first stitch <strong>of</strong> the front knitting needle as if youwere going to purl, pull the working yarn (wy) through, leave the stitch on the knitting needle.©2012, Isela G. Phelps All rights reserved, for personal use only.
Insert tn through the first stitch on the back needle, as if to knit, pull the wy through, leave thestitch on the knitting needle.Insert the tn through the first stitch on the front needle, as if to knit, pull the yarn through, slidethe stitch <strong>of</strong>f the needle.Insert tn through the next stitch on the front needle, as if to purl, pull wy through, leave stitchon the knitting needle.Insert the tn through the first stitch on the back needle as if to purl, pull wy through, slide thestitch <strong>of</strong>f the needle.Insert the tn through the next stitch on the back needle, as if to knit, pull wy through, leave thestitch on the needle.Repeat steps 3‐6, until only one stitch remains on the knitting needles. Insert the tn throughthat last stitch and slide it <strong>of</strong>f the knitting needle, pull yarn through. Weave ends in.Tassel CordCut 12 pieces <strong>of</strong> red yarn about 14 inches long. Separate into three groups <strong>of</strong> 4 pieces <strong>of</strong> yarn(4, 4, 4). Tie a tight knot on one end. Do a simple braid with the three groups <strong>of</strong> yarn. Knot it.Pom PomCreate a small pom pom using both colors <strong>of</strong> yarn. Attach to one <strong>of</strong> the ends <strong>of</strong> the tassel cord.AssemblyPlace the Tassel cord at one <strong>of</strong> the sides <strong>of</strong> the top <strong>of</strong> the stocking, so that the tassel hangsdown to the body <strong>of</strong> the stocking and leave about 4 inches <strong>of</strong> the tassel cord hanging above thecuff, securely sew the tassel to the cuff area. Make a loop with the 4 inches by folding it to theinside <strong>of</strong> the stocking, sew it in place.Using CC yarn, sew the Decorative Trim to the Cuff <strong>of</strong> the stocking. 1 ridge per stitch (line up aridge with one <strong>of</strong> the small “v”). Sew BO edge <strong>of</strong> Decorative Trim to CO edge <strong>of</strong> DecorativeTrim.Weave ends in.Steam block.©2012, Isela G. Phelps All rights reserved, for personal use only.