Made To Fit Double Knit Slippers - Authentic Knitting board
Made To Fit Double Knit Slippers - Authentic Knitting board
Made To Fit Double Knit Slippers - Authentic Knitting board

You also want an ePaper? Increase the reach of your titles
YUMPU automatically turns print PDFs into web optimized ePapers that Google loves.
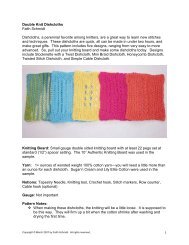
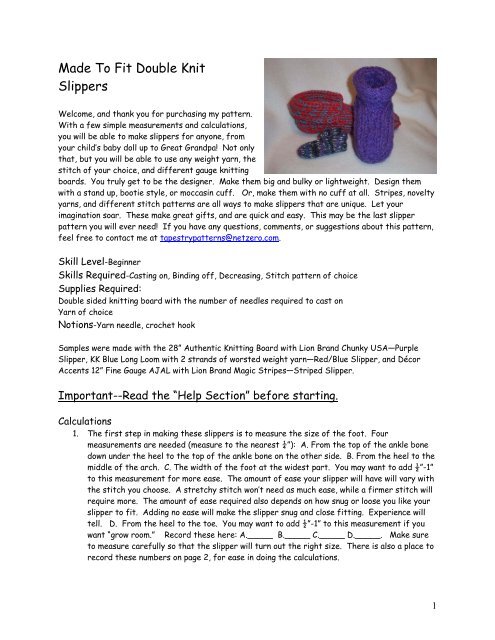
<strong>Made</strong> <strong>To</strong> <strong>Fit</strong> <strong>Double</strong> <strong>Knit</strong><strong>Slippers</strong>Welcome, and thank you for purchasing my pattern.With a few simple measurements and calculations,you will be able to make slippers for anyone, fromyour child’s baby doll up to Great Grandpa! Not onlythat, but you will be able to use any weight yarn, thestitch of your choice, and different gauge knitting<strong>board</strong>s. You truly get to be the designer. Make them big and bulky or lightweight. Design themwith a stand up, bootie style, or moccasin cuff. Or, make them with no cuff at all. Stripes, noveltyyarns, and different stitch patterns are all ways to make slippers that are unique. Let yourimagination soar. These make great gifts, and are quick and easy. This may be the last slipperpattern you will ever need! If you have any questions, comments, or suggestions about this pattern,feel free to contact me at tapestrypatterns@netzero.com.Skill Level-BeginnerSkills Required-Casting on, Binding off, Decreasing, Stitch pattern of choiceSupplies Required:<strong>Double</strong> sided knitting <strong>board</strong> with the number of needles required to cast onYarn of choiceNotions-Yarn needle, crochet hookSamples were made with the 28” <strong>Authentic</strong> <strong>Knit</strong>ting Board with Lion Brand Chunky USA—PurpleSlipper, KK Blue Long Loom with 2 strands of worsted weight yarn—Red/Blue Slipper, and DécorAccents 12” Fine Gauge AJAL with Lion Brand Magic Stripes—Striped Slipper.Important--Read the “Help Section” before starting.Calculations1. The first step in making these slippers is to measure the size of the foot. Fourmeasurements are needed (measure to the nearest ¼”): A. From the top of the ankle bonedown under the heel to the top of the ankle bone on the other side. B. From the heel to themiddle of the arch. C. The width of the foot at the widest part. You may want to add ½”-1”to this measurement for more ease. The amount of ease your slipper will have will vary withthe stitch you choose. A stretchy stitch won’t need as much ease, while a firmer stitch willrequire more. The amount of ease required also depends on how snug or loose you like yourslipper to fit. Adding no ease will make the slipper snug and close fitting. Experience willtell. D. From the heel to the toe. You may want to add ½”-1” to this measurement if youwant “grow room.” Record these here: A._____ B._____ C._____ D._____. Make sureto measure carefully so that the slipper will turn out the right size. There is also a place torecord these numbers on page 2, for ease in doing the calculations.1
2. Now you need to make a swatch with your chosen yarn, stitch, and knitting <strong>board</strong>. Irecommend casting on at least 12 needles, more for smaller gauge <strong>board</strong>s, and knitting forabout 3-4 inches. Keep track of how many rows you knit. You will need that number later.Remove the swatch by binding off with a crochet hook (see step #3 in the pattern). Now,measure the width of the knitted piece. Record this here:_____. Divide this number bythe number of needles cast on. Record this number here: W._____. This tells you howmuch knitting you get per needle. Measure the length of the knitted piece. Record thishere:_____. Divide this number by the number of rows knitted. Record this number here:L._____. This tells you how much knitting you get per row. Make sure to measure carefullyso that the slipper will turn out the right size.3. Divide (A) by (W). Record this here:_____. Add 8 to this number. If you added someease to (C), are using thin yarn or a fine gauge <strong>board</strong>, or you just want a taller cuff, you maywant to add 10-12 to the first calculation in the place of the 8, to give you more cuff. Ifyou want a stand up cuff, you can add 6 or less in the place of the 8. If you want a “footie”style slipper (no cuff), don’t add anything to the first number. Round to the nearest wholenumber. Record this here: E._____.4. Divide (B) by (L). Round to the nearest whole number. Record this here: F._____.5. Divide (C) by (W). <strong>Double</strong> this number. Record this number here:_____. Now, subtractthis number from the total number of needles cast on (E). Round to an even number, ifnecessary. Record this number here:_____. Divide by 2. Record this here: G._____.6. Divide (D) by (L). Record this number here:_____. Subtract (F) from this number. Recordthis number here:_____. Subtract 3 from this number. Record this here: H._____.A._____ B._____ C._____ D._____ (From page 1)Decimal equivalents for common fractions (to help with calculations):1/8=0.125 1/4 =0.25 3/8=0.375 1/2 =0.5 5/8=0.625 3/4=0.75 7/8=0.875Sample SlipperFor those, like me, who like to “see” what they are doing, here’s an example of using the calculationsto make a slipper on a fine gauge <strong>board</strong> with worsted weight yarn. First I’ll list the measurementsand then show the calculations step by step.1. Foot Measurement: A.—7.5”, B.—3”, C.—3”, D.—6.75”2. Swatch Measurements: W—4” / 16 needles = 0.25” L—2.5” / 13 rows = 0.2”3. 7.5(A) / 0.25(W) = 30 + 8 = 38 E.—38 (Cast on stitches)4. 3(B) / 0.2(L) = 15 F.—15 (<strong>Knit</strong> this many rows)5. 3(C) / 0.25(W) = 12 x 2 = 24, 38(E) – 24 = 14 / 2 = 7 G.—7 (Bind off this many stitchesfrom each end.)6. 6.75(D) / 0.2(L) = 33.75, 33.75 – 15(F) = 18.75 – 3 = 15.75 (I’ll round this up to 16) H.—16(<strong>Knit</strong> 16 rows)2
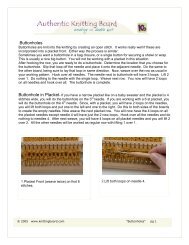
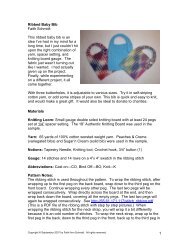
Pattern1. Cast on (E)____ stitches with your favorite method. Leave a long tail that will be used tosew up the back of the slipper later. Instructions for the Stockinette cast-on are at theend of the pattern.2. <strong>Knit</strong> (F)____ rows in stitch of choice.3. Bind off (G)____ stitches on EACH end of the <strong>board</strong>. <strong>To</strong> bind off on the end opposite theworking yarn, simply slip a crochet hook into the first stitch on the front and back <strong>board</strong>,and pull the first loop through the second loop. Now, pick up the next front stitch and pullit through the loop on the hook, then the next back stitch. Continue until the requirednumber of stitches are bound off. At thispoint, you’ll still have one loop on yourcrochet hook. Place this loop on the endneedle on the back <strong>board</strong>. There will nowbe 2 loops on the end back needle. (Seetop picture.) Do the same to the otherside with the working yarn, but pick upthe back stitch first and then the frontstitch (where the working yarn isattached). Also, it is very important tolay the working yarn across the stitchesas you bind off. (See middle picture.) Itwill be buried inside and then be rightwhere you want it when you are finishedbinding off.4. <strong>Knit</strong> (H)____rows. On the first row, knit2 stitches over 1 on the two back needlesthat have 3 loops on them from bindingoff. After the first row is knitted, allthe needles should have 1 loop on them.Continue knitting the remaining rows asusual.5. Decrease half of the stitches. Do this bylifting stitch 1 onto needle 2 then stitch 3onto needle 4. Repeat for the whole<strong>board</strong>, both front and back. You will endup with every other needle being empty.If you have an odd number of stitchescast on, the last 2 needles will not have anempty needle between them. Wrap therow, skipping the empty needles (seebottom picture). If an odd number ofstitches are cast on, you will wrap the last2 needles consecutively. <strong>Knit</strong> the bottom 2 stitches over the top stitch. You should nowhave 1 stitch on every other needle. Shuffle all the stitches together so that there are noempty needles.6. <strong>Knit</strong> 1 row.3
7. Repeat step #5, except you don’t have to shuffle all the stitches together afterdecreasing.8. Remove slipper by cutting the working yarn, leaving a long tail. Thread the yarn tail onto ayarn needle and slip the stitches, starting with the far left back needle (the one oppositethe working yarn), back and forth across the <strong>board</strong> (1A, 1B, 2A, 2B, 3A, 3B, etc.) onto theyarn needle. Remove from the <strong>board</strong>.9. Finish up by binding off the cast-on stitches (if the stockinette cast-on was used). Bind offis the same as done in step #3 of the pattern starting with the stitch on the end oppositethe yarn tail. After binding off thelast stitch, wrap the yarn tail aroundthe hook and pull it through the loop.The piece will look like a capital T.(See picture top left.) Fold it inhalf from side to side. (See picturemiddle left.) Sew up the back seam(this is the cast on edge—seepicture below left) using the longtail left from casting on. Whenabout 1”-1 ½” (more for larger sizes,less for smaller sizes) from thebottom, bring the bottom of theslipper down to meet the seam youare sewing (this will look like acapital T—see picture below right)and finish sewing closed. This givesthe back heel a nice shape. Threadthe yarn tail at the toe onto a yarnneedle. Run the needle back throughthe toe stitches again and pull tight,then sew up the top of the slipper.You can sew just the top of the slipper and leave the cuff open to fold over moccasin style,or sew all the way up the cuff and then fold over for more of a “bootie” look, or sew all theway up the cuff and leave it standing up. Weave in all the loose ends. Turn right side out.Congratulations!! You’re done. Now make another slipper.4
Help SectionWhen referring to the front <strong>board</strong>, this is the <strong>board</strong> nearest you when it is lying flat. The back<strong>board</strong> is the <strong>board</strong> furthest from you when lying flat.When making your calculations, you will run into partial numbers. You can either round up or rounddown. A lot depends on how stretchy your stitch or yarn is, if you want to leave “grow room”, andhow you like your slippers to fit. I usually round up so the slippers won’t end up too small. Whencalculating (W) and (L) round the number to the nearest hundredth (2 places to the right of thedecimal). For example if (W)=0.34373, record 0.34. But if the number in the thousandth place is 5or above then you would round up. So, 0.34573 would become 0.35.If you have measured correctly, your slippers should turn out the right size. If you are unsure, orjust want to check your measurements, measure the knitted piece at the end of step #2 and step#5. It should be the same as (B)(after step #2) and almost (D)(after step #5). If it’s shorter,add a row or two. If it’s a little longer, you could just leave it, or you could pull back a row or two.Remember when measuring after step #5 that the piece will be a bit shorter than (D) because youstill have 3 rows to knit. When in doubt, take the time to measure. You’ll be glad you did.After binding off from each end, you may have to adjust how you wrap your needles to keep yourstitch pattern. For example, when using ribbing you may (not always) have to switch from (1A to 3B)to (2A to 4B) to keep in pattern. By observing the pattern in the knitting, you will be able to tell ifyou need to adjust your wrapping. If using stockinette stitch, this will not be a problem.When wrapping the last 3 rows, I usually switch to stockinette stitch, as it’s easier to wrap with theempty needles.For a nicer finish when sewing up the front and back seam of the fold down cuff, sew the cuff seamon the right side (outside) of the slipper. The stitches will be hidden when the cuff is folded. Thisapplies only to the part of the seam that makes up the cuff. The rest of the top and back seam issewn on the wrong side (inside).Any size yarn can be used, but chunky/bulky yarn will give you more thickness and last longer.Ribbing is a very nice stitch to make slippers in, as it is thick and comfortable. If you are using alarger gauge knitting <strong>board</strong>, it may be helpful to wrap the <strong>board</strong> 3 times, when casting on, and thenlift the bottom loop over the top 2. Then wrap as normal, always lifting 1 over 2. This will give morethickness. Using two strands of worsted weight yarn, held together, will make a nice thick slipperand give you many color combinations. Baby booties can be made by using baby or sport weight yarnand a small or fine gauge knitting <strong>board</strong> set at ¼” spacing. For closer fitting, lightweight “footie”style slippers, sock yarn and a fine gauge knitting <strong>board</strong> work well. Crochet a chain and weave itthrough the cuff of the slipper and tie into a bow. Be creative!!Keep a record of your swatches. That way when you want to make a pair of slippers out of the sameyarn, you’ll already have that part done.5
Definitions and StitchesWorking Yarn—The yarn attached to the skein.Stockinette cast on and stitch—Place a slip knot on the back left needle of the <strong>board</strong>. (“Back”meaning the <strong>board</strong> furthest from you when lying flat.) Call this 1A. Bring yarn down from 1A to 2B.(This is the front of the <strong>board</strong>.) Wrap around 2B and go back up to 3A. Continue wrapping everyother needle for the desired amount of stitches. Then take the yarn straight across to the needledirectly across from the needle that was wrapped last, and wrap back to the beginning, covering allthe needles that are empty. Lay a long piece of yarn (this is called the anchor yarn—see picture),about twice as long as the stitches, across the stitches and then wrap again. Every needle will nowhave 2 loops on it. Hook the loops over by lifting the bottom loop over the top loop and off theneedle. Push the ends of the anchor yarn through the <strong>board</strong>s and tie loosely under the <strong>board</strong>s. Youare now cast on. Continue wrapping in this pattern for the stockinette stitch. You only lay theanchor yarn on the cast on row.<strong>To</strong> see a visual demonstration ofthe cast-on, bind off, anddecrease, visit<strong>Knit</strong>ting<strong>board</strong>.com.Copyright © December 2006 by FaithSchmidtAll rights reserved6