ROLL-AROUND SHOP CART - Woodsmith Shop
ROLL-AROUND SHOP CART - Woodsmith Shop
ROLL-AROUND SHOP CART - Woodsmith Shop

You also want an ePaper? Increase the reach of your titles
YUMPU automatically turns print PDFs into web optimized ePapers that Google loves.
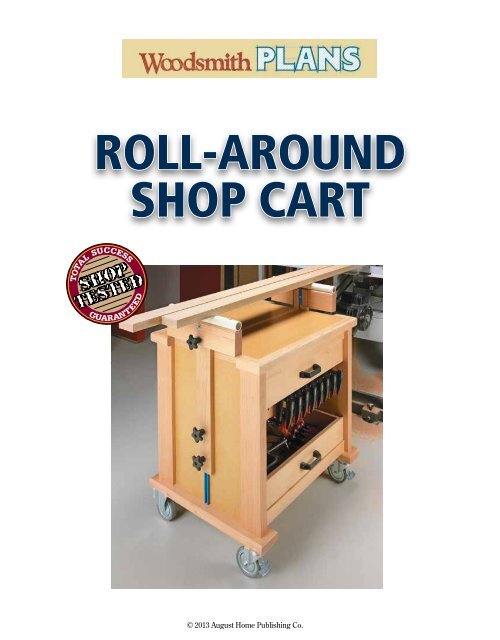
FeatureProjectRoll-Around <strong>Shop</strong> CartThis handy shop cart is a tool storage center, an adjustable stock supportsystem, and a workstation all in one compact package.1 <strong>Woodsmith</strong>Plans.com SN11416 ©2013 August Home Publishing Co. All Rights Reserved.
3ICLAMPSTRIPS(3" x 21")J#8 x 1!/4" FhWOODSCREWa.CLAMPRACKSIDE%/161!!/32 1!!/16 1!!/16#8 x 1!/4" FhWOODSCREW!/2CLAMP STRIPCLAMP STRIPCLAMP RAILFRONT VIEWKCLAMP RAIL(1" x 21")b.SIDE VIEWNOTE: SEE<strong>SHOP</strong> SHORT CUTSON PAGE 8 FORMORE ON CUTTINGCLAMP STRIP DADOESJCLAMP RACKSIDE(2!/2" x 14!/2")NOTE: ALLPARTS ARE#/4"-THICK STOCK113CLAMP RAILCLAMPSTRIPSWhen you’ve cut the rails to size,you’ll need to cut a groove in thelower rail to match the tongue onthe front edge of the bottom. Aftergluing the lower rail in place, attachthe upper rail with glue and screws.Adding StorageYou could use the interior of thecase as is for storage. But it onlytakes a little bit of work to add theclamp rack and pair of drawers yousee in Figures 3 and 4.Clamp Rack. The cart has a simplesystem for storing clamps, as youcan see in Figure 3. The main partof the rack consists of a pair of offsetclamp strips with dadoes inthem (Figure 3a). You just slide theclamps into the dadoes and theirweight holds them in place.The completed clamp rack is sizedto fit the opening in the case. Onpage 8, you’ll learn how to cut perfectlyaligned dadoes in the clampstrips using an oversized workpiece.4!/4" DRAWER PULL(REID SUPPLYCOMPANY #KHO-5)DRAWER SIDE(4" x 18")NC LNOTE:DRAWER FRONTSL !/4 MARE #/4" THICK.DRAWER SIDESAND BACKS ARE!/2" THICK1!/4b.DRAWERBACK(4" x 21")FRONT VIEWC LO!/4MDRAWERSIDEDRAWERBOTTOMDRAWER BOTTOM(17!/2" x 21" - !/4" Hdbd.)#8 x #/4"Rh WOODSCREWLDRAWER FRONT(4" x 22#/8")After cutting the clamp rack sidesand rail to size, you can assemblethe rack, and screw it in place.Add the Drawers. A pair of drawerscompletes the storage optionsinside the case. To provide easyaccess to the contents, I installedthem on full-extension slides. Onedrawer is located above the clamprack and the other is at the bottom.To hide the drawer slides, thesides connect to the front using a4lipped, locking rabbet joint. And atthe back of the drawer, the joineryis a simple tongue and dado. You’llneed to account for the drawer joinery,the thickness of the slides (1"total), and the gaps ( 1 ⁄ 16 ") around thedrawer front when sizing the parts(Figures 4 and 4a).After cutting a groove in all theparts for the drawer bottoms, youcan assemble the drawers. Once theglue dries, install them in the case.18"FULL-EXTENSIONMETAL SLIDESCENTERED ONDRAWER SIDES(ROCKLER #32490)a.!%/16!/16!/4TOP VIEWN!/4!/4!/4LOWERRAIL!/44 <strong>Woodsmith</strong>Plans.com SN11416 ©2013 August Home Publishing Co. All Rights Reserved.
Outfeed Supports & TopAt this point, there are only a coupleof items left to complete on thecart. The first is to add a strong andsturdy top. And the second is toinstall a pair of adjustable supportsthat turn the cart into an even moreversatile shop project.5LONG EDGING(1!/2" x 27")Q14!/4TOP(19#/4" x 24")PSHORT EDGING(1!/2" x 4!/4")RTopThere isn’t all that much work incompleting the top of the cart. It’snothing more than a piece of 3 ⁄ 4 " MDFwrapped with edging, as you see inFigure 5. You’ll need to cut the topto size so it’s flush with the outsideedges of the mounting strips.Edging. Once you have the topsized, you’re ready to add the solidwoodedging. The edging doesn’twrap completely around the top,though. As you can see in Figure5, the ends are open. This createsa “pocket” for the adjustable outfeedsupports that you’ll install next.After gluing the edging in place,attach the top with screws.adjustable supportsWhat really makes this cart so versatileare the adjustable outfeedsupports on the ends of the cart.Just loosen a couple of knobs, adjusteach one to suit the task at hand,and then lock them in place.Tilting Head. Another nice thingabout this cart is that you don’t haveto have a perfectly level floor to alignthe supports, as indicated in theNOTE: TOP IS #/4"MDF. EDGING IS1!/2"-THICK STOCKlower left photo. The head tiltsslightly each way to match it up tothe top of a tool or worksurface.When you don’t need the supports,they store out of the way— flush with the cart sides andjust below the surface of the top.Build the Support. Each support isjust a T-shaped assembly consistingof a post, a cradle, and a piece of PVCpipe that acts as an outfeed support,as shown in Figure 6 on the nextpage. The PVC creates a smoothsurface for a workpiece to slide on.I started on each adjustable supportby cutting a piece of 1 1 ⁄ 4 "-dia.PVC to length. To provide clearance,each support is 1 ⁄ 4 " shorter thanthe openings at the ends of the top.a.MOUNTINGSTRIP#8 x 1!/4" FhWOODSCREWSIDE VIEWTOP!/4"CHAMFERSLONGEDGINGThen you’ll need to drill a couple ofholes to install the support.Add the Cradle. The next piece ofthe system to add is the supportcradle. After cutting it to match thelength of the outfeed support, cuta wide, centered dado across oneface (Figure 6b, page 6). This dadois sized to provide clearance aroundthe edges of the support post. Thisallows the cradle to tilt as needed toprovide even support.Low-Profile. To createan open worksurface, theoutfeed supports storeout of the way.Built-In Adjustment. The headof the outfeed support can be tiltedslightly to compensate for uneven floors.5 <strong>Woodsmith</strong>Plans.com SN11416 ©2013 August Home Publishing Co. All Rights Reserved.
cutting diagram#/4" x 49" - 97" MDFCBEBP1!/2" x 3!/2" - 96" DOUGLAS FIRA A A A1!/2" x 3!/2" - 96" DOUGLAS FIRD D Q R R1!/2" x 3!/2" - 48" DOUGLAS FIRTT#/4" x 3!/2" - 96" DOUGLAS FIRS S I I#/4" x 7!/2" - 96" DOUGLAS FIRJHHJFFGGLL#/4" x 5!/2" - 72" DOUGLAS FIRM M NKNOTE: DRAWER BACKS (M)AND SIDES (N) ARE PLANEDTO !/2" THICK#/4" x 5!/2" - 72" DOUGLAS FIRN N NALSO NEEDED: ONE SHEET OF 24" x 48" - !/4" HARDBOARD FOR DRAWER BOTTOMS (O) ANDONE PIECE OF 1!/4"-DIA. PVC 30" LONG FOR OUTFEED SUPPORTS (U)7 <strong>Woodsmith</strong>Plans.com SN11416 ©2013 August Home Publishing Co. All Rights Reserved.
Tips FromOur <strong>Shop</strong><strong>Shop</strong> Short CutsAligning DadoesCreating perfectly aligned dadoesstarts with a wide blank, as in thedrawing at right. It’s the techniqueI used to create the clamp rackdescribed on page 4.To support the blank, I attachedan auxiliary fence to the miter gaugeand used the rip fence to positionthe dadoes at the desired locations.After completing the dadoes, just ripthe parts to final width.NOTE: CUT DADOESIN PAIRS, FLIPPINGBLANK END FOR ENDAFTER FIRST CUTRIP FENCEACTS AS STOPWIDE BLANKAUXILIARYFENCE8 <strong>Woodsmith</strong>Plans.com SN11416 ©2013 August Home Publishing Co. All Rights Reserved.
MAILORDERSOURCES<strong>Woodsmith</strong> Store800-444-7527Lee Valley800-871-8158leevalley.comRockler800-279-4441rockler.comProject SourcesFor the roll-around shop cart, you’ll needa few pieces of hardware, like the casterset (00K20.10), which I found at Lee Valley.The 4' T-track (20054), 5 ⁄ 16" insertknobs (23812), 5 ⁄ 16" flange bolts (36677),and 18" full-extension slides (32490)were all purchased from Rockler. Andthe 4 1 ⁄ 4" drawer pulls (KHO-5) came fromReid Supply.Reid Supply800-253-0421reidsupply.com9 <strong>Woodsmith</strong>Plans.com SN11416 ©2013 August Home Publishing Co. All Rights Reserved.