Mitered Frame and Easel - Woodsmith Shop
Mitered Frame and Easel - Woodsmith Shop
Mitered Frame and Easel - Woodsmith Shop
- No tags were found...
Create successful ePaper yourself
Turn your PDF publications into a flip-book with our unique Google optimized e-Paper software.
miteredframe & easel© 2011 August Home Publishing Co.
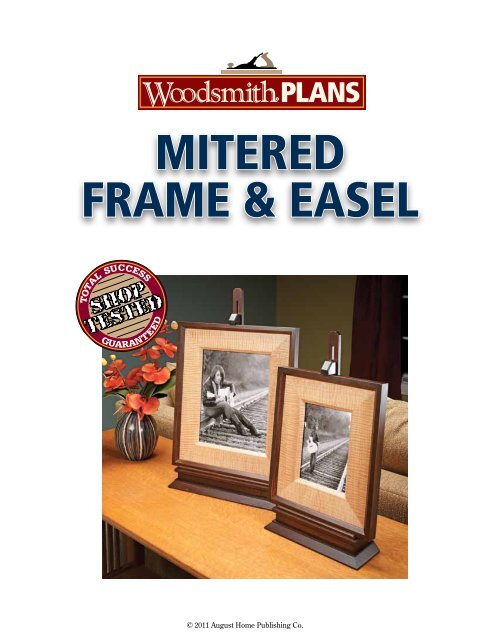
FeatureProject<strong>Mitered</strong> <strong>Frame</strong> & <strong>Easel</strong>Your favorite art or photograph will look great in this easy-to-build frameresting on a classic, adjustable easel.Treasured photographs <strong>and</strong>artwork deserve a distinctiveplace in any home. And this frame<strong>and</strong> easel combination makes agreat place to display those gems.This project is pretty simple tobuild. It doesn’t require complicatedjoinery because both thebase <strong>and</strong> the frame are built upfrom three separate components.The easel is nothing more than athree-tiered base with a support<strong>and</strong> clamp added to hold the framein place. The individual componentsare chamfered to add to the form<strong>and</strong> character of the easel.The frame is built by gluing thefacing to a backer board <strong>and</strong> thenadding trim around the edges. Imade the facing <strong>and</strong> the trim out ofcontrasting woods <strong>and</strong> chamferedthe edges to add character.There are several size options forthis project. The 8x10 frame (leftframe in the photo above) is featuredthroughout this article <strong>and</strong>in the cutting diagram on page 4.Details for the 5x7 version (rightframe above) <strong>and</strong> an 11x14 versionare provided on page 5.1 <strong>Woodsmith</strong><strong>Shop</strong>.com © 2011 August Home Publishing Co. All Rights Reserved.
USENDVIEWHINGESUPPORTBLANKBuilding the <strong>Frame</strong>Building the frame for the frame <strong>and</strong>easel duo is pretty straightforward.To keep it simple, I eliminated theneed for splines on the mitered cornersby gluing the facing to a backer<strong>and</strong> then mitering the trim aroundthe assembly. The trim has a rabbetededge that fits tight against thefacing <strong>and</strong> backer.Backer & Facing. The backer <strong>and</strong>the facing are s<strong>and</strong>wiched together.The backer is 1 ⁄ 4 " narrower thanthe facing. That way, when they areglued together, they form a rabbetto hold the glass <strong>and</strong> the photographor artwork in the frame.The backer pieces are cut to size<strong>and</strong> fit with butt joints (main drawing).The facing has mitered joints<strong>and</strong> a chamfer on the inside edge.I cut the facing to width <strong>and</strong> roughlength <strong>and</strong> then routed the chamferededge (How-To box below).The facing can be mitered to length<strong>and</strong> glued together onto the backer,as shown in detail ‘a.’Trim. The rabbeted trim fitsaround the facing <strong>and</strong> backer <strong>and</strong>has a chamfer on the inside frontedge (main drawing). Again, it’s easiestto do this work before the piecesare cut to length, as in the two rightdrawings in the box below. I rippedan extra-long workpiece to width forall four sides of the trim. You canrout the chamfer on one edge of theworkpiece <strong>and</strong> then cut the rabbet%/8"chamferNOTE: Dimensionsshown are for8 x 10 frameChamferis cut onrouter tableNOTE: Trim is madefrom %/8"-thick stockNOTE:Trim pieces are miteredto fit around frame1Miter jointsjoin trimEDFACINGSIDECFACINGTOP / BOTTOMTrim is gluedto facing <strong>and</strong>backerhow-to: shape the frame components14Rabbet holdsfacing <strong>and</strong>backer assemblyETRIMon the table saw. Finally, miter thepieces to length <strong>and</strong> glue them tothe backer <strong>and</strong> facing edges.Details. To finish up, add a pieceof glass to the opening. I cut a pieceof posterboard to back the photo(detail ‘b’). Turn buttons will keepthe backing <strong>and</strong> photo in place.BACKERSIDEBNOTE:Backer is ! /4"hardboardNOTE: Glass <strong>and</strong> posterboardare 8" x 10"12BACKERTOP /BOTTOMAFacing BackerTrimA8a.Turn buttonRockler#27912NOTE: Facingis #/8"-thickhardwoodGlassPosterboardD2! /42PosterboardB14Facing <strong>and</strong>backer are gluedtogether to createrabbeted openingfor photo <strong>and</strong> glassGlassPhotoFacing <strong>and</strong>backer(assembled)b.Trima. a. a.!/8ENDVIEW!/4FacingblankC DENDVIEW!/4PushblockDAux.fence!/4%/8ENDVIEWPreviouslyroutedchamferTrimEPushblockFenceCut chamfer onoutside edgeFenceETrimblankNOTE: Rout chamferon inside edgeAuxiliaryfenceDadobladeFacing Chamfer. It’s easiest to rout thechamfer on the facing blanks beforemitering the pieces to length.Chamfer. To make the trim for theframe, start by routing a chamfer on theoutside edge of an extra-long blank.Rabbet. Cut the rabbet on the insideedge of the trim on the table saw usinga dado blade buried in an auxiliary fence.2 <strong>Woodsmith</strong><strong>Shop</strong>.com © 2011 August Home Publishing Co. All Rights Reserved.
firstmferAdding the <strong>Easel</strong>The easel consists of a base <strong>and</strong> avertical support that holds a slidinglock to secure the frame in position.The base is assembled from threehardwood blocks — each with adifferent edge profile. This addsweight <strong>and</strong> an intricate profile to theeasel. A dado in the back of the baseholds the vertical support.Bottom. The bottom of the base hasa wide chamfer with a shoulder at thetop. Cut the shoulder <strong>and</strong> the chamferon the table saw (box below).To define the shoulder, I cut a kerfin three sides of the top face. Then, Iset the saw blade at 45° <strong>and</strong> cut thechamfer on the edges of the bottom.Riser & Top. The riser in the centerof the base is a rectangular workpiececut to size with the edges leftsquare. The top has a 1 ⁄ 4 " chamferalong the bottom edge. After thisworkpiece is cut to size, you canrout the chamfer.Begin Assembly. Once you have thethree base pieces cut <strong>and</strong> shaped,glue them up. Assemble the piecesso they’re centered from side toside but flush at the back edge. Afew cut-off brads inserted in bothfaces of the riser will help hold thebottom <strong>and</strong> top in place as you applythe clamps for glueup. After the gluedries, cut the notch on the back ofthe base for the vertical support.prepare the Stop. A stop on thefront of the base keeps the framea.STOP(!/4"x !/4"-10!/2")I!/8"chamfer1110!/212Large chamfercut on table saw(see box below)CLAMP TOP VIEW#/16(/32 (/321!/2KCLAMPNOTE:Top <strong>and</strong> vertical supportare #/8"-thick hardwoodTOPHThreeworkpiecesare stacked <strong>and</strong>gluedNOTE: Riser<strong>and</strong> bottom are#/4"-thickhardwoodGRISERfrom slipping. It’s a narrow piecewith trimmed corners <strong>and</strong> chamfersalong the edges. Because thefinished piece is so small, I cut theprofiles on an extra-wide blank. Justmiter the corners first. Then, takethe workpiece over to the routertable to rout the chamfers on the!/4FBOTTOM1!/44!/23!/43!/2how-to: shaping the baseH1#10 -24 x 2" brass machinescrew with head cut offWasherThumbnutJVERTICALSUPPORT!/8"chamfer#6 x 1"brass FhwoodscrewFasten supportto base withglue <strong>and</strong> screwsc.b.1SIDESECTIONVIEWFKJGH1%/16SIDE SECTION VIEW!/4!/43!/2I Hedges. Finally, rip!/8!/16#/43!/4Gthe stop free fromthe waste.Vertical support.At this point, you#/16F4can go ahead <strong>and</strong> rip the verticalsupport for the frame to width to fitthe notch you cut earlier.#/820!/2FBOTTOMa.END VIEW!/2!/16BOTTOMFa.#/16ENDVIEW 1!/245˚a.END VIEW!/4Tilt blade45˚NOTE: Notch iscentered onwidth of baseFirst. To shape the chamfer on the tablesaw, I started by cutting a kerf 1 ⁄ 2" fromthe edge on three sides of the workpiece.Second. To complete the chamfer, youneed to tilt the blade 45° <strong>and</strong> raise it tomeet the kerf. Then, cut off the waste.Notch. The notch in the base that holdsthe vertical support should be cut afterthe three layers of the base are glued up.3 <strong>Woodsmith</strong><strong>Shop</strong>.com © 2011 August Home Publishing Co. All Rights Reserved.
The miters on the top corners ofthe support are cut on the table saw.After that, it’s just a matter of cuttingthe slot to hold the clamp <strong>and</strong>drilling pilot holes for the mountingscrews in the back.The slot in the support can bemade on the router table (page 6).Two screws hold the support to thebase, as shown in detail ‘b.’<strong>Frame</strong> clamp. The frame clamp isalso a small piece with several shortcuts <strong>and</strong> chamfers, so again, it’s easierto work with an oversized blank.I cut the blank to width this time <strong>and</strong>then cut a bevel on the end of thepiece. Once you’ve completed this,you’ll need to go back to the routertable to rout the chamfers on theedges. Then you can cut 9 ⁄ 32 "-deepnotches at the back of the clamp toform a tongue. Finally, cut the clampfree. There’s more information inthe How-To box below.You’ll need to drill a hole throughthe middle of the tongue on theclamp to hold the screw thatattaches it to the support. Thissounds like it could be a challenge,but take a look at the photo belowfor an easy way to do this.Finish Assembly. The clamp is fittedwith a cut-off 10-24 brass machinescrew. Cut the screwto 1 1 ⁄ 2 ". Epoxy on theend of the screw holdsit in place in the clamp.Then, add a washer<strong>and</strong> a brass thumb nut(drawing on page 3).Final details. When itcame time to finish theframes, I applied GeneralFinishes’ Java GelStain to the easel <strong>and</strong>frame trim. To bring outthe figure of the curlymaple, a coat of GeneralFinishes’ Seal-a-Cell was wiped ontoframe facing. Then everything wascoated with lacquer.The easel is designed to hold theframe either horizontally or vertically— depending on your photo orartwork. All you need to do now isdecide which of your photos or artworkto display.Materials & SuppliesA Backer Top/Bottom (2) 1 ⁄ 4 hdbd. - 2 x 8B Backer Side (2) 1 ⁄ 4 hdbd. - 2 x 14C Facing Top/Bottom (2) 3 ⁄ 8 x 2 1 ⁄ 4 - 12D Facing Side (2) 3 ⁄ 8 x 2 1 ⁄ 4 - 14E Trim (1) 5 ⁄ 8 x 1 - 60 rgh.F Base Bottom (1) 3 ⁄ 4 x 4 - 12G Base Riser (1) 3 ⁄ 4 x 3 1 ⁄ 4 - 10 1 ⁄ 2H Base Top (1) 3 ⁄ 8 x 3 1 ⁄ 2 - 11I <strong>Frame</strong> Stop (1) 1 ⁄ 4 x 1 ⁄ 4 - 10 1 ⁄ 2J Vertical Support (1) 3 ⁄ 8 x 1 - 20K Clamp (1) 3 ⁄ 4 x 1 - 1 1 ⁄ 2• (4) 7 ⁄ 8 " Brass Turn Buttons w/Screws• (2) #6 x 1" Brass Fh Woodscrews• (1) 10-24 x 2" Brass Machine Screw• (1) #10 Brass Flat Washer• (1) #10 Brass Thumb NutCutting Diagram!/2" x 3" x 60" Curly Maple (1.3 Sq. Ft.) NOTE: Plane to #/8"thickC C D D#/4" x 5!/2" x 60" Poplar (2.3 Bd. Ft.)F G HKIJEClamp the <strong>Frame</strong> Clamp. The small clamp needs to be drilledprecisely. Secure it to the drill press table using a h<strong>and</strong>screw.NOTE: Parts E, H, I, <strong>and</strong> J are planed to thicknessALSO NEEDED: One 12" x 24" sheet ! /4" hardboardhow-to: making the frame clamp#/8KNOTE: Setmiter gauge45˚Auxiliarymiter fenceKTOPVIEWChamferbitRout !/8"chamfer onedgesK #/81!/4Fence ENDVIEWKBearingKAuxiliarymiter fencea. a. a.Beveled Front. First, locate the bevel onthe front of the clamp by marking a point3 ⁄ 8" from the bottom of the workpiece.Chamfers. The chamfers on the edgesare cut on the router table. Use a mitergauge for the end <strong>and</strong> angled chamfers.Cut (/32"-deep notchon both sidesof blankEND VIEW1!/4 Waste!/4Tongue. The final steps are to cut thenotch to form the tongue on the clamp,<strong>and</strong> then cut it free from the blank.K4 <strong>Woodsmith</strong><strong>Shop</strong>.com © 2011 August Home Publishing Co. All Rights Reserved.
Design Options5x7 VersionMaterials, Supplies & cutting diagramA Backer Top/Bottom (2) 1 ⁄ 4 hdbd. - 2 x 5B Backer Side (2) 1 ⁄ 4 hdbd. - 2 x 11C Facing Top/Bottom (2) 3 ⁄ 8 x 2 1 ⁄ 4 - 9D Facing Side (2) 3 ⁄ 8 x 2 1 ⁄ 4 - 11E Trim (1) 5 ⁄ 8 x 1 - 48 rgh.F Base Bottom (1) 3 ⁄ 4 x 3 1 ⁄ 2 - 9G Base Riser (1) 3 ⁄ 4 x 2 3 ⁄ 4 - 7 1 ⁄ 2H Base Top (1) 3 ⁄ 8 x 3 - 8I <strong>Frame</strong> Stop (1) 1 ⁄ 4 x 1 ⁄ 4 - 7 1 ⁄ 2J Vertical Support (1) 3 ⁄ 8 x 1 - 17K Clamp (1) 3 ⁄ 4 x 1 - 1 1 ⁄ 2• (4) 7 ⁄ 8 " Brass Turn Buttons w/Screws• (2) #6 x 1" Brass Fh Woodscrews• (1) 10-24 x 2" Brass Machine Screw• (1) #10 Brass Flat Washer• (1) #10 Brass Thumb Nut!/2" x 3" x 48" Curly Maple (1 Sq. Ft.) NOTE: Plane to #/8"thickC C DD#/4" x 5!/2" x 48" Poplar (1.8 Bd. Ft.)F G HKNOTE: Parts E, H, I, <strong>and</strong> J are planed to thicknessALSO NEEDED: One 12" x 12" sheet ! /4" hardboardIJE11x14 VersionMaterials, Supplies & cutting diagramA Backer Top/Bottom (2) 1 ⁄ 4 hdbd. - 3 x 11B Backer Side (2) 1 ⁄ 4 hdbd. - 3 x 20C Facing Top/Bottom (2) 3 ⁄ 8 x 3 1 ⁄ 4 - 17D Facing Side (2) 3 ⁄ 8 x 3 1 ⁄ 4 - 20E Trim (1) 5 ⁄ 8 x 1 - 80 rgh.F Base Bottom (1) 3 ⁄ 4 x 5 - 17G Base Riser (1) 3 ⁄ 4 x 4 1 ⁄ 4 - 15 1 ⁄ 2H Base Top (1) 3 ⁄ 8 x 4 1 ⁄ 2 - 16I <strong>Frame</strong> Stop (1) 1 ⁄ 4 x 1 ⁄ 4 - 15 1 ⁄ 2J Vertical Support (1) 3 ⁄ 8 x 1 - 26K Clamp (1) 3 ⁄ 4 x 1 - 1 1 ⁄ 2• (4) 7 ⁄ 8 " Brass Turn Buttons w/Screws• (2) #6 x 1" Brass Fh Woodscrews• (1) 10-24 x 2" Brass Machine Screw• (1) #10 Brass Flat Washer• (1) #10 Brass Thumb Nut!/2" x 4" - 84" Curly Maple (2.3 Sq. Ft.)C C D D#/4" x 8" - 84" Poplar (4.7 Bd. Ft.)F G HNOTE: Parts C, D, E, H, I, <strong>and</strong> J are planed to correct thicknessALSO NEEDED: One 12" x 24" sheet ! /4" hardboardKIJE5 <strong>Woodsmith</strong><strong>Shop</strong>.com © 2011 August Home Publishing Co. All Rights Reserved.


