LBB 1965/00 Plena Message Manager - WES Components
LBB 1965/00 Plena Message Manager - WES Components
LBB 1965/00 Plena Message Manager - WES Components

You also want an ePaper? Increase the reach of your titles
YUMPU automatically turns print PDFs into web optimized ePapers that Google loves.
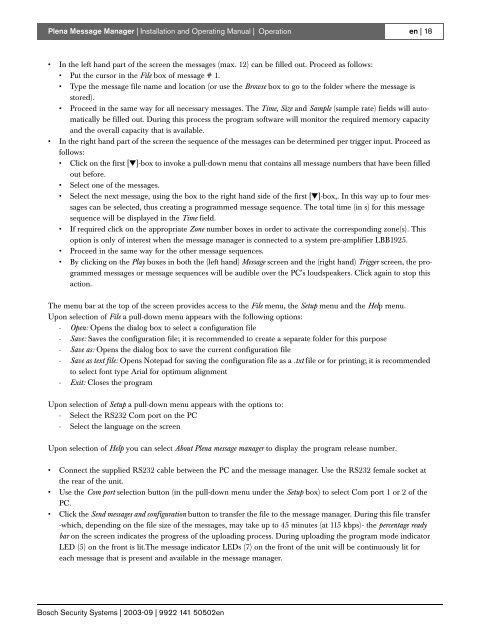
<strong>Plena</strong> <strong>Message</strong> <strong>Manager</strong> | Installation and Operating Manual | Operationen | 18• In the left hand part of the screen the messages (max. 12) can be filled out. Proceed as follows:• Put the cursor in the File box of message # 1.• Type the message file name and location (or use the Browse box to go to the folder where the message isstored).• Proceed in the same way for all necessary messages. The Time, Size and Sample (sample rate) fields will automaticallybe filled out. During this process the program software will monitor the required memory capacityand the overall capacity that is available.• In the right hand part of the screen the sequence of the messages can be determined per trigger input. Proceed asfollows:• Click on the first [▼]-box to invoke a pull-down menu that contains all message numbers that have been filledout before.• Select one of the messages.• Select the next message, using the box to the right hand side of the first [▼]-box,. In this way up to four messagescan be selected, thus creating a programmed message sequence. The total time (in s) for this messagesequence will be displayed in the Time field.• If required click on the appropriate Zone number boxes in order to activate the corresponding zone(s). Thisoption is only of interest when the message manager is connected to a system pre-amplifier <strong>LBB</strong>1925.• Proceed in the same way for the other message sequences.• By clicking on the Play boxes in both the (left hand) <strong>Message</strong> screen and the (right hand) Trigger screen, the programmedmessages or message sequences will be audible over the PC's loudspeakers. Click again to stop thisaction.The menu bar at the top of the screen provides access to the File menu, the Setup menu and the Help menu.Upon selection of File a pull-down menu appears with the following options:- Open: Opens the dialog box to select a configuration file- Save: Saves the configuration file; it is recommended to create a separate folder for this purpose- Save as: Opens the dialog box to save the current configuration file- Save as text file: Opens Notepad for saving the configuration file as a .txt file or for printing; it is recommendedto select font type Arial for optimum alignment- Exit: Closes the programUpon selection of Setup a pull-down menu appears with the options to:- Select the RS232 Com port on the PC- Select the language on the screenUpon selection of Help you can select About <strong>Plena</strong> message manager to display the program release number.• Connect the supplied RS232 cable between the PC and the message manager. Use the RS232 female socket atthe rear of the unit.• Use the Com port selection button (in the pull-down menu under the Setup box) to select Com port 1 or 2 of thePC.• Click the Send messages and configuration button to transfer the file to the message manager. During this file transfer-which, depending on the file size of the messages, may take up to 45 minutes (at 115 kbps)- the percentage readybar on the screen indicates the progress of the uploading process. During uploading the program mode indicatorLED (5) on the front is lit.The message indicator LEDs (7) on the front of the unit will be continuously lit foreach message that is present and available in the message manager.Bosch Security Systems | 2<strong>00</strong>3-09 | 9922 141 50502en