EVAPORATIVE (EVAP) EMISSION CONTROL SYSTEM CLEANING ...
EVAPORATIVE (EVAP) EMISSION CONTROL SYSTEM CLEANING ...
EVAPORATIVE (EVAP) EMISSION CONTROL SYSTEM CLEANING ...

You also want an ePaper? Increase the reach of your titles
YUMPU automatically turns print PDFs into web optimized ePapers that Google loves.
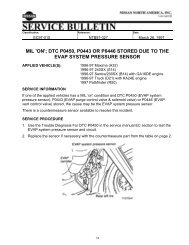
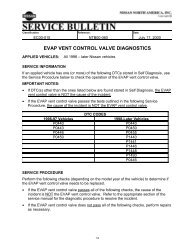
<strong>EVAP</strong> Emission Control System with DUTY CYCLE TYPE Purge Volume Conrol Valve<strong>EVAP</strong> PurgeVolume Control ValveIntake manifoldAir intakeVacuumCut ValveDuty CycleTypeFuel Tank<strong>EVAP</strong> PressureSensorVacuumCut ValveBypassValve<strong>EVAP</strong>WaterSeparator<strong>EVAP</strong> VentControl Valve<strong>EVAP</strong>CanisterFigure 1TP000511<strong>EVAP</strong> PurgeVolume ControlValve<strong>EVAP</strong> Emission Control System with STEP MOTOR TYPE Purge Volume Conrol ValveIntake manifoldAir intakeStep MotorTypeVacuumCut Valve<strong>EVAP</strong> PurgeControl SolenoidValve<strong>EVAP</strong> PurgeCut ValveFuel Tank<strong>EVAP</strong> PressureSensorVacuumCut ValveBypassValve<strong>EVAP</strong>WaterSeparator<strong>EVAP</strong> VentControl Valve<strong>EVAP</strong>CanisterFigure 2TP0005402/6
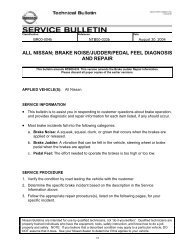
SERVICE PROCEDUREIMPORTANT: Before disconnecting any hose, make sure you mark the hose so it canbe correctly re-installed later. If a hose is incorrectly re-installed, the MIL will comeon.1. Disconnect the vacuum hose from the <strong>EVAP</strong> System Pressure Sensor (see Figure 3).CAUTION: The vacuum hose must be disconnected from the Pressure Sensor to prevent itfrom being damaged.<strong>EVAP</strong> SystemPressure Sensor<strong>EVAP</strong>canisterTireVacuum hose(<strong>EVAP</strong> SystemPressureSensor)Purge hoseFrontFigure 3TP0005132. Disconnect the Purge hose from the <strong>EVAP</strong> canister port labeled “Purge” (see Figure 3).3. Disconnect the hose from the <strong>EVAP</strong> Purge Volume Control Valve (or Purge Cut Valve, ifequipped). Refer to Figures 1, 2, and 4 to determine which hose to disconnect basedon the type of Purge Volume Control Valve on the vehicle (i.e., duty cycle or step motortype).IMPORTANT: Before disconnecting any hose, make sure you mark the hose so it can becorrectly re-installed later. If a hose is incorrectly re-installed, the MIL will come on.3/6
6. Re-assemble the <strong>EVAP</strong> system.7. Erase all stored DTCs.8. Road test the vehicle until the <strong>EVAP</strong> SRT shows “Complete”, then re-check for anystored DTCs.CLAIMS INFORMATIONFor replacement of the <strong>EVAP</strong> canister and <strong>EVAP</strong> system charcoal debriscleaning/removal, submit a Primary Failed Part (PP) line claim using the followingclaims coding. To claim for diagnostic time(s) associated with the DTC code(s)and/or the replacement of those components that have been rendered non-functionaldue to charcoal contamination, reference the current Nissan "Warranty Flat RateManual" and use the indicated Op Codes and FRTs:DESCRIPTION PFP OP CODE SYM DIA FRTReplace Vapor Canister assembly (1) FC40AA (2) 32 (3)Cleaning procedure for <strong>EVAP</strong>Canister charcoal leakage incidentsFC80AA(1) Reference the indicated Parts Catalog and use the <strong>EVAP</strong> Canister P/N as the PFP.(2) As indicated by the customer's complaint.(3) Reference the current Nissan "Warranty Flat Rate Manual" and use the indicated FRT.B14 – 1.4 hrsB15 – 1.3 hrsS14 – 1.4 hrsA32 – 1.3 hrsA33 – 1.3 hrsD22 – 1.5 hrsR50 – 1.6 hrsV40 – 1.7 hrsV41 – 1.7 hrs6/6