P1 W1MAX Desktop Modem with WiFi Function (DV-230) Computer
P1 W1MAX Desktop Modem with WiFi Function (DV-230) Computer
P1 W1MAX Desktop Modem with WiFi Function (DV-230) Computer

You also want an ePaper? Increase the reach of your titles
YUMPU automatically turns print PDFs into web optimized ePapers that Google loves.
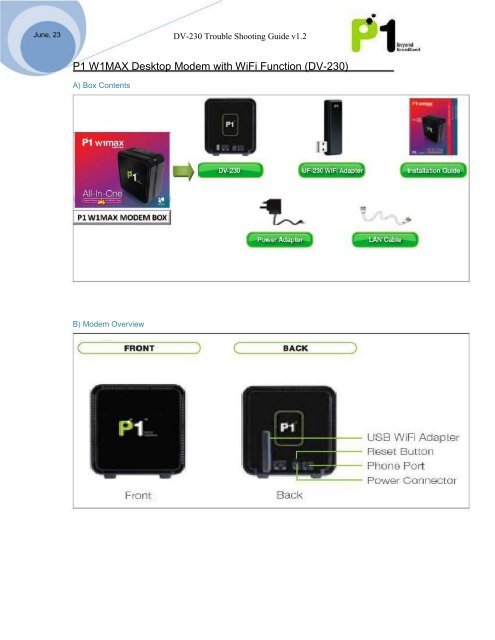
June, 23 <strong>DV</strong>-<strong>230</strong> Trouble Shooting Guide v1.2<strong>P1</strong> <strong>W1MAX</strong> <strong>Desktop</strong> <strong>Modem</strong> <strong>with</strong> <strong>WiFi</strong> <strong>Function</strong> (<strong>DV</strong>-<strong>230</strong>)A) Box ContentsB) <strong>Modem</strong> Overview
June, 23 <strong>DV</strong>-<strong>230</strong> Trouble Shooting Guide v1.2C) <strong>Modem</strong> Minimum System RequirementsOperating SystemHardwareSoftwareDevice: Any Operating System that has been configured to operate anetwork card. (Windows/Linux/Mac): <strong>Computer</strong> <strong>with</strong> at least one network card installed.: IE, Mozilla, opera or any web browser.: +12V power adapter, <strong>P1</strong> <strong>W1MAX</strong> <strong>Modem</strong> (Provided by <strong>P1</strong>)Your <strong>P1</strong> W!MAX <strong>Modem</strong> (<strong>DV</strong>-<strong>230</strong>) is a Plug and Play device.No configuration is needed.D) <strong>Modem</strong> SpecificationsThis information can be found at the bottom of your <strong>P1</strong><strong>W1MAX</strong> <strong>Modem</strong> (<strong>DV</strong>-<strong>230</strong>).Serial Number S/NMAC Address
June, 23 <strong>DV</strong>-<strong>230</strong> Trouble Shooting Guide v1.2<strong>P1</strong> <strong>W1MAX</strong> <strong>Desktop</strong> <strong>Modem</strong> (<strong>DV</strong>-<strong>230</strong>) Troubleshooting GuideMODEM SETU<strong>P1</strong>. Plug the Power Adapter into the plug point and the Adapter’s DC tip into your<strong>Modem</strong>’s AC Power Port.2. Switch on the power. Wait three seconds for the <strong>P1</strong> Logo and all three LEDlights to light up.Back ViewPower requirement: +12V, 1APlease use the power adaptor supplied by <strong>P1</strong> for guaranteed performance.If the <strong>P1</strong> Logo and all three LED lights do not light up, these are the possible problemsand solutions:1) The plug point is faulty. Switch to another plug point to confirm.2) The AC Power Adapter is faulty. Replace your power adapter.Should the problem persist, please contact the <strong>P1</strong> Care Line at 1300 03 1300 forassistance.
June, 23 <strong>DV</strong>-<strong>230</strong> Trouble Shooting Guide v1.23. Please wait 25 seconds for the <strong>Modem</strong> to boot up. The RED LED will startblinking, indicating <strong>P1</strong> Network Initialization.If the RED LED does not start blinking after 2 minutes, please contact the <strong>P1</strong> Care Lineat 1300 03 1300 for assistance.If the RED LED keeps blinking, please reposition your <strong>Modem</strong> in another direction ornear a window. Ensure that the front of the <strong>Modem</strong> is facing outwards.If problem still persist, please contact <strong>P1</strong> Care Line.4. If your <strong>Modem</strong> is <strong>with</strong>in coverage, the Yellow LED will start blinking. Thisindicates that the <strong>Modem</strong> is getting Authentication from the <strong>P1</strong> Network.If the RED and YELLOW LED keeps blinking in sequence after 2 minutes, pleasecontact our <strong>P1</strong> Care Line at 1300 03 1300 for assistance.
June, 23 <strong>DV</strong>-<strong>230</strong> Trouble Shooting Guide v1.25. Once Authentication is successful, the GREEN LED will start blinking. Your<strong>Modem</strong> is requesting the DHCP IP from the <strong>P1</strong> Network.If the Green LED keeps blinking, this indicates a problem in obtaining theDHCP IP from the <strong>P1</strong> Network. This may be a temporary network problem.Please contact our <strong>P1</strong> Care Line at 1300 03 1300 for assistance.1. One of the following LED lights will then remain lighted up. The type of colourindicates the signal strength.Red LED: Weak Signal Yellow LED: Good Signal Green LED: Excellent Signal<strong>Modem</strong> position guide:Condominiums/Apartments: <strong>Modem</strong> must face windowHouses: <strong>Modem</strong> must be on top floor, facing window
June, 23 <strong>DV</strong>-<strong>230</strong> Trouble Shooting Guide v1.26. Connect one end of the Ethernet cable to your <strong>Modem</strong>’s LAN port and the otherend to your computer/laptop’s LAN port.The <strong>P1</strong> <strong>W1MAX</strong> <strong>Modem</strong> (<strong>DV</strong>-<strong>230</strong>) requires a straight Ethernet Cable towork. For optimum connection, please use Ethernet cable provided by<strong>P1</strong>.7. If the Ethernet cable is connected the LAN Blue LED will light up. The LED mayblink, indicating that there is data transferring activity between yourcomputer/laptop and the <strong>Modem</strong>.If the Blue LED does not light up:Step 1: Please check to ensure that the Ethernet Cable is connectedsecurely. If the problem persists, proceed to Step 2.Step 2: Check if your computer’s Ethernet Port is enabled andfunctional.
June, 23 <strong>DV</strong>-<strong>230</strong> Trouble Shooting Guide v1.2WIFI CONNECTION SETU<strong>P1</strong>. Plug in the USB <strong>WiFi</strong> adapter into the modem. The USB <strong>WiFi</strong> adapter Blue LEDwill light up and the Blue LED will be blinking, indicating data is beingtransmitted.2. Switch on the <strong>WiFi</strong> adapter on your laptop.3. Right-click the Wireless Network Connection icon at the bottom-right of thescreen and select View Available Wireless Networks.
June, 23 <strong>DV</strong>-<strong>230</strong> Trouble Shooting Guide v1.24. Select the “SSID” that is printed on your USB <strong>WiFi</strong> adaptor. Click Connect.5. You will be prompted to key in the WEP password. The WEP password is printedon your USB <strong>WiFi</strong> Adapter.
June, 23 <strong>DV</strong>-<strong>230</strong> Trouble Shooting Guide v1.26. Once connected, ensure that your laptop has obtained the correct DHCP IP andSSID. Check for signal quality and readjust the position of your <strong>Modem</strong>accordingly.7.8. Note: This step is optional. If you want to change the default SSID or WEP key,open any Internet browser and type in the URL address for Customer WebGUIDE at http://10.1.1.254Username : adminPassword : admin123
June, 23 <strong>DV</strong>-<strong>230</strong> Trouble Shooting Guide v1.2Laptop’s Power Saving Schemes when running on BatteryBackground :Laptop’s tend to have those power saving schemes so that the laptop can last longer whenrunning on battery only. The laptop will dim down the brightness of the laptop displayscreen, lower down the laptop’s <strong>WiFi</strong> transmitting power and shutting down or loweringdown power of other functions.Troubleshooting steps:1) In order to isolate the issue that it’s not our <strong>DV</strong><strong>230</strong> product issue or Wimax issue,it is advisable to ask the customer when experiencing slow, intermittent or badinternet browsing experience, are they using a laptop and if yes, are they runningon battery.2) If the above are all yes, ask the customer to go to “Start -> Control Panel ->System -> Hardware” Click “Device Manager”
June, 23 <strong>DV</strong>-<strong>230</strong> Trouble Shooting Guide v1.23) Go to “Network Adapters” and look for the laptop’s <strong>WiFi</strong> driver and double clickon it.4) Go to “Advanced” and scroll down to look for “power management” and set it to the“highest” setting.
June, 23 <strong>DV</strong>-<strong>230</strong> Trouble Shooting Guide v1.2
June, 23 <strong>DV</strong>-<strong>230</strong> Trouble Shooting Guide v1.2CONNECTIVITY ISSUESNo1.DescriptionSuggested SolutionYour laptop/desktop cannotI. Ensure that the modem is switched ondetect the <strong>Modem</strong>’s <strong>WiFi</strong>and that the USB <strong>WiFi</strong> Adapter isSignal/SSID.properly plugged into the modem.II. Make sure that user “start” the wifi at“networking -> Wifi” at Web GUI. Inaddition, Disable the Hide SSID option.III. Check that your laptop/desktop has its<strong>WiFi</strong> function turned on. Ensure that itcan detect <strong>WiFi</strong> 11 frequencies and isable to support B, G and B/G mixmode.IV. To ensure that it is not an issue ofweak service signals, position yourlaptop/desktop near to the <strong>Modem</strong>.V. Make sure that the SSID you aresearching for through the <strong>WiFi</strong> searchnetwork menu matches the SSID thathas been set in the <strong>Modem</strong>.2.Your laptop/desktop candetect the <strong>Modem</strong>’s <strong>WiFi</strong>signal and SSID but unableto connect to it.3. You are connected to the<strong>Modem</strong>’s <strong>WiFi</strong> SSID butunable to get an IP or haslimited connection.I. Ensure that you are connected to thecorrect SSID.II. Check your <strong>WiFi</strong> Security Mode assome security modes may requireRadius Server Authentication.III. Ensure you key in the correct andmatching security key/mode in thelaptop/desktop and <strong>Modem</strong>.IV. Disable Access Control at the <strong>P1</strong><strong>W1MAX</strong> <strong>Modem</strong> (<strong>DV</strong>-<strong>230</strong>) <strong>WiFi</strong> tab onthe web GUI.I. Check that you have keyed in thecorrect and matching security keymode in the laptop/desktop and<strong>Modem</strong>II. Check that the <strong>Modem</strong>’s DHCP serveris enabled at Networking -> DHCPServer. Ensure that the DHCP IP rangeis bigger than the amount ofdesktop/laptop connected to it viawired or wireless to <strong>DV</strong><strong>230</strong>.III. Disable Access Control at the <strong>P1</strong><strong>W1MAX</strong> <strong>Modem</strong> (<strong>DV</strong>-<strong>230</strong>) <strong>WiFi</strong> tab on
June, 23 <strong>DV</strong>-<strong>230</strong> Trouble Shooting Guide v1.2the web GUI.4. You are connected to the<strong>Modem</strong>’s <strong>WiFi</strong> SSID and canan IP but cannot browsethe Internet.5. You experience irregular orslow browsing whenconnected through <strong>WiFi</strong>.I. Set your laptop’s/desktop’s NetworkWireless Connection to Obtain IPautomatically and Obtain DNS serveraddress automatically.II. Ensure that your <strong>Modem</strong> is connectedto <strong>W1MAX</strong> service by checking your<strong>Modem</strong>’s LED lights.III. Check for proxy settings that disablesyour connection in your Web browser.IV. User may have to click Repair on their<strong>WiFi</strong> Network Connection for WindowsOS or a similar function for otheroperating systems.V. Check whether you can ping to the<strong>Modem</strong>. The gateway for yourlaptop/desktop should have the sameIP as the LAN IP for your <strong>Modem</strong>.VI. Disable Access Control at the <strong>P1</strong><strong>W1MAX</strong> <strong>Modem</strong> (<strong>DV</strong>-<strong>230</strong>) <strong>WiFi</strong> tab onthe web GUI.I. Check whether you can ping to the<strong>Modem</strong>. The gateway for yourlaptop/desktop should have the sameIP as the LAN IP for your <strong>Modem</strong>.II. To ensure that it is not an issue ofweak service signals, position yourlaptop/desktop near to the <strong>Modem</strong>.III. Try changing the <strong>WiFi</strong> Channel to adifferent channel as it may be due to<strong>WiFi</strong> Interference.IV. Do a ping and speed test check viawired to the <strong>Modem</strong> to determine if itis a <strong>W1MAX</strong> network congestion issue.
June, 23 <strong>DV</strong>-<strong>230</strong> Trouble Shooting Guide v1.2COMPUTER/LAPTOP SETUP INFORMATIONBy default, all Operating Systems (Windows/Linux/Mac) will set the DHCP optionto Obtain an IP address automatically.WINDOWS X<strong>P1</strong>. Right-click on the My Network Places icon on your desktop and select“Properties” from the menu that appears.2. In the window that appears, (labeled Network and Dial-up Connections) rightclickon the icon titled Local Area Connection and select the item Propertiesfrom the menu that appears.
June, 23 <strong>DV</strong>-<strong>230</strong> Trouble Shooting Guide v1.23. A window titled Local Area Connection Properties will now appear. In the listbelow, select the item called Internet Protocol (TCP/IP) and click on thebutton labeled Properties.4. A window titled Internet Protocol (TCP/IP) Properties will now appear. In thiswindow, click on the radio button to the left of Obtain an IP addressautomatically.5. In the same window near the bottom, make sure the radio button to the left ofObtain DNS server address automatically is filled.
June, 23 <strong>DV</strong>-<strong>230</strong> Trouble Shooting Guide v1.2Mac OS XThis guide assumes that your computer has the network adapter and TCP/IP alreadyinstalled. All Mac computers certified by Apple to run Mac OS X will have built-inEthernet adapter hardware and the necessary networking software as part of of OS X'sdefault installation.1. Click on the Apple Menu Icon in the upper left corner of your screen.2. Select System Preferences3. Click on the Network icon.
June, 23 <strong>DV</strong>-<strong>230</strong> Trouble Shooting Guide v1.24. Select the TCP/IP tab.5. From the Configure IPv4 menu, select Using DHCP.6. Click the Apply Now or Save button.
June, 23 <strong>DV</strong>-<strong>230</strong> Trouble Shooting Guide v1.2Linux (Fedora)1. Go to the System Administration and select the Network menu item. This willlaunch the Network Config tool, which will prompt Configure Network Devicesand Connections.2. Select the appropriate network interface and click on Edit.
June, 23 <strong>DV</strong>-<strong>230</strong> Trouble Shooting Guide v1.23. Check on the Activate device when computer starts and Allow all users toenable and disable the device. Check the Automatically obtain IP addresssettings and choose DHCP (these are default settings). Click on the OK button.