Ultracom cxi - Abacus Flame
Ultracom cxi - Abacus Flame
Ultracom cxi - Abacus Flame
You also want an ePaper? Increase the reach of your titles
YUMPU automatically turns print PDFs into web optimized ePapers that Google loves.
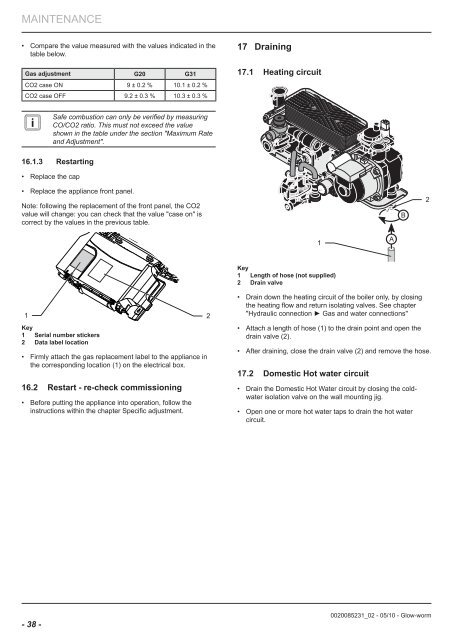
MAINTENANCE• Compare the value measured with the values indicated in thetable below.Gas adjustment G20 G31CO2 case ON 9 ± 0.2 % 10.1 ± 0.2 %CO2 case OFF 9.2 ± 0.3 % 10.3 ± 0.3 %17 Draining17.1 Heating circuitiSafecombustion can only be verified by measuringCO/CO2 ratio. This must not exceed the valueshown in the table under the section "Maximum Rateand Adjustment".16.1.3 Restarting• Replace the cap• Replace the appliance front panel.Note: following the replacement of the front panel, the CO2value will change: you can check that the value "case on" iscorrect by the values in the previous table.B21AKey1 Length of hose (not supplied)2 Drain valve1 2Key1 Serial number stickers2 Data label location• Firmly attach the gas replacement label to the appliance inthe corresponding location (1) on the electrical box.16.2 Restart - re-check commissioning• Before putting the appliance into operation, follow theinstructions within the chapter Specific adjustment.• Drain down the heating circuit of the boiler only, by closingthe heating flow and return isolating valves. See chapter"Hydraulic connection ► Gas and water connections"• Attach a length of hose (1) to the drain point and open thedrain valve (2).• After draining, close the drain valve (2) and remove the hose.17.2 Domestic Hot water circuit• Drain the Domestic Hot Water circuit by closing the coldwaterisolation valve on the wall mounting jig.• Open one or more hot water taps to drain the hot watercircuit.- 38 -0020085231_02 - 05/10 - Glow-worm


