Motherboard Removal and Installation
Motherboard Removal and Installation
Motherboard Removal and Installation

Create successful ePaper yourself
Turn your PDF publications into a flip-book with our unique Google optimized e-Paper software.
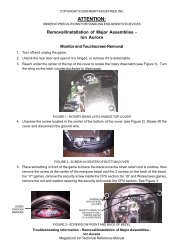
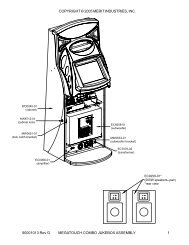
COPYRIGHT © 2008 MERIT INDUSTRIES, INC.ATTENTION:OBSERVE PRECAUTIONS FOR HANDLING ESD-SENSITIVE DEVICES<strong>Removal</strong>/<strong>Installation</strong> of Major Assemblies -Ion Aurora (cont’d)3. Reconnect the power cord to the power supply. Reattach the OSD board to the Velcro on thepower supply bracket <strong>and</strong> secure with one wing nut. See Figure 3.4. Reconnect the ground wire to the rear cover <strong>and</strong> lower the cover into place, carefully lining up the2 tabs on the cover with the 2 mating holes on the sides of the game. See Figure 9. Make sure theplastic lip on the bottom of the rear cover is behind the metal base.TABMATING HOLENOTE: ONLY LEFT SIDE SHOWN.TAB AND MATING HOLE AREALSO ON RIGHT SIDE.Tighten the screw securing the bottom of the door. See Figure 2. Turn the wing on the draw latchclockwise to engage the latch (Figure 1).5. Close (or reattach) <strong>and</strong> lock the rear door.6. Plug in <strong>and</strong> turn on the game.FIGURE 9 - SIDE VIEW OF GAMETroubleshooting Information - <strong>Removal</strong>/<strong>Installation</strong> of Major Assemblies -Ion AuroraMegatouch Ion Technical Reference Manual