Download - Buderus
Download - Buderus
Download - Buderus
- No tags were found...

You also want an ePaper? Increase the reach of your titles
YUMPU automatically turns print PDFs into web optimized ePapers that Google loves.
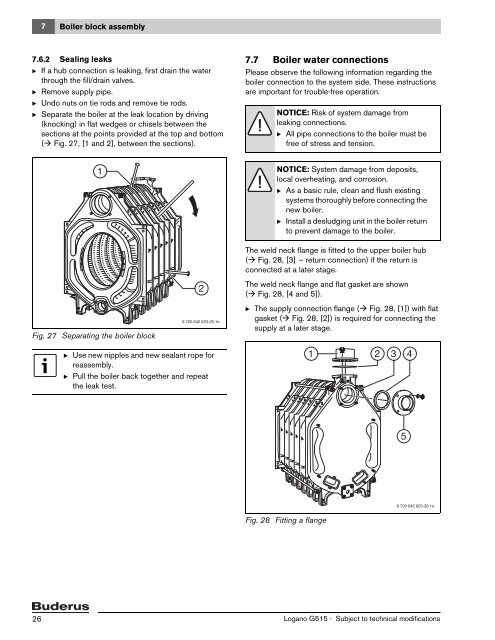
7 Boiler block assembly7.6.2 Sealing leaksB If a hub connection is leaking, first drain the waterthrough the fill/drain valves.B Remove supply pipe.B Undo nuts on tie rods and remove tie rods.B Separate the boiler at the leak location by driving(knocking) in flat wedges or chisels between thesections at the points provided at the top and bottom( Fig. 27, [1 and 2], between the sections).7.7 Boiler water connectionsPlease observe the following information regarding theboiler connection to the system side. These instructionsare important for trouble-free operation.NOTICE: Risk of system damage fromleaking connections.B All pipe connections to the boiler must befree of stress and tension.1NOTICE: System damage from deposits,local overheating, and corrosion.B As a basic rule, clean and flush existingsystems thoroughly before connecting thenew boiler.B Install a desludging unit in the boiler returnto prevent damage to the boiler.Fig. 27 Separating the boiler block26 720 642 623-25.1oThe weld neck flange is fitted to the upper boiler hub( Fig. 28, [3] – return connection) if the return isconnected at a later stage.The weld neck flange and flat gasket are shown( Fig. 28, [4 and 5]).B The supply connection flange ( Fig. 28, [1]) with flatgasket ( Fig. 28, [2]) is required for connecting thesupply at a later stage.B Use new nipples and new sealant rope forreassembly.B Pull the boiler back together and repeatthe leak test.1 2 3 456 720 642 623-26.1oFig. 28 Fitting a flange26Logano G515 - Subject to technical modifications