Six-Series BL 2000Kv Instructions - E-flite
Six-Series BL 2000Kv Instructions - E-flite
Six-Series BL 2000Kv Instructions - E-flite
- No tags were found...
You also want an ePaper? Increase the reach of your titles
YUMPU automatically turns print PDFs into web optimized ePapers that Google loves.
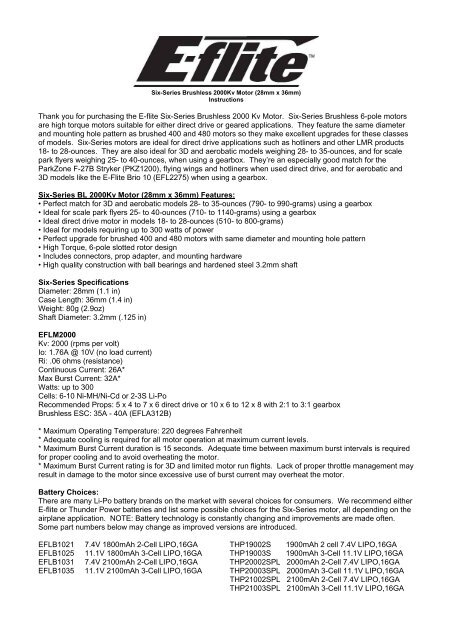
<strong>Six</strong>-<strong>Series</strong> Brushless <strong>2000Kv</strong> Motor (28mm x 36mm)<strong>Instructions</strong>Thank you for purchasing the E-<strong>flite</strong> <strong>Six</strong>-<strong>Series</strong> Brushless 2000 Kv Motor. <strong>Six</strong>-<strong>Series</strong> Brushless 6-pole motorsare high torque motors suitable for either direct drive or geared applications. They feature the same diameterand mounting hole pattern as brushed 400 and 480 motors so they make excellent upgrades for these classesof models. <strong>Six</strong>-<strong>Series</strong> motors are ideal for direct drive applications such as hotliners and other LMR products18- to 28-ounces. They are also ideal for 3D and aerobatic models weighing 28- to 35-ounces, and for scalepark flyers weighing 25- to 40-ounces, when using a gearbox. They’re an especially good match for theParkZone F-27B Stryker (PKZ1200), flying wings and hotliners when used direct drive, and for aerobatic and3D models like the E-Flite Brio 10 (EFL2275) when using a gearbox.<strong>Six</strong>-<strong>Series</strong> <strong>BL</strong> <strong>2000Kv</strong> Motor (28mm x 36mm) Features:• Perfect match for 3D and aerobatic models 28- to 35-ounces (790- to 990-grams) using a gearbox• Ideal for scale park flyers 25- to 40-ounces (710- to 1140-grams) using a gearbox• Ideal direct drive motor in models 18- to 28-ounces (510- to 800-grams)• Ideal for models requiring up to 300 watts of power• Perfect upgrade for brushed 400 and 480 motors with same diameter and mounting hole pattern• High Torque, 6-pole slotted rotor design• Includes connectors, prop adapter, and mounting hardware• High quality construction with ball bearings and hardened steel 3.2mm shaft<strong>Six</strong>-<strong>Series</strong> SpecificationsDiameter: 28mm (1.1 in)Case Length: 36mm (1.4 in)Weight: 80g (2.9oz)Shaft Diameter: 3.2mm (.125 in)EFLM<strong>2000Kv</strong>: 2000 (rpms per volt)Io: 1.76A @ 10V (no load current)Ri: .06 ohms (resistance)Continuous Current: 26A*Max Burst Current: 32A*Watts: up to 300Cells: 6-10 Ni-MH/Ni-Cd or 2-3S Li-PoRecommended Props: 5 x 4 to 7 x 6 direct drive or 10 x 6 to 12 x 8 with 2:1 to 3:1 gearboxBrushless ESC: 35A - 40A (EFLA312B)* Maximum Operating Temperature: 220 degrees Fahrenheit* Adequate cooling is required for all motor operation at maximum current levels.* Maximum Burst Current duration is 15 seconds. Adequate time between maximum burst intervals is requiredfor proper cooling and to avoid overheating the motor.* Maximum Burst Current rating is for 3D and limited motor run flights. Lack of proper throttle management mayresult in damage to the motor since excessive use of burst current may overheat the motor.Battery Choices:There are many Li-Po battery brands on the market with several choices for consumers. We recommend eitherE-<strong>flite</strong> or Thunder Power batteries and list some possible choices for the <strong>Six</strong>-<strong>Series</strong> motor, all depending on theairplane application. NOTE: Battery technology is constantly changing and improvements are made often.Some part numbers below may change as improved versions are introduced.EFLB1021 7.4V 1800mAh 2-Cell LIPO,16GA THP19002S 1900mAh 2 cell 7.4V LIPO,16GAEFLB1025 11.1V 1800mAh 3-Cell LIPO,16GA THP19003S 1900mAh 3-Cell 11.1V LIPO,16GAEFLB1031 7.4V 2100mAh 2-Cell LIPO,16GA THP20002SPL 2000mAh 2-Cell 7.4V LIPO,16GAEFLB1035 11.1V 2100mAh 3-Cell LIPO,16GA THP20003SPL 2000mAh 3-Cell 11.1V LIPO,16GATHP21002SPL 2100mAh 2-Cell 7.4V LIPO,16GATHP21003SPL 2100mAh 3-Cell 11.1V LIPO,16GA
Examples of Airplane Setups:Please see our web site for the most up-to-date information and airplane setup examples.NOTE: Actual performance may vary depending on battery, propeller, and flight conditions.E-<strong>flite</strong> Brio 10 ARF (EFL2275)Weight w/Battery: 31.5 oz (895g)Prop: 12 x 8E (APC12080E)Gearbox: 400 Gearbox w/56T 0.5M Spur Gear (EFLM236) and 19T 0.5 Module 3.2mm ID Pinion Gear(EFLM1957),Battery: 2100mAh 3-Cell 11.1V LIPO (THP21003SPL)ESC: 40A Brushless (EFLA312B)Comments – Strong power and performance with good flight time. Expect good vertical performance andpower for aerobatic flying.ParkZone F-27B Stryker RTF (PKZ1200)Note: This is a direct drive set up requiring slight modification to the existing motor mount for motor installationWeight w/Battery: 22 oz (625-g)Prop: 7 x 6 Sport (APC07060)Battery: 2100mAh 3-Cell 11.1V LIPO (THP21003SPL)ESC: 40A Brushless (EFLA312B)Comments – Extreme power and performance with long flight time. Expect unlimited vertical performance andvery high speeds.Accessories:See our web site at www.E-<strong>flite</strong>RC.com or www.horizonhobby.com for our complete line of brushless motors.We have posted a specification comparison sheet on our web site so you can compare the different motors weoffer.EFLA110 Power Meter (measures power output in amps, volts, watts, and capacity)EFLA312B 40-Amp Brushless ESC (V2)EFLM1916 Firewall Stick MountEFLA241 Gold Bullet Connector Set, 3.5mm (3)EFLM236 400 Gearbox, w/56T 0.5M Spur GearEFLM1956 Pinion Gear, 18T 0.5 Module 3.2mm IDEFLM1957 Pinion Gear, 19T 0.5 Module 3.2mm IDEFLA212 Gear Puller: 1mm-5mm ShaftEFLM1923 Prop Adapter w/ Collet, 1/8 inEFLM2001 Rotor Assembly w/Shaft: <strong>Six</strong> <strong>Series</strong>Installation of Pinion Gear & Gearbox:It will be necessary for you to install the pinion on the shaft if you are using a gearbox.When installing motors into the E-<strong>flite</strong> gearbox, it is very important that your gear mesh is correct and the gear’smesh is smooth with no binding. The E-<strong>flite</strong> gearbox features adjustable slotted mounting holes so that you canensure your gear mesh is correct. Remember, if your mesh is too loose or too tight, it may strip the gears.One suggestion may be to insert the polybag included with the motor or a small piece of paper in between thepinion and spur gear as you are installing them. Tighten and secure the screws to the gearbox. Always makesure the screws are long enough so they have properly seated into the motor. You can easily pull the polybagor paper out by rotating the shaft until it comes out. Be certain to check the mesh at multiple points on the spurgear before finalizing the motor mounting position in the gearbox. To extend the life of your gearbox, we alsorecommend using a small amount of grease, such as lithium grease, on the spur gear.Once a pinion is installed on the shaft, it will be necessary to remove the pinion from the motor shaft if you wantto use the motor with a gearbox that uses a different module of spur gear. If not, the gears may bind and themotor will not operate properly. We recommend using a gear puller for this step (EFLA212) for the safestremoval of the pinion gear. Never reuse a pinion gear that has been removed from a shaft.Installing Pinion Gear1. Align pinion on end of shaft and press fit using a vise for proper installation.2. Support the aft bearing and shaft using a small hardwood block to prevent both from separating from thecase.3. Be careful you do not crimp the motor wires in the process and make sure they are safely out of the way.
NOTE: For a more secure press fit, you may add Loctite® Threadlocker Green to the inside of the pinion beforeinstallation.Removing Pinion Gear1. To remove the pinion gear, it is recommended to always use a gear puller to prevent damage to thepinion and shaft. We recommend the E-<strong>flite</strong> Pinion Puller (EFLA212).NOTE: Never reuse a pinion gear once it has been removed from the shaft.Operating <strong>Instructions</strong>:1. This brushless motor requires the use of a sensorless brushless speed control. Failure to use thecorrect speed control may result in damage to the motor and/or speed control.2. When mounting the motor, be sure the correct length of screws are used so damage to the inside of themotor will not occur. We suggest you use the mounting hardware included with your motor. The useof long screws will damage the motor.3. You may connect the three motor wires directly to the controller with solder or use connectors such asgold plated brushless bullet connectors (EFLA241), which will also need to be soldered properly to yourwires. The three motor wires can be connected in any order to the three output wires or output port ona sensorless brushless speed control. Be sure to use heat shrink tubing to properly insulate the wiresso the wires will not short. Shorting may damage the motor and speed control.4. If you add connectors and you no longer wish to use them, never cut the motor wires. Remove them byproperly desoldering them. Shortening the motor wires is considered an improper modification of themotor and may cause the motor to fail.5. When you connect the motor to the esc, check the rotation direction of the motor. If you find therotation is reversed, switching any two motor wires will reverse the direction so the motor rotatesproperly.6. Proper cooling of the motor is very important during operation. New technology has brought muchhigher capacity batteries with higher discharge rates, which can cause extreme motor temperaturesduring operation. It is the responsibility of the user to monitor the temperature and prevent overheating.Overheating of the motor is not covered under any warranty.7. You can install the propeller on the motor shaft after you have confirmed proper rotation direction. Alsoconsult the instruction included with your sensorless electronic speed control for proper adjustmentsand timing.8. Once the battery is connected to the motor, please use extreme caution. Stay clear of the rotatingpropeller since spinning propellers are very dangerous as the motors produce high amounts of torque.9. Never disassemble the motor. This will void any warranty.Safety Precautions:This is a sophisticated hobby product and not a toy. It must be operated with caution and common sense andrequires some basic mechanical ability. Failure to operate this product in a safe and responsible manner couldresult in injury or damage to the product or other property. This product is not intended for use by childrenwithout direct adult supervision. The motor shaft is a rotating part so use extreme caution. Please readthe warning information included with your propellers for safety information related to the operation of motorswith propellers. Failure to comply with these warnings and/or improper use of propellers may result in seriousinjury.Limited Warranty PeriodHorizon Hobby, Inc. guarantees this product to be free from defects in both material and workmanship for aperiod of 1 year from the date of purchase.Limited Warranty & Limits of LiabilityPursuant to this Limited Warranty, Horizon Hobby, Inc. will, at its option, (i) repair or (ii) replace, any productdetermined by Horizon Hobby, Inc. to be defective. In the event of a defect, these are your exclusiveremedies.This warranty does not cover cosmetic damage or damage due to acts of God, accident, misuse, abuse,negligence, commercial use, or modification of, or to any part of the Product. This warranty does notcover damage due to improper installation, operation, maintenance, or attempted repair by anyoneother than an authorized Horizon Hobby, Inc. service center. This warranty is limited to the originalpurchaser and is not transferable. In no case shall Horizon Hobby’s liability exceed the original cost ofthe purchased product and will not cover consequential, incidental or collateral damage. HorizonHobby, Inc. reserves the right to inspect any and all equipment involved in a warranty claim. Repair orreplacement decisions are at the sole discretion of Horizon Hobby, Inc. Further, Horizon Hobbyreserves the right to change or modify this warranty without notice.


