Wadkin PP Panel Dimension Saw Manual and Parts List
Wadkin PP Panel Dimension Saw Manual and Parts List
Wadkin PP Panel Dimension Saw Manual and Parts List
- No tags were found...
Create successful ePaper yourself
Turn your PDF publications into a flip-book with our unique Google optimized e-Paper software.
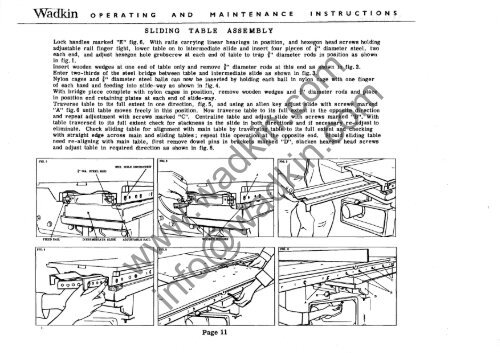
WaaKin OPERATING AND MAINTENANCE INSTRUCTIONSSLIDING TABLE ASSEMBLYLock h<strong>and</strong>les marked "E" fig. 6. With rails carrying linear bearings in position, <strong>and</strong> hexegon head screws holdingadjustable rail finger tight, lower table on to intermediate slide <strong>and</strong> insert four pi.eces of i" diameter steel; twoeach end, <strong>and</strong> adjust hexegon hole grubscrew at each end of table to trap i" diameter rods in position as shownin fig. 1.Insert wooden wedges at one end of table only <strong>and</strong> remove i" diameter rods at this end as shown in fig. 2.Enter two-thirds of the steel bridge between table <strong>and</strong> intermediate slide as shown in fig. 3.Nylon cages <strong>and</strong> i" diameter steel balls can now be inserted by holding each ball in nylon cage with one fingerof each h<strong>and</strong> <strong>and</strong> feeding into slide-way as shown in fig. 4.With bridge piece complete with nylon cages in position, remove wooden wedges <strong>and</strong> i" diameter rods <strong>and</strong> placein position end retaining plates at each end of slide-way.Traverse table to its full extent in one direction, fig. 5, <strong>and</strong> using an allen key adjust slide with screws marked"A" fig.6 until table moves freely in this position. Now traverse table to its full extent in the opposite direction<strong>and</strong> repeat adjustment with screwS marked "C". Centralise table <strong>and</strong> adjust slide with screws marked "Bit. Withtable traversed to its full extent check for slackness in the slide in both directions <strong>and</strong> if necessary re-adjust toeliminate. Check sliding table for alignment with main table by traversing table to its full extent <strong>and</strong> checkingwith straight edge across main <strong>and</strong> sliding tables; repeat this operation at the opposite end. ShoUld sliding tableneed re-aligning with main table, first remove dowel pins in brackets marked "D", slacken hexegon head screws<strong>and</strong> adjust table in required direction as shown in fig. 6.www.wadkin.cominfo@wadkin.comPage 11


