Installation Instruction for POS-X All-In-One - Corner Store Point of ...
Installation Instruction for POS-X All-In-One - Corner Store Point of ...
Installation Instruction for POS-X All-In-One - Corner Store Point of ...

You also want an ePaper? Increase the reach of your titles
YUMPU automatically turns print PDFs into web optimized ePapers that Google loves.
<strong>In</strong>ternational <strong>Point</strong> <strong>of</strong> Sale: <strong>Corner</strong><strong>Store</strong> <strong>POS</strong>Step 7: Click on <strong>POS</strong>Printer, then click Add New Device.Step 8: For Device Name select Thermal, For Device Type select Thermal U, Click OK.Step 9: Select Add New LDN and enter in a name <strong>for</strong> your printer. Click OK.5 1-866-468-5767 or 201-928-0222 <strong>In</strong>ternational <strong>Point</strong> <strong>of</strong> Sale
<strong>In</strong>ternational <strong>Point</strong> <strong>of</strong> Sale: <strong>Corner</strong><strong>Store</strong> <strong>POS</strong>Step 10: Click on Cash Drawer then click Add New Device. For Device name select Standard, For DeviceType select StandardU. Click OK.Step 11: Click on the Cash Drawer and select Add New LDN, enter in a name <strong>for</strong> the cash drawer andclick OK.Step 12: Click on the Thermal Printer, then click Device Details. Click Printer Test And Setting.6 1-866-468-5767 or 201-928-0222 <strong>In</strong>ternational <strong>Point</strong> <strong>of</strong> Sale
<strong>In</strong>ternational <strong>Point</strong> <strong>of</strong> Sale: <strong>Corner</strong><strong>Store</strong> <strong>POS</strong>Step 13: Click Printer Test, a test page should come out <strong>of</strong> the printer. Click Close, then OK.Step 14: Click on the Cash Drawer and click Device Details. Then click on Printer Test And Setting.7 1-866-468-5767 or 201-928-0222 <strong>In</strong>ternational <strong>Point</strong> <strong>of</strong> Sale
<strong>In</strong>ternational <strong>Point</strong> <strong>of</strong> Sale: <strong>Corner</strong><strong>Store</strong> <strong>POS</strong>Step 15: Put Open Level to High and Pin No to 5 only if you are using a <strong>POS</strong>X cash drawer. If you areusing any other cash drawer do nothing. Click on Printer test, the cash drawer should open. Click closethen OK.8 1-866-468-5767 or 201-928-0222 <strong>In</strong>ternational <strong>Point</strong> <strong>of</strong> Sale
<strong>In</strong>ternational <strong>Point</strong> <strong>of</strong> Sale: <strong>Corner</strong><strong>Store</strong> <strong>POS</strong>Step 16: Open up <strong>Corner</strong><strong>Store</strong> and go to Setup -> Hardware Maintenance. On the Printers tab, selectthe ThermalU. Go to the Cash Drawers Tab.\9 1-866-468-5767 or 201-928-0222 <strong>In</strong>ternational <strong>Point</strong> <strong>of</strong> Sale
<strong>In</strong>ternational <strong>Point</strong> <strong>of</strong> Sale: <strong>Corner</strong><strong>Store</strong> <strong>POS</strong>Step 17: Select the StandardU. Press Save& Exit.10 1-866-468-5767 or 201-928-0222 <strong>In</strong>ternational <strong>Point</strong> <strong>of</strong> Sale
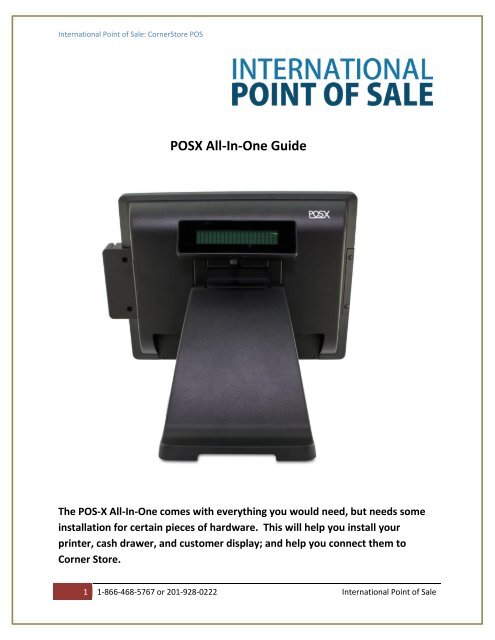
<strong>In</strong>ternational <strong>Point</strong> <strong>of</strong> Sale: <strong>Corner</strong><strong>Store</strong> <strong>POS</strong><strong>In</strong>stalling the PoSX Customer DisplayThe PoSX Pole Display has 2 different Variations:- A Rear Customer Display- Pole Customer DisplayRear Display11 1-866-468-5767 or 201-928-0222 <strong>In</strong>ternational <strong>Point</strong> <strong>of</strong> Sale
<strong>In</strong>ternational <strong>Point</strong> <strong>of</strong> Sale: <strong>Corner</strong><strong>Store</strong> <strong>POS</strong>Step 1: Download the file:http://cornerstorepos.com/downloads/hardware/EVO-RD4-VFD%20Config.zipStep 2: Open the application P07303II_AIOStep 3: Click on Scan Device.12 1-866-468-5767 or 201-928-0222 <strong>In</strong>ternational <strong>Point</strong> <strong>of</strong> Sale
<strong>In</strong>ternational <strong>Point</strong> <strong>of</strong> Sale: <strong>Corner</strong><strong>Store</strong> <strong>POS</strong>Step 4: Make sure the device is plugged into the computer be<strong>for</strong>e proceeding. Click on Auto-Scan.It should produce a message at the top <strong>of</strong> the screen when done looking similar to this.Take note <strong>of</strong> the COM number.Step 5: Click on Change Settings.13 1-866-468-5767 or 201-928-0222 <strong>In</strong>ternational <strong>Point</strong> <strong>of</strong> Sale
<strong>In</strong>ternational <strong>Point</strong> <strong>of</strong> Sale: <strong>Corner</strong><strong>Store</strong> <strong>POS</strong>Step 6: Change Baud Rate to 9600, Data Bits to 8, and Command Type to 7=CD5220. Click Set toDevice.Step 6: Open up <strong>Corner</strong> <strong>Store</strong> and go to Setup -> Hardware Setup -> Pole Display.14 1-866-468-5767 or 201-928-0222 <strong>In</strong>ternational <strong>Point</strong> <strong>of</strong> Sale
<strong>In</strong>ternational <strong>Point</strong> <strong>of</strong> Sale: <strong>Corner</strong><strong>Store</strong> <strong>POS</strong>Step 7: Select Partner Tech (CD7220) and select the COM port that was noted earlier. Click Save & Exit.You have now set up the <strong>POS</strong>X Rear Display with <strong>Corner</strong><strong>Store</strong>.15 1-866-468-5767 or 201-928-0222 <strong>In</strong>ternational <strong>Point</strong> <strong>of</strong> Sale
<strong>In</strong>ternational <strong>Point</strong> <strong>of</strong> Sale: <strong>Corner</strong><strong>Store</strong> <strong>POS</strong>Pole Customer Display (Tower)16 1-866-468-5767 or 201-928-0222 <strong>In</strong>ternational <strong>Point</strong> <strong>of</strong> Sale
<strong>In</strong>ternational <strong>Point</strong> <strong>of</strong> Sale: <strong>Corner</strong><strong>Store</strong> <strong>POS</strong>Step 1: Download the files fromhttp://cornerstorepos.com/downloads/hardware/<strong>POS</strong>-X%208200-USB%20Driver.exeStep 2: Open the file and click on 8200-USB Driver.17 1-866-468-5767 or 201-928-0222 <strong>In</strong>ternational <strong>Point</strong> <strong>of</strong> Sale
<strong>In</strong>ternational <strong>Point</strong> <strong>of</strong> Sale: <strong>Corner</strong><strong>Store</strong> <strong>POS</strong>Step 3: Click NextStep 4: Click Finish18 1-866-468-5767 or 201-928-0222 <strong>In</strong>ternational <strong>Point</strong> <strong>of</strong> Sale
<strong>In</strong>ternational <strong>Point</strong> <strong>of</strong> Sale: <strong>Corner</strong><strong>Store</strong> <strong>POS</strong>Step 5: Click On the Windows Start Button, then right click My Computer, and click Manage.Step 6: Click on Device Manager, then click on Ports, look <strong>for</strong> Prolific USB-To-Serial-Port and notice thenumber next to the COM. Take note <strong>of</strong> that number.Step 7: Download the files fromhttp://cornerstorepos.com/downloads/hardware/<strong>POS</strong>-XP-8200.zipOpen up the folder <strong>POS</strong>-X PD and click on VFD Setup.19 1-866-468-5767 or 201-928-0222 <strong>In</strong>ternational <strong>Point</strong> <strong>of</strong> Sale
<strong>In</strong>ternational <strong>Point</strong> <strong>of</strong> Sale: <strong>Corner</strong><strong>Store</strong> <strong>POS</strong>Step 8: Under Com Port Select, choose the COM port that you noted earlier. Under Command Modechoose CD5220. Under Passthru Mode, choose with ESC/<strong>POS</strong> command.Step 9: Once that is all done press download setting to VFD. Turn <strong>of</strong>f and turn on the pole display. ClickOK.Step 10: Open up <strong>Corner</strong><strong>Store</strong> and go to Setup-> Hardware Maintenance and select Pole Display20 1-866-468-5767 or 201-928-0222 <strong>In</strong>ternational <strong>Point</strong> <strong>of</strong> Sale
<strong>In</strong>ternational <strong>Point</strong> <strong>of</strong> Sale: <strong>Corner</strong><strong>Store</strong> <strong>POS</strong>Step 11: Check PartnerTech (CD7220) and select the COM port that you noted earlier.You have now installed the drivers <strong>for</strong> the Pole and set it up with <strong>Corner</strong> <strong>Store</strong>. You are now ready touse the <strong>POS</strong>-X <strong>All</strong>-<strong>In</strong>-<strong>One</strong> system.21 1-866-468-5767 or 201-928-0222 <strong>In</strong>ternational <strong>Point</strong> <strong>of</strong> Sale