INSTRUCTION MANUAL Super compact 5 Watt 80 Channel ... - GME
INSTRUCTION MANUAL Super compact 5 Watt 80 Channel ... - GME
INSTRUCTION MANUAL Super compact 5 Watt 80 Channel ... - GME
- No tags were found...
Create successful ePaper yourself
Turn your PDF publications into a flip-book with our unique Google optimized e-Paper software.
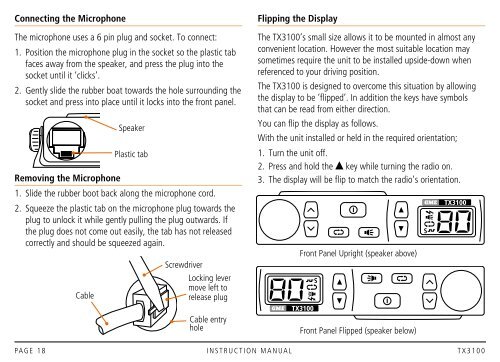
Connecting the MicrophoneThe microphone uses a 6 pin plug and socket. To connect:1. Position the microphone plug in the socket so the plastic tabfaces away from the speaker, and press the plug into thesocket until it ‘clicks’.2. Gently slide the rubber boat towards the hole surrounding thesocket and press into place until it locks into the front panel.Removing the Microphone1. Slide the rubber boot back along the microphone cord.2. Squeeze the plastic tab on the microphone plug towards theplug to unlock it while gently pulling the plug outwards. Ifthe plug does not come out easily, the tab has not releasedcorrectly and should be squeezed again.CableSpeakerPlastic tabScrewdriverLocking levermove left torelease plugCable entryholeFlipping the DisplayThe TX3100’s small size allows it to be mounted in almost anyconvenient location. However the most suitable location maysometimes require the unit to be installed upside-down whenreferenced to your driving position.The TX3100 is designed to overcome this situation by allowingthe display to be ‘flipped’. In addition the keys have symbolsthat can be read from either direction.You can flip the display as follows.With the unit installed or held in the required orientation;1. Turn the unit off.2. Press and hold the key while turning the radio on.3. The display will be flip to match the radio’s orientation.Front Panel Upright (speaker above)TX3100SFront Panel Flipped (speaker below)STX3100PA G E 1 8 i n s t r u c t i o n m a n ua l t X 3 1 0 0


