Montageanleitung Hydraulische Weiche bis 4,5 m3/h - Wolf
Montageanleitung Hydraulische Weiche bis 4,5 m3/h - Wolf
Montageanleitung Hydraulische Weiche bis 4,5 m3/h - Wolf
- No tags were found...

You also want an ePaper? Increase the reach of your titles
YUMPU automatically turns print PDFs into web optimized ePapers that Google loves.
D<strong>Montageanleitung</strong><strong>Hydraulische</strong> <strong>Weiche</strong> <strong>bis</strong> 4,5 m 3 /hSeite 2GBInstallation instructionsLow-loss header up to 4,5 m 3 /hPage 3FNotice de MontageBouteille de Mélange jusqu’à 4,5 m 3 /hPage 4BMontagehandleiding<strong>Hydraulische</strong> scheiding tot 4,5 m 3 /u.Pagina 5IIstruzioni di montaggioCompensatore idraulico fino a 4,5 m 3 /hPagina 6EInstrucciones de montajeAguja hidraúlica hasta 4,5 m 3 /hPagina 7<strong>Wolf</strong> GmbH · 84048 Mainburg · Postfach 1380 · Telefon 08751/74-0 · Telefax 08751/741600Art.-Nr. 30 43 665Änderungen vorbehalten02/03 TV D
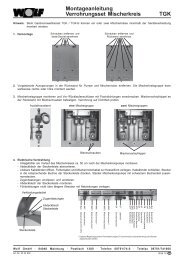
<strong>Montageanleitung</strong><strong>Hydraulische</strong> <strong>Weiche</strong> <strong>bis</strong> 4,5 m 3 /hDWTKTherme TGB-40/60VerteilerbalkenTauchhülse fürSammelfühler(in der Heizkreisseite)RückschlagventilRohranbindungLieferumfang:• 1 <strong>Hydraulische</strong> <strong>Weiche</strong> <strong>bis</strong> 4,5 m 3 /h• 1 Wandbefestigungskonsole• 2 Wärmedämmschalen aus EPP (steckbar)• 2 Schrauben SW 13• 2 Dübel d = 10 mm• 4 Flachdichtung 1 ½” (43,5 x 32,2)• SchalldämmgummisMontagehinweise:1. Schalldämmgummis an der Rückwand der Konsole aufkleben!2. Wandbefestigungskonsole mittels der 2 Dübel und Schrauben ander Wand befestigen.3. Isolierung mit den 2 Öffnungen an der Rückseite auf die Konsoleschieben.4. <strong>Weiche</strong> in die Konsole einhängen.Die Kammerhälfte mit der Tauchhülse muss an die Heizkreisseiteangeschlossen werden!5. Die Verrohrung im Kesselkreis ist bauseits zu erstellen.6. Im Kesselvorlauf ist ein Rückschlagventil 1” einzubauen, um denFörderstrom zu drosseln und das Durchströmen durch anderePumpen zu vermeiden.7. “Rohranbindung” zwischen <strong>Weiche</strong> und Verteilerbalken einbauen.8. Zwei beliebige Anschlüsse am Verteilerbalken auswählen. Vorlauf /Rücklauf beachten!9. Sammlerfühler in die Tauchhülse schieben und gegen Herausziehensichern.10. Anlage über den Rücklauf füllen und am Handentlüfter der <strong>Weiche</strong>,am Schnellentlüfter / Pumpe der Therme und Heizungsanlage gutentlüften.11. Anlage auf mindestens 70°C aufheizen und nochmals entlüften.Dazu sollte die Pumpe ausgeschaltet sein.2
Installation instructionsLow-loss header up to 4,5 m 3 /hDWTKApplianceTGB-40/60HeaderPocket for headersensor(in the heating circuit)Non-return valveConnecting tubesScope of supply:• 1 low-loss header up to 4,5 m 3 /h• 1 wall bracket• 2 insulation shells of EPP (plug-in type)• 2 screws SW 13• 2 dowels d = 10 mm• 4 flat seals 1 ½” (43,5 x 32,2)• sound attenuating patchesInstallation advice:1. Glue sound attenuating patches to the rear surface of the wallbracket!2. Fix wall bracket by means of the two dowels and screws.3. Slide insulation with the the two openings at the rear onto thebracket.4. Hang up low-loss header onto the bracket.The chamber with the sensor pocket has to be connected to theheating circuit !5. Pipework of boiler circuit has to be provided on site.6. The boiler flow has to be provided with a 1” non-return valve,to reduce the residual volume and to prevent water passagethrough other pumps.7. Fit „connecting tubes“ between low-loss header and header .8. Select appropriate connections on header!9. Slide header sensor into pocket and secure sensor against pullingout.10. Fill the installation via the return and vent thoroughly on themanual vent cock of the low-loss header, as well as on the ventcock/ pump of the appliance and the heating installation.11. Heat the installation up to minimum 70°C and vent again. Thepump should be switched off.3
Notice de MontageBouteille de Mélange jusqu’à 4,5 m 3 /hDWTKChaudière Murale TGB-40/60CollecteursDoigt de Gant poursonde collecteur(côté Chaudière)Clapet antiretourTuyau de Raccordementcomprenant:• 1 Bouteille de Mélange jusqu’à 4,5 m 3 /h• 1 Console Murale• 2 Coquilles isolantes EPP (enfichables)• 2 Vis SW 13• 2 Chevilles (diamètre = 10 mm)• 4 Joints plats 1 ½” (43,5 x 32,2)• Caoutchoucs d’insonorisationIndications de Montage:1. Fixer les caoutchoucs d’insonorisation au dos de la console murale!2. Fixer la console murale au moyen des 2 chevilles et des 2 vis.3. Enfoncer l’isolation avec les 2 ouvertures se trouvant à l’arrière dela console.4. Acrocher la bouteille de mélange à la console.La moitié de la bouteille de mélange sur laquelle se trouve le doigtde gant doit être raccordée au groupe de raccordement ou collecteursi plusieurs départs!5. Le raccordement doit s’effectuer aux emplacements de connexionprédéterminés.6. Un clapet anti-retour 1“ doit être installé sur le départchaudière, pour réduire la perte de puissance de la chaudière etpour éviter la circulation d’eau par d’autres pompes.7. Installer les tuyauteries entre la bouteille de mélange et le collecteur.8. Choisir 2 connexions quelconques au collecteur, en tenant comptedu départ et du retour!9. Mettre en place la sonde collecteur dans le doigt de gant ets’assurer de sa bonne fixation pour éviter un possible arrachement.10. Remplir l’installation par le retour et purger manuellement labouteille de mélange, la pompe de la chaudière murale etl’installation.11. Faire monter la température de l’installation à au moins 70°C etpurger de nouveau.La pompe doit être coupée.4
Montagehandleiding<strong>Hydraulische</strong> scheiding tot 4,5 m 3 /u.DWTKTherme TGB-40/60VerdeelbalkenDompelhuls voorcentrale voeler(in hetverwarmingscircuit)TerugslagklepBuisbevestigingLeveringsomvang:• 1 hydraulische scheiding tot 4,5 m 3 /u.• 1 wandconsole• 2 isolatiedekens uit EPP (insteekbaar)• 2 schroeven SW 13• 2 pluggen d = 10 mm• 4 vlakdichting 1 ½” (43,5 x 32,2)• geluiddempende rubbersMontagetips:1. Kleef de geluiddempende rubbers aan de achterkant van deconsole!2. Bevestig de wandconsole met de 2 pluggen en schroeven aan dewand.3. Schuif de isolatie met de 2 openingen aan de achterkant op deconsole.4. Steek de scheiding in de console.De kamerhelft met de dompelhuls moet op het verwarmingscircuitaangesloten worden!5. Het leidingwerk in het ketelcircuit moet op de bouwplaats uitgewerktworden.6. In de ketelvoorloop moet een terugslagklep 1” ingebouwdworden om het debiet te verminderen en de doorstroom doorandere pompen te vermijden.7. Bouw een “buisbevestiging” tussen de scheiding en verdeelbalk in.8. Kies twee vrije aansluitingen aan de verdeelbalk uit. Let op devoorloop / terugloop!9. Schuif de centrale voeler in de dompelhuls en beveilig hemtegen uittrekking.10. Vul de installatie via de terugloop en ontlucht goed aan dehandontluchter van de scheiding en de snelontluchter / pomp vande therme en verwarmingsinstallatie.11. Warm de installatie tot minstens 70° C op en ontlucht nogmaals.Schakel daarvoor de pomp uit.5
Istruzioni di montaggioCompensatore idraulico 4,5 m 3 /hDWTKCaldaia TGB-40/60Collettori circ. riscald.Pozzetto per sondacollettore (lato circ.riscaldamento)Valvola di ritegnotubi di allaciamentoComposto da:• 1 compensatore idraulico fino a 4,5 m 3 /h• 1 mensola per fissaggio a parete• 2 rivestimenti isolanti in EPP (ad innesto)• 2 viti SW 13• 2 tasselli d = 10 mm• 4 guarnizioni piatte 1 ½” (43,5 x 32,2)• isolanti acustici di gommaIstruzioni di montaggio:1. Incollare gli isolanti acustici di gomma sul retro della mensola!2. Fissare la mensola alla parete con i 2 tasselli e le viti.3. Applicare l‘isolamento con le 2 aperture sul retro della mensola.4. Appendere il compensatore alla mensola.La parte di camera che comprende il pozzetto deve essere collegataal circuito riscaldamento!5. Il collegamento del circuito caldaia deve essere previsto in fase diinstallazione.6. Nella mandata della caldaia deve essere montata una valvola diritegno 1“ per chiudere la corrente di mandata ed evitare il flussoattraverso altre pompe.7. Montare i „tubi di allacciamento“ tra compensatore e collettori.8. Scegliere due attacchi a piacere del circuito riscaldamento. Prestareattenzione alla mandata / ritorno!9. Innestare la sonda collettore nel pozzetto ed assicurarsi che nonfuoriesca.10. Riempire l‘impianto sopra la mandata e disaerare bene con ildisaeratore manuale con il disaeratore rapido / pompa della caldaiao dell‘impianto di riscaldamento.11. Portare la temperatura dell‘impianto fino a min. 70°C e disaerarenuovamente. Durante l‘operazione la pompa dovrebbe esseredisinserita.6
Instrucciones de montajeAguja hidraúlica hasta 4,5 m 3 /hDWTKCaldera mural TGB-40/60ColectorVaína para sondaimpulsión común(lado circuitos calef.)VálvulaantiretornoConexión tuberiaSuministro:• 1 Aguja hidraulica hasta 4,5 m 3 /h• 1 Consola para montaje en pared• 2 Aislamiento de EPP (montaje a presión)• 2 tornillos SW 13• 2 tacos d = 10 mm• 4 juntas planas 1 ½” (43,5 x 32,2)• Gomas aislantesIndicaciones de montaje:1. Pegar las gomas aislantes en la parte trasera de la consola!2. Fijar la consola con los dos tacos y los tornillos a la pared.3. Cortar el aislamiento por la perforación montar en la consola.4. Colgar la aguja en la consola.La mitad de la aguja con la vaína se ha de conectar al circuito decalefacción!5. La conexión al circuito de caldera se ha realizar por el instalador.6. En la impulsión de la caldera se ha de montar una válvula antiretornode 1” para estrangular el caudal y evitar la circulación por otrasbombas.7. Elegir dos conexiones del colector teniendo en cuenta impulsión yretorno lugo realizar la conexión!8. Enroscar la fijación del cable en la vaína , introducir la sonda deimpulsión común y fijar de forma que no se pueda extraer.9. Llenar la instalación y purgar de forma adecuada a traves depurgadores de instalación bomba , aguja y caldera .10. Elevar la temperatura de la instalación a un mínimo de 70ºC y luegovolver a purgar. La bomba debera permanecer desconectada.7