Montageanleitung Hydraulische Weiche bis 4,5 m3/h - Wolf
Montageanleitung Hydraulische Weiche bis 4,5 m3/h - Wolf
Montageanleitung Hydraulische Weiche bis 4,5 m3/h - Wolf
- No tags were found...

Create successful ePaper yourself
Turn your PDF publications into a flip-book with our unique Google optimized e-Paper software.
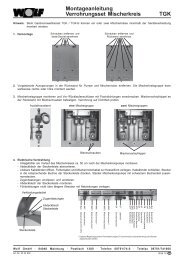
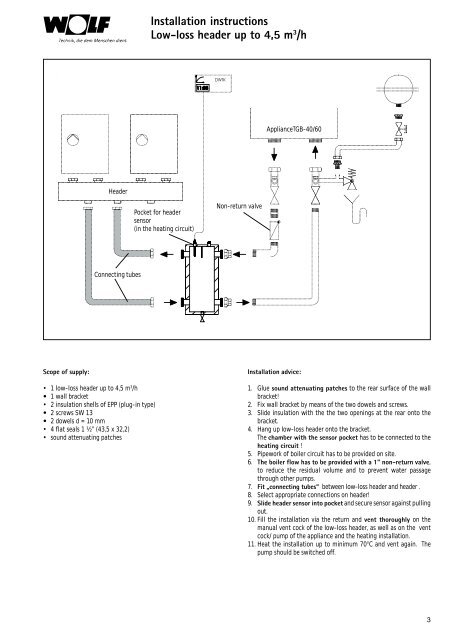
Installation instructionsLow-loss header up to 4,5 m 3 /hDWTKApplianceTGB-40/60HeaderPocket for headersensor(in the heating circuit)Non-return valveConnecting tubesScope of supply:• 1 low-loss header up to 4,5 m 3 /h• 1 wall bracket• 2 insulation shells of EPP (plug-in type)• 2 screws SW 13• 2 dowels d = 10 mm• 4 flat seals 1 ½” (43,5 x 32,2)• sound attenuating patchesInstallation advice:1. Glue sound attenuating patches to the rear surface of the wallbracket!2. Fix wall bracket by means of the two dowels and screws.3. Slide insulation with the the two openings at the rear onto thebracket.4. Hang up low-loss header onto the bracket.The chamber with the sensor pocket has to be connected to theheating circuit !5. Pipework of boiler circuit has to be provided on site.6. The boiler flow has to be provided with a 1” non-return valve,to reduce the residual volume and to prevent water passagethrough other pumps.7. Fit „connecting tubes“ between low-loss header and header .8. Select appropriate connections on header!9. Slide header sensor into pocket and secure sensor against pullingout.10. Fill the installation via the return and vent thoroughly on themanual vent cock of the low-loss header, as well as on the ventcock/ pump of the appliance and the heating installation.11. Heat the installation up to minimum 70°C and vent again. Thepump should be switched off.3