Rio3224-D/Rio1608-D Firmware Update Guide - Yamaha ...
Rio3224-D/Rio1608-D Firmware Update Guide - Yamaha ...
Rio3224-D/Rio1608-D Firmware Update Guide - Yamaha ...

Create successful ePaper yourself
Turn your PDF publications into a flip-book with our unique Google optimized e-Paper software.
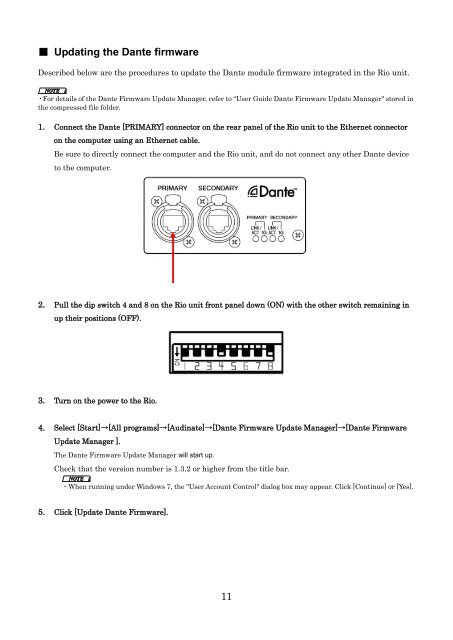
■ Updating the Dante firmwareDescribed below are the procedures to update the Dante module firmware integrated in the Rio unit.・For details of the Dante <strong>Firmware</strong> <strong>Update</strong> Manager, refer to “User <strong>Guide</strong> Dante <strong>Firmware</strong> <strong>Update</strong> Manager" stored inthe compressed file folder.1. Connect the Dante [PRIMARY] connector on the rear panel of the Rio unit to the Ethernet connectoron the computer using an Ethernet cable.Be sure to directly connect the computer and the Rio unit, and do not connect any other Dante deviceto the computer.2. Pull the dip switch 4 and 8 on the Rio unit front panel down (ON) with the other switch remaining inup their positions (OFF).3. Turn on the power to the Rio.4. Select [Start]→[All programs]→[Audinate]→[Dante <strong>Firmware</strong> <strong>Update</strong> Manager]→[Dante <strong>Firmware</strong><strong>Update</strong> Manager ].The Dante <strong>Firmware</strong> <strong>Update</strong> Manager will start up.Check that the version number is 1.3.2 or higher from the title bar.・When running under Windows 7, the "User Account Control" dialog box may appear. Click [Continue] or [Yes].5. Click [<strong>Update</strong> Dante <strong>Firmware</strong>].11