UART LCD Controller Module - Elechouse
UART LCD Controller Module - Elechouse
UART LCD Controller Module - Elechouse

You also want an ePaper? Increase the reach of your titles
YUMPU automatically turns print PDFs into web optimized ePapers that Google loves.
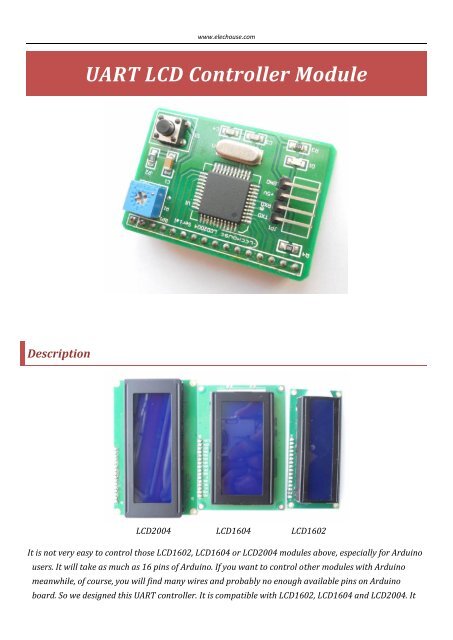
www.elechouse.com<strong>UART</strong> <strong>LCD</strong> <strong>Controller</strong> <strong>Module</strong>Description<strong>LCD</strong>2004 <strong>LCD</strong>1604 <strong>LCD</strong>1602It is not very easy to control those <strong>LCD</strong>1602, <strong>LCD</strong>1604 or <strong>LCD</strong>2004 modules above, especially for Arduinousers. It will take as much as 16 pins of Arduino. If you want to control other modules with Arduinomeanwhile, of course, you will find many wires and probably no enough available pins on Arduinoboard. So we designed this <strong>UART</strong> controller. It is compatible with <strong>LCD</strong>1602, <strong>LCD</strong>1604 and <strong>LCD</strong>2004. It
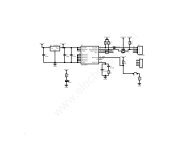
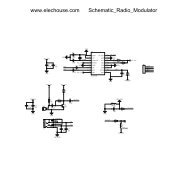
www.elechouse.comonly takes 4 pins on Arduino (in fact, only 2 data pins- Tx and Rx). You could control it via hardwareserial interface on Arduino, or any 2 data pins with SoftSerial library.Hardware connection VCC: +5VGND: GroundTXD: <strong>UART</strong> transmission pin, connect with host RX pin.RXD: <strong>UART</strong> reception pin, connect with host TX pin.Just plug in the <strong>LCD</strong> on the controller as below:Connecting with Arduino is pretty easy if you have Arduino Sensor Shield. If you don’t have sensorshield, connect it in the following way:<strong>Controller</strong> 5V --- Arduino 5V<strong>Controller</strong> GND --- Arduino GND<strong>Controller</strong> TXD --- Arduino RX (Pin 0)<strong>Controller</strong> RXD --- Arduino TX (Pin 1)2
www.elechouse.comCommandOperation is very easy. Just send command to <strong>LCD</strong> controller via <strong>UART</strong> interface.The basic command format is “$cmd [par1] [par2]\n”. It begins with the “$” character and ends with “\n”. For some commands,parameter is optional, and some commands have no parameter.Note1. There is no space between $ and cmd, so as to between [par2] and \n in the command line. But there is one space betweencmd and [par1] , [par1] and [par2].2. Command is compatible with both upper and lower case, or mix mode. For example, ‘cLeAr’ also works well as “CLEAR” or“clear”.3. This controller will change the line automatically. For controlling <strong>LCD</strong>1602, it could display 32 characters, with 16 in each of the2 lines. If you print “ABCDEFGHIJKLMNOPQRSTUVWXYZ0123456”, on <strong>LCD</strong> the first line will be “ABCDEFGHIJKLMNOP”, and thesecond line will be “QRSTUVWXYZ012345”. Note that the last “6”will be discarded because the <strong>LCD</strong> could only display 32characters.4. Screwing the changeable resistor on the module could change the brightness of the <strong>LCD</strong>. If your lcd displays nothing on it, youmight need to do this changing.3
www.elechouse.comThe following table will show you details about how to use those commands.Command Format Description Example for Arduino<strong>LCD</strong>1602<strong>LCD</strong>1604$lcd1602\n$lcd1604\nChoose <strong>LCD</strong> type to control:<strong>LCD</strong>1602<strong>LCD</strong>1604Serial.print("$<strong>LCD</strong>1602 \n");Serial.print("$<strong>LCD</strong>1604 \n");Serial.print("$<strong>LCD</strong>2004 \n");<strong>LCD</strong>2004 $lcd2004\n<strong>LCD</strong>2004This setting will be stored this module. Itmeans, if you use it to control <strong>LCD</strong>2004 andwon’t change the <strong>LCD</strong> type, you only need touse this command once.HOME $home\n The HOME command is to move the cursor to Serial.print("$HOME\n");the start position (0,0).GO $GO x y\n The “Go x y” command is to move the cursor to Serial.print("$GO 3 10\n");the coordinate (x,y) on the <strong>LCD</strong>.x : horizontal ordinate.y : vertical coordinate.x and y start from 0. If the <strong>LCD</strong> is <strong>LCD</strong>2004, ithas 4 lines and 20 characters per line. So therange of x is 0-4, y is 0-19. The start position is(0,0).CLEAR $clear\n The CLEAR command is to clear all theSerial.print("$CLEAR\n");characters on the <strong>LCD</strong>. The cursor will return tostart point “0, 0”.PRINT $print [para]\n This command is to print your characters from Serial.print("$PRINT Hello World!\n");the current cursor position. [Para] is thecharacters which will be displayed on <strong>LCD</strong>.CURSOR $cursor [status]\n This command to set the cursor on, off or blink.[status]: ON, OFF, or BLINKING//Show cursorSerial.print("$CURSOR ON\n");//Hide cursorSerial.print("$CURSOR OFF\n");//Set cursor blinkingSerial.print("$CURSOR BLINKING\n");CLOSE $close\n <strong>LCD</strong> display off Serial.print("$CLOSE \n");OPEN $open\n <strong>LCD</strong> display on Serial.print("$OPEN \n");4
www.elechouse.comExample for ArduinoThis demo simply shows how to display some characters with this <strong>LCD</strong> controller.<strong>LCD</strong>2004 here.We use to controlvoid setup(void){/* baud 9600 */Serial.begin(9600);/** set <strong>LCD</strong> type<strong>LCD</strong>1602, <strong>LCD</strong>1604 and <strong>LCD</strong>2004 are supported**/Serial.print("$<strong>LCD</strong>1604\n");delay(2000);/** clear screen */Serial.print("$clear\n");/** go home (top left corner)*/Serial.print("$Home\n");delay(2000);/** cursor on and blinking */Serial.print("$CURSOR BLINKING\n");delay(2000);Serial.print("$go 0 0\n");delay(500);Serial.print("$go 1 0\n");delay(500);Serial.print("$go 0 1\n");delay(500);Serial.print("$go 1 1\n");delay(500);Serial.print("$go 1 1\n");delay(500);5
www.elechouse.com/** cursor off */Serial.print("$cURSor OFf\n");delay(100);Serial.print("$go 0 0\n");}void loop(void){/** write character to <strong>LCD</strong> */}Serial.print("$prinT www.elechouse.com \n");//here $print is OK.Serial.print("$prinT <strong>LCD</strong> controller\n");delay(1000);Serial.print("$clear\n");delay(1000);Disclaimer and RevisionsThe information in this document may change without notice. Please visit www.elechouse.com or mail toservice@elechouse.com for updating.Revision History6