Danfoss Randall WP7BH & WP75-RF Programmable ... - BHL.co.uk
Danfoss Randall WP7BH & WP75-RF Programmable ... - BHL.co.uk
Danfoss Randall WP7BH & WP75-RF Programmable ... - BHL.co.uk

You also want an ePaper? Increase the reach of your titles
YUMPU automatically turns print PDFs into web optimized ePapers that Google loves.
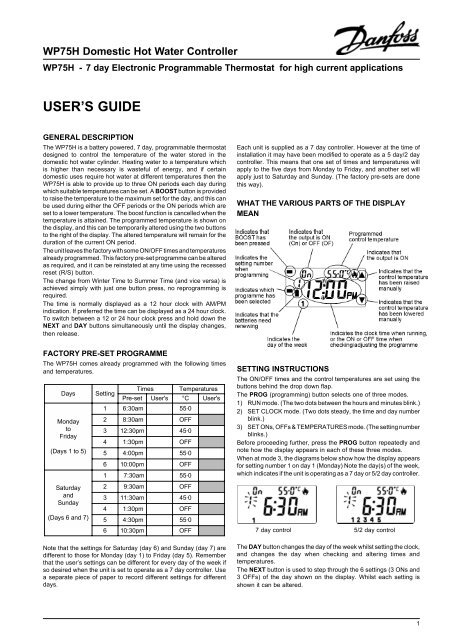
<strong>WP75</strong>H Domestic Hot Water Controller<strong>WP75</strong>H - 7 day Electronic <strong>Programmable</strong> Thermostat for high current applicationsUSER’S GUIDEGENERAL DESCRIPTIONThe <strong>WP75</strong>H is a battery powered, 7 day, programmable thermostatdesigned to <strong>co</strong>ntrol the temperature of the water stored in thedomestic hot water cylinder. Heating water to a temperature whichis higher than necessary is wasteful of energy, and if certaindomestic uses require hot water at different temperatures then the<strong>WP75</strong>H is able to provide up to three ON periods each day duringwhich suitable temperatures can be set. A BOOST button is providedto raise the temperature to the maximum set for the day, and this canbe used during either the OFF periods or the ON periods which areset to a lower temperature. The boost function is cancelled when thetemperature is attained. The programmed temperature is shown onthe display, and this can be temporarily altered using the two buttonsto the right of the display. The altered temperature will remain for theduration of the current ON period.The unit leaves the factory with some ON/OFF times and temperaturesalready programmed. This factory pre-set programme can be alteredas required, and it can be reinstated at any time using the recessedreset (R/S) button.The change from Winter Time to Summer Time (and vice versa) isachieved simply with just one button press, no reprogramming isrequired.The time is normally displayed as a 12 hour clock with AM/PMindication. If preferred the time can be displayed as a 24 hour clock.To switch between a 12 or 24 hour clock press and hold down theNEXT and DAY buttons simultaneously until the display changes,then release.Each unit is supplied as a 7 day <strong>co</strong>ntroller. However at the time ofinstallation it may have been modified to operate as a 5 day/2 day<strong>co</strong>ntroller. This means that one set of times and temperatures willapply to the five days from Monday to Friday, and another set willapply just to Saturday and Sunday. (The factory pre-sets are donethis way).WHAT THE VARIOUS PARTS OF THE DISPLAYMEANFACTORY PRE-SET PROGRAMMEThe <strong>WP75</strong>H <strong>co</strong>mes already programmed with the following timesand temperatures.DaysMondaytoFriday(Days 1 to 5)SaturdayandSunday(Days 6 and 7)SettingTimes TemperaturesPre-set User's °C User's1 6:30am 55·02 8:30am OFF3 12:30pm 45·04 1:30pm OFF5 4:00pm 55·06 10:00pm OFF1 7:30am 55·02 9:30am OFF3 11:30am 45·04 1:30pm OFF5 4:30pm 55·06 10:30pm OFFNote that the settings for Saturday (day 6) and Sunday (day 7) aredifferent to those for Monday (day 1) to Friday (day 5). Rememberthat the user’s settings can be different for every day of the week ifso desired when the unit is set to operate as a 7 day <strong>co</strong>ntroller. Usea separate piece of paper to re<strong>co</strong>rd different settings for differentdays.SETTING INSTRUCTIONSThe ON/OFF times and the <strong>co</strong>ntrol temperatures are set using thebuttons behind the drop down flap.The PROG (programming) button selects one of three modes.1) RUN mode. (The two dots between the hours and minutes blink.)2) SET CLOCK mode. (Two dots steady, the time and day numberblink.)3) SET ONs, OFFs & TEMPERATURES mode. (The setting numberblinks.)Before proceeding further, press the PROG button repeatedly andnote how the display appears in each of these three modes.When at mode 3, the diagrams below show how the display appearsfor setting number 1 on day 1 (Monday) Note the day(s) of the week,which indicates if the unit is operating as a 7 day or 5/2 day <strong>co</strong>ntroller.7 day <strong>co</strong>ntrol 5/2 day <strong>co</strong>ntrolThe DAY button changes the day of the week whilst setting the clock,and changes the day when checking and altering times andtemperatures.The NEXT button is used to step through the 6 settings (3 ONs and3 OFFs) of the day shown on the display. Whilst each setting isshown it can be altered.1
The + and - buttons are used to alter the time displayed. (The ▲ and▼ buttons to the right of the display are used to set the required watertemperature.)The COPY button is used during setting the ON/OFF times andtemperatures to repeat all of the previous day’s settings with just onebutton press.SETTING THE CLOCKPress and release the PROG button until the time and day numberblink. Then use the + and/or - buttons to set the clock to the <strong>co</strong>rrecttime. Hold down the + or - button to change the time quickly in 10minute steps, then press and release them to change the time by oneminute to set the clock accurately.Use the DAY button to select the day. (1 = Monday,2 = Tuesday, 6 = Saturday, 7 = Sunday.)Press PROG to start the clock and move on to the setting mode.ON/OFF TIMES AND TEMPERATURESSetting number 1 (the first ON) for the day to which the clock was setis displayed. The setting number blinks. It is re<strong>co</strong>mmended that theDAY button is used to change the day to 1 (Monday).A) Before making any changes use the NEXT button to stepthrough the six settings for the day. Note that settings 1, 3 and5 are ON times and have an associated <strong>co</strong>ntrol temperature.Settings 2, 4 and 6 are OFF times. Continue using the NEXTbutton to step through the settings, making any changesrequired to the ON and OFF times using the + and - buttons,and to the temperatures using the ▲ and ▼ buttons.NOTE that if an ON/OFF pair are set to the same timethen theON period is effectively cancelled.B) When all six settings for the day being programmed are asrequired press the DAY button to show the settings for thefollowing day.Repeat the actions in section A above for the new day shown, or, usethe COPY button to repeat all the previous day’s settings with justone button press.Repeat section B until each days’ settings are as required, thenpress PROG to return to RUN mode. The two dots now blinkindicating that the clock is running and that the unit is <strong>co</strong>ntrolling thehot water temperature as programmed.The flap can now be closed.USING THE <strong>WP75</strong>HTo the left of the display are two buttons. The lower button is usedto select how the unit will <strong>co</strong>ntrol the domestic hot water temperature.When this button is pressed a bar in the display moves to indicatewhich function is selected. The four available functions and theirmeanings are as follows:ON The water will be heated <strong>co</strong>ntinuously to the highesttemperature set for the day shown on the display.OFF The water will not be heated at all.(Unless the BOOST button is pressed, then the waterwill be heated up to the highest temperature set forthe day. When this temperature is achieved theoutput with revert to OFF.)AUTO The water will be heated to the temperaturesprogrammed during the ON periods.ALLDAY The water will be heated during the whole periodbetween settings 1 and 6, to the highest temperatureset for the day.The upper left hand button is the BOOST button. This can be usedat any time whilst the output is OFF to heat the water to the highestsetting for the day. It can also be used to raise the water temperatureduring an ON period where the <strong>co</strong>ntrol temperature is programmedat a lower value.To the right of the display are the temperature adjustment buttons.The ▲ button raises the temperature and the ▼ button lowers it.These can be used during a ON period to vary the temperature towhich the water will be heated, the new temperature lasting until thenext OFF time.HOT WATER AVAILABLE FUNCTIONA simple ‘hot water available’ function is included. To see anapproximate indication of how much hot water is currently storedpress the ▲ and ▼ buttons simultaneously.The number of horizontal bars displayed indicates approximatelyhow much hot water is available at the temperature shown.Cylinder more Cylinder between Cylinder lessthan 2/3rds full 1/3 and 2/3rds full than1/3 fullof hot water of hot water of hot waterWINTER TIME, SUMMER TIME CLOCKWhen the clock is changed in spring and autumn there is no need touse the PROG button to select set clock mode in order to change thetime as when setting the clock. Just press the + button in the springor the - button in the autumn to change the clock by one hour asappropriate. Once this has been done the first time the clock can onlybe changed in the opposite direction alternately. Take care to pressthe <strong>co</strong>rrect button the first time it is done. (Don’t forget - springforward - fall (autumn) back).BATTERY MAINTENANCEThe unit requires two AA size (LR6) alkaline dry cells to operate.When the voltage falls to close to the minimum level needed tomaintain operation a battery symbol blinks in the display.Blinking battery symbolThe batteries should be replaced within two weeks. Have thereplacement batteries ready. Remove the weak batteries and fit thenew batteries within one minute. If this is done then the unit willresume <strong>co</strong>ntrol with no loss of time or programme. If the batteries arenot replaced within two weeks of the symbol starting to blink the unitwill switch off and the display will be<strong>co</strong>me blank. When new batteriesare eventually fitted the clock time and day will have to be re-entered,however the user’s programme of ON/OFF times and temperatureswill still be available.It is re<strong>co</strong>mmended therefore that the batteries be renewed once ayear.2<strong>Danfoss</strong> can accept no responsibility for possible errors in catalogues, brochures and other printed material. <strong>Danfoss</strong> reserves the right to alter its products withoutnotice. This also applies to products already on order provided that such alterations can be made without subsequential changes being necessary in specificationsalready agreed.<strong>Danfoss</strong> <strong>Randall</strong> Ltd.Ampthill Road,Bedford, MK42 9ERTel: 01234 364621 Fax: 01234 219705Email: danfossrandall@danfoss.<strong>co</strong>mWebsite: www.danfoss-randall.<strong>co</strong>.<strong>uk</strong>Part No. 4458 Issue 4 08/99