Download Commander II Instruction Manual PDF file
Download Commander II Instruction Manual PDF file
Download Commander II Instruction Manual PDF file

Create successful ePaper yourself
Turn your PDF publications into a flip-book with our unique Google optimized e-Paper software.
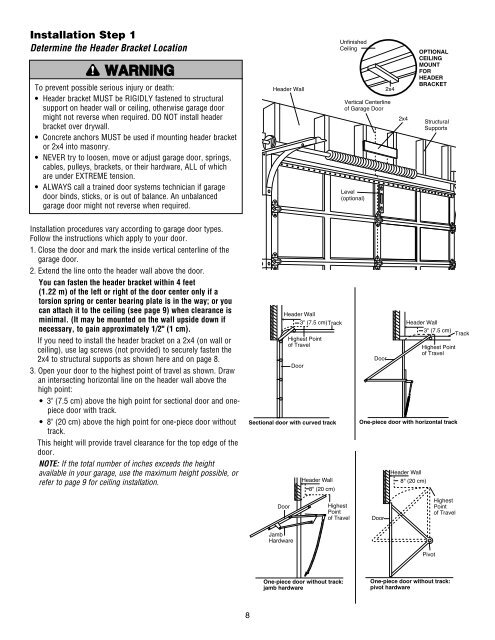
Installation Step 1Determine the Header Bracket LocationTo prevent possible serious injury or death:• Header bracket MUST be RIGIDLY fastened to structuralsupport on header wall or ceiling, otherwise garage doormight not reverse when required. DO NOT install headerbracket over drywall.• Concrete anchors MUST be used if mounting header bracketor 2x4 into masonry.• NEVER try to loosen, move or adjust garage door, springs,cables, pulleys, brackets, or their hardware, ALL of whichare under EXTREME tension.• ALWAYS call a trained door systems technician if garagedoor binds, sticks, or is out of balance. An unbalancedgarage door might not reverse when required.Header WallUnfinishedCeilingVertical Centerlineof Garage DoorLevel(optional)2x42x4OPTIONALCEILINGMOUNTFORHEADERBRACKETStructuralSupportsInstallation procedures vary according to garage door types.Follow the instructions which apply to your door.1. Close the door and mark the inside vertical centerline of thegarage door.2. Extend the line onto the header wall above the door.You can fasten the header bracket within 4 feet(1.22 m) of the left or right of the door center only if atorsion spring or center bearing plate is in the way; or youcan attach it to the ceiling (see page 9) when clearance isminimal. (It may be mounted on the wall upside down ifnecessary, to gain approximately 1/2" (1 cm).If you need to install the header bracket on a 2x4 (on wall orceiling), use lag screws (not provided) to securely fasten the2x4 to structural supports as shown here and on page 8.3. Open your door to the highest point of travel as shown. Drawan inter secting horizontal line on the header wall above thehigh point:• 3" (7.5 cm) above the high point for sectional door and onepiecedoor with track.• 8" (20 cm) above the high point for one-piece door withouttrack.This height will provide travel clearance for the top edge of thedoor.NOTE: If the total number of inches exceeds the heightavailable in your garage, use the maximum height possible, orrefer to page 9 for ceiling installation.Header Wall3" (7.5 cm)TrackHighest Pointof TravelDoorSectional door with curved trackHeader Wall8" (20 cm)DoorHeader Wall3" (7.5 cm)Highest Pointof TravelOne-piece door with horizontal trackHeader Wall8" (20 cm)TrackDoorHighestPointof TravelDoorHighestPointof TravelJambHardwarePivotOne-piece door without track:jamb hardwareOne-piece door without track:pivot hardware8