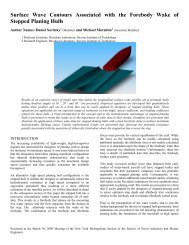
3 Bow Bimini Boat Top Instructions - Boat Design Net
3 Bow Bimini Boat Top Instructions - Boat Design Net
3 Bow Bimini Boat Top Instructions - Boat Design Net

You also want an ePaper? Increase the reach of your titles
YUMPU automatically turns print PDFs into web optimized ePapers that Google loves.
make sure that the shorter bows nest properlyagainst the long one. This usually meanscutting a similar length from their legs.Changes in width are a bit more complicated.The crowned center bows on all legsshould be cut an appropriate amount fromeach end in order to keep the crown properlycentered. Follow the procedure below todetermine the amount to cut:1. Put the assembled bows flat on the floor andmeasure across their (uncut) base.2. Add 6 inches to the desired width of the finishedbimini bows if they are aluminum. Add 2 inches tothis width if the bows are stainless. This meansthat the bows will be compressed (more or lessdepending upon whether aluminum or stainless isused). This compression will keep the framesfrom rattling in their mounts when under way withpower.3. Subtract the desired width (plus the 6 inch or 2inch compression allowance above) from theactual width measured in step one.4. Divide this result by 2 and cut that length fromeach end of the "crowned" tubing. When youreassemble the bows, they should measureeither 6 or 2 inches wider than the desired widthat the bottom of the legs.When your frame is the desired widthcheck to make sure that the center piececurve is "up". With each bow lying on a flatsurface, lock the assemblies in place.If the tubing is aluminum, self tappingscrews are normal for this task. Use a 5/32nds inch drill bit to make pilot holes oneinch or so from the joints where the framepieces meet. Drill through both the framepiece and the spline tubing. Drill up from thebottom of the frame so that, when the #10self-tapping screw is inserted, its head willnot abrade the fabric cover on the top surfaceof the frame (Figure 5). A center punchcan be used to create a "dimple" to makedrilling more accurate.With stainless bows, self taping screwssometimes break. We recommend that a#21 drill bit be used to open the hole andthat the tubing be tapped. Use a 10-32 tapand, of course, a 10-32 stainless machinescrew.Install the fittings on the legs and assembleyour frame to the mounting plates onthe wooden frame. Use tape (filament strappingtape works very well) to support theframe at the proper spread and height (Figure4). Tape the frame carefully so it is quiteridged. Double check your measurementsmaking sure the fore and aft bow are at theappropriate height and that the center bow isslightly higher (3" or so) than the other two.When the frame is installed, you maywant to use blue Loctite ® to keep the screwsfrom working loose.Making a PatternWith your frame securely anchored andtaped, the fabric cover can be patterned. Welike to make patterns with basting tape and alight weight clear plastic material. Begin byapplying filament tape to the surfaces of thebows that define the flat planes of the fabriccover (this means the top of the middle bowand the surfaces opposite the legs on the foreand aft bows). Now put basting tape on top ofthe filament tape. DO NOT put the bastingtape directly on the frame since it is very hardto remove — the filament tape, on the otherhand, can be peeled right away removing thebasting tape at the same time.Put a mark at the center of each bow.Now drape your pattern material over the4