3 Bow Bimini Boat Top Instructions - Boat Design Net
3 Bow Bimini Boat Top Instructions - Boat Design Net
3 Bow Bimini Boat Top Instructions - Boat Design Net

You also want an ePaper? Increase the reach of your titles
YUMPU automatically turns print PDFs into web optimized ePapers that Google loves.
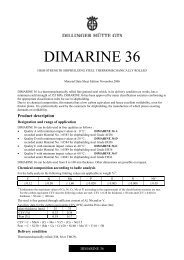
aft endFigure 8Cut lines for front and rear are dashed.Cut lines for sides are solid.fore end½" seamallowanceforward patternaft patterncenterlinefore endFigure 9<strong>Bimini</strong> Panels marked onfabric blankcenterlineaft end46”forward patternaft patternunused fabricfor sleevesto the edge. Also place 6 match up marks onboth the bimini panels and the sleeves—3 toeach side of the center line (see Figure 10).Space these marks at equal intervals from thecenter line so they will be useful even thoughsome sleeve layers will be turned end for endbefore attachment. These will insure that thesleeves can be sewn in place accurately alongtheir length.Create the forward sleeve in the samemanner but use the forward end of this panelinstead of the aft end to pattern this sleeve.Cut out the sleeves with a hotknife orscissors. Mark the sleeves “inside” and “fore” or“aft” to guide work in subsequent steps.Webbing straps will be used to pull forwardand aft on the frame. These straps are runaround the tubing usually just inside the curveson the bows. Mark 2 1/2-inch semicircles on thesleeves at each of these strap locations. Cutout these semicircles in the sleeves and covertheir raw edges with binding tape to preventraveling.“Tails” are placed at the forward and aftends of the cover. These are narrow strips offabric that serve two functions. First, they tendto keep rain or spray from wicking back alongthe underside of the top to drip on those undercreatedabove and sew it to the appropriateareas. A simple overlap of 1/2-inch with two rowsof stitching is all that is needed to join thesepieces since they will be on the sides of thebimini. Use the longest straight stitch yourmachine will make since that reduces the naturaltendency for the acrylic material to pucker as it issewn.Next cut the sleeves that are used tosecure the cover to the frame. There will betwo long sleeves along the forward and aftedges of the top. These sleeves should be cutfrom the unused portion of the cloth blank.They will be 5 inches wide and reproduce thecurves found along the aft end of the aftbimini panel and the forward end of the forwardbimini panel.Place the aft end of the aft bimini panelover one of the long edges of the unusedfabric so that its curve can be marked on thefabric and then move it up 5 inches and markthe curve onto the fabric again as shown inFigure 10. Now mark the corners of the sleevesso they will be about 1 1/2-inches short of theedges of the bimini panels on each side. Thismakes binding the outer edge of the biminieasier and it tends to give the finished side ofthe bimini a less constrained appearance thanwould be the case if the sleeves ran all the way6