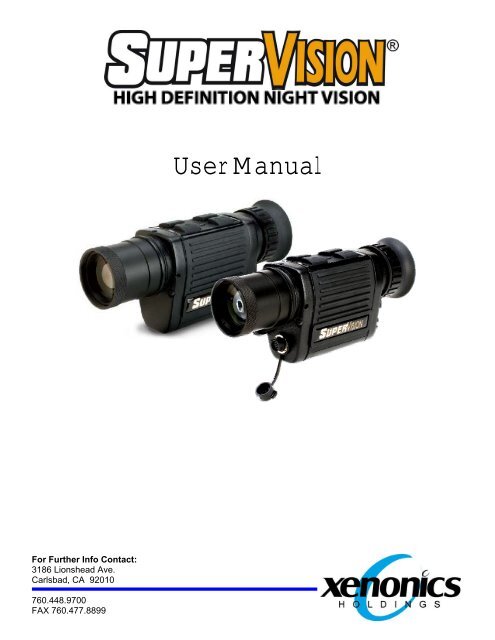
User Manual
User Manual
User Manual

You also want an ePaper? Increase the reach of your titles
YUMPU automatically turns print PDFs into web optimized ePapers that Google loves.
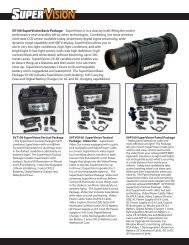
SuperVision High Definition Night Vision <strong>User</strong> <strong>Manual</strong>Important SafeguardsSOME DO’S AND DON’TS ON THE SAFE USE OF EQUIPMENT Your SuperVision has beendesigned and manufactured to meet international safety standards but, like any electrical equipment,care must be taken if you are to obtain the best results and safety is to be assured.DODORisk of electric shock - Do not openTo reduce the risk of electric shock, do not modify your SuperVision or open the case. Thereare no user-serviceable parts inside. Opening the case voids the warranty. Have yourSuperVision repaired by qualified service personnel only.read the operating instructions before you attempt to use the equipment.ensure that all electrical connections (including the mains plug, extension leads andinterconnections between pieces of equipment) are properly made and in accordance withthe manufacturer’s instructions. Switch off and withdraw the mains plug when making orchanging connections.DO consult your dealer if you are ever in doubt about the installation, operation or safety of yourequipment.DON’T continue to operate the equipment if you are in any doubt about it working normally, or if it isdamaged in any way — switch off, withdraw the mains plug and consult your dealer.DON’T remove any fixed cover as this may expose dangerous voltages.DON’T leave equipment switched on when it is unattended unless it is specifically stated that it isdesigned for unattended operation or has a standby mode. Switch off using the switch on theequipment and make sure that your family knows how to do this. Special arrangements mayneed to be made for infirm or handicapped people.DON’T do not remove the front lens or eye-piece, or touch the optical surfaces. These componentsare precision optics and can be damaged.DON’T do not drop your SuperVision.DON’T try to operate your SuperVision while driving a vehicle.DON’T allow SuperVision to be subjected to excessive heat. Overheating will cause damage andshorten the life of the equipment.DON’T allow SuperVision to be exposed to rain or moisture.Warnings and precautions• Disconnect your SuperVision and remove the batteries when not used for a long period oftime.• Do not use any other batteries than ones specified for your SuperVision.• Turn Off your SuperVision and remove the batteries if your SuperVision acts in any wayabnormal while following normal operating instructions.• Do not place your SuperVision on an unstable cart, stand, or table. Your SuperVision may fall,causing serious damage.20-50-11-1001 REV B page 2
SuperVision High Definition Night Vision <strong>User</strong> <strong>Manual</strong>PrefaceSuperVision High Definition Night Vision -- a Class by ItselfUnlike most post Desert Storm Gen I, Gen II or Gen III image intensified night vision devices thathave been adapted for law enforcement, SuperVision has been built from the ground up, specificallydesigned for military and law enforcement and their special requirements in an increasinglydangerous urban environment. While there are plenty of night vision and thermal imaging productson the market, only SuperVision is in a class by itself.The Tactical EdgeSuperVision is built on an entirely new, patented technology. Xenonics’ engineers have taken solidstate,wide-dynamic range imaging to the next level of sophistication with the application of digitalsignal processing (DSP) and image enhancement software that transform otherwise indistinguishableforms into sharp identifiable objects. SuperVision’s advanced technology gives night time operatorsthe tactical edge they need to identify people and objects with confidence.Uses and ApplicationsSuperVision is designed to give soldiers, officers and agents the edge at night, no matter what thenight may bring. From situational awareness, gathering intelligence to recording evidence, see thedetails you need in the dark or shadows, from a safe distance.Key Features• Low-Light CCD Sensor• 2-8x Zoom Capability• Digital Signal Processing• HDTV Display• Rechargeable Li-ion Battery• Run Time: 2 hours• Smart Digital Battery Charger• Lightweight, Ruggedized• Patented TechnologySystem SpecificationsSensor 1/2" CCD mono Power SupplyNear Eye Display 0.55” LCOS mono Battery type Li-Ion 18650CCD Total Pixels 811(H) X 508(V) Operating Voltage 2.8 to 4.2VDCDisplay Total Pixels 1280 (H) x 720 Battery life 120 minutesAspect Ratio 16:9 Operating temperature -20 to 60CResolution ~ 380K pixels Immersion 1 meterFrame Rate 1/60 - 1 MechanicalMagnification 2X fixed Mounting 1/4" X 20Digital Zoom 4X Length 6.8" (173.9 mm)Focus Range 6" to infinity Height 3.2" (80.5 mm)Frame integration yes Width 2.0" (51.5 mm)Gain adjustment yes Weight 20 oz (567 g)Minimum Illumination 0.00000003 luxLight Sensitivty 300 to 1050 nm20-50-11-1001 REV B page 3
SuperVision High Definition Night Vision <strong>User</strong> <strong>Manual</strong>Introducing Your SuperVisionPackage ContentsYour SuperVision package includes the following:1) SuperVision High Definition Night VIsion2) Rechargeable Battery (inside SuperVision)3) Digital Battery ChargerYour specific package will include additional companion accessories.About Your SuperVisionThe key components of your SuperVision are shown belowEye PieceKeypad35mm LensBatteryCapZoom ModeIn On/Off +ZoomOutMode-20-50-11-1001 REV B page 4
SuperVision High Definition Night Vision <strong>User</strong> <strong>Manual</strong>Getting StartedStep 1: Check supplied itemsStep 2: Charge the battery:1 Remove the battery compartment cover.2 Remove the battery.3 Replace the battery compartment cover and screw in until hand tight.4 Fully charge battery in supplied charger.Step 3: Install the battery:To supply power to your SuperVision, install the rechargeable battery provided.1 Remove the battery compartment cover.2 Insert the fully charged battery with the (+) side (with small metallic button) facing inward.3 Replace the battery compartment cover and screw in until hand tight.Warning Never use different types of batteries together (alkaline and Ni-MH) or mix old and newbatteries.Step 4: Turn Your Supervision ON:The ON/OFF Button is located in the center of the keypad.To turn ON: Press and release ON/OFF button -- your SuperVision’s display screen will becomevisible.Once your SuperVision is turned on, it will go through an initialization sequence for several seconds.During this initialization sequence, you will see “SuperVision” and finally “Configuration ##” on yourSuperVision’s On-Screen Display (OSD). After this short time and once the OSD is clear, yourSuperVision is ready for use.To turn OFF: Press and Release ON/OFF button to turn your SuperVision off.Step 5: Adjust SuperVision:SuperVision is factory adjusted for use.SuperVision’s High Definition display and precision optics are a miniature rear projection television.The position of the eye-piece has been precisely set. Xenonics recommends that you DO NOTadjust the eye piece.If the image viewed appears out of focus, adjust the front lens by turning it counter- or clockwise, untilthe image appears in sharp focus.When you start SuperVision for the first time, the unit will start in “normal” mode. You can adjust themodes to “lighter” for lighter conditions, or “darker” for darker conditions. Cycle through the modes indifferent conditions to get a feel for the differences, and what best suits your needs.20-50-11-1001 REV B page 5
SuperVision High Definition Night Vision <strong>User</strong> <strong>Manual</strong>Getting Started – Video Out Model OnlyStep 1: Using the Video Out Function:1 Connect the supplied Video/Power Adapter to the video out connector on the front of yourSuperVision. Carefully rotate the keyed connector until it mates with the unit, then slide in. Oncefully engaged, the connector backshell will lock (you will hear and feel it “click”) and secure theadapter to your SuperVision.Warning DO NOT FORCE CONNECTOR. FORCING CONNECTOR CAN RENDER ITINOPERABLE.Caution Turn the backshell counter-clockwise to unlock the connector, to remove the Video/PowerAdapter. DO NOT ATTEMPT TO PULL IT DIRECTLY FROM THE UNIT.2 Connect a video cable (user supplied) to the video side of the Video/Power Adapter. The videoside is terminated with a female 3.5 mm mono micro-jack. Your (user supplied) video cableattaches to your recording or viewing device. This cable must be terminated on one side with amale 3.5 mm mono micro-jack connector and on the opposite side, the mating connector for yourdevice.Step 2: Using External Power for Extended Runtime:To supply external power to your SuperVision for extended viewing, use the supplied DC or ACPower Supply. The DC or AC Power Supply recharges SuperVision’s internal battery while the unit isoperated (like a cell phone plugged in to your car).1 Connect either the DC or AC Power Supply to the power side of the Video/Power Adapter.2 Plug the DC or AC Power Supply in external power.Caution SuperVision’s internal battery must be installed and charged to use either the DC or ACPower SupplyStep 3: Power up the System:1 Turn on your recording or viewing device.2 Turn on your SuperVision.3 If all connections have been made properly, your external device will be receiving the video signalfrom your SuperVision. Zoom and mode controls operate the same as the standard SuperVision(refer to Quick Start Guide for more information).4 If not, recheck all connections to make sure they have been made properly. If the problempersists, call Xenonics Technical Support.20-50-11-1001 REV B page 6
SuperVision High Definition Night Vision <strong>User</strong> <strong>Manual</strong>Using Your SuperVisonOptimizing for Different Lighting ConditionsMode+Mode-MODE Functions are located on the front of the control deck as shown:Left Button: Mode + (increasingly darker conditions)Right Button: Mode - (increasingly lighter conditions)Your SuperVision provides the capability to optimize performance for varying ambient lightingconditions from overcast night, starlight, moonlight, urban night and dusk, to daylight.To utilize MODE: Press and release Mode + or Mode - to increase or decrease MODE for optimalimage clarity. Press and release Mode + or Mode - again, until optimal clarity is achieved.When you turn your SuperVision off, your SuperVision will default to the last MODE setting once it isturned back on.MODE setting (normal, lighter, darker) will be displayed on the OSD for a short time at startup, orwhen MODE is changed.The MODE feature optimizes the following parameters for best viewing in varying lighting conditions:GainSensitivityAGC OffsetPriorityGammaELC LevelDisplay BrightnessDisplay Contrast20-50-11-1001 REV B page 7
SuperVision High Definition Night Vision <strong>User</strong> <strong>Manual</strong>Using Your SuperVisonUsing the ZoomZoomInZoomOutZOOM Functions are located on the rear of the control deck. With your Supervision facing forward(display to the rear),Left Button: Zoom + (increases size of viewed image)Right Button: Zoom - (decreases size of viewed image)Your SuperVision provides the capability to zoom or magnify viewed images from a minimum of twiceyour naked eye (2x) continuously up to eight times (8X) your naked eye.To utilize ZOOM: Press and hold Zoom + or Zoom - to increase or decrease the size of a viewedimage.When you turn your SuperVision off, ZOOM will revert to its minimum (2X) setting.There is no ZOOM indication on the OSD.20-50-11-1001 REV B page 8
SuperVision High Definition Night Vision <strong>User</strong> <strong>Manual</strong>Using Your SuperVisonUsing Video Out (Video Out Model Only)If your SuperVision is equipped with video-out, you will be able to hook the NTSC video output fromthe system to an external device for recording and/or viewing. In addition, you Video Out packagecomes equipped with both a DC and AC Power Supply, that enables you to operate SuperVision forextended periods.Step 1: Using the Video Out Function:1 Connect the supplied Video/Power Adapter to the video out connector on the front of yourSuperVision. Carefully rotate the keyed connector until it mates with the unit, then slide in. Oncefully engaged, the connector backshell will lock (you will hear and feel it “click”) and secure theadapter to your SuperVision.Warning DO NOT FORCE CONNECTOR. FORCING CONNECTOR CAN RENDER ITINOPERABLE.Caution Turn the backshell counter-clockwise to unlock the connector, to remove the Video/PowerAdapter. DO NOT ATTEMPT TO PULL IT DIRECTLY FROM THE UNIT.2 Connect a video cable (user supplied) to the video side of the Video/Power Adapter. The videoside is terminated with a female 3.5 mm mono micro-jack. Your (user supplied) video cableattaches to your recording or viewing device. This cable must be terminated on one side with amale 3.5 mm mono micro-jack connector and on the opposite side, the mating connector for yourdevice.Step 2: Using External Power for Extended Runtime:To supply external power to your SuperVision for extended viewing, use the supplied DC or ACPower Supply. The DC or AC Power Supply recharges SuperVision’s internal battery while the unit isoperated (like a cell phone plugged in to your car).1 Connect either the DC or AC Power Supply to the power side of the Video/Power Adapter.2 Plug the DC or AC Power Supply in external power.Caution SuperVision’s internal battery must be installed and charged to use either the DC or ACPower SupplyStep 3: Power up the System:1 Turn on your recording or viewing device.2 Turn on your SuperVision.3 If all connections have been made properly, your external device will be receiving the video signalfrom your SuperVision. Zoom and mode controls operate the same as the standard SuperVision(refer to Quick Start Guide for more information).4 If not, recheck all connections to make sure they have been made properly. If the problempersists, call Xenonics Technical Support.20-50-11-1001 REV B page 9
SuperVision High Definition Night Vision <strong>User</strong> <strong>Manual</strong>Using Your SuperVisonYour On-Screen DisplayYour SuperVision is equipped with an On-Screen Display that provides you with important informationon the use of your system.INITIAIZATION:MODE:ZOOM:Once your SuperVision is turned on, it will go through an initialization sequencefor several seconds. During this initialization sequence, you will see“SuperVision” followed by “Configuration ##” on your SuperVision’s On-ScreenDisplay (OSD). After this short time and once the OSD is clear, yourSuperVision is ready for use.MODE setting (Normal, Lighter, Darker) will be displayed on the OSD, for a shorttime at startup and when MODE is changed.There is no ZOOM indication on the OSD.20-50-11-1001 REV B page 10
SuperVision High Definition Night Vision <strong>User</strong> <strong>Manual</strong>Using Your SuperVisonCharging Your BatteryYour SuperVision provides two hours of operation on a fully charged battery.When your battery is fully discharged, your SuperVision is automatically turn off.When turned off, your SuperVison will save all settings.Charging your SuperVision Battery:1 Plug supplied charger into AC outlet or 12V DC power.2 Insert battery with “+” side facing the “+” side of charger.3 Charging Indicator LED will turn RED indicating battery is below a fully charged condition.4 Allow battery to fully charge (~5 hours). Charging Indicator LED will turn green indicating batteryis now in a fully charged condition..20-50-11-1001 REV B page 11
SuperVision High Definition Night Vision <strong>User</strong> <strong>Manual</strong>Using Your SuperVisonUsing Tactical IR (Accessory)Your SuperVision may be equipped with (or purchased separately) the Tactical IR. The Tactical IR isa precision LED illuminator that projects infrared illumination that is undetectable with the naked eye(880nm) on to your observation area. SuperVision is extremely sensitive to infrared illumination, so invery dark conditions, you will be able to see clear as day.Turning the Unit On & Off:ON Turn tail switch in a clockwise direction. (Note: Variable control provides 3 power levels foroptimum viewing at close, medium and long range)• 1 Click = Low• 2 Clicks = Medium• 3 Clicks = HighOFF Turn tail switch in a counter-clockwise direction until switch will no longer rotate.IR Beam Spread: The Tactical IR infrared beam is adjustable from flood to spot, allowing you toproject the right amount of light on to the objects you are observing, from close in to far away.Spot – Slide head outward to narrow the beam for longest range. For best results, adjust beamspread to fill the observation area.Flood – Side head inward to widen the beam.Battery Operation: The SuperVision Tactical IR comes equipped with one CR123 battery that willgive you up to 8 hours of operation.Replacing Battery1. Remove tail cap.2. Remove old CR123 battery.3. Slide new CR123 battery in, with (+) side facing outward.20-50-11-1001 REV B page 12
SuperVision High Definition Night Vision <strong>User</strong> <strong>Manual</strong>Using Your SuperVisonTroubleshootingYour SuperVision is equipped with an On-Screen Display that provides you with important informationon the use of your system.20-50-11-1001 REV B page 13
SuperVision High Definition Night Vision <strong>User</strong> <strong>Manual</strong>Using Your SuperVisonWarrantyXenonics warrants its products to be free from defects in workmanship and materials for a period of 1 year,parts and labor. The warranty does not apply to items exposed to abuse, accident, misapplication, neglect,alteration, misuse, or repair by anyone other than Xenonics or its designated representatives. Within thewarranty period, Xenonics will, at its option, repair or replace, without charge, any product proved defective inmaterial or workmanship and returned to Xenonics in accordance with Xenonics return policies. All warrantyrepairs/replacements are warranted for 90 days or the original warranty period (whichever is longer).Getting HelpThe Technical Support Department is available to assist you during normal business hours (0700 to 1600Pacific Time) with technical help and return material authorizations. If you call, please have any affected partsand accessories nearby. Xenonics Technical Support: (888) 595-4004 (USA and Canada), or (760) 477-8900(Commercial)The Customer Service Department is available to assist you during normal business hours (0700 to 1600Pacific Time) for questions that do not require technical assistance or for information regarding pricing,ordering and/or delivery. Xenonics Customer Service: (888) 603-4004 (USA and Canada), or 760-448-9700(Commercial)Return ProcedureWhat You Need to DoWhen you need to return an item to Xenonics, whether in or out of warranty, for repair or replacement, pleasefollow these steps:1. Contact Technical Support at (888) 595-4004, or 760-477-8900 to get a Return Material Authorization(RMA) number (no work will be done without one). The representative will ask you for the following:• Product Name:• Product Serial Number:• Date of shipment, your purchase order number, or the Xenonics invoice number• Details of the problem• Your return address2. Prepare the item(s) for shipping:• Use the original shipping container to reduce the risk of damage in shipment. (Xenonics will return allwarranted repaired/replaced items using your packaging.)• Ship repairs/replacements (in or out of warranty) prepaid to:Xenonics Holdings, Inc.3186 Lionshead Ave.Carlsbad, CA 92010 USAWhat Xenonics Will Do1. Repair or replace and ship most warranted parts and accessories no later than 30 days after they arereceived.2. Inspect and test out-of-warranty repairs and give you a firm price for the repair and return of the item(s).20-50-11-1001 REV B page 14
©2009-2012 Xenonics Holdings, Inc. All Rights Reserved