Van de Graaff Generator with Discharge Electrode (115 V, 50/60 Hz)
Van de Graaff Generator with Discharge Electrode (115 V, 50/60 Hz)
Van de Graaff Generator with Discharge Electrode (115 V, 50/60 Hz)

You also want an ePaper? Increase the reach of your titles
YUMPU automatically turns print PDFs into web optimized ePapers that Google loves.
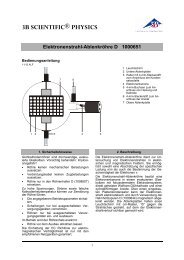
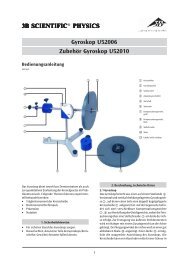
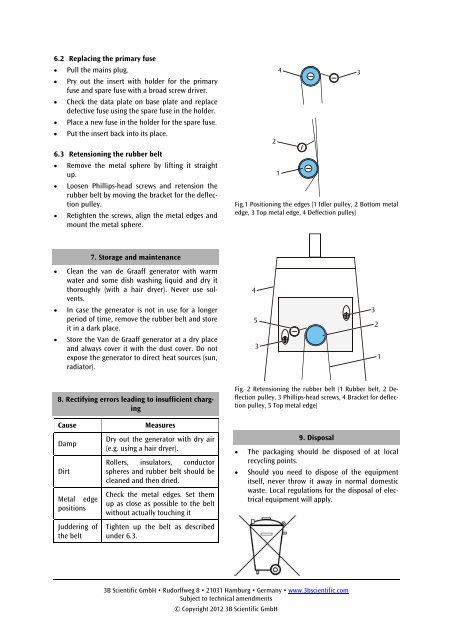
6.2 Replacing the primary fuse• Pull the mains plug.• Pry out the insert <strong>with</strong> hol<strong>de</strong>r for the primaryfuse and spare fuse <strong>with</strong> a broad screw driver.• Check the data plate on base plate and replace<strong>de</strong>fective fuse using the spare fuse in the hol<strong>de</strong>r.• Place a new fuse in the hol<strong>de</strong>r for the spare fuse.• Put the insert back into its place.6.3 Retensioning the rubber belt• Remove the metal sphere by lifting it straightup.• Loosen Phillips-head screws and retension therubber belt by moving the bracket for the <strong>de</strong>flectionpulley.• Retighten the screws, align the metal edges andmount the metal sphere.214Fig.1 Positioning the edges (1 Idler pulley, 2 Bottom metaledge, 3 Top metal edge, 4 Deflection pulley)37. Storage and maintenance• Clean the van <strong>de</strong> <strong>Graaff</strong> generator <strong>with</strong> warmwater and some dish washing liquid and dry itthoroughly (<strong>with</strong> a hair dryer). Never use solvents.• In case the generator is not in use for a longerperiod of time, remove the rubber belt and storeit in a dark place.• Store the <strong>Van</strong> <strong>de</strong> <strong>Graaff</strong> generator at a dry placeand always cover it <strong>with</strong> the dust cover. Do notexpose the generator to direct heat sources (sun,radiator).4533218. Rectifying errors leading to insufficient chargingFig. 2 Retensioning the rubber belt (1 Rubber belt, 2 Deflectionpulley, 3 Phillips-head screws, 4 Bracket for <strong>de</strong>flectionpulley, 5 Top metal edge)CauseDampDirtMetal edgepositionsJud<strong>de</strong>ring ofthe beltMeasuresDry out the generator <strong>with</strong> dry air(e.g. using a hair dryer).Rollers, insulators, conductorspheres and rubber belt should becleaned and then dried.Check the metal edges. Set themup as close as possible to the belt<strong>with</strong>out actually touching itTighten up the belt as <strong>de</strong>scribedun<strong>de</strong>r 6.3.9. Disposal• The packaging should be disposed of at localrecycling points.• Should you need to dispose of the equipmentitself, never throw it away in normal domesticwaste. Local regulations for the disposal of electricalequipment will apply.3B Scientific GmbH • Rudorffweg 8 • 21031 Hamburg • Germany • www.3bscientific.comSubject to technical amendments© Copyright 2012 3B Scientific GmbH