

Introduction to Autodesk Inventor for F1 in Schools
Introduction to Autodesk Inventor for F1 in Schools
Introduction to Autodesk Inventor for F1 in Schools

You also want an ePaper? Increase the reach of your titles
YUMPU automatically turns print PDFs into web optimized ePapers that Google loves.
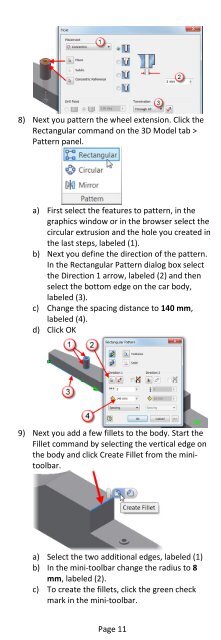
8) Next you pattern the wheel extension. Click theRectangular command on the 3D Model tab >Pattern panel.a) First select the features <strong>to</strong> pattern, <strong>in</strong> thegraphics w<strong>in</strong>dow or <strong>in</strong> the browser select thecircular extrusion and the hole you created <strong>in</strong>the last steps, labeled (1).b) Next you def<strong>in</strong>e the direction of the pattern.In the Rectangular Pattern dialog box selectthe Direction 1 arrow, labeled (2) and thenselect the bot<strong>to</strong>m edge on the car body,labeled (3).c) Change the spac<strong>in</strong>g distance <strong>to</strong> 140 mm,labeled (4).d) Click OK9) Next you add a few fillets <strong>to</strong> the body. Start theFillet command by select<strong>in</strong>g the vertical edge onthe body and click Create Fillet from the m<strong>in</strong>i<strong>to</strong>olbar.a) Select the two additional edges, labeled (1)b) In the m<strong>in</strong>i-<strong>to</strong>olbar change the radius <strong>to</strong> 8mm, labeled (2).c) To create the fillets, click the green checkmark <strong>in</strong> the m<strong>in</strong>i-<strong>to</strong>olbar.Page 11