

Introduction to Autodesk Inventor for F1 in Schools
Introduction to Autodesk Inventor for F1 in Schools
Introduction to Autodesk Inventor for F1 in Schools

You also want an ePaper? Increase the reach of your titles
YUMPU automatically turns print PDFs into web optimized ePapers that Google loves.
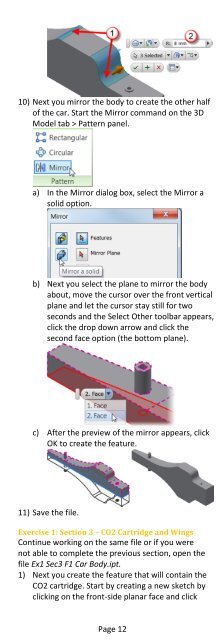
10) Next you mirror the body <strong>to</strong> create the other halfof the car. Start the Mirror command on the 3DModel tab > Pattern panel.a) In the Mirror dialog box, select the Mirror asolid option.b) Next you select the plane <strong>to</strong> mirror the bodyabout, move the cursor over the front verticalplane and let the cursor stay still <strong>for</strong> twoseconds and the Select Other <strong>to</strong>olbar appears,click the drop down arrow and click thesecond face option (the bot<strong>to</strong>m plane).c) After the preview of the mirror appears, clickOK <strong>to</strong> create the feature.11) Save the file.Exercise 1: Section 3 – CO2 Cartridge and W<strong>in</strong>gsCont<strong>in</strong>ue work<strong>in</strong>g on the same file or if you werenot able <strong>to</strong> complete the previous section, open thefile Ex1 Sec3 <strong>F1</strong> Car Body.ipt.1) Next you create the feature that will conta<strong>in</strong> theCO2 cartridge. Start by creat<strong>in</strong>g a new sketch byclick<strong>in</strong>g on the front-side planar face and clickPage 12