

Introduction to Autodesk Inventor for F1 in Schools
Introduction to Autodesk Inventor for F1 in Schools
Introduction to Autodesk Inventor for F1 in Schools

You also want an ePaper? Increase the reach of your titles
YUMPU automatically turns print PDFs into web optimized ePapers that Google loves.
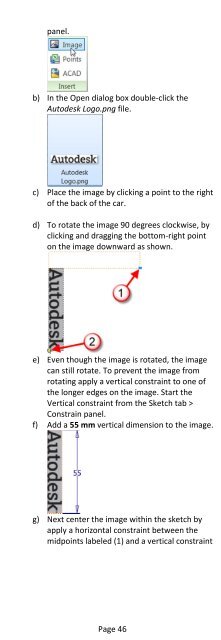
panel.b) In the Open dialog box double-click theAu<strong>to</strong>desk Logo.png file.c) Place the image by click<strong>in</strong>g a po<strong>in</strong>t <strong>to</strong> the righ<strong>to</strong>f the back of the car.d) To rotate the image 90 degrees clockwise, byclick<strong>in</strong>g and dragg<strong>in</strong>g the bot<strong>to</strong>m-right po<strong>in</strong><strong>to</strong>n the image downward as shown.e) Even though the image is rotated, the imagecan still rotate. To prevent the image fromrotat<strong>in</strong>g apply a vertical constra<strong>in</strong>t <strong>to</strong> one ofthe longer edges on the image. Start theVertical constra<strong>in</strong>t from the Sketch tab >Constra<strong>in</strong> panel.f) Add a 55 mm vertical dimension <strong>to</strong> the image.g) Next center the image with<strong>in</strong> the sketch byapply a horizontal constra<strong>in</strong>t between themidpo<strong>in</strong>ts labeled (1) and a vertical constra<strong>in</strong>tPage 46