Telemecanique Altivar 56 manual - Northern Industrial
Telemecanique Altivar 56 manual - Northern Industrial
Telemecanique Altivar 56 manual - Northern Industrial

Create successful ePaper yourself
Turn your PDF publications into a flip-book with our unique Google optimized e-Paper software.
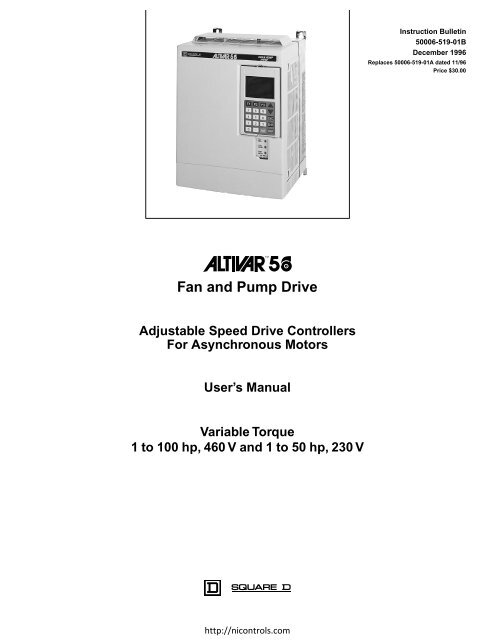
Instruction Bulletin50006-519-01BDecember 1996Replaces 50006-519-01A dated 11/96Price $30.00TMFan and Pump DriveAdjustable Speed Drive ControllersFor Asynchronous MotorsUser’s ManualVariable Torque1 to 100 hp, 460 V and 1 to 50 hp, 230 Vηττπ://νιχοντρολσ.χοm
<strong>Northern</strong> <strong>Industrial</strong>Reliable spares & repairs since 1978Order online nicontrols.com | Call us +44 (0) 1254 673747 | Email us: info@nicontrols.com
DANGERHAZARDOUS VOLTAGE• Read and understand this bulletin in its entirety before installing or operatingALTIVAR <strong>56</strong> drive controllers. Installation, adjustment, repair and maintenance ofthese drive controllers must be performed by qualified personnel.• Disconnect all power before servicing drive controller. WAIT ONE MINUTE until DCbus capacitors discharge, then measure DC bus capacitor voltage between PA and(-) terminals to verify DC voltage is less than 45 V (see page 42). The DC bus LEDis not an accurate indication of the absence of DC bus voltage.• DO NOT short across DC bus capacitors or touch unshielded components orterminal strip screw connections with voltage present.• Install all covers and close door before applying power or starting and stopping thedrive controller.• User is responsible for conforming to all applicable code requirements with respectto grounding all equipment. For drive controller grounding points, refer to theterminal connection drawings on Figure 9 on page 22.• Many parts in this drive controller, including printed wiring boards, operate at linevoltage. DO NOT TOUCH. Use only electrically insulated tools.Before servicing drive controller:• Disconnect all power.• Place a “DO NOT TURN ON” label on drive controller disconnect.• Lock disconnect in open position.Failure to follow these instructions will result in death or serious injury.ALTIVAR is a trademark of <strong>Telemecanique</strong> S.A. or its successor-in-interest, Schneider Electric S.A.© 1996 Square D All Rights Reserved. This document may not be copied in whole or in part, or transferred to anyother media without the written permission of Square D.Electrical equipment should be serviced only by qualified electrical maintenance personnel. No responsibility isassumed by Square D for any consequences arising out of the use of this material.ηττπ://νιχοντρολσ.χοm
Bulletin No. 50006-519-01BDecember 1996ALTIVAR <strong>56</strong> Fan and Pump Drive User’s ManualTable of ContentsChapter 1 — Receiving and Installation . . . . . . . . . . . . . . . . . . . . .1INTRODUCTION . . . . . . . . . . . . . . . . . . . . . . . . . . . . . . . . . . . . . . . . . . . . . . . . . . . . . . . . .2HAZARD LABELING . . . . . . . . . . . . . . . . . . . . . . . . . . . . . . . . . . . . . . . . . . . . . . . . . . . . . .2TECHNICAL CHARACTERISTICS . . . . . . . . . . . . . . . . . . . . . . . . . . . . . . . . . . . . . . . . . . .3Specifications . . . . . . . . . . . . . . . . . . . . . . . . . . . . . . . . . . . . . . . . . . . . . . . . . . . . . . . .4DIMENSIONS & WEIGHTS FOR WALL OR PANEL MOUNTING. . . . . . . . . . . . . . . . . . . .6HANDLING DRIVE CONTROLLERS . . . . . . . . . . . . . . . . . . . . . . . . . . . . . . . . . . . . . . . . . .8PRELIMINARY INSPECTION . . . . . . . . . . . . . . . . . . . . . . . . . . . . . . . . . . . . . . . . . . . . . . .8INSTALLATION PRECAUTIONS . . . . . . . . . . . . . . . . . . . . . . . . . . . . . . . . . . . . . . . . . . . . .9MOUNTING IN GENERAL PURPOSE METAL ENCLOSURE . . . . . . . . . . . . . . . . . . . . .10Ventilation . . . . . . . . . . . . . . . . . . . . . . . . . . . . . . . . . . . . . . . . . . . . . . . . . . . . . . . . . .10MOUNTING IN TYPE 12 (IP54) METAL ENCLOSURE . . . . . . . . . . . . . . . . . . . . . . . . . . .12Calculating Non-Ventilated Enclosure Size. . . . . . . . . . . . . . . . . . . . . . . . . . . . . . . . .12Ventilation . . . . . . . . . . . . . . . . . . . . . . . . . . . . . . . . . . . . . . . . . . . . . . . . . . . . . . . . . .13Recess Mounting. . . . . . . . . . . . . . . . . . . . . . . . . . . . . . . . . . . . . . . . . . . . . . . . . . . . .13Chapter 2 — Wiring . . . . . . . . . . . . . . . . . . . . . . . . . . . . . . . . . . . .15WIRING . . . . . . . . . . . . . . . . . . . . . . . . . . . . . . . . . . . . . . . . . . . . . . . . . . . . . . . . . . . . . . .16General Wiring Practices. . . . . . . . . . . . . . . . . . . . . . . . . . . . . . . . . . . . . . . . . . . . . . .16Branch Circuit Connections . . . . . . . . . . . . . . . . . . . . . . . . . . . . . . . . . . . . . . . . . . . . .16Control Wiring Precautions . . . . . . . . . . . . . . . . . . . . . . . . . . . . . . . . . . . . . . . . . . . . .17Output Wiring Precautions. . . . . . . . . . . . . . . . . . . . . . . . . . . . . . . . . . . . . . . . . . . . . .17Grounding . . . . . . . . . . . . . . . . . . . . . . . . . . . . . . . . . . . . . . . . . . . . . . . . . . . . . . . . . .18TERMINAL STRIP LOCATIONS . . . . . . . . . . . . . . . . . . . . . . . . . . . . . . . . . . . . . . . . . . . .19POWER WIRING . . . . . . . . . . . . . . . . . . . . . . . . . . . . . . . . . . . . . . . . . . . . . . . . . . . . . . . .20CONTROL WIRING . . . . . . . . . . . . . . . . . . . . . . . . . . . . . . . . . . . . . . . . . . . . . . . . . . . . . .22USING THE LOGIC INPUTS (J12). . . . . . . . . . . . . . . . . . . . . . . . . . . . . . . . . . . . . . . . . . .24USING THE LOGIC OUTPUTS (J12). . . . . . . . . . . . . . . . . . . . . . . . . . . . . . . . . . . . . . . . .25USING THE SPEED REFERENCE INPUTS (J13) . . . . . . . . . . . . . . . . . . . . . . . . . . . . . .26USING THE ANALOG OUTPUTS (J13). . . . . . . . . . . . . . . . . . . . . . . . . . . . . . . . . . . . . . .26USING THE RELAY OUTPUTS (J1) . . . . . . . . . . . . . . . . . . . . . . . . . . . . . . . . . . . . . . . . .27REMOVAL OF CL1, CL2 JUMPERS . . . . . . . . . . . . . . . . . . . . . . . . . . . . . . . . . . . . . . . . .27CONTROL CIRCUIT DIAGRAMS . . . . . . . . . . . . . . . . . . . . . . . . . . . . . . . . . . . . . . . . . . .283-Wire Control . . . . . . . . . . . . . . . . . . . . . . . . . . . . . . . . . . . . . . . . . . . . . . . . . . . . . . .282-Wire Control with Isolation Contactor on Line Side (Coast to Stop). . . . . . . . . . . . .29Chapter 3 — Start-Up. . . . . . . . . . . . . . . . . . . . . . . . . . . . . . . . . . .33INTRODUCTION . . . . . . . . . . . . . . . . . . . . . . . . . . . . . . . . . . . . . . . . . . . . . . . . . . . . . . . .34FACTORY SETTINGS . . . . . . . . . . . . . . . . . . . . . . . . . . . . . . . . . . . . . . . . . . . . . . . . . . . .34CONTROL TYPES . . . . . . . . . . . . . . . . . . . . . . . . . . . . . . . . . . . . . . . . . . . . . . . . . . . . . . .35Normal . . . . . . . . . . . . . . . . . . . . . . . . . . . . . . . . . . . . . . . . . . . . . . . . . . . . . . . . . . . . .35NOLD (No Load) . . . . . . . . . . . . . . . . . . . . . . . . . . . . . . . . . . . . . . . . . . . . . . . . . . . . .35MOTOR THERMAL OVERLOAD PROTECTION. . . . . . . . . . . . . . . . . . . . . . . . . . . . . . . .36ADJUSTMENT OF MOTOR OVERLOAD . . . . . . . . . . . . . . . . . . . . . . . . . . . . . . . . . . . . .37© 1996 Square D All Rights Reservediηττπ://νιχοντρολσ.χοm
ALTIVAR <strong>56</strong> Fan and Pump Drive User’s ManualBulletin No. 50006-519-01BTable of Contents December 1996AVAILABLE MOTOR TORQUE. . . . . . . . . . . . . . . . . . . . . . . . . . . . . . . . . . . . . . . . . . . . . 37Continuous Duty . . . . . . . . . . . . . . . . . . . . . . . . . . . . . . . . . . . . . . . . . . . . . . . . . . . . . 37Overtorque Capability and Speed Range . . . . . . . . . . . . . . . . . . . . . . . . . . . . . . . . . . 37Overspeed Operation (f ≥ 60 Hz) . . . . . . . . . . . . . . . . . . . . . . . . . . . . . . . . . . . . . . . . 38Driving Torque Production Envelope . . . . . . . . . . . . . . . . . . . . . . . . . . . . . . . . . . . . . 38MOTOR CONSIDERATIONS . . . . . . . . . . . . . . . . . . . . . . . . . . . . . . . . . . . . . . . . . . . . . . 39Chapter 4 — Diagnostics. . . . . . . . . . . . . . . . . . . . . . . . . . . . . . . . 41PRECAUTIONS . . . . . . . . . . . . . . . . . . . . . . . . . . . . . . . . . . . . . . . . . . . . . . . . . . . . . . . . . 42PROCEDURE 1: BUS VOLTAGE MEASUREMENT. . . . . . . . . . . . . . . . . . . . . . . . . . . . . 42PROCEDURE 2: INPUT LINE VOLTAGE MEASUREMENT . . . . . . . . . . . . . . . . . . . . . . 43PROCEDURE 3: CHECKING PERIPHERAL EQUIPMENT . . . . . . . . . . . . . . . . . . . . . . . 43PREVENTIVE MAINTENANCE . . . . . . . . . . . . . . . . . . . . . . . . . . . . . . . . . . . . . . . . . . . . . 44LEDS . . . . . . . . . . . . . . . . . . . . . . . . . . . . . . . . . . . . . . . . . . . . . . . . . . . . . . . . . . . . . . . . . 44FAULT MESSAGES . . . . . . . . . . . . . . . . . . . . . . . . . . . . . . . . . . . . . . . . . . . . . . . . . . . . . 45Chapter 5 — Configuration . . . . . . . . . . . . . . . . . . . . . . . . . . . . . . 49KEYPAD DISPLAY . . . . . . . . . . . . . . . . . . . . . . . . . . . . . . . . . . . . . . . . . . . . . . . . . . . . . . 50LCD Display . . . . . . . . . . . . . . . . . . . . . . . . . . . . . . . . . . . . . . . . . . . . . . . . . . . . . . . . 50ENT Key . . . . . . . . . . . . . . . . . . . . . . . . . . . . . . . . . . . . . . . . . . . . . . . . . . . . . . . . . . . 50ESC Key . . . . . . . . . . . . . . . . . . . . . . . . . . . . . . . . . . . . . . . . . . . . . . . . . . . . . . . . . . . 50Arrow (▲ ▼) Keys. . . . . . . . . . . . . . . . . . . . . . . . . . . . . . . . . . . . . . . . . . . . . . . . . . . . 50Numeric Keys . . . . . . . . . . . . . . . . . . . . . . . . . . . . . . . . . . . . . . . . . . . . . . . . . . . . . . . 50Function Keys . . . . . . . . . . . . . . . . . . . . . . . . . . . . . . . . . . . . . . . . . . . . . . . . . . . . . . . 51Key Cover . . . . . . . . . . . . . . . . . . . . . . . . . . . . . . . . . . . . . . . . . . . . . . . . . . . . . . . . . . 51STOP Key. . . . . . . . . . . . . . . . . . . . . . . . . . . . . . . . . . . . . . . . . . . . . . . . . . . . . . . . . . 51RUN Key. . . . . . . . . . . . . . . . . . . . . . . . . . . . . . . . . . . . . . . . . . . . . . . . . . . . . . . . . . . 52Keypad Display Connections . . . . . . . . . . . . . . . . . . . . . . . . . . . . . . . . . . . . . . . . . . . 52MENU OVERVIEW . . . . . . . . . . . . . . . . . . . . . . . . . . . . . . . . . . . . . . . . . . . . . . . . . . . . . . 53Selecting the Language . . . . . . . . . . . . . . . . . . . . . . . . . . . . . . . . . . . . . . . . . . . . . . . 53Drive Configuration . . . . . . . . . . . . . . . . . . . . . . . . . . . . . . . . . . . . . . . . . . . . . . . . . . . 53Drive Identification . . . . . . . . . . . . . . . . . . . . . . . . . . . . . . . . . . . . . . . . . . . . . . . . . . . 53Display Mode . . . . . . . . . . . . . . . . . . . . . . . . . . . . . . . . . . . . . . . . . . . . . . . . . . . . . . . 53Main Menu . . . . . . . . . . . . . . . . . . . . . . . . . . . . . . . . . . . . . . . . . . . . . . . . . . . . . . . . . 54DISPLAY MODE . . . . . . . . . . . . . . . . . . . . . . . . . . . . . . . . . . . . . . . . . . . . . . . . . . . . . . . . 55Drive Controller Running . . . . . . . . . . . . . . . . . . . . . . . . . . . . . . . . . . . . . . . . . . . . . . 55Drive Controller in Fault State. . . . . . . . . . . . . . . . . . . . . . . . . . . . . . . . . . . . . . . . . . . 55ACCESS LEVELS . . . . . . . . . . . . . . . . . . . . . . . . . . . . . . . . . . . . . . . . . . . . . . . . . . . . . . . <strong>56</strong>Total Lock . . . . . . . . . . . . . . . . . . . . . . . . . . . . . . . . . . . . . . . . . . . . . . . . . . . . . . . . . . <strong>56</strong>Total Unlock . . . . . . . . . . . . . . . . . . . . . . . . . . . . . . . . . . . . . . . . . . . . . . . . . . . . . . . . <strong>56</strong>MENU SUMMARY: USING THIS CHAPTER . . . . . . . . . . . . . . . . . . . . . . . . . . . . . . . . . . 571→PARAMETER SETTING MENU . . . . . . . . . . . . . . . . . . . . . . . . . . . . . . . . . . . . . . . . . . 58Low Speed . . . . . . . . . . . . . . . . . . . . . . . . . . . . . . . . . . . . . . . . . . . . . . . . . . . . . . . . . 58High Speed . . . . . . . . . . . . . . . . . . . . . . . . . . . . . . . . . . . . . . . . . . . . . . . . . . . . . . . . . 59Acceleration Time . . . . . . . . . . . . . . . . . . . . . . . . . . . . . . . . . . . . . . . . . . . . . . . . . . . . 59Deceleration Time. . . . . . . . . . . . . . . . . . . . . . . . . . . . . . . . . . . . . . . . . . . . . . . . . . . . 59Damping . . . . . . . . . . . . . . . . . . . . . . . . . . . . . . . . . . . . . . . . . . . . . . . . . . . . . . . . . . . 59Profile . . . . . . . . . . . . . . . . . . . . . . . . . . . . . . . . . . . . . . . . . . . . . . . . . . . . . . . . . . . . . 60Motor Overload . . . . . . . . . . . . . . . . . . . . . . . . . . . . . . . . . . . . . . . . . . . . . . . . . . . . . . 60ii© 1996 Square D All Rights Reservedηττπ://νιχοντρολσ.χοm
ALTIVAR <strong>56</strong> Fan and Pump Drive User’s ManualBulletin No. 50006-519-01BTable of Contents December 19967.3→Output Assignments . . . . . . . . . . . . . . . . . . . . . . . . . . . . . . . . . . . . . . . . . . . . . . 96Logic Output Functions . . . . . . . . . . . . . . . . . . . . . . . . . . . . . . . . . . . . . . . . . . . . 96Analog Output Functions. . . . . . . . . . . . . . . . . . . . . . . . . . . . . . . . . . . . . . . . . . . 997.4→Fault Management . . . . . . . . . . . . . . . . . . . . . . . . . . . . . . . . . . . . . . . . . . . . . . 100Fault Stop . . . . . . . . . . . . . . . . . . . . . . . . . . . . . . . . . . . . . . . . . . . . . . . . . . . . . 100Drive Controller Restart Methods . . . . . . . . . . . . . . . . . . . . . . . . . . . . . . . . . . . 100Power Loss . . . . . . . . . . . . . . . . . . . . . . . . . . . . . . . . . . . . . . . . . . . . . . . . . . . . 101Automatic Restart . . . . . . . . . . . . . . . . . . . . . . . . . . . . . . . . . . . . . . . . . . . . . . . 102Catch On Fly . . . . . . . . . . . . . . . . . . . . . . . . . . . . . . . . . . . . . . . . . . . . . . . . . . . 103Motor Overload . . . . . . . . . . . . . . . . . . . . . . . . . . . . . . . . . . . . . . . . . . . . . . . . . 105Adjustment of Motor Overload. . . . . . . . . . . . . . . . . . . . . . . . . . . . . . . . . . . . . . 106Types of Protection . . . . . . . . . . . . . . . . . . . . . . . . . . . . . . . . . . . . . . . . . . . . . . . . . 106Self-Cooled Motor . . . . . . . . . . . . . . . . . . . . . . . . . . . . . . . . . . . . . . . . . . . . . . . 106No Thermal Protection. . . . . . . . . . . . . . . . . . . . . . . . . . . . . . . . . . . . . . . . . . . . 106Input Phase Failure . . . . . . . . . . . . . . . . . . . . . . . . . . . . . . . . . . . . . . . . . . . . . . 107Loss of Follower . . . . . . . . . . . . . . . . . . . . . . . . . . . . . . . . . . . . . . . . . . . . . . . . 107Fold Back. . . . . . . . . . . . . . . . . . . . . . . . . . . . . . . . . . . . . . . . . . . . . . . . . . . . . . 108Fault Reset . . . . . . . . . . . . . . . . . . . . . . . . . . . . . . . . . . . . . . . . . . . . . . . . . . . . 108Dynamic Brake Fault . . . . . . . . . . . . . . . . . . . . . . . . . . . . . . . . . . . . . . . . . . . . . 108Output Phase Fault . . . . . . . . . . . . . . . . . . . . . . . . . . . . . . . . . . . . . . . . . . . . . . 1088→DIAGNOSTIC MODE . . . . . . . . . . . . . . . . . . . . . . . . . . . . . . . . . . . . . . . . . . . . . . . . . 109Autodiagnostics . . . . . . . . . . . . . . . . . . . . . . . . . . . . . . . . . . . . . . . . . . . . . . . . . . . . 109Logic Input Test . . . . . . . . . . . . . . . . . . . . . . . . . . . . . . . . . . . . . . . . . . . . . . . . . . . . 110Analog Input Test . . . . . . . . . . . . . . . . . . . . . . . . . . . . . . . . . . . . . . . . . . . . . . . . . . . 110Logic Output Test . . . . . . . . . . . . . . . . . . . . . . . . . . . . . . . . . . . . . . . . . . . . . . . . . . . 110Analog Output Test. . . . . . . . . . . . . . . . . . . . . . . . . . . . . . . . . . . . . . . . . . . . . . . . . . 1119→DRIVE INITIALIZATION MENU . . . . . . . . . . . . . . . . . . . . . . . . . . . . . . . . . . . . . . . . . 112Total Factory Settings. . . . . . . . . . . . . . . . . . . . . . . . . . . . . . . . . . . . . . . . . . . . . . . . 112Store User Settings. . . . . . . . . . . . . . . . . . . . . . . . . . . . . . . . . . . . . . . . . . . . . . . . . . 112Recall User Settings . . . . . . . . . . . . . . . . . . . . . . . . . . . . . . . . . . . . . . . . . . . . . . . . . 113Chapter 6 — Class 8839 ATV<strong>56</strong> Combination Devices . . . . . . . 115INTRODUCTION . . . . . . . . . . . . . . . . . . . . . . . . . . . . . . . . . . . . . . . . . . . . . . . . . . . . . . . 117CONTROLLER PART NUMBERS. . . . . . . . . . . . . . . . . . . . . . . . . . . . . . . . . . . . . . . . . . 118CONTROLLER NAMEPLATE IDENTIFICATION . . . . . . . . . . . . . . . . . . . . . . . . . . . . . . 118TECHNICAL CHARACTERISTICS . . . . . . . . . . . . . . . . . . . . . . . . . . . . . . . . . . . . . . . . . 119Specifications . . . . . . . . . . . . . . . . . . . . . . . . . . . . . . . . . . . . . . . . . . . . . . . . . . . . . . 122Short-Circuit Withstand Ratings . . . . . . . . . . . . . . . . . . . . . . . . . . . . . . . . . . . . . . . . 123DIMENSIONS AND WEIGHTS FOR WALL OR PANEL MOUNTING. . . . . . . . . . . . . . . 124HANDLING DRIVE CONTROLLERS . . . . . . . . . . . . . . . . . . . . . . . . . . . . . . . . . . . . . . . 128PRELIMINARY INSPECTION . . . . . . . . . . . . . . . . . . . . . . . . . . . . . . . . . . . . . . . . . . . . . 128WIRE ROUTING AND INTERCONNECTION . . . . . . . . . . . . . . . . . . . . . . . . . . . . . . . . . 129Wire Class . . . . . . . . . . . . . . . . . . . . . . . . . . . . . . . . . . . . . . . . . . . . . . . . . . . . . . . . 129Noise Class. . . . . . . . . . . . . . . . . . . . . . . . . . . . . . . . . . . . . . . . . . . . . . . . . . . . . . . . 129Voltage Class . . . . . . . . . . . . . . . . . . . . . . . . . . . . . . . . . . . . . . . . . . . . . . . . . . . . . . 130TERMINAL STRIP LOCATIONS . . . . . . . . . . . . . . . . . . . . . . . . . . . . . . . . . . . . . . . . . . . 131POWER WIRING . . . . . . . . . . . . . . . . . . . . . . . . . . . . . . . . . . . . . . . . . . . . . . . . . . . . . . . 134CONTROL WIRING . . . . . . . . . . . . . . . . . . . . . . . . . . . . . . . . . . . . . . . . . . . . . . . . . . . . . 135iv© 1996 Square D All Rights Reservedηττπ://νιχοντρολσ.χοm
Bulletin No. 50006-519-01BDecember 1996ALTIVAR <strong>56</strong> Fan and Pump Drive User’s ManualTable of ContentsSEQUENCE OF OPERATION AND OPTIONS . . . . . . . . . . . . . . . . . . . . . . . . . . . . . . . .138Terminal Command Mode vs. Keypad Command Mode. . . . . . . . . . . . . . . . . . . . . .138POWER CIRCUIT W COMBINATION PACKAGE . . . . . . . . . . . . . . . . . . . . . . . . . . . . . .139Operator Controls – General Arrangement and Operation . . . . . . . . . . . . . . . . . . . .139Adjustable Speed Operation . . . . . . . . . . . . . . . . . . . . . . . . . . . . . . . . . . . . . . .139Freeze/Fire Stats Interlocks . . . . . . . . . . . . . . . . . . . . . . . . . . . . . . . . . . . . . . . .139MOD B07 Group 2 Pilot Light Cluster . . . . . . . . . . . . . . . . . . . . . . . . . . . . . . . .139MOD C07 Line Isolation Contactor. . . . . . . . . . . . . . . . . . . . . . . . . . . . . . . . . . .139MOD D07 Omit Hand-Off-Auto Switch & Manual Speed Potentiometer . . . . . .140MOD E07 CSA Certification . . . . . . . . . . . . . . . . . . . . . . . . . . . . . . . . . . . . . . . .141MOD F07 Smoke Purge Option . . . . . . . . . . . . . . . . . . . . . . . . . . . . . . . . . . . . .141POWER CIRCUIT Y BYPASS PACKAGE . . . . . . . . . . . . . . . . . . . . . . . . . . . . . . . . . . . .142Operator Controls — General Arrangement and Operation . . . . . . . . . . . . . . . . . . .142Adjustable Speed Operation . . . . . . . . . . . . . . . . . . . . . . . . . . . . . . . . . . . . . . .142Bypass Operation. . . . . . . . . . . . . . . . . . . . . . . . . . . . . . . . . . . . . . . . . . . . . . . .142Freeze/Fire Stats Interlock . . . . . . . . . . . . . . . . . . . . . . . . . . . . . . . . . . . . . . . . .142MOD A07 Group 1 Pilot Light Cluster . . . . . . . . . . . . . . . . . . . . . . . . . . . . . . . .143MOD B07 Group 2 Pilot Light Cluster . . . . . . . . . . . . . . . . . . . . . . . . . . . . . . . .143MOD C07 Line Isolation Contactor. . . . . . . . . . . . . . . . . . . . . . . . . . . . . . . . . . .143MOD D07 Omit Hand-Off-Auto Switch & Manual Speed Potentiometer . . . . . .143MOD E07 CSA Certification (if used) . . . . . . . . . . . . . . . . . . . . . . . . . . . . . . . . .145MOD F07 Smoke Purge Option (if used) . . . . . . . . . . . . . . . . . . . . . . . . . . . . . .145POWER CIRCUIT Z REMOTE STARTER BYPASS PACKAGE . . . . . . . . . . . . . . . . . . .146Operator Controls — General Arrangement and Operation . . . . . . . . . . . . . . . . . . .146Adjustable Speed Operation . . . . . . . . . . . . . . . . . . . . . . . . . . . . . . . . . . . . . . .146Bypass Operation. . . . . . . . . . . . . . . . . . . . . . . . . . . . . . . . . . . . . . . . . . . . . . . .146Freeze/Fire Stats Interlocks . . . . . . . . . . . . . . . . . . . . . . . . . . . . . . . . . . . . . . . .146MOD A07 Group 1 Pilot Light Cluster . . . . . . . . . . . . . . . . . . . . . . . . . . . . . . . .147MOD B07 Group 2 Pilot Light Cluster . . . . . . . . . . . . . . . . . . . . . . . . . . . . . . . .147MOD C07 Line Isolation Contactor. . . . . . . . . . . . . . . . . . . . . . . . . . . . . . . . . . .147MOD D07 Omit Hand-Off-Auto Switch & Manual Speed Potentiometer . . . . . .147MOD E07 CSA Certification . . . . . . . . . . . . . . . . . . . . . . . . . . . . . . . . . . . . . . . .149MOD F07 Smoke Purge. . . . . . . . . . . . . . . . . . . . . . . . . . . . . . . . . . . . . . . . . . .149PROPER DRIVE ISOLATION METHOD . . . . . . . . . . . . . . . . . . . . . . . . . . . . . . . . . . . . .150CONTROL CIRCUIT DIAGRAMS . . . . . . . . . . . . . . . . . . . . . . . . . . . . . . . . . . . . . . . . . .151Appendix A — Parameter Summary . . . . . . . . . . . . . . . . . . . . . .159Appendix B — Menu Summary. . . . . . . . . . . . . . . . . . . . . . . . . . .165Appendix C — Spare Parts. . . . . . . . . . . . . . . . . . . . . . . . . . . . . .169Index . . . . . . . . . . . . . . . . . . . . . . . . . . . . . . . . . . . . . . . . . . . . . .173© 1996 Square D All Rights Reservedvηττπ://νιχοντρολσ.χοm
ηττπ://νιχοντρολσ.χοm
Bulletin No. 50006-519-01BDecember 1996Chapter 1 — Receiving and InstallationContentsChapter 1 — Receiving and InstallationINTRODUCTION . . . . . . . . . . . . . . . . . . . . . . . . . . . . . . . . . . . . . . . . . . . . . . . . . . . . . . . . .2Scope . . . . . . . . . . . . . . . . . . . . . . . . . . . . . . . . . . . . . . . . . . . . . . . . . . . . . . . . . . . . . .2Revision Level . . . . . . . . . . . . . . . . . . . . . . . . . . . . . . . . . . . . . . . . . . . . . . . . . . . . . . . .2HAZARD LABELING . . . . . . . . . . . . . . . . . . . . . . . . . . . . . . . . . . . . . . . . . . . . . . . . . . . . . .2TECHNICAL CHARACTERISTICS . . . . . . . . . . . . . . . . . . . . . . . . . . . . . . . . . . . . . . . . . . .3Specifications . . . . . . . . . . . . . . . . . . . . . . . . . . . . . . . . . . . . . . . . . . . . . . . . . . . . . . . .4DIMENSIONS & WEIGHTS FOR WALL OR PANEL MOUNTING. . . . . . . . . . . . . . . . . . . .6HANDLING DRIVE CONTROLLERS . . . . . . . . . . . . . . . . . . . . . . . . . . . . . . . . . . . . . . . . . .8PRELIMINARY INSPECTION . . . . . . . . . . . . . . . . . . . . . . . . . . . . . . . . . . . . . . . . . . . . . . .8INSTALLATION PRECAUTIONS . . . . . . . . . . . . . . . . . . . . . . . . . . . . . . . . . . . . . . . . . . . . .9MOUNTING IN GENERAL PURPOSE METAL ENCLOSURE . . . . . . . . . . . . . . . . . . . . .10Ventilation . . . . . . . . . . . . . . . . . . . . . . . . . . . . . . . . . . . . . . . . . . . . . . . . . . . . . . . . . .10MOUNTING IN TYPE 12 (IP54) METAL ENCLOSURE . . . . . . . . . . . . . . . . . . . . . . . . . . .12Calculating Non-Ventilated Enclosure Size . . . . . . . . . . . . . . . . . . . . . . . . . . . . . . . .12Ventilation . . . . . . . . . . . . . . . . . . . . . . . . . . . . . . . . . . . . . . . . . . . . . . . . . . . . . . . . . .13Recess Mounting. . . . . . . . . . . . . . . . . . . . . . . . . . . . . . . . . . . . . . . . . . . . . . . . . . . . .13© 1996 Square D All Rights Reserved1ηττπ://νιχοντρολσ.χοm
Chapter 1 — Receiving and InstallationBulletin No. 50006-519-01BIntroduction December 1996INTRODUCTIONScopeRevision LevelHAZARD LABELINGALTIVAR TM <strong>56</strong> is a family of 1 to 100 hp, 460 V and 1 to 50 hp, 208/230 V adjustablefrequency AC drive controllers. The ALTIVAR <strong>56</strong> family consists of 20 devices in 5outlines. The ALTIVAR <strong>56</strong> drive controllers may function as stand-alone drivecontrollers or as part of complex drive systems.The ALTIVAR <strong>56</strong> controller is also available as a combination device drivecontroller. The Class 8839 ALTIVAR <strong>56</strong> is a family of 1 to 100 hp, 460 Vand 1 to 50 hp, 208/230 V combination devices consisting of the drive controller,power circuit box with options, and back pan.The ALTIVAR <strong>56</strong> family also includes optional peripherals. Consult catalog fordescriptions.This <strong>manual</strong> covers receiving, installation, start-up, and configuration of the460 V, 208 V, and 230 V lines of ALTIVAR <strong>56</strong> and Class 8839 drive controllers.Information on diagnostics is also included.Several options are available for the ALTIVAR <strong>56</strong> drive controller. Refer to thecatalog for a description of these options. A <strong>manual</strong> or instruction sheet isprovided with each option.This is Revision B. It replaces 50006-519-01A dated November, 1996, and includesinformation on the Class 8839 ALTIVAR <strong>56</strong> combination device.The ALTIVAR <strong>56</strong> drive controller is shipped with an English safety label applied tothe control board. If a Spanish, German, or French label is required, affix it to themain control board above the English label (see Figure 1). Do not obstruct theEnglish label.Spanish, German, orFrench!English!AI2-UAI2-IFigure 1:Hazard Labeling2 © 1996 Square D All Rights Reservedηττπ://νιχοντρολσ.χοm
Bulletin No. 50006-519-01BDecember 1996Chapter 1 — Receiving and InstallationTechnical CharacteristicsTECHNICALCHARACTERISTICSTables 1 and 2 show the power and current ratings for 460 V drive controllers whenset for variable torque (Table 1) and variable torque, low noise (Table 2).Table 1:Variable Torque Drive Controller Ratings, 460 VOutline1234460 V ±15%, 60 Hz ±5%Switching Frequency: ATV<strong>56</strong>U41N4 to D46N4 = 4 kHz, ATV<strong>56</strong>D54N4 to D79N4 = 2 kHzDriveControllerPart No.ATV<strong>56</strong>U41N4MotorPower460 V60 HzInput Line Current5,000 AIC or 22,00010,000 AIC [1] AICOutputCurrentMax.TransientCurrent(60 s)TotalDissipatedPowerhp A A A A W1232.74.76.53.25.781.83.44.85.35.35.390110130ATV<strong>56</strong>U54N4 5 9.8 11.9 7.6 8.4 180ATV<strong>56</strong>U72N4 7.5 14 17 11 12.1 205ATV<strong>56</strong>U90N4 10 17.7 21.4 14 15.4 265ATV<strong>56</strong>D12N4 15 25.1 30.6 21 23.1 350ATV<strong>56</strong>D16N4 20 31.8 38.3 27 29.7 480ATV<strong>56</strong>D23N4 25 38.7 47 34 37.4 <strong>56</strong>0ATV<strong>56</strong>D33N4 40 57.1 67.6 52 57.2 800ATV<strong>56</strong>D46N4 50 68.6 81.2 65 71.5 910ATV<strong>56</strong>D54N4 60 86.4* 94.6 77 84.7 9605 ATV<strong>56</strong>D64N4 75 106* 116 96 105.6 1150ATV<strong>56</strong>D79N4 100 138* 150 124 136.4 1400[1] 10,000 AIC denoted by asterisk (*).Table 2:Variable Torque, Low Noise Drive Controller Ratings, 460 VOutline1234460 V ±15%, 60 Hz ±5%Switching Frequency: ATV<strong>56</strong>U41N4 to D46N4 = 10 kHz, ATV<strong>56</strong>D54N4 to D79N4 = 4 kHzDriveControllerPart No.ATV<strong>56</strong>U41N4MotorPower460 V60 HzInput Line Current5,000 AIC or 22,00010,000AIC [1] AICOutputCurrentMax.TransientCurrent(60 s)TotalDissipatedPowerhp A A A A W1232.74.76.5ATV<strong>56</strong>U72N4 5 9.8 11.9 7.6 8.4 1803.25.781.83.44.85.35.35.390110130ATV<strong>56</strong>U90N4 7.5 13.9 16.7 11 12.1 205ATV<strong>56</strong>D12N4 10 17.6 21.4 14 15.4 265ATV<strong>56</strong>D16N4 15 24.8 29.9 21 23.1 350ATV<strong>56</strong>D23N4 20 31.9 38.7 27 29.7 480ATV<strong>56</strong>D33N4 30 44 52.4 40 44 600ATV<strong>56</strong>D46N4 40 57.1 67.6 52 57.2 800ATV<strong>56</strong>D54N4 50 68.3 80.8 65 71.5 9105 ATV<strong>56</strong>D64N4 60 86.4* 94.6 77 84.7 960ATV<strong>56</strong>D79N4 75 106* 116 96 105.6 1150[1] 10,000 AIC denoted by asterisk (*).© 1996 Square D All Rights Reserved3ηττπ://νιχοντρολσ.χοm
Chapter 1 — Receiving and InstallationBulletin No. 50006-519-01BTechnical Characteristics December 1996Tables 3 and 4 show the power and current ratings for 230 V drive controllers whenset for variable torque (Table 3) and variable torque, low noise (Table 4).Table 3:Variable Torque Drive Controller Ratings, 208/230 VOutlineDriveControllerPart No.1 ATV<strong>56</strong>U41M2208 V ±10% and 230 V ±15%, 60 Hz ±5%Switching Frequency: ATV<strong>56</strong>U41M2 to D33M2 = 4 kHz, ATV<strong>56</strong>D46M2 = 2 kHzMotorPower208/230 V60 HzInput Line CurrentOutputCurrentMax.TransientCurrent(60 s)TotalDissipatedPower208 V230 V8,800 5,000 22,000AIC AICAIChp A A A A A W1235.710.214.04.98.611.85.810.214.04.07.510.611.711.711.7120140170ATV<strong>56</strong>U72M2 7.5 30.6 25.8 30.6 24.2 26.6 3022ATV<strong>56</strong>U90M2 10 38.8 32.7 38.8 31 34 4143 ATV<strong>56</strong>D12M2 15 54.7 46.2 54.8 47 51 5594 ATV<strong>56</strong>D23M2 20 69.3 58.7 69.4 60 65 77025 84.4 71.5 84.4 75 82 831ATV<strong>56</strong>D33M2 40 124.9 102.7 125.9 116 126 12605 ATV<strong>56</strong>D46M2 50 149.3 122.6 151.1 143 158 1528Table 4:Variable Torque, Low Noise Drive Controller Ratings, 208/230 VOutline208 V ±10% and 230 V ±15%, 60 Hz ±5%Switching Frequency: ATV<strong>56</strong>U41M2 to D33M2 = 10 kHz, ATV<strong>56</strong>D46M2 = 4 kHzDriveControllerPart No.1 ATV<strong>56</strong>U41M223MotorPower208/230 V60 Hz208 V8,800 AICInput Line Current230 V5,000 22,000AICAICOutputCurrentMax.TransientCurrent(60 s)TotalDissipatedPowerhp A A A A A W1235.810.414.35.48.812.06.410.414.34.07.510.611.711.711.7125150181ATV<strong>56</strong>U72M2 5 21.8 18.3 21.8 16.7 18.4 252ATV<strong>56</strong>U90M2 7.5 30.6 25.8 30.7 24.2 26.6 375ATV<strong>56</strong>D12M2 10 38.9 32.8 39.0 31 34 459ATV<strong>56</strong>D16M2 15 55.1 46.5 55.2 47 51 619ATV<strong>56</strong>D23M2 20 70.3 59.6 70.3 60 66 7854ATV<strong>56</strong>D33M2 30 97.2 80.8 97.2 88 97 11275 ATV<strong>56</strong>D46M2 40 124.2 102.0 125.4 115 126 1332SpecificationsTable 5 contains specifications for 460 V and 208/230 V drive controllers.Table 5:SpecificationsInput voltage 460 V ±15% or 208 V ±10% and 230 V ±15%Displacement power factor Approximately 0.96Input frequency47.5 to 63 HzOutput voltageMaximum voltage equal to input line voltage4 © 1996 Square D All Rights Reservedηττπ://νιχοντρολσ.χοm
Bulletin No. 50006-519-01BDecember 1996Chapter 1 — Receiving and InstallationTechnical CharacteristicsTable 5:Specifications (Continued)Frequency resolutionFrequency accuracyTemperature drift [2]Drive controller:Input AI1: (High Speed/1,024) Hz [1]Input AI2: (High Speed/512) Hz [1]Keypad display: 0.1 Hz incrementsProcessor: 0.015 Hz incrementsWith Option Board:Option board analog inputs: (High Speed/4096) Hz [1]±(0.0075 Hz + 0.00005 times High Speed)Drive controller:Analog inputs: 3 x 10 -4 times High Speed/°C typicalKeypad display: 7 x 10 -7 times High Speed/°C maximumWith option board:Option board analog inputs: 2.5 x 10 -5 times High Speed/ °C typicalFrequency rangeATV<strong>56</strong>U41N4 to D79N4: 0.1 to 72 HzATV<strong>56</strong>U41M2 to D46M2: 0.1 to 72 HzTorque/overtorque See page 37.Speed referenceAI1:AI2:0-10 V4-20 mA0-5 V with switch on control board0-20 mA, x-20 mA, 20-4 mA with keypad displaySpeed regulationV/f: determined by motor slip, typically 3%SLFV (sensorless flux vector): 1%Efficiency Typically greater than 96%Reference sample time 10 msRampsBraking to standstillAcceleration: 0.1 to 999.9 secondsDeceleration: 0.1 to 999.9 secondsBy DC injection:Automatic for 0.5 s if frequency drops below 1 HzManual by external signalAgainst short circuits:• between output phases• between output phases and groundDrive controller protection • on the outputs of internal supplies• on the logic and analog outputsAgainst input line supply under/overvoltageAgainst overheating: by thermal sensorMotor protection Incorporated electronic thermal protection (see page 11 and page 36)Keypad displayTemperatureHumidity• Self-diagnostics with full fault messages in seven languages• Also refer to Chapter 5Operation: +32 to +104 °F (0 to +40 °C)Storage: -13 to +158 °F (-25 to +70 °C)95% maximum without condensation or dripping waterAltitude≤ 3,300 ft (1,000 m); above this derate by 1.2% for every 300 ft (100 m),max. 6,600 ft (2,000 m)EnclosureNEMA Type 1 (IP30)Pollution Degree Pollution Degree 3 per NEMA ICS-1 and IEC 664-1Resistance to vibrationResistance to shockConforming to IEC 68-2-6:• ATV<strong>56</strong>U41N4 to D46N4 and ATV<strong>56</strong>U41M2 to D33M2: 1 mm peak topeak from 5 to 22.3 Hz and 2 g peak from 22.3 to 150 Hz• ATV<strong>56</strong>D54N4 to D79N4 and ATV<strong>56</strong>D46M2: 0.15 mm peak to peakfrom 10 to 58 Hz and 1 g peak from 58 to 150 HzConforming to IEC 68-2-27: 15 g peak for 11 ms• UL Listed per UL 508C under category NMMS as incorporatingelectronic overload protectionCodes and standards• CSA certified• Conforms to applicable NEMA ICS, NFPA, IEC, & ISO 9001 standards[1] Resolution limited to processor resolution.[2] Drive Controller at operating load and temperature.© 1996 Square D All Rights Reserved5ηττπ://νιχοντρολσ.χοm
Chapter 1 — Receiving and InstallationBulletin No. 50006-519-01BDimensions & Weights December 1996DIMENSIONS &WEIGHTS FOR WALLOR PANELMOUNTING2 x ø1.14 (29)CONDUIT ENTRIES - BOTTOM VIEW1.69 (43)5 x ø1.14 (29)2.28 (58)3 x ø0.87 (22)4.45(113)3.11(79)6.50(165)5.28(134)4.17(106)7.68(195)1.77 (45) 1.77 (45)3.94 (100)Outline 12.28 (58) 2.28 (58)4.61 (117)Outline 25 x ø1.14 (29)2.28 (58)MOUNTINGW1W24 x ø0.22 (5.5)6.89(175)5.79(147)9.65(245)H2H12.28 (58)4.61 (117)2.28 (58)Dimensions:in (mm)Outline 3OutlineDriveControllerATV<strong>56</strong>•••N4DriveControllerATV<strong>56</strong>•••M2MOUNTING DIMENSIONSH1 H2 W1 W2 Ø WeightDoor SwingClearance [1]in mm in mm in mm in mm in mm lb kg in mm1 U41 - U72 U41 11.6 295 10.9 280 7.8 200 6.9 175 0.22 5.5 10.4 4.7 7.8 2002 U90, D12 U72, U90 12.8 325 12.2 310 9.2 234 8.2 209 0.22 5.5 16.1 7.3 9.2 2343 D16, D23 D12, D16 16.3 415 15.7 400 9.2 234 8.2 209 0.22 5.5 30.9 14 9.2 234[1] Door hinges on left-hand side of drive controller.Figure 2:Mounting Information for ATV<strong>56</strong>U41N4 to D23N4 & ATV<strong>56</strong>U41M2 to D16M2NOTE: When metallic conduit is used with drive controllers of outlines 1-3, install a metalconduit entry plate (kit VY1A66201 – separately ordered). Kit mounts in place of theexisting plastic plate and has a conduit hole pattern identical to those shown for outlines 1through 3.6 © 1996 Square D All Rights Reservedηττπ://νιχοντρολσ.χοm
Bulletin No. 50006-519-01BDecember 1996Chapter 1 — Receiving and InstallationDimensions & WeightsCONDUIT ENTRIES - BOTTOM VIEW02.12REF (54)3.<strong>56</strong>(90.5)4.94(125.5)6.32(160.5)7.52(191)2 x ø1.14 (29)9.45(240)MOUNTING0.39 (10) 4 x øDepth 11.0 (280)9.25 (235)ø1.85 (47)2 x ø 1.46 (37)H1H25.31(135)3.25(82.5)J2.44(62)7.95 (202)0.35(9)Outline 4W2W10 REF 3.62 5.32(92) (135)6.77(172)8.23(209)9.92(252)13.54(344)2 x ø1.14 (29)2 x ø2.01 (51)10.0 (254)Depth 11.8 (300)2.52(64)8.36 (212)Outline 5Dimensions:in (mm)OutlineDrive DriveController ControllerATV<strong>56</strong>•••N4 ATV<strong>56</strong>•••M2MOUNTING DIMENSIONSH1 H2 W1 W2 Ø J WeightDoorSwingClearance[1]in mm in mm in mm in mm in mm in mm lb kg in mm4 D33, D46 D23, D33 23.6 600 22.8 580 9.5 240 8.1 205 0.28 7 3.19 81 59.5 27 9.5 2405 D54 - D79 D46 25.6 650 24.4 620 13.8 350 11.8 300 0.35 9 3.39 86[1] Door hinges on left-hand side of drive controller.88.290.4404113.8 350Figure 3:Mounting Information for ATV<strong>56</strong>D33N4 to D79N4 & ATV<strong>56</strong>D33M2 to D46M2© 1996 Square D All Rights Reserved7ηττπ://νιχοντρολσ.χοm
Chapter 1 — Receiving and InstallationBulletin No. 50006-519-01BHandling Drive Controllers December 1996HANDLING DRIVECONTROLLERSDo not remove drive controller from carton until it is at final installation site. Thecarton protects the drive controller and prevents damage to its exterior. Handledrive controller carefully to avoid damage to internal components, frame orexterior. When handling drive controller, balance it carefully to keep it from tipping.ATV<strong>56</strong>U41N4 through D46N4 and ATV<strong>56</strong>U41M2 through D33M2 drivecontrollers can be removed from their packing and installed <strong>manual</strong>ly.After being removed from the carton or shipping wrap, ATV<strong>56</strong>D54N4 throughD79N4 and ATV<strong>56</strong>D46M2 drive controllers require some type of mechanicallifting. Handle drive controllers:• With a hoist, attaching a spreader bar to the two lifting rings on top of the drivecontroller (see Figure 4) or• For ATV<strong>56</strong>D54N4 through D79N4 and ATV<strong>56</strong>D46M2, in a horizontal position,with back of drive controller resting on a pallet.WARNINGHANDLING AND LIFTING HAZARDKeep area below any equipment being lifted clear of all personnel and property. Uselifting method shown below in Figure 4.Failure to follow this instruction can result in death, serious injury, or equipmentdamage.To hoist the drive controller, attach a spreader bar to the two lifting rings on top ofthe drive controller, as shown in Figure 4. Handle the drive controller carefully toavoid damage to the internal components, frame or exterior. Place the drivecontroller in an upright position.YES45°MAX.NOSPREADER BARLIFTINGFORCELIFTINGFORCEFigure 4: Hoisting ATV<strong>56</strong>D54N4 to D79N4 and ATV<strong>56</strong>D46M2PRELIMINARYINSPECTIONThe drive controller must be thoroughly inspected before storing or installing.Upon receipt:1. Remove the drive controller from its packaging and visually inspect exteriorfor shipping damage.2. Ensure that the drive controller catalog number agrees with the packing slipand corresponding purchase order. The catalog number appears on the drivecontroller nameplate and shipping package label. Refer to page 16 for locationof drive controller nameplate.3. If any shipping damage is found, notify your carrier and sales representative.4. If drive controller is to be stored after receipt, replace it in original packingmaterial and observe storage temperature specifications on page 4.8 © 1996 Square D All Rights Reservedηττπ://νιχοντρολσ.χοm
Bulletin No. 50006-519-01BDecember 1996Chapter 1 — Receiving and InstallationInstallation PrecautionsPrior to installation:1. Open the drive controller door or remove access covers.2. Visually verify that all internal mounting hardware and terminal connectionhardware is properly seated, securely fastened and undamaged.3. Visually verify that the control board is properly seated, securely fastened andundamaged. Verify that internal wiring connections are tight. Inspect allconnections for damage.4. Close and secure the drive controller door or replace access covers.CAUTIONEQUIPMENT DAMAGE HAZARDDo not operate or install any drive controller that appears damaged.Failure to follow this instruction can result in injury or equipment damage.INSTALLATIONPRECAUTIONSTo avoid equipment damage, follow these precautions when installing the drivecontroller:• Electrical current through drive controller will result in heat losses that mustbe dissipated into the ambient air immediately surrounding the drivecontroller. To prevent thermal fault or equipment damage, provide sufficientenclosure cooling and/or ventilation to limit the ambient temperature arounddrive controller to a maximum of 40 °C. For power dissipation, refer to Tables1 through 4 on pages 3- 4. Minimum clearances required around the drivecontroller for unobstructed air flow are shown in Figure 5. For proper thermaldissipation, the minimum enclosure size must not be based on clearancesalone. Refer to section “MOUNTING IN GENERAL PURPOSEMETAL ENCLOSURE” on page 10 for additional information.8 (200)Dimensions: in (mm)4(100)2(50)2(50)2 2(50) (50)4 (100)8 (200)Outlines 1-3 Outlines 4-5(ATV<strong>56</strong>U41N4 to D23N4 andATV<strong>56</strong>U41M2 to D16M2)(ATV<strong>56</strong>D33N4 to D79N4 andATV<strong>56</strong>D23M2 to D46M2)Figure 5: Clearances for Drive Controllers• Mount drive controller vertically.• Do not locate drive controller near heat radiating elements.• When installation surface is uneven, put a spacer behind the drive controllermounting pads to eliminate gaps. The drive controller exterior may bedamaged if fastened to an uneven surface.• Drive controllers are Type 1 enclosed devices and must be installed in asuitable environment. The environment around drive controller must notexceed Pollution Degree 3 requirements as defined in NEMA ICS 1 or IEC 664.© 1996 Square D All Rights Reserved9ηττπ://νιχοντρολσ.χοm
Chapter 1 — Receiving and InstallationBulletin No. 50006-519-01BMounting in General Purpose Metal Enclosure December 1996• Verify that the voltage and frequency characteristics of the input line match thedrive controller nameplate rating.• Installation of a disconnect switch between the input line and drive controlleris recommended. Follow national and local codes.• Overcurrent protection is required. Install line power fuses (F1-F3)recommended in Table 11 on page 30 and Table 13 on page 31.• Turn off all power before installing the drive controller. Place a “DO NOTTURN ON” label on the drive controller disconnect. Before proceeding withinstallation, lock the disconnect in the open position.• The ATV<strong>56</strong>U41N4 to ATV<strong>56</strong>D79N4 and ATV<strong>56</strong>U41M2 to ATV<strong>56</strong>D46M2 drivecontrollers may be mounted inside another enclosure to increase the degree ofprotection or size of the enclosure. See “MOUNTING INGENERAL PURPOSE METAL ENCLOSURE” on page 10 and “MOUNTINGIN TYPE 12 (IP54) METAL ENCLOSURE” on page 12.• To improve ventilation, the front cover may be removed when mounting thedrive controller in an enclosure. For ATV<strong>56</strong>U41N4 to D23N4 andATV<strong>56</strong>U41M2 to ATV<strong>56</strong>D16M2 drive controllers, the front cover is removedby first opening the cover, then separating the retaining clips on the cover fromthe side panel. For ATV<strong>56</strong>D33N4 to D79N4 and ATV<strong>56</strong>D23M2 toATV<strong>56</strong>D46M2 drive controllers, the front cover is removed by first opening thecover, then lifting it vertically.• With the front cover removed, the ATV<strong>56</strong>U41N4 to D79N4 and ATV<strong>56</strong>U41M2to ATV<strong>56</strong>D46M2 drive controllers have an IP20 enclosure rating.• The solid state switches of the drive controller power circuit do not providecomplete isolation from the line. Leakage currents and voltages may bepresent at the U/T1, V/T2, and W/T3 terminals of the drive controllerwhenever power is present.MOUNTING INGENERAL PURPOSEMETAL ENCLOSUREVentilationThe ALTIVAR <strong>56</strong> drive controller is a Type 1/IP30 enclosed product. However,certain application considerations may require that the drive controller be installedinside a larger enclosure. If so, observe the following precautions:Forced air cooling is provided on all drive controllers. A fan is located in thebottom of the drive controller (see Figure 6 on page 11) and is protected by aperforated cover. The fan draws in ambient air from underneath or from the frontof the enclosure over the heat sink fins, and expels it vertically from the top of theenclosure. When mounting the drive controller, be sure the air inlets and outletsare not obstructed.• Follow the installation precautions on pages 9 and 10.• Observe minimum clearance distances as indicated in Figure 5 on page 9.• If the enclosure does not provide sufficient free air flow, an enclosureventilation fan is required to exhaust the heat to the enclosure outside ambient.The enclosure fan should have a greater fan flow rate than the drive controllerfan flow rate listed in Table 6 on page 11.• If there is a possibility of condensation, keep the control supply switched onduring periods when the motor is not running or install thermostaticallycontrolled strip heaters.10 © 1996 Square D All Rights Reservedηττπ://νιχοντρολσ.χοm
Bulletin No. 50006-519-01BDecember 1996Chapter 1 — Receiving and InstallationMounting in General Purpose Metal EnclosureSide view shown.ATV<strong>56</strong>U41N4 to D23N4and U41M2 to D16M2ATV<strong>56</strong>D33N4 to D79N4and D23M2 to D46M2Figure 6: Ventilation for ATV<strong>56</strong>U41N4 to D79N4 and ATV<strong>56</strong>U41M2 to D46M2Table 6:Flow Rates for ALTIVAR <strong>56</strong> Drive Controller FansDrive ControllerFan Flow Rate [1]CFM dm 3 /sATV<strong>56</strong>U41N4, ATV<strong>56</strong>U54N4 10 5ATV<strong>56</strong>U72N4, ATV<strong>56</strong>U41M2 20 10ATV<strong>56</strong>U90N4, ATV<strong>56</strong>D12N4, ATV<strong>56</strong>U72M2, ATV<strong>56</strong>U90M2 44 22ATV<strong>56</strong>D16N4, ATV<strong>56</strong>D23N4, ATV<strong>56</strong>D12M2, ATV<strong>56</strong>D16M2 94 47ATV<strong>56</strong>D33N4, ATV<strong>56</strong>D46N4, ATV<strong>56</strong>D54N4, ATV<strong>56</strong>D64N4,ATV<strong>56</strong>D79N4, ATV<strong>56</strong>D23M2, ATV<strong>56</strong>D33M2, ATV<strong>56</strong>D46M2200 100[1] Free air flow rates.For ATV<strong>56</strong>D16N4 to D79N4 and ATV<strong>56</strong>D12M2 to D46M2 drive controllers, theyellow pre-alarm LED flashes when the drive controller approaches the thermallimit. When the drive controller is running at rated load, this pre-alarm is issued atleast one minute before the thermal limit is reached.Thermal protection of all drive controllers is ensured by a thermal sensor attachedto the heat sink. When the sensor opens:• Drive controller trips, the fault LED is illuminated and a fault message appearson the keypad display.• Ventilation system continues operating if control supply is maintained,enabling the drive controller to be rapidly cooled down.© 1996 Square D All Rights Reserved11ηττπ://νιχοντρολσ.χοm
Chapter 1 — Receiving and InstallationBulletin No. 50006-519-01BMounting in Type 12 (IP54) Metal Enclosure December 1996MOUNTING INTYPE 12 (IP54)METAL ENCLOSURECalculating Non-VentilatedEnclosure SizeThe ALTIVAR <strong>56</strong> drive controller is a Type 1/IP30 enclosed product, howevercertain applications may require Type 12 or IP54 protection. The following kits areavailable:• Recess mounting kits for mounting drive controller with the heat sink outsidethe enclosure. There are two types available (see page 13).Below is the equation for calculating Rth (°C/W), the maximum allowable thermalresistance of the enclosure:RthT i = Max. internal ambient temp. ( ° C) around drive controllerT i – T o= ---------------- T o = Max. external ambient temp. ( °C) around enclosurePP = Total power dissipated in enclosure (W)For the power dissipated by the drive controllers at rated load, see Tables 1through 4 on pages 3-4.Useful heat exchange surface area, S (in 2 ), of a wall-mounted enclosure generallyconsists of the sides, top and front. The minimum surface area required for a drivecontroller enclosure is calculated as follows:SK= --------RthRth = Thermal resistance of the enclosure (calculated previously)K = 300 for painted metalThe following points should be considered when sizing the enclosure:• Use only metallic enclosures, since they have good thermal conduction.• This procedure does not consider radiant or convected heat load from externalsources. Do not install enclosures where external heat sources (such as directsunlight) can add to enclosure heat load.• If additional devices are present inside the enclosure, the heat load of thedevices must be considered in the calculation.• The actual useful area for convection cooling of the enclosure will varydepending upon the method of mounting. The method of mounting mustallow for free air movement over all surfaces considered for convectioncooling.Below is a sample calculation of the enclosure size for an ATV<strong>56</strong>U72N4 (5 hp) drivecontroller mounted in a Type 12 enclosure.• Maximum external temperature: T o = 25 °C• Power dissipated inside enclosure: P = 165 W• Maximum internal temperature: T i = 40 °C• Area resistivity for painted metal: K = 300• Calculate maximum allowable thermal resistance, Rth:40 ° C–25 ° CRth = ----------------------------------- = 0.091 ° C/W165 W• Calculate minimum useful heat exchange surface area, S:300S = ---------------- = 3300 in 20.09112 © 1996 Square D All Rights Reservedηττπ://νιχοντρολσ.χοm
Bulletin No. 50006-519-01BDecember 1996Chapter 1 — Receiving and InstallationMounting in Type 12 (IP54) Metal EnclosureUseful heat exchange surface area (S) of the proposed wall-mounted enclosure:• Height: 40 in (1016 mm)• Width: 40 in (1016 mm)• Depth: 20 in (508 mm)front area top area side areaS = ( 40 × 40) + ( 20 × 40) + 2( 40 × 20)= 4000 in 2If the selected enclosure does not provide the required surface area or does notmeet application needs, consider the following:• Use a larger enclosure.• Use one of the recess mounting kits (ATV<strong>56</strong>U41N4 to D23N4 andATV<strong>56</strong>U41M2 to D16M2 drive controllers). Refer to Table 7.• Add a passive heat exchanger to the enclosure.• Add an air conditioning unit to the enclosure.VentilationRecess MountingWhen the drive controller is mounted inside a Type 12 or IP54 enclosure, observethe following ventilation precautions:• Observe minimum clearance distances shown in Figure 5 on page 9.• Follow the installation precautions on pages 9 and 10.• A stirring fan may be necessary to circulate the air inside the enclosure andprevent hot spots in the drive controller and to distribute the heat uniformlyto surfaces used for convection cooling.• If there is a possibility of condensation, keep the control supply switched onduring periods when the motor is not running or install thermostaticallycontrolled strip heaters.To reduce power dissipated in an enclosure, ATV<strong>56</strong>U41N4 to D23N4 andATV<strong>56</strong>U41M2 to D16M2 drive controllers may be recess mounted in a wall of theenclosure, with the heat sink on the outside. This requires a cutout in the enclosureand a recess mounting kit for recess mounting. When this kit is used, the majorityof the drive controller heat load is dissipated outside the enclosure.The power dissipated in the enclosure (P i ) must be dissipated by the availablesurface area of the enclosure. The heat sink assembly, which is mounted outsidethe enclosure, is rated for Type 12/IP54 protection when used with this kit.There are two types of recess mounting kits, the Gasket Kit, which contains onlythe gasket necessary for recess mounting, and the Mounting Adaptor Plate Kitwhich provides mounting plates along with gaskets to allow assembling the drivecontroller to the plates before bolting the assembly into the enclosure. This aids ininstallation and maintenance of the drive controller.© 1996 Square D All Rights Reserved13ηττπ://νιχοντρολσ.χοm
Chapter 1 — Receiving and InstallationBulletin No. 50006-519-01BMounting in Type 12 (IP54) Metal Enclosure December 1996Table 7:Recess Mounting KitsGasket KitMounting AdaptorPlate KitDrive ControllerP i[1] (W)VW3-A66801TVW3-A66806ATV<strong>56</strong>U41N4ATV<strong>56</strong>U54N4ATV<strong>56</strong>U72N4ATV<strong>56</strong>U41M270VW3-A66802TVW3-A66807ATV<strong>56</strong>U90N4ATV<strong>56</strong>D12N4ATV<strong>56</strong>U72M2ATV<strong>56</strong>U90M275VW3-A66803TVW3-A66808ATV<strong>56</strong>D16N4ATV<strong>56</strong>D23N4ATV<strong>56</strong>D12M2ATV<strong>56</strong>D16M2110130110130[1] P i = power dissipated in the enclosure by a recess-mounted drive controller.14 © 1996 Square D All Rights Reservedηττπ://νιχοντρολσ.χοm
Bulletin No. 50006-519-01BDecember 1996Chapter 2 — WiringContentsChapter 2 — WiringWIRING . . . . . . . . . . . . . . . . . . . . . . . . . . . . . . . . . . . . . . . . . . . . . . . . . . . . . . . . . . . . . . .16General Wiring Practices . . . . . . . . . . . . . . . . . . . . . . . . . . . . . . . . . . . . . . . . . . . . . .16Branch Circuit Connections . . . . . . . . . . . . . . . . . . . . . . . . . . . . . . . . . . . . . . . . . . . .16Control Wiring Precautions . . . . . . . . . . . . . . . . . . . . . . . . . . . . . . . . . . . . . . . . . . . . .17Output Wiring Precautions . . . . . . . . . . . . . . . . . . . . . . . . . . . . . . . . . . . . . . . . . . . . .17Grounding . . . . . . . . . . . . . . . . . . . . . . . . . . . . . . . . . . . . . . . . . . . . . . . . . . . . . . . . . .18TERMINAL STRIP LOCATIONS . . . . . . . . . . . . . . . . . . . . . . . . . . . . . . . . . . . . . . . . . . . .19POWER WIRING . . . . . . . . . . . . . . . . . . . . . . . . . . . . . . . . . . . . . . . . . . . . . . . . . . . . . . . .20CONTROL WIRING . . . . . . . . . . . . . . . . . . . . . . . . . . . . . . . . . . . . . . . . . . . . . . . . . . . . . .22USING THE LOGIC INPUTS (J12). . . . . . . . . . . . . . . . . . . . . . . . . . . . . . . . . . . . . . . . . . .24USING THE LOGIC OUTPUTS (J12). . . . . . . . . . . . . . . . . . . . . . . . . . . . . . . . . . . . . . . . .25USING THE SPEED REFERENCE INPUTS (J13) . . . . . . . . . . . . . . . . . . . . . . . . . . . . . .26USING THE ANALOG OUTPUTS (J13). . . . . . . . . . . . . . . . . . . . . . . . . . . . . . . . . . . . . . .26USING THE RELAY OUTPUTS (J1) . . . . . . . . . . . . . . . . . . . . . . . . . . . . . . . . . . . . . . . . .27REMOVAL OF CL1, CL2 JUMPERS . . . . . . . . . . . . . . . . . . . . . . . . . . . . . . . . . . . . . . . . .27CONTROL CIRCUIT DIAGRAMS . . . . . . . . . . . . . . . . . . . . . . . . . . . . . . . . . . . . . . . . . . .283-Wire Control . . . . . . . . . . . . . . . . . . . . . . . . . . . . . . . . . . . . . . . . . . . . . . . . . . . . . .282-Wire Control with Isolation Contactor on Line Side (Coast to Stop) . . . . . . . . . . . .29© 1996 Square D All Rights Reserved15ηττπ://νιχοντρολσ.χοm
Chapter 2 — WiringBulletin No. 50006-519-01BGeneral Wiring Practices December 1996WIRINGGeneral Wiring PracticesBranch Circuit ConnectionsGood wiring practice requires the separation of control circuit wiring from allpower (line and load) wiring. Power wiring to the motor must have the maximumpossible separation from all other power wiring, whether from the same drive orother drives; do not run in the same conduit. This separation reduces thepossibility of coupling electrical noise between circuits.When wiring ALTIVAR TM <strong>56</strong> drive controllers, follow the wiring practicesrequired by national and local electrical codes in addition to the following:• When metallic conduit is used with ATV<strong>56</strong>U41N4 to D23N4 andATV<strong>56</strong>U41M2 to D16M2 drive controllers, a metal conduit entry plate, kitVY1A66201, must be used. It mounts in place of the existing plastic plate andis held in place with two screws. A bond wire is included, which must beconnected to ground (GND) on the J2 terminal strip.• Use metallic conduit for all drive controller wiring. Do not run control andpower wiring in the same conduit.• Metallic conduits carrying power wiring or low-level control wiring must beseparated by at least 3 in (8 cm).• Non-metallic conduits or cable trays used to carry power wiring must beseparated from metallic conduit carrying low-level control wiring by at least12 in (30.5 cm).• Whenever power and control wiring cross, the metallic conduits and nonmetallicconduits or trays must cross at right angles.• In some installations, conducted emissions to the line from the drive controllermust be attenuated to prevent interference with telecommunication, radio andsensitive electronic equipment. In these instances, attenuating filters may berequired. Consult catalog for selection and application of these filters.All branch circuit components and equipment (such as transformers, feeder cables,disconnect devices and protective devices) must be rated for the maximum inputcurrent of the ALTIVAR <strong>56</strong> drive controller, not the motor full load current. Thedrive controller input current is stamped on the nameplate. Since maximum inputcurrent depends on the impedance of the power system, several nameplate valuesare listed. The input current values listed are based on available fault current at thedrive input terminals. Select the input current corresponding to the available faultcurrent capability. If current limiting fuses or circuit breakers are used to reduce theavailable fault current, use the maximum input current listed. On theATV<strong>56</strong>U41N4 to D79N4 and ATV<strong>56</strong>U41M2 to D46M2 drive controllers, thenameplate is located in the bottom right corner of the right side of the drivecontroller.WARNINGOVERCURRENT PROTECTIVE DEVICES MUST BE PROPERLY COORDINATED• To achieve published fault withstand current ratings, install the specified fuses listedon drive controller nameplate and in Table 11 on page 30.• Do not connect drive controller to power feeder whose short circuit capacityexceeds drive controller withstand fault rating listed on drive controller nameplate.Failure to follow these instructions can result in death, serious injury, orequipment damage.All ALTIVAR <strong>56</strong> drive controllers require fuse protection. ATV<strong>56</strong>U41N4 to D79N4and ATV<strong>56</strong>U41M2 to D46M2 drive controllers require user-supplied external fusesas indicated on the nameplate and in Table 11 on page 30 and Table 13 on page 31.16 © 1996 Square D All Rights Reservedηττπ://νιχοντρολσ.χοm
Bulletin No. 50006-519-01BDecember 1996Chapter 2 — WiringControl Wiring PrecautionsControl Wiring PrecautionsOutput Wiring PrecautionsAll control inputs and outputs of the drive controller are isolated from the inputlines, however certain control wiring precautions must be followed:• Control wiring conductor runs must be kept short and direct. Follow theconduit and circuit separation requirements listed in “WIRING” on page 16.• Control contacts used with the drive controller inputs must be rated foroperation at open circuit voltages of 24 VDC and closed circuit currents of10 mADC.• Twisted cable with a pitch of 1 to 2 inches is required for analog inputs andoutputs. Use of a cable shield is recommended. The shield must be terminatedto ground at one end only. It is recommended that the shield be terminated atthe drive controller. Shield connection terminals are provided on the ALTIVAR<strong>56</strong> drive controller for this purpose.• The coils of all relays and solenoids connected to the output contacts of thedrive controller must be equipped with appropriate transient suppressors.• For proper control wiring, conductors must be routed to avoid contact withother voltage potentials in the drive controller. Wire insulation must have theappropriate voltage rating for the voltage present.WARNINGDRIVE CONTROLLER DAMAGEDrive controller will be damaged if input line voltage is applied to output terminals(U/T1, V/T2, W/T3). Check power connections before energizing drive controller.Failure to follow these instructions can result in death, serious injury, orequipment damage.The drive controller is sensitive to the amount of capacitance (either phase-tophaseor phase-to-ground) present on the output power conductors. If excessivecapacitance is present, the drive controller may trip. Follow the guidelines belowwhen selecting output cable:• Cable type: the cable selected must have a low capacitance phase-to-phase andto ground. Do not use mineral impregnated cable because it has a very highcapacitance. Immersion of cables in water increases capacitance.• Cable length: the longer the cable, the greater the capacitance. Cable lengthsgreater than 100 ft (30.5 m) may cause problems.• Proximity to output cables from other drive controllers: because of the highfrequency switching and increased capacitance, the drive may fault undersome conditions.• Do not use lightning arrestors or power factor correction capacitors on outputof drive controller.For installation where cable capacitances may be a problem, an inductor can beinstalled between the drive controller and the motor. See catalog or consult factoryfor additional information.CAUTIONDRIVE CONTROLLER SWITCH FAILUREFor proper drive controller electronic short circuit protection, inductance is required inthe output power wiring. Provide at least 48 in (122 cm) of cable at the drive controlleroutput (U/T1, V/T2, W/T3).Failure to follow this instruction can result in equipment damage.© 1996 Square D All Rights Reserved17ηττπ://νιχοντρολσ.χοm
Chapter 2 — WiringBulletin No. 50006-519-01BGrounding December 1996GroundingFor safe, dependable operation, drive controllers must be grounded according toall national and local codes. To ground the drive controller:• Connect a copper wire from the grounding terminal to the power systemground conductor. Wire size is determined by the drive controller size and bynational and local codes.• Verify that resistance to ground is one ohm or less. Improper grounding causesintermittent and unreliable operation.DANGERHAZARDOUS VOLTAGE—INADEQUATE GROUNDING• Ground equipment using screw provided. Drive controller must be properlygrounded before applying power.• Do not use metallic conduits or shields as a ground conductor.Failure to follow these instructions will result in death or serious injury.Multiple drive controllers must be grounded as shown in Figure 7. Do not loop orseries the ground cables.YESNODrive ControllerDrive ControllerDrive ControllerDrive ControllerDrive ControllerDrive ControllerDrive ControllerDrive ControllerDrive ControllerFigure 7:Grounding Multiple Drive Controllers• When using the metal conduit entry plate (kit VY1A66201) with ATV<strong>56</strong>U41N4to D23N4 and ATV<strong>56</strong>U41M2 to D16M2 drive controllers, the bond wire mustbe connected to ground (GND) as shown in Figure 9 on page 22.18 © 1996 Square D All Rights Reservedηττπ://νιχοντρολσ.χοm
AI2-UAI2-IAI2-UAI2-IAI2-UAI2-IAI2-UAI2-IBulletin No. 50006-519-01BDecember 1996Chapter 2 — WiringTerminal Strip LocationsTERMINAL STRIPLOCATIONSDC Bus LEDJ13J2GNDCL1CL2L1L2L3Fault LEDCaution LEDPower LEDJ12W/T3V/T2U/T1PBPAJ2GNDCL1CL2L1L2L3J13J12J1GNDW/T3V/T2U/T1PBPAOutlines 1 & 2ATV66U41N4 to D12N4 and ATV66U41M2 to U90M2Outline 3ATV66D16N4 to D23N4 and ATV66D12M2 to D16M2J13J12J13J12J2CL2CL1J2GNDGNDCL1CL2L1L2L3J1W/T3V/T2U/T1PBPAGNDL1L2L3GNDW/T3V/T2U/T1PBPAOutline 5ATV66D54N4 to D79N4 and ATV66D46M2Outline 4ATV66D33N4 to D46N4 and ATV66D23M2 to D33M2Figure 8:Terminal Strip Locations: ATV<strong>56</strong>U41N4 to D79N4 and ATV<strong>56</strong>U41M2 toD46M2© 1996 Square D All Rights Reserved19ηττπ://νιχοντρολσ.χοm
Chapter 2 — WiringBulletin No. 50006-519-01BPower Wiring December 1996POWER WIRINGTable 8: Power Terminal Strip Characteristics [1]Connector Terminal [2] Function CharacteristicsGNDL1L2L33-phase powersupply460 VAC ±15% (ATV<strong>56</strong>•••N4 units)208 V ±10% / 230 V ±15% (ATV<strong>56</strong>•••M2 units)47 to 63 Hz+–FilteredDC voltage620 to 850 VDC (ATV<strong>56</strong>•••N4 units)275 to 425 VDC (ATV<strong>56</strong>•••M2 units)J2U/T1V/T2W/T3GNDOutputconnections tomotor0 to 460 VAC0 to 208 VAC / 0 to 230 VACCL1 [3]CL2Single-phasecontrol supply460 VAC ±15% (ATV<strong>56</strong>•••N4 units)208 V ± 10% / 230 V ± 15% (ATV<strong>56</strong>•••M2 units)47 to 63 HzPAPBReservedReserved. Do not wire to PA, PB terminals.CL21CL22Tap for CL1 andCL2460 VAC ±15% (ATV<strong>56</strong>•••N4 units)208 V ± 10% / 230 V ± 15% (ATV<strong>56</strong>•••M2 units)47 to 63 HzATV<strong>56</strong>D16N4 to D79N4 drive controllers only[1] For power terminal strip locations, refer to Figure 9 on page 22.[2] See circuit diagrams on page 28 and 29.[3] The CL1 and CL2 terminals are connected with jumpers to L1 and L2 terminals. When using a line contactor,the jumpers must be removed and CL1 and CL2 supplied separately to maintain control power. See circuitdiagrams on page 28 and page 29. CL1 and CL2 must be connected to the same feeder conductors that supplyL1, L2 and L3 of the drive controller.20 © 1996 Square D All Rights Reservedηττπ://νιχοντρολσ.χοm
Bulletin No. 50006-519-01BDecember 1996Chapter 2 — WiringPower WiringTable 9: Power Terminal Wire RangeNOTE: All wire entries in AWG or Thousand Circular Mills (MCM) represent themaximum allowable conductor size for the referenced field wiring terminal. All wire entriesin square mm (mm 2 ) represent the recommended size of conductor based on IEC 364conductor dimensioning criteria. Do not use the IEC 364 conductor selections forinstallations requiring dimensioning per NFPA 70 or CSA C22.Drive Controller (ATV<strong>56</strong>•••••)CL1, CL21CL2, CL22L1L2L3U/T1V/T2W/T3+–PAPBGNDINGNDOUTTerminalsMax. WireSizeTerminalTorqueMax. WireSizeTerminalTorqueMax. WireSizeTerminalTorqueMax. WireSizeTerminalTorqueMax. WireSizeTerminalTorqueMax. WireSizeTerminalTorqueMax. WireSizeTerminalTorqueU41N4U54N4U72N4U41M2[1]AWGmm 2 102.5lb-inN•m6.730.76AWG 10mm 2 2.5lb-inN•m6.730.76AWG 10mm 2 2.5lb-inN•m6.730.76AWGmm 2 102.5lb-inN•m6.730.76U90N4D12N4U72M2U90M2[1]61035.4461035.4461035.4461035.44D16N4D23N4D12M2D16M2[1]122.<strong>56</strong>.730.7641017.7241017.7241017.72D33N4D46N4D23M2D33M2[2]122.<strong>56</strong>.730.762/03526.532/03526.532/03526.53D54N4D64N4D79N4D46M2[2]122.<strong>56</strong>.730.764/070170194/070170194/07017019AWGmm 2 [3] [3] [3] [3] [3]lb-inN•mAWG6mm 2 6lb-inN•m[3] [3] [3] [3] [3]17.41.96AWG6mm 2 6lb-inN•m17.41.9661035.4461035.4441017.7241017.7241626.5341626.5323526.5323526.53[1] 60/75 °C copper.[2] 75 °C copper.[3] Reserved. Do not wire to PA, PB terminals.© 1996 Square D All Rights Reserved21ηττπ://νιχοντρολσ.χοm
Chapter 2 — WiringBulletin No. 50006-519-01BControl Wiring December 1996AI2VOLTSJ13J12SLI1LI2LI3LI4+24LOPLO1LO2COMCONTROL WIRINGNOTE:The logic inputs and outputs and analog inputs andoutputs are all referenced to Common (COM on J12 andJ13). This Common is isolated from the input line and fromground (S on J13).RMS voltage rating of the isolation barrier betweenCommon and ground is 250 V. If Common is elevated withrespect to earth by external user connections, then alldevices connected to Common must be rated for the appliedvoltage.J1 is located on the power board.CURRENTCOMAI1+10AI2AO1AO2COMFigure 9:Terminal Strip Connections for Control Board22 © 1996 Square D All Rights Reservedηττπ://νιχοντρολσ.χοm
Bulletin No. 50006-519-01BDecember 1996Chapter 2 — WiringControl WiringTable 10: Control Terminal Strip CharacteristicsConnector Terminal [1] Function CharacteristicsR1A [3]R1BJ1 [2] R1CR2AR2BR2CJ12 [2]J13 [2]LI1LI2LI3LI4+24LOPLO1LO2COMSCOMAI1+10AI2AO1AO2COMN.O. contact [4]N.C. contactCommonN.O. contact [4]N.C. contactCommonLogic input 1Logic input 2Logic input 3Logic input 4Control supplyLO supply inputLogic output 1Logic output 2Logic commonFault relayoutputProgrammablerelay outputShield/GroundSpace, for isolationSpeed ref. commonInput 1: Speed ref.voltageReference supplyInput 2: Speed ref. currentAnalog output 1Analog output 2Analog commonMinimum: 10 mA, 24 VDCMaximum: inductive load of:2.0 A, 120 VAC; max: 0.10 J/operation, 80 operations/minute1.0 A, 220 VAC; max: 0.25 J/operation, 25 operations/minute2.0 A, 24 VDC; max: 0.10 J/operation, 80 operations/minuteArc suppression provided by varistors in parallel with relay contacts24 V, 10 mA; State 0: V12 V; Vmax = 30 V24 V, 10 mA; State 0: V12 V; Vmax = 30 V24 V, 10 mA; State 0: V12 V; Vmax = 30 V24 V, 10 mA; State 0: V12 V; Vmax = 30 VIs = 210 mA max. [5]Minimum: 12 V, Maximum: 30 V, quiescent current: typical 15 mA24 V, 200 mA max. [5]24 V, 200 mA max. [5]0 V0 V0-10 V, Z = 30 kΩ10 V, Is = 10 mA max.4-20 mA [6] , Z = 250 Ω0-20 mA, 12 V max. (programmable as 4-20 mA w/ keypad display)0-20 mA, 12 V max. (programmable as 4-20 mA w/ keypad display)0 V[1] See circuit diagrams on page 28 and 29.[2] Max. wire size for all terminals: 14 AWG (2.5 mm 2 ). Tightening torque: 3.5 lb-in (0.4 n•m).[3] Relay coil deenergizes on fault.[4] Contact state with drive controller deenergized.[5] Total current of + 24 V internal supply is 210 mA. Available current of the two logic outputs can be calculated as follows: each logic input requires10 mA, each analog output requires 20 mA and the typical quiescent current of LOP is 15 mA. For example, in an application where three logicinputs and one analog output are used, the total available current is 210 mA - (3 x 10 mA) - (1 x 20 mA) - 15 mA = 145 mA to drive the logic outputloads. If more current is required, an external supply must be used.[6] 0-20 mA, x-20 mA, 20-4 mA programmable with keypad display. 0-5 V (Z = 30 kΩ) selectable with switch on control board.© 1996 Square D All Rights Reserved23ηττπ://νιχοντρολσ.χοm
Chapter 2 — WiringBulletin No. 50006-519-01BUsing the Logic Inputs (J12) December 1996USING THE LOGICINPUTS (J12)The logic inputs may be operated from either the internal supply or an externalsupply. Figure 10 shows the connections for operating the logic inputs from theinternal power supply.+ 24 –VDCLI1 LI2 LI3 LI4 +24 COMCustomersuppliedFigure 10: Operating the Logic Inputs from Internal Power SupplyFigure 11 shows the connections for operating the logic inputs from an externalpower supply.+ 24 –VDCLI1 LI2 LI3 LI4 +24 COM12-30 VDC –Supply +CustomersuppliedFigure 11: Operating the Logic Inputs from External Power SupplyThe logic inputs may be assigned to other functions than those set at the factory.Factory settings are listed in Table 16 on page 34. For information on otherfunctions, refer to Chapter 5.24 © 1996 Square D All Rights Reservedηττπ://νιχοντρολσ.χοm
Bulletin No. 50006-519-01BDecember 1996Chapter 2 — WiringUsing the Logic Outputs (J12)USING THE LOGICOUTPUTS (J12)The logic outputs can be operated from either the internal supply or an externalsupply. An external supply is required if the logic outputs drive a load at a voltageother than 24 V or if the current required is greater than the available current ascalculated in Note 5 in Table 10 on page 23.NOTE: If the internal supply is used, LOP must be connected to +24.+24VDC–+24 LOPLO1LO2 COMI Limit200 mACustomersuppliedFigure 12: Operating the Logic Outputs from Internal Power SupplyFigure 13 shows the connection of an external supply for operating the logicoutputs.+24VDC–+24 LOPLO1LO2 COM+12-30 VDC–SupplyCustomersuppliedFigure 13: Operating the Logic Outputs from External Power Supply© 1996 Square D All Rights Reserved25ηττπ://νιχοντρολσ.χοm
Chapter 2 — WiringBulletin No. 50006-519-01BUsing the Speed Reference Inputs (J13) December 1996USING THE SPEEDREFERENCE INPUTS(J13)The ALTIVAR <strong>56</strong> drive controller has two analog inputs for the speed reference,AI1 and AI2. AI1 is a 0-10 V voltage input. A speed potentiometer between2.2 kΩ and 2.5 kΩ can be connected at COM, AI1 and +10 V as shown in Figure 14.AI2 is factory set as a 4-20 mA current input. It can be programmed to0-20 mA, x-20 mA or 20-4 mA with the keypad display. It can also be set for0-5 V with a switch on the control board.• The speed reference controls the frequency of applied power to the motor. Theactual shaft speed remains dependent on the acceleration and decelerationramps, the torque capabilities of the motor/drive controller combination, thecontrol type selected (see page 35), and the number of poles on the motor.• The speed range is limited by Low Speed and High Speed settings. Factorysettings are zero and nominal or base frequency.• The speed reference inputs share the same common and are isolated from theinput line and from ground.• The +10 V internal supply (terminals +10/COM) has a 10 mA supplycapability and is protected against short circuits.• If signals are present on both inputs, the values are summed for the speedreference. With the keypad display, they can be configured to be independent.For more information on configuration of the analog inputs, refer to Chapter 5.Figure 14 shows how the speed reference inputs may be connected. The speedreference inputs are isolated from the input line.S0 VCOM AI1+10V+10V AI2R4-20 mACustomersupplied2.2 kΩ < R < 2.5 kΩDefault setting: AI1 + AI2Figure 14: Using Speed Reference InputsUSING THE ANALOGOUTPUTS (J13)The ALTIVAR <strong>56</strong> drive controller has two 0-20 mA analog outputs, AO1 and AO2.They are both 0-20 mA current inputs. AO1 is factory set as proportional to motorfrequency, with 20 mA corresponding to High Speed. AO2 is factory set asproportional to motor current, with 20 mA corresponding to twice the rated outputcurrent of the drive controller (see Tables 1 to 4 on pages 3-4).• Maximum driving voltage is +12 V with an internal impedance of 100 Ω.• The analog outputs can be assigned to other functions than those set at thefactory. For information on other functions, refer to Chapter 5.0-20 mA0-20 mACOM AO1 AO2Hz250 Ω A 250 Ω CustomersuppliedFigure 15: Analog Outputs26 © 1996 Square D All Rights Reservedηττπ://νιχοντρολσ.χοm
Bulletin No. 50006-519-01BDecember 1996Chapter 2 — WiringUsing the Relay Outputs (J1)USING THE RELAYOUTPUTS (J1)The ALTIVAR <strong>56</strong> drive controller has two voltage-free Form C relay outputcontacts (see Figure 16). The contacts have the following characteristics:• Minimum voltage: +24 VDC; minimum current: 10 mA• Maximum voltage: +30 VDC; maximum current: 2 A• 120 VAC: maximum current 2 A• 220 VAC: maximum current 1 A• R1 is the drive controller fault relay. It is not programmable.R1R1R2R2R1AR1C R1B R2A R2C R2B+ –Customer SuppliedVoltageCustomerSuppliedFigure 16: Relay OutputsContact state is shown with drive controller deenergized. Relay contact outputscan be assigned to other functions than those set at the factory. Factory settings arelisted in Table 16 on page 34. For information on other functions, refer to Chapter 5.Maximum recommended fuse type and rating is Bussmann FNQ-2 or equivalent.REMOVAL OF CL1,CL2 JUMPERSJumpers CL1 and CL2 are factory installed. If separate control power is required,these jumpers must be removed. To remove jumpers, use the following procedure:ATV<strong>56</strong>U41N4 to D12N4 and ATV<strong>56</strong>U41M2 to U90M2 drive controllers: Loosen theCL1 and CL2 screws and the L1 and L2 screws. Remove captive jumper wireassembly.ATV<strong>56</strong>D16N4 to D79N4 and ATV<strong>56</strong>D12M2 to D46M2 drive controllers:1. Loosen the front screws only (see Figure 17).CL1 CL2Front screwsPull jumper straight outSleeveFigure 17: CL1, CL2 Jumper Removal2. Using a pair of needle nose pliers, grasp the jumpers and pull straight out.The sleeve on the bottom terminal should remain.3. Connect separate control power to the top terminals. DO NOT makeconnections to the bottom terminals which contain the sleeves. Leave thebottom terminals open circuited.4. Tighten the front screws to secure the connections.© 1996 Square D All Rights Reserved27ηττπ://νιχοντρολσ.χοm
Chapter 2 — WiringBulletin No. 50006-519-01BControl Circuit Diagrams December 1996CONTROL CIRCUITDIAGRAMSThis section contains wiring diagrams for 2- and 3-wire control circuits. Operationof 2- and 3-wire control is explained in Chapter 5.3-Wire ControlExternalControlPower[1]F11EquipmentF10L3L2L1F1-F3STOP0-20 mA4-20 mAR1+ –InternalControlPowerL3L2L1F1-F3CL2CL1L3L2L1+24KeypadConnectorLOP LO2LI4LI3LO1 COM AO2LI2 LI1A1AO1 COMAI2 +10AI1R2C R2A R2BCOMCL2 CL1L3L2W/T3 U/T1R1C R1A R1B V/T2L1PBPA+–[1]Add F10 and F11 fuses if tap conductor protection is required. The CL1 and CL2 inputs of all ATV<strong>56</strong> drive controllers are internally protected and require no external fusing.AHzW1 V1M13øU1Figure 18: Recommended 3-Wire Control Circuit DiagramFigure 18 is the recommended 3-wire control circuit diagram. It shows how toconnect a branch circuit disconnect device and protective fusing to the drivecontroller. Additional sequencing logic may be required. Refer to Tables 11 to 15 onpages 30-32 for additional equipment required. The drive controller is factory setfor 2-wire control. To set for 3-wire control, refer to Chapter 5.2-Wire ControlExternalControl PowerEquipment[1] F11 F10L3L2L1F1-F3RUNENABLE0-20 mA4-20 mAR1+ –InternalControlPowerL3L2L1F1-F3CL2CL1L3L2L1+24KeypadConnectorLOP LO2LI4LI3LI2A1LI1LO1 COM AO2 AO1 COMAI2+10AI1R2C R2A R2BCOMCL2 CL1L3L2W/T3 U/T1R1C R1A R1B V/T2L1PBPA+–[1]Add F10 and F11 fuses if tap conductor protection is required. The CL1 and CL2 inputs of all ATV<strong>56</strong> drive controllers are internally protected and require no external fusing.AHzW1 V1M13øU1Figure 19: 2-Wire Control Circuit DiagramFigure 19 is a 2-wire control circuit diagram. It shows how to connect a branchcircuit disconnect device and protective fusing to the drive controller. Additionalsequencing logic may be required. See Tables 11 to 15 on pages 30-32 for additionalequipment required.28 © 1996 Square D All Rights Reservedηττπ://νιχοντρολσ.χοm
Bulletin No. 50006-519-01BDecember 1996Chapter 2 — WiringControl Circuit Diagrams2-Wire Control withIsolation Contactor on LineSide (Coast to Stop)InternalControlPowerL3L2L1F1-F3Existinguser supply,or as shownF8T1F7F9+24LI4LI3LI2LI1AI20-20 mA4-20 mAR1[1]F11 F10+ –+10A1KeypadConnector –W/T3 U/T1LOP LO2 LO1 COM AO2 AO1 COM R2C R2B R1C R1B V/T2 PB PAAI1COMCL2CL1L3L2KM1L1+AHzR2AR1AW1V1U1KM1TSIsolationClosedKM1IsolationOpenM13ø[1]Add F10 and F11 fuses if tap conductor protection is required. The CL1 and CL2 inputs of all ATV<strong>56</strong> drive controllers are internally protected and require no external fusing.Figure 20: 2-Wire Control Circuit Diagram with Isolation ContactorFigure 20 is a 2-wire control circuit diagram with an isolation contactor on the lineside. It shows how to connect a branch circuit disconnect device and protectivefusing to the drive controller. Additional sequencing logic may be required. Referto Tables 11 to 15 on pages 30-32 for additional equipment required.The maximum number of operations of the KM1 contactor should not exceed oneper minute for the ATV<strong>56</strong>U41N4 to ATV<strong>56</strong>D79N4 and ATV<strong>56</strong>U41M2 toATV<strong>56</strong>D46M2 drive controllers.© 1996 Square D All Rights Reserved29ηττπ://νιχοντρολσ.χοm
Chapter 2 — WiringBulletin No. 50006-519-01BEquipment Recommendations December 1996Table 11: Recommended Equipment for 1 to 100 hp 460 V Drive ControllersNOTE: The equipment listed in Tables 4 through 8 is valid for all versions of the circuit diagrams.M1 A1 F1-F3 Input F10, F11 Control KM1 TS T1 F7, F8 F9MotorHPControllerATV<strong>56</strong>•••N4VTLowNoiseVTLine Power FusesRatings, Fuse ClassCC FastActing1 U41 U41 600 V, 6 A 600 V, 6 A2 U41 U41 600 V, 10 A 600 V, 10 A3 U41 U41 600 V, 15 A 600 V, 15 A4 U54 U41 600 V, 20 A 600 V, 20 A5 U72 U54 600 V, 20 A 600 V, 20 A7.5 — U72 600 V, 25 A 600 V, 25 ATFuse Carriers9080-FB3611CCT60060-3CR [2]9080-FB3611CCT60060-3CR [2]9080-FB3611CCT60060-3CR [2]9080-FB3611CCT60060-3CR [2]9080-FB3611CCT60060-3CR [2]9080-FB3611CCT60060-3CR [2]ControlFuses[2][1] KTK-R-3[1] KTK-R-3[1] KTK-R-3[1] KTK-R-3[1] KTK-R-3[1] KTK-R-37.5 U90 — 600 V, 30 A T60060-3CR [2] KTK-R-310 D12 U90 600 V, 35 A T60060-3CR [2] KTK-R-315 — D12 600 V, 60 A T60060-3CR [2] KTK-R-315 D16 — 600 V, 60 A T60060-3CR [2] KTK-R-320 D23 D16 600 V, 70 A T60100-3C [2] KTK-R-325 — D23 600 V, 90 A T60100-3C [2] KTK-R-330 D33 — 600 V, 90 A T60100-3C [2] KTK-R-340 D46 D33 600 V, 125 A 3 ea.T60200-1C [2]50 D54 D46 600 V, 125 A 3 ea.T60200-1C [2]60 D64 D54 600 V, 175 A 3 ea.T60200-1C [2]75 D79 D64 600 V, 200 A 3 ea.T60200-1C [2]100 — D79 600 V, 225 A 3 ea.T60400-1C [2]KTK-R-3KTK-R-3KTK-R-3KTK-R-3KTK-R-3FuseCarriers9080-FB2611CC9080-FB2611CC9080-FB2611CC9080-FB2611CC9080-FB2611CC9080-FB2611CC9080-FB2611CC9080-FB2611CC9080-FB2611CC9080-FB2611CC9080-FB2611CC9080-FB2611CC9080-FB2611CC9080-FB2611CC9080-FB2611CC9080-FB2611CC9080-FB2611CC9080-FB2611CCLineContactorLC1-D2510G6LC1-D2510G6LC1-D2510G6LC1-D2510G6LC1-D2510G6LC1-D2510G6LC1-D2510G6LC1-D2510G6LC1-D2510G6LC1-D2510G6LC1-D3210G6LC1-D4011G6LC1-D5011G6LC1-D8011G6LC1-D8011G6LC1-F115G6LC1-F115G6LC1-F150G6TransientSuppressorLA4-DA2GLA4-DA2GLA4-DA2GLA4-DA2GLA4-DA2GLA4-DA2GLA4-DA2GLA4-DA2GLA4-DA2GLA4-DA2GLA4-DA2GLA4-DA2GLA4-DA2GLA4-DA2GLA4-DA2GLA9-F980LA9-F980LA9-F980Xfmr[7]9070-K50D209070-K50D209070-K50D209070-K50D209070-K50D209070-K50D209070-K50D209070-K50D209070-K50D209070-K50D209070-K50D209070-K75D209070-K75D209070-K75D209070-K75D209070-K200D209070-K200D209070-K200D20PrimaryXfmrFuses[2]FNQ-R-1/4FNQ-R-1/4FNQ-R-1/4FNQ-R-1/4FNQ-R-1/4FNQ-R-1/4FNQ-R-1/4FNQ-R-1/4FNQ-R-1/4FNQ-R-1/4FNQ-R-1/4FNQ-R-3/10FNQ-R-3/10FNQ-R-3/10FNQ-R-3/10FNQ-R-1-1/4FNQ-R-1-1/4FNQ-R-1-1/4Sec.XfmrFuses[2]FNQ-R-1/2FNQ-R-1/2FNQ-R-1/2FNQ-R-1/2FNQ-R-1/2FNQ-R-1/2FNQ-R-1/2FNQ-R-1/2FNQ-R-1/2FNQ-R-1/2FNQ-R-1/2FNQ-R-6/10FNQ-R-6/10FNQ-R-6/10FNQ-R-6/10FNQ-R-1-6/10FNQ-R-1-6/10FNQ-R-1-6/10[1] Square D Class CC Fuse Block numbers.[2] Bussmann part numbers.[7] T1 has been dimensioned to supply KM1 coil inrush and sealed VA requirements only. Any user control / pilot device additions may require re-dimensioning of T1 VAcapacity.30 © 1996 Square D All Rights Reservedηττπ://νιχοντρολσ.χοm
Bulletin No. 50006-519-01BDecember 1996Chapter 2 — WiringEquipment RecommendationsTable 12: Maximum Allowable Line Fuse (F1 to F3) for 460 V Drive ControllersController ATV<strong>56</strong>•••N4 Class CC (Fast-Acting) Class T SemiconductorU41, U54, U72 600 V, 25 A 600 V, 35 A —U90, D12 — 600 V, 60 A —D16, D23 — 600 V, 100 A —D33, D46 — 600 V, 125 A —D54, D64, D79 — 600 V, 225 A —Table 13: Recommended Equipment for 1 to 50 hp 208/230 V Drive ControllersM1 A1 F1-F3 Input F1, F2 Control KM1 TS T1 F7, F8 F9MotorHPControllerATV<strong>56</strong>•••M2VTLowNoiseVT1 U41 U411.5 U41 U412 U41 U413 U41 U414 — U415 U72 U727.5 U90 U7210 D12 U9015 D16 D1220 D23 D2325 D33 D2330 D33 D3340 D46 D3350 — D46Line PowerFusesRatings,Fuse ClassCCFastActing600 V,10 A600 V,15 A600 V,20 A600 V,25 A600 V,25 AFuse CarriersControlFuses[2]FuseCarriersLineContactorTransientSuppressorXfmr[7]Primary XfmrFuses[2]T 208 V 230 V600 V,10 A600 V,15 A600 V,20 A600 V,25 A600 V,25 A600 V,35 A600 V,45 A600 V,60 A600 V,90 A600 V,110 A600 V,150 A600 V,150 A600 V,200 A600 V,250 A9080-FB3611CC [1] KTK-R-3T60030-3CR [2]9080-FB3611CC [1] KTK-R-3T60030-3CR [2]9080FB3611CC [1] KTK-R-3T60030-3CR [2]9080-FB3611CC [1] KTK-R-3T60030-3CR [2]9080-FB3611CC [1] KTK-R-3T60030-3CR [2]T60060-3C [2] KTK-R-3T60060-3C [2] KTK-R-3T60060-3C [2] KTK-R-33 ea.T60100-1C [2]3 ea.T60200-1C [2]3 ea.T60200-1C [2]3 ea.T60200-1C [2]3 ea.T60200-1C [2]3 ea.T60400-1C [2]KTK-R-3KTK-R-3KTK-R-3KTK-R-3KTK-R-3KTK-R-39080-FB2611CC9080-FB2611CC9080-FB2611CC9080-FB2611CC9080-FB2611CC9080-FB2611CC9080-FB2611CC9080-FB2611CC9080-FB2611CC9080-FB2611CC9080-FB2611CC9080-FB2611CC9080-FB2611CC9080-FB2611CCLC1-D2510G6LC1-D2510G6LC1-D2510G6LC1-D2510G6LC1-D2510G6LC1-D2510G6LC1-D2510G6LC1-D3210G6LC1-D4010G6LC1-D8011G6LC1-D8011G6LC1-D8011G6LC1-F115G6LC1-F115G6LA4-DA2GLA4-DA2GLA4-DA2GLA4-DA2GLA4-DA2GLA4-DA2GLA4-DA2GLA4-DA2GLA4-DA2GLA4-DA2GLA4-DA2GLA4-DA2GLA9-F980LA9-F9809070-K50D209070-K50D209070-K50D209070-K50D209070-K50D209070-K50D209070-K50D209070-K50D209070-K75D209070-K75D209070-K75D209070-K75D20FNQ-R-1/2FNQ-R-1/2FNQ-R-1/2FNQ-R-1/2FNQ-R-1/2FNQ-R-1/2FNQ-R-1/2FNQ-R-1/2FNQ-R-1FNQ-R-1FNQ-R-1FNQ-R-19070- FNQ-R-K200D20 2-1/49070- FNQ-R-K200D20 2-1/4FNQ-R-1/2FNQ-R-1/2FNQ-R-1/2FNQ-R-1/2FNQ-R-1/2FNQ-R-1/2FNQ-R-1/2FNQ-R-1/2FNQ-R-3/4FNQ-R-3/4FNQ-R-3/4FNQ-R-3/4FNQ-R-1-6/10FNQ-R-1-6/10Sec.XfmrFuses[2]FNQ-R-1/2FNQ-R-1/2FNQ-R-1/2FNQ-R-1/2FNQ-R-1/2FNQ-R-1/2FNQ-R-1/2FNQ-R-1/2FNQ-R-6/10FNQ-R-6/10FNQ-R-6/10FNQ-R-6/10FNQ-R-1-6/10FNQ-R-1-6/10[1] Square D Class CC Fuse Block numbers.[2] Bussmann part numbers.[7] T1 has been dimensioned to supply KM1 coil inrush and sealed VA requirements only. Any user control / pilot device additions may require re-dimensioning of T1 VAcapacity.© 1996 Square D All Rights Reserved31ηττπ://νιχοντρολσ.χοm
Chapter 2 — WiringBulletin No. 50006-519-01BEquipment Recommendations December 1996Table 14: Maximum Allowable Line Fuse (F1 to F3) for 208/230 VDrive ControllersController ATV<strong>56</strong>•••M2 Class CC (Fast-Acting) Class TU41 600 V, 25 A 600 V, 45 AU72, U90 — 600 V, 100 AD12, D16 — 600 V, 125 AD23, D33 — 600 V, 225 AD46 — 600 V, 250 ATable 15: Recommended Equipment for all Drive ControllersR1 Potentiometer 9001 K2106— Push buttons 9001 KR1UH13—Control station enclosure(accepts R1 and two pushbuttons)9001 KYAF332 © 1996 Square D All Rights Reservedηττπ://νιχοντρολσ.χοm
Bulletin No. 50006-519-01BDecember 1996Chapter 3 — Start-UpContentsChapter 3 — Start-UpINTRODUCTION . . . . . . . . . . . . . . . . . . . . . . . . . . . . . . . . . . . . . . . . . . . . . . . . . . . . . . . .34FACTORY SETTINGS . . . . . . . . . . . . . . . . . . . . . . . . . . . . . . . . . . . . . . . . . . . . . . . . . . . .34CONTROL TYPES . . . . . . . . . . . . . . . . . . . . . . . . . . . . . . . . . . . . . . . . . . . . . . . . . . . . . . .35Normal . . . . . . . . . . . . . . . . . . . . . . . . . . . . . . . . . . . . . . . . . . . . . . . . . . . . . . . . . . . .35NOLD (No Load) . . . . . . . . . . . . . . . . . . . . . . . . . . . . . . . . . . . . . . . . . . . . . . . . . . . . .35MOTOR THERMAL OVERLOAD PROTECTION. . . . . . . . . . . . . . . . . . . . . . . . . . . . . . . .36ADJUSTMENT OF MOTOR OVERLOAD . . . . . . . . . . . . . . . . . . . . . . . . . . . . . . . . . . . . .37AVAILABLE MOTOR TORQUE . . . . . . . . . . . . . . . . . . . . . . . . . . . . . . . . . . . . . . . . . . . . .37Continuous Duty . . . . . . . . . . . . . . . . . . . . . . . . . . . . . . . . . . . . . . . . . . . . . . . . . . . . .37Overtorque Capability and Speed Range . . . . . . . . . . . . . . . . . . . . . . . . . . . . . . . . . .37Overspeed Operation (f ≥ 60 Hz) . . . . . . . . . . . . . . . . . . . . . . . . . . . . . . . . . . . . . . . .38Driving Torque Production Envelope . . . . . . . . . . . . . . . . . . . . . . . . . . . . . . . . . . . . .38MOTOR CONSIDERATIONS . . . . . . . . . . . . . . . . . . . . . . . . . . . . . . . . . . . . . . . . . . . . . . .39Motor Insulation . . . . . . . . . . . . . . . . . . . . . . . . . . . . . . . . . . . . . . . . . . . . . . . . . . . . .39Motors in Parallel . . . . . . . . . . . . . . . . . . . . . . . . . . . . . . . . . . . . . . . . . . . . . . . . . . . .39Output Contactor Between Motor and Drive Controller . . . . . . . . . . . . . . . . . . . . . . .39Additional Motor Connected Downstream of the Drive Controller . . . . . . . . . . . . . . .39© 1996 Square D All Rights Reserved33ηττπ://νιχοντρολσ.χοm
Chapter 3 — Start-UpBulletin No. 50006-519-01BIntroduction December 1996INTRODUCTIONFACTORY SETTINGSThe ALTIVAR TM <strong>56</strong> drive controller is software driven. Reconfiguration of thefactory default settings may be required. If the factory settings do not match therequirements of your application, or if the drive controller must be reconfiguredfor a new application, refer to Chapter 5.Generally, at least four key parameters should be checked and adjusted ifnecessary prior to motor operation:• Nominal Current• Motor Overload• Control Type• Rotation Normalization (Note: Changing the wiring of drive controller lineterminals L1, L2 and L3 does not affect the motor rotation direction).If the ALTIVAR <strong>56</strong> drive controller is supplied as part of a larger system, also referto the documentation supplied with the system for applicable configurationsettings. Observe the following precautions when using Normal control types:• The adjustment range of the Nominal Current parameter is 45% to 105% of thedrive controller rated output current, allowing the use of motors withhorsepower equal to or one horsepower size less than the drive controllerhorsepower. To adjust the Nominal Current parameter, see Chapter 5.• Before powering up for the first time, compare motor nameplate current ratingwith output current in Tables 1 through 4 on pages 3-4, depending on drivecontroller configuration. If the motor rating is not within 45% to 105% of thevalue in the table, it is necessary to use a different drive controller. For theATV<strong>56</strong>U41, use the output current corresponding to motor horsepower andset Motor Power parameter for that value. See Chapter 5.• The Nominal Current parameter must be set on the drive controller keypaddisplay to match the motor full load current rating. If the Nominal Currentparameter cannot be adjusted to the motor full load current, Normal controltypes cannot be used for the application.• For multiple motor applications, consult the factory.The ALTIVAR <strong>56</strong> drive controller is factory set to meet most applications. If thevalues below are compatible with the application, the drive controller can bestarted up. If the values listed below do not match the requirements of yourapplication, change their settings with the keypad display. For detailed use of thekeypad display, refer to Chapter 5.FunctionNominal Output Voltage andFrequencyNominal CurrentVolts/Frequency LawTable 16: Factory Settings – FunctionsOperating Frequency Range 60 Hz input: 0.1 to 60 HzRamp TimesBraking-To-Standstill(low speed)Factory SettingAutomatically set at first power-up according to the input frequency:60 Hz input: 460 V (ATV<strong>56</strong>•••N4 units); 230 V (ATV<strong>56</strong>•••M2 units)0.9 times permanent output current of drive controllerNormal linear lawAcceleration: 3 sDeceleration: 3 sRamp time: automatically adapted in case of overtorqueAutomatic by DC injection for 0.5 s when frequency drops below 0.1 HzDC current level: 0.7 times the permanent output current of drivecontrollerMotor Thermal Protection 0.9 times permanent output current of drive controller, see page 36Control SchemeTwo-wire control34 © 1996 Square D All Rights Reservedηττπ://νιχοντρολσ.χοm
Bulletin No. 50006-519-01BDecember 1996Chapter 3 — Start-UpControl TypesTable 17: Factory Settings – Inputs and OutputsInputs and Outputs Terminal Factory Setting ProgrammableLI1 Run Enable NoLogic InputsLI2 Run Forward NoLI3 Auto/Manual YesLI4 Auto Run YesAnalog InputsAI1 Speed Reference 1 YesAI2 Speed Reference 2 YesLO1 At Speed YesLogic OutputsLO2 Current Limit YesR1 Fault NoR2 Running State YesAnalog OutputsAO1 Motor Speed YesAO2 Motor Current YesCONTROL TYPESNormalNOLD (No Load)The control type affects the amount of available motor torque. The control typesetting is dependent on the type of motor used and the application. Control typesare described below. For information on changing the control type, see Chapter 5.The Normal control type is the factory setting. Normal is a sensorless flux vectorcontrol. In order to create high torque at low speeds, the drive controller maintainsa 90° phase relationship between the rotor and stator electromagnetic fields bycontinuously calculating the position of the rotor in relation to the electricalposition of the stator. It is generally applicable on asynchronous motors andprovides good torque performance. When using Normal control, the motorhorsepower must be equal to or one horsepower size less than the drive controllerhorsepower.NOLD control maintains a constant volts/frequency ratio during acceleration butonce the motor is stable, voltage to the motor is automatically reduced as afunction of load. At light load, the motor voltage is minimized, even at motor basespeed. This reduces audible motor noise without reducing motor RPM. NOLDcontrol should not be used with motors in parallel. For more information, seeChapter 5.© 1996 Square D All Rights Reserved35ηττπ://νιχοντρολσ.χοm
Chapter 3 — Start-UpBulletin No. 50006-519-01BMotor Thermal Overload Protection December 1996MOTOR THERMALOVERLOADPROTECTIONCAUTIONLOSS OF MOTOR OVERLOAD PROTECTIONWhen using external overload relays connected to drive controller output, overloadrelay must be capable of operation over the expected range of drive controller outputfrequencies (including direct current).When DC injection braking is used:• Overload relay must be suitable for operation with direct current flowing to themotor.• Do not use overload relays equipped with current transformers for sensing themotor current.Failure to follow these instructions can result in equipment damage.CAUTIONMOTOR OVERHEATINGThis drive controller does not provide direct thermal protection for the motor. Use of athermal sensor in the motor may be required for protection at all speeds and loadingconditions. Consult motor manufacturer for thermal capability of motor when operatedover desired speed range.Failure to follow these instructions can result in injury or equipment damage.• ALTIVAR <strong>56</strong> drive controllers provide indirect motor thermal protection bycontinuously calculating the theoretical thermal state of the motor. The drivecontroller will trip if this state reaches 109% of nominal current.• The microprocessor calculates the theoretical thermal state of the motor from:— Motor thermal time constant based on assumed motor power— Operating frequency— Current absorbed by the motor— Running time— Assumed maximum ambient temperature of 40 °C around the motor1 ht 6 24 3660 Hz10 mincold4 min2 min1 minhot10 s0.7 0.8 0.9 1 1.1Figure 21: Thermal Curves36 © 1996 Square D All Rights Reservedηττπ://νιχοντρολσ.χοm
Bulletin No. 50006-519-01BDecember 1996Chapter 3 — Start-UpAdjustment of Motor Overload• External thermal overload relays are required when more than one motor isconnected to the output or when the motor connected to the drive controller isless than half of the drive controller rating.• The thermal state of the drive controller is not automatically reset when poweris removed.ADJUSTMENT OFMOTOR OVERLOADAVAILABLE MOTORTORQUEContinuous DutyOvertorque Capability andSpeed RangeTo adjust Motor Overload, first select the type of protection in the 7.4 → FaultManagement menu. Two types of protection are available from the MotorOverload screen:• Self-Cooled Motor• No Thermal ProtectionThe drive controller is factory set for a self-cooled motor. Once the type ofprotection is selected, the Motor Overload current can be set in either the1 → Parameter Setting menu or in the 7.4 → Fault Management menu.Motor Overload can be adjusted from 0.45 to 1.15 times the nominal drivecontroller current, factory preset at 0.9 times the nominal drive controller current.Adjust Motor Overload value to nominal motor current. For more information onconfiguring the drive controller, refer to Chapter 5.For continuous duty reduced speed applications, motor torque derating may benecessary. This derating is linked to two causes:• Although the current waveform is similar to a sine wave, motor heating isslightly greater than when operating directly from the input line supply. Theresulting torque derating is approximately 5%. For 1.0 service factor motors,derating must be considered when choosing the continuous torque productioncapability of the motor at nameplate speed. For 1.15 service factor motors,derating of motor continuous torque capability is not required at nameplaterated speed.• For self-ventilating motors, ventilation produced by the internal shaft fandecreases as speed is reduced, therefore requiring derating of the maximumcontinuous torque capability of the motor. Generally, the required deratingoccurs at approximately 50% of nameplate motor speed. Since motor designsvary, consult the motor manufacturer for the required derating for a specificmotor.The driving overtorque capabilities of a given motor are determined by: the motorNEMA design category (Design B, Design D, etc.), no-load (magnetizing) currentof the motor at nameplate speed, maximum transient output current of the drivecontroller, and the applied V/Hz at reduced speed.Maximum transient overtorque capability is typically:• Normal control type:— ATV<strong>56</strong>U41N4 to D79N4 and ATV<strong>56</strong>U41M2 to D46M2: 110% over 50:1speed range• NOLD control type:— ATV<strong>56</strong>U41N4 to D79N4 and ATV<strong>56</strong>U41M2 to D46M2: 110% over 10:1speed rangeWith NOLD control, the motor overtorque capability begins to decrease below 50%of motor nameplate speed.© 1996 Square D All Rights Reserved37ηττπ://νιχοντρολσ.χοm
Chapter 3 — Start-UpBulletin No. 50006-519-01BAvailable Motor Torque December 1996Overspeed Operation(f ≥ 60 Hz)With an adjustable frequency drive controller, operation at speeds greater thanmotor nameplate speed may be possible. The following must be considered:CAUTIONMACHINERY OVERSPEEDSome motors and/or loads may not be suited for operation above nameplate motorspeed and frequency. Consult motor manufacturer before operating motor above ratedspeed.Failure to follow this instruction can result in injury or equipment damage.The drive controller is incapable of producing additional output voltage whenoperating above the nominal output frequency (60 Hz). When operating above thenominal output frequency, the available continuous motor torque will begin todecrease along with the motor maximum overtorque capability. Consult the motormanufacturer for continuous and overtorque torque capabilities of the particularmotor.Driving Torque ProductionEnvelopeFigure 22 illustrates a typical continuous torque and overtorque driving capabilityfor a typical NEMA Design B, 1.0 service factor motor with variable torque loads.For 1.15 service factor motors, the continuous torque rating is 1.0 times the motorrated torque value from 50 to 100% of motor nameplate rated speed.• Normal control type:— 100% torque typical at 50% of nominal frequency (over 2:1 speed range)— Torque decreases linearly to 50% at 0.1 Hz— Transient overtorque, typical ±10%:— ATV<strong>56</strong>U41N4 to D79N4 and ATV<strong>56</strong>U41M2 to D46M2: 110% torque for60 s.• NOLD control type:— 100% torque typical at 50% of nominal frequency (over 2:1 speed range)— Torque decreases linearly to 50% at 10% of nominal frequency— Transient overtorque, typical ±10%:— ATV<strong>56</strong>U41N4 to D79N4 and ATV<strong>56</strong>U41M2 to D46M2: 110% torque for60 s.T/Tn1.110.70.50.33211 Continuous useful torque2 Transient overtorque3 Transient overtorque during accelerationFn = nominal frequency00.1 FnfFn FmaxFigure 22: Typical Torque Curves38 © 1996 Square D All Rights Reservedηττπ://νιχοντρολσ.χοm
Bulletin No. 50006-519-01BDecember 1996Chapter 3 — Start-UpMotor ConsiderationsMOTORCONSIDERATIONSMotor InsulationMany factors must be considered when controlling a motor with a drive controller.The following sections describe several drive controller characteristics as theyrelate to motor protection and performance.ALTIVAR <strong>56</strong> drive controllers use pulse width modulation. Verify that the motorinsulation is designed for this modulation method.Motors in ParallelDriveControllerIn1In2InxM1M2MxDrive controller selection:• Drive controller In ≥ In1 + In2 + … Inx• Drive controller Pn ≥ Pn1 + Pn2 + … Pnx• Protect each motor with a thermaloverload relayIn: rated current Pn: rated powerFigure 23: Motors in ParallelTo operate motors in parallel, use the keypad display to set the Control Type to“Normal.” For information on adjusting and disabling parameters, see Chapter 5.If three or more motors are to be installed in parallel, consult factory.Output Contactor BetweenMotor and Drive ControllerAdditional Motor ConnectedDownstream of the DriveControllerWhen using an output contactor between the drive controller and motor, use of theBypass application function is recommended. In order to set the motor parametersfor optimum performance, the motor must be directly connected to the output ofthe drive controller at least one time during drive controller power-up. For moreinformation, refer to Chapter 5.When connecting an additional motor, comply with the recommendation for“Motors in Parallel” on page 39.DriveControllerOL1M1KM1OL2M2Figure 24: Connecting an Additional MotorIf the motor is to be connected to the drive controller while the drive controller isrunning, the sum of the running motor current(s) plus the expected startingcurrent of the switched motor must not exceed 90% of the drive controller’stransient output current rating.Table 18: Operating Non-Standard MotorsDescription Overload ControlTypeMotors in parallel Disable [1] NormalAdditional motor Disable [1] NormalSynchronous permanent magnetSynchronous wound fieldSynchronous reluctanceNot RecommendedNot RecommendedNot Recommended[1] An external thermal overload relay is required if thedrive controller protection is disabled.© 1996 Square D All Rights Reserved39ηττπ://νιχοντρολσ.χοm
Chapter 3 — Start-UpBulletin No. 50006-519-01BMotor Considerations December 199640 © 1996 Square D All Rights Reservedηττπ://νιχοντρολσ.χοm
Bulletin No. 50006-519-01BDecember 1996Chapter 4 — DiagnosticsContentsChapter 4 — DiagnosticsPRECAUTIONS . . . . . . . . . . . . . . . . . . . . . . . . . . . . . . . . . . . . . . . . . . . . . . . . . . . . . . . . .42PROCEDURE 1: BUS VOLTAGE MEASUREMENT . . . . . . . . . . . . . . . . . . . . . . . . . . . . .42PROCEDURE 2: INPUT LINE VOLTAGE MEASUREMENT . . . . . . . . . . . . . . . . . . . . . . .43PROCEDURE 3: CHECKING PERIPHERAL EQUIPMENT. . . . . . . . . . . . . . . . . . . . . . . .43PREVENTIVE MAINTENANCE . . . . . . . . . . . . . . . . . . . . . . . . . . . . . . . . . . . . . . . . . . . . .44LEDS . . . . . . . . . . . . . . . . . . . . . . . . . . . . . . . . . . . . . . . . . . . . . . . . . . . . . . . . . . . . . . . . .44FAULT MESSAGES . . . . . . . . . . . . . . . . . . . . . . . . . . . . . . . . . . . . . . . . . . . . . . . . . . . . . .45© 1996 Square D All Rights Reserved41ηττπ://νιχοντρολσ.χοm
Chapter 4 — DiagnosticsBulletin No. 50006-519-01BPrecautions December 1996PRECAUTIONSRead the safety statement below before proceeding with any maintenance ortroubleshooting procedures.Table 27 on pages 45-48 lists fault messages (displayed on the keypad display),probable causes or faults, and associated corrective action. Before taking correctiveaction, remove all power and check the bus voltage (Procedure 1), input linevoltage (Procedure 2 on page 43) and peripheral equipment (Procedure 3 on page43).DANGERHAZARDOUS VOLTAGERead and understand these procedures before servicing ALTIVAR <strong>56</strong> drive controllers.Installation, adjustment, repair and maintenance of these drive controllers must beperformed by qualified personnel.Failure to follow this instruction will result in death or serious injury.PROCEDURE 1: BUSVOLTAGEMEASUREMENTDANGERHAZARDOUS VOLTAGE• This device contains energy storage devices. Read and understand Bus VoltageMeasurement Procedure before performing procedure. Measurement of DC buscapacitor voltage must be performed by qualified personnel.• DC bus LED is not an accurate indication of absence of DC bus voltage.• DO NOT short across capacitors or touch unshielded components or terminal stripscrew connections with voltage present.• Many parts in this drive controller, including printed wiring boards, operate at linevoltage. DO NOT TOUCH. Use only electrically insulated tools.Failure to follow these instructions will result in death or serious injury.The PA and – terminals are located inside the drive controller (see Figure 25 onpage 43). To measure the bus capacitor voltage:1. Disconnect and verify all power is removed from drive controller.2. Wait 1 minute to allow the DC bus to discharge.3. Open the front cover of the drive controller.4. Set the voltmeter to the 1000 VDC scale. Measure the bus capacitor voltagebetween the PA and – terminals to verify the DC voltage is less than 45 V.Do not short across capacitor terminals with voltage present!5. If the bus capacitors are not fully discharged, contact your localrepresentative. Do not operate the drive controller.42 © 1996 Square D All Rights Reservedηττπ://νιχοντρολσ.χοm
AI2-UAI2-IAI2-UAI2-IBulletin No. 50006-519-01BDecember 1996Chapter 4 — DiagnosticsInput Line Voltage Measurement— PAATV<strong>56</strong>U41N4 to D12N4 andATV<strong>56</strong>U41M2 to U90M2— PAATV<strong>56</strong>D16N4 to D79N4 andATV<strong>56</strong>D12M2 to D46M2Figure 25: Location of PA and – Terminals: ATV<strong>56</strong>U41N4 to D79N4 &ATV<strong>56</strong>U41M2 to D46M2PROCEDURE 2:INPUT LINEVOLTAGEMEASUREMENTPROCEDURE 3:CHECKINGPERIPHERALEQUIPMENTTo measure the input line voltage:1. Perform Bus Voltage Measurement procedure (see page 42).2. Attach meter leads to L1 and L2. Set voltmeter to the 600 VAC scale.3. Reapply power. Check for correct line voltage per drive controller nameplaterating.4. Remove power and repeat procedure for L2 and L3, and L1 and L3.5. When all phases have been measured, remove power. Remove meter leadsand reinstall covers.The following equipment may need to be checked. Follow the manufacturer’sprocedures when checking this equipment.1. A protective device such as a fuse or circuit breaker may have tripped.2. A switching device such as a contactor may not be closing at the correct time.3. Conductors may require repair or replacement.4. Connection of cables to the motor or connections to ground may need to bechecked. Follow NEMA standard procedure WC-53.5. Motor insulation may need to be checked. Follow NEMA standard procedureMG-1. Do not apply high voltage to drive controller output terminals (U/T1,V/T2 or W/T3). Do not connect high potential dielectric test equipment orinsulation resistance tester to the drive controller since the test voltagesutilized may damage the drive controller. Always disconnect the drivecontroller from the conductors or motor while performing such tests.© 1996 Square D All Rights Reserved43ηττπ://νιχοντρολσ.χοm
Chapter 4 — DiagnosticsBulletin No. 50006-519-01BPreventive Maintenance December 1996PREVENTIVEMAINTENANCELEDSBefore performing preventive maintenance, remove all power and check the busvoltage (Procedure 1 on page 42).The following preventive maintenance procedures are recommended at regularintervals:• Check the condition and tightness of the connections.• Make sure the ventilation is effective and temperature around the drivecontroller remains at an acceptable level.• Remove dust and debris from the drive controller, if necessary.• If anything unusual occurs when putting the drive controller into service orduring operation, be sure all recommendations relating to the environment,mounting and connecting the drive controller have been followed.The LEDs on the front of the drive controller indicate the following:FAULT(Red)CAUTION(Yellow)POWER(Green)DC BUS(RED)Illuminated: Fault exists.Illuminated with Fault LED OFF: Drive controller is running and in current limit.NOTE: LED may appear to flash rapidly as drive controller regulates at current limit.Slow Flashing with Fault LED OFF: This Pre-Alarm indicates either a Drive Overtemperature Fault (ATV<strong>56</strong>D16N4 to D79N4 and ATV<strong>56</strong>D12M2 to D46M2) or a Motor Overload Fault. Consult Keypad Display for Motor Thermal State or Drive Thermal State (ATV<strong>56</strong>D16N4 to D79N4 and ATV<strong>56</strong>D12M2 to D46M2) to determine which condition is causing the Pre-Alarm. If either of these thermal states exceeds 100%, the Caution LED will flash slowly. Illuminated with Fault LED ON: Drive controller fault exists on either Motor Overload or Drive Overtemperature and the cool-down period has not yet expired. Consultthe fault display on the keypad or the fault history in Menu 3 to determine the most recent fault.Illuminated: Drive controller is powered;DC bus ≥ 50 V or voltage is present at CL1-CL2.Illuminated: DC bus ≥ 50 VFigure 26: Drive Controller LEDs44 © 1996 Square D All Rights Reservedηττπ://νιχοντρολσ.χοm
Bulletin No. 50006-519-01BDecember 1996Chapter 4 — DiagnosticsFault MessagesFAULT MESSAGESThe ALTIVAR <strong>56</strong> drive controller can store up to eight faults and display them asmessages on the keypad display. These fault messages, listed in Table 27, allowaccess to Fault History Screens, which display the drive controller run status at thetime of each fault. For more information on Fault History Screens, see Chapter 5.Figure 27: Fault MessagesFault Message Probable Cause Troubleshooting Procedure(Display off or partialdisplay)IN-PHASE LOSS(Input phase loss)UNDERVOLTAGE [1]AC-LIN. OVERVOL [1](AC Line Overvoltage)DC-BUS OVERVOL [1](DC Bus Overvoltage)OVERTEMP DRIVE(Drive Overtemp.)MOT. OVERLOAD(Motor Overload)1. No control supply. 1. Check input line voltage (Procedure 2on page 43).2. Control voltage too low. 2. Check fuses and circuit breaker(Procedure 3 on page 43).3. Check CL1-CL2 control terminalconnections.1. No supply to terminals L1-L2-L3.1. Check input line voltage (Procedure 2on page 43).2. Power fuses blown. 2. Check fuses and circuit breaker(Procedure 3 on page 43).3. Brief input line failure (t ≥ 3. Reset drive controller.200 ms).4. Internal connections. 4. Check connections.1. Supply too low:V ≤ 380 V (ATV<strong>56</strong>•••N4)V ≤ 170 V (ATV<strong>56</strong>•••M2)2. Temporary voltage drop (t≥200 ms).3. Internal connections.1. Supply too high:V ≥ 550 V (ATV<strong>56</strong>•••N4)V ≥ 270 V (ATV<strong>56</strong>•••M2)1. Overvoltage or overcurrentdue to excessive braking oran overhauling load.1. Heat sink temperature toohigh (≥ 203 °F / 95 °C).1. If thermal trip setting is ≥118% of normal thermalstate (109% of nominalcurrent), thermal trip is dueto prolonged overload oroutput phase failure.2. Motor power rating too lowfor application.1. Check input line voltage (Procedure 2on page 43). Check Nominal MotorVoltage parameter (see Chapter 5).2. Reset drive controller.3. Check connections.1. Check input line voltage (Procedure 2on page 43). Check Nominal MotorVoltage parameter (see Chapter 5).1. Increase deceleration time. Add brakingoption if necessary. Reset is possible ifline voltage ≤ 550 V.1. Check motor load, fan and ambienttemperature around drive controller.Wait for drive controller to cool downbefore resetting.1. Check setting of MOT. OVERLOADparameter and compare with motor In.Check load and compare with operatingspeed. Check braking conditions(possibility of single phase operation).Wait approximately 7 minutes beforeresetting.2. Verify motor and drive controllerselection is correct for application.3. For motors with continuous currentrating less than 50% of drive controllercurrent rating, see Chapter 5.[1] Fault cannot be disabled; always causes a freewheel stop.[2] Occurs upon power up only.© 1996 Square D All Rights Reserved45ηττπ://νιχοντρολσ.χοm
Chapter 4 — DiagnosticsBulletin No. 50006-519-01BFault Messages December 1996SHORT CIRCUIT [1](SHORT CKT_ =DesaturationSHORT CKT. = LICexceeded)PRECHARGE FAIL [2]INTERNAL FAULT [1]LOSS FOLLOWERGROUND FAULT [1]MEMORY FAILURE [2]1. Short circuit or grounding ondrive controller output.(Short circuit_ or shortcircuit.)2. Internal drive fault.(Short circuit_)3. Motor improperly applied.(Short circuit.)1. Capacitor charge relayclosure control fault.1. Internal connection fault.2. Missing connections on CL1and CL2.1. Loss of 4-20 mA signal onAI2 input.1. Short circuit of phase toearth or grounding on theoutput of the drive controller.1. EEPROM memory storagefault.1. Remove all power. With drive controllerdisconnected, check connecting cablesand motor insulation.2. Use drive controller self-diagnostics.See Chapter 5.3. See “MOTOR CONSIDERATIONS” onpage 39.1. Check connections in drive controllerafter following Bus VoltageMeasurement Procedure (see page42).1. Check internal connections afterfollowing Bus Voltage Measurementprocedure (see page 42).1. Verify signal connections.2. Check signal.1. Remove all power. With drive controllerdisconnected, check connecting cablesand motor insulation.2. Use drive controller diagnostics. SeeChapter 5.1. Recall factory or customer settings withkeypad.AUTO-TEST FAIL [2] 1. Main control board failure. 1. Remove all power. Check control boardconnections with drive controllerdisconnected.2. Replace main control board.CONTROL SUPPLY [2] 1. CL1/CL2 not connected. 1. Check connection of CL1 and CL2.OVERSPEEDDYNAMIC BRAKELINK FAULTFigure 27: Fault Messages (Continued)Fault Message Probable Cause Troubleshooting Procedure1. Output frequency is 20%above Maximum Frequencyparameter setting (notachometer present).1. DB transistor short circuit.2. DB resistor short or opencircuited.3. Braking resistor thermalcontact tripped.1. Internal fault.2. Software execution stopped.[1] Fault cannot be disabled; always causes a freewheel stop.[2] Occurs upon power up only.1. Check load base speed and powerrating, compare with operating speedand drive controller/motor power rating.2. Check setting of damping andbandwidth (if used) adjustments.1. Remove all power. Check connectingcables and DB resistor with drivecontroller disconnected.2. Use drive controller selfdiagnostics.SeeChapter 5.3. Check dynamic brake connections.Change resistor if necessary.1. Note LED sequence on drive controller:– FAULT, CAUTION, POWER allilluminated, or– CAUTION, POWER illuminated2. Cycle power.3. If fault persists, replace keypad or maincontrol board.46 © 1996 Square D All Rights Reservedηττπ://νιχοντρολσ.χοm
Bulletin No. 50006-519-01BDecember 1996Chapter 4 — DiagnosticsFault MessagesSEQUENCE T. OUT(Sequence Time out)PROCESS TIME OUTTRANS. SHORT C. orGF(Transistor ShortCircuit)1. Sequence input not receivedafter Run command withinprogrammed time (Bypassfunction).1. Process input not receivedafter Run command withinprogrammed time (Bypassfunction).1. Check connection between usersuppliedcontact and logic input,ensuring it is connected to programmedinput.2. Verify operation of contact.3. Verify operation of external controlsequencing.1. Check connection between usersuppliedcontact and logic input,ensuring it is connected to programmedinput.2. Verify operation of contact.3. Verify operation of process.1. Transistor is in short circuit. 1. Contact local service representative.OPEN TRANSISTOR 1. Transistor has failed open. 1. Contact local service representative.OUT. PHASE LOSSFigure 27: Fault Messages (Continued)Fault Message Probable Cause Troubleshooting Procedure1. Motor power rating too smallfor controller.2. Output phasesdisconnected.[1] Fault cannot be disabled; always causes a freewheel stop.[2] Occurs upon power up only.1. Motor power rating must be > 45% ofcontroller power rating.2. Check output power conductors andconnectors for lack of continuity.3. Check output contactor sequencing.The additional faults listed in Table 19 may be displayed if an option module isinstalled and a fault occurs.Table 19: Fault Messages from Option ModulesFault Messages Probable Cause Troubleshooting ProcedureWithout tachometer:OVERSPEED1. Output frequency is 20% aboveMaximum Frequency parametersetting.With tachometer:1. Incorrect adjustment oftachometer feedback.1. Check load base speed and powerrating, compare with operatingspeed and drive controller/motorpower rating.1. Check feedback.2. Machine overload. 2. Check load base speed and powerrating, compare with operatingspeed and drive controller/motorpower rating.3. No tachometer signal. 3. Check tachometer connection.4. Tachometer polarity incorrect. 4. Check tachometer polarity.CUSTOM. FAULT 1. User defined. 1. Dependent on user setting.FEEDBACK LOSS 1. No tachometer feedback signal. 1. Check tachometer wiring.Other faults may be displayed depending on how the drive controller isprogrammed. For more information on faults and self-diagnostics, refer toChapter 5.© 1996 Square D All Rights Reserved47ηττπ://νιχοντρολσ.χοm
Chapter 4 — DiagnosticsBulletin No. 50006-519-01BNotes December 199648 © 1996 Square D All Rights Reservedηττπ://νιχοντρολσ.χοm
Bulletin No. 50006-519-01BDecember 1996Chapter 5 — ConfigurationContentsChapter 5 — ConfigurationKEYPAD DISPLAY . . . . . . . . . . . . . . . . . . . . . . . . . . . . . . . . . . . . . . . . . . . . . . . . . . . . . . .50LCD Display . . . . . . . . . . . . . . . . . . . . . . . . . . . . . . . . . . . . . . . . . . . . . . . . . . . . . . . .50ENT Key . . . . . . . . . . . . . . . . . . . . . . . . . . . . . . . . . . . . . . . . . . . . . . . . . . . . . . . . . . .50ESC Key . . . . . . . . . . . . . . . . . . . . . . . . . . . . . . . . . . . . . . . . . . . . . . . . . . . . . . . . . . .50Arrow (▲ ▼) Keys . . . . . . . . . . . . . . . . . . . . . . . . . . . . . . . . . . . . . . . . . . . . . . . . . . .50Numeric Keys . . . . . . . . . . . . . . . . . . . . . . . . . . . . . . . . . . . . . . . . . . . . . . . . . . . . . . .50Function Keys . . . . . . . . . . . . . . . . . . . . . . . . . . . . . . . . . . . . . . . . . . . . . . . . . . . . . . .51Key Cover . . . . . . . . . . . . . . . . . . . . . . . . . . . . . . . . . . . . . . . . . . . . . . . . . . . . . . . . . .51STOP Key . . . . . . . . . . . . . . . . . . . . . . . . . . . . . . . . . . . . . . . . . . . . . . . . . . . . . . . . . .51RUN Key . . . . . . . . . . . . . . . . . . . . . . . . . . . . . . . . . . . . . . . . . . . . . . . . . . . . . . . . . . .52Keypad Display Connections . . . . . . . . . . . . . . . . . . . . . . . . . . . . . . . . . . . . . . . . . . .52MENU OVERVIEW. . . . . . . . . . . . . . . . . . . . . . . . . . . . . . . . . . . . . . . . . . . . . . . . . . . . . . .53Selecting the Language . . . . . . . . . . . . . . . . . . . . . . . . . . . . . . . . . . . . . . . . . . . . . . .53Drive Configuration . . . . . . . . . . . . . . . . . . . . . . . . . . . . . . . . . . . . . . . . . . . . . . . . . . .53Drive Identification . . . . . . . . . . . . . . . . . . . . . . . . . . . . . . . . . . . . . . . . . . . . . . . . . . .53Display Mode . . . . . . . . . . . . . . . . . . . . . . . . . . . . . . . . . . . . . . . . . . . . . . . . . . . . . . .53Main Menu . . . . . . . . . . . . . . . . . . . . . . . . . . . . . . . . . . . . . . . . . . . . . . . . . . . . . . . . .54DISPLAY MODE. . . . . . . . . . . . . . . . . . . . . . . . . . . . . . . . . . . . . . . . . . . . . . . . . . . . . . . . .55Drive Controller Running . . . . . . . . . . . . . . . . . . . . . . . . . . . . . . . . . . . . . . . . . . . . . .55Drive Controller in Fault State . . . . . . . . . . . . . . . . . . . . . . . . . . . . . . . . . . . . . . . . . .55ACCESS LEVELS . . . . . . . . . . . . . . . . . . . . . . . . . . . . . . . . . . . . . . . . . . . . . . . . . . . . . . .<strong>56</strong>Total Lock . . . . . . . . . . . . . . . . . . . . . . . . . . . . . . . . . . . . . . . . . . . . . . . . . . . . . . . . . .<strong>56</strong>Total Unlock . . . . . . . . . . . . . . . . . . . . . . . . . . . . . . . . . . . . . . . . . . . . . . . . . . . . . . . .<strong>56</strong>MENU SUMMARY: USING THIS CHAPTER . . . . . . . . . . . . . . . . . . . . . . . . . . . . . . . . . . .571→PARAMETER SETTING MENU . . . . . . . . . . . . . . . . . . . . . . . . . . . . . . . . . . . . . . . . . .582→I/O MAP . . . . . . . . . . . . . . . . . . . . . . . . . . . . . . . . . . . . . . . . . . . . . . . . . . . . . . . . . . . . .613→FAULT HISTORY . . . . . . . . . . . . . . . . . . . . . . . . . . . . . . . . . . . . . . . . . . . . . . . . . . . . .624→DISPLAY CONFIGURATION MENU. . . . . . . . . . . . . . . . . . . . . . . . . . . . . . . . . . . . . . .625→KEYPAD CONFIGURATION MENU . . . . . . . . . . . . . . . . . . . . . . . . . . . . . . . . . . . . . . .646→DRIVE CONFIGURATION MENU . . . . . . . . . . . . . . . . . . . . . . . . . . . . . . . . . . . . . . . . .666.1→Torque Type . . . . . . . . . . . . . . . . . . . . . . . . . . . . . . . . . . . . . . . . . . . . . . . . . . . .676.2→Command Type . . . . . . . . . . . . . . . . . . . . . . . . . . . . . . . . . . . . . . . . . . . . . . . . .676.3→Motor Power (ATV<strong>56</strong>U41 only) . . . . . . . . . . . . . . . . . . . . . . . . . . . . . . . . . . . . . .672-Wire Command . . . . . . . . . . . . . . . . . . . . . . . . . . . . . . . . . . . . . . . . . . . . . . . . . . . .683-Wire Command . . . . . . . . . . . . . . . . . . . . . . . . . . . . . . . . . . . . . . . . . . . . . . . . . . . .687→GENERAL CONFIGURATION MENU. . . . . . . . . . . . . . . . . . . . . . . . . . . . . . . . . . . . . .697.1→Drive Parameters . . . . . . . . . . . . . . . . . . . . . . . . . . . . . . . . . . . . . . . . . . . . . . . .697.11→Motor Parameters . . . . . . . . . . . . . . . . . . . . . . . . . . . . . . . . . . . . . . . . . . . . . . .697.12→Control Parameters . . . . . . . . . . . . . . . . . . . . . . . . . . . . . . . . . . . . . . . . . . . . .747.13→Control Type . . . . . . . . . . . . . . . . . . . . . . . . . . . . . . . . . . . . . . . . . . . . . . . . . . .767.2→Application Functions . . . . . . . . . . . . . . . . . . . . . . . . . . . . . . . . . . . . . . . . . . . . .777.3→Output Assignments . . . . . . . . . . . . . . . . . . . . . . . . . . . . . . . . . . . . . . . . . . . . . .967.4→Fault Management . . . . . . . . . . . . . . . . . . . . . . . . . . . . . . . . . . . . . . . . . . . . . .1008→DIAGNOSTIC MODE. . . . . . . . . . . . . . . . . . . . . . . . . . . . . . . . . . . . . . . . . . . . . . . . . .1099→DRIVE INITIALIZATION MENU. . . . . . . . . . . . . . . . . . . . . . . . . . . . . . . . . . . . . . . . . .112© 1996 Square D All Rights Reserved49ηττπ://νιχοντρολσ.χοm
Chapter 5 — ConfigurationBulletin No. 50006-519-01BKeypad Display December 1996KEYPAD DISPLAYThe ALTIVAR <strong>56</strong> drive controller includes a keypad display mounted on front for:• Identification of the drive controller• Display of parameters and faults• Recall and adjustment of drive controller parameters• Local command of the drive controllerLCDFunction KeysArrow KeysEscape KeyEnter KeySTOP KeyDecimal KeyFigure 28: Keypad LayoutRUN KeyLCD DisplayENT KeyESC KeyArrow (▲ ▼) KeysNumeric KeysThe LCD display is a 128 x 64 point graphic screen consisting of six 21-characterlines. The display can be programmed to show text lines and bar graphs, and hasreverse video capability for enhancement of text or numbers on the screen.Use the ENT (Enter) key to:• Confirm a menu selection• Go to the next menuUse the ESC (Escape) key to:• Reset an adjustment to its original value• Leave the present menu and go back to the previous menuUse the arrow keys to:• Scroll through the screens and menus• Select an item or function• Increase or decrease numeric parameters (i.e. from 12.5 A to 12.6 A). The arrowkeys adjust the portion of the parameter value highlighted on the display. Toincrease the scrolling speed, press and hold the arrow key for two seconds.Use the numeric and decimal point keys to enter numeric values for parameteradjustments. The format and limits of values entered are checked by the controlsoftware according to the nature of the parameter.50 © 1996 Square D All Rights Reservedηττπ://νιχοντρολσ.χοm
Bulletin No. 50006-519-01BDecember 1996Chapter 5 — ConfigurationKeypad DisplayFunction KeysKey CoverSTOP KeyUse the function keys to program the drive controller or issue commands.Operation of the function keys depends on whether the drive controller is inTerminal Command or Keypad Command mode.In Terminal Command (drive controller receives its Run, Stop, and ReferenceFrequency signals from the drive controller terminal strip) the function keysoperate as follows:• F1 calls up the Help menu• F2 returns to the Display Mode screen (page 53 and page 55), unless set forTerminal/Keypad switching in the 5→Keypad Configuration menu• F3 functions as a jump keyTo jump directly to a menu, press F3. A window will appear. Enter the menu’sindex number and press ENT. The display will jump directly to that menu. Indexnumbers are found in the upper left corner of the display for each menu, and arealso listed in Table 22 on page 57. Throughout this <strong>manual</strong>, menu names arepreceded by their index numbers. For example, in a reference such as“1→Parameter Setting,” “1” is the index number for the Parameter Setting menu.In Keypad Command (drive controller receives its Run, Stop and ReferenceFrequency signals from the keypad display). The functions of the keys are:• F1 Resets the drive controller after a fault.• F2 Scrolls through the displays.• F3 Not assigned (No functionality).Terminal Command and Keypad Command are described further in the5→Keypad Configuration menu section (page 64).A plastic cover is factory-installed over the RUN and STOP keys. For access toRUN and STOP keys and local command of drive controller, this cover must beremoved. See Figure 32 on page 52. The key cover can be re-installed to cover RUNand STOP keys.The STOP key, active in Terminal and Keypad Command modes, commandsnormal stop of the motor. The motor follows ramp as determined by selecteddeceleration time.WARNINGINABILITY TO INITIATE STOP• With the key cover removed, the STOP key is enabled and active in both TerminalCommand and Keypad Command modes.• When the key cover is installed, the STOP key is not accessible. Verify thatappropriate system STOP functions are in place when the STOP key is not accessible.Failure to follow these instructions can result in death, serious injury, orequipment damage.© 1996 Square D All Rights Reserved51ηττπ://νιχοντρολσ.χοm
Chapter 5 — ConfigurationBulletin No. 50006-519-01BKeypad Display December 1996RUN KeyThe RUN key commands the motor to run when the drive controller is in KeypadCommand mode. The motor follows the ramp determined by the selectedacceleration time. LI1 (Run Enable) on J12 must be high for the RUN key tocommand the motor.LI1 (Run Enable)Run keyStop key101010Motor SpeedFigure 29: Run Timing DiagramKeypad DisplayConnectionsSub D 9-pin connector for connection to thedrive controller.• For remote handheld use, connect terminalwith a 3-meter cable (part # VW3-A66311) or2-meter cable (part # VW3-A66312).• For mounting in an enclosure door, use kit #VW3-A66101 (3-meter cable) orVW3-A66100 (2-meter cable).Switch for access locking to prohibit orauthorize changes to the configuration.Figure 30: Rear View of Keypad DisplayFigure 31: Removing KeypadNOTE: Keypad supplied with this drivecontroller has been matched with thesoftware revision level. Do not installkeypad on another drive controller.Installation of an incompatible keypad mayresult in non-recognition of the keypad bythe drive controller at power-up.Figure 32: Access to RUN and STOP Keys52 © 1996 Square D All Rights Reservedηττπ://νιχοντρολσ.χοm
Bulletin No. 50006-519-01BDecember 1996Chapter 5 — ConfigurationMenu OverviewMENU OVERVIEWWARNINGUNINTENDED EQUIPMENT ACTION• Unlocking keypad display (page <strong>56</strong>) gives access to parameters.• Parameter changes affect drive controller operation. Most parameter changesrequire pressing ENT. Some parameter changes, such as reference frequency,take effect as soon as you press the ▲ or ▼ key.• Read and understand this <strong>manual</strong> before using the keypad display.Failure to follow these instructions can result in death, serious injury, orequipment damage.Selecting the LanguageDrive ConfigurationDrive IdentificationDisplay ModeWhen drive controller is powered up for the first time, the Language menu appearsallowing you to choose the language used on all menus. Scroll through thelanguage choices with the ▲ and ▼ keys, and make a selection by pressing ENT.Upon subsequent power ups, the display passes directly to the Display screen. Todisplay Language menu after first power up, press the ESC key twice.The Drive Configuration screen shows factory settings of the configurationparameters. Voltage is fixed at 460 V for the 460 V units (ATV<strong>56</strong>•••N4) and is setto 230 V at first power up for 230 V units (ATV<strong>56</strong>•••M2). This screen is onlyshown on first power up or after a total return to factory settings. Advance to theDrive Configuration screen from the Language menu by pressing ENT.The Drive Identification screen is automatically displayed on power up, or can beaccessed from the Drive Configuration screen by pressing ENT. The DriveIdentification screen displays the following nameplate information:• ATV<strong>56</strong> catalog number• Software version• Motor power• Drive nominal current• I maximum/I nominal• VoltageFrom the Drive Identification screen, press ENT to advance to the Display screen.While the drive controller is running, the default display is a bar graph showingreference frequency and drive status. The type and number of functions displayedcan be modified in the 4→Display Configuration menu (page 62). If the drivecontroller is in fault state, the Display screen shows the fault type. If the drivecontroller has been programmed for Keypad Command, the last line of the Displayscreen indicates the functions of F1, F2, and F3 keys.© 1996 Square D All Rights Reserved53ηττπ://νιχοντρολσ.χοm
Chapter 5 — ConfigurationBulletin No. 50006-519-01BMain Menu December 1996Main MenuFrom the Display screen, press ENT to advance to the Main menu. Depending onthe access level selected (page <strong>56</strong>), the Main menu contains two (Total Lock), ornine (Total Unlock) sub-menus.Subsequentpower upFirst power upDIALOGUE/LANGUAGE ?EnglishEspanolFrancais†, & ENTSelect language by scrolling with the ▲ and ▼keys and pressing ENT. Press ENT to advance toDrive Configuration menu.ESCENTor 20 sENTor 10 sDRIVE IDENTIFICATIONATV<strong>56</strong>U41N4 VT V3.1POWER :2.2kW/3HPIn=5.8A Imax=1.5InSUPPLY :460VENT to continueESCSPEED REFER.47.2 HzACTUAL DRIVE CONFIG.TORQUE: VARIABLECOMMAND: 2 WIREMOT.:60Hz,440-460 VPower: 2.2kW/3 HPENT if OK/F3‘changeENTor 10 sRUNF3Displays factory settings of drivecontroller configuration parameters.Motor power displayed only forATV<strong>56</strong>U41N4 drive controller. Press ENTto advance to Drive Identification screen.Unlock access locking switch, ifnecessary, for display of the 6→DriveConfiguration menu.Displays drive controller nameplate information:•ATV<strong>56</strong>U41N4: Drive controller catalog number•VT = Variable torque•V3.1 = Version of drive controller software•2.2 kW / 3 HP = Horsepower•In = Nominal drive controller current•Imax = Maximum drive controller currentPress ENT to advance to Display Mode.When drive controller is running, reference frequency isdisplayed (factory setting). When drive controller is in fault state,fault is displayed. Press ENT to advance to Main menu.ESCMAIN MENUI/O MAPFAULT HISTORYENTContent of Main menu depends on access level selected. Seepage <strong>56</strong>.†, & ENT to selectFigure 33: Menus Viewed at First Power Up (Factory Default Screens)54 © 1996 Square D All Rights Reservedηττπ://νιχοντρολσ.χοm
Bulletin No. 50006-519-01BDecember 1996Chapter 5 — ConfigurationDisplay ModeDISPLAY MODEDrive Controller RunningSPEED REFER.47.2 HzRUNStatus codeWhen the drive controller is running, the Display screen can show one bar graph,two bar graphs, or fourteen items in four tables. Factory setting is one bar graphdisplaying reference frequency. Drive controller status is also displayed in thelower right corner of the screen. Status codes are defined in Table 20. The type andnumber of functions shown can be modified in the 4→Display Configuration menu(page 62) when access level is set to Total Unlock.Drive Controller in FaultStateDISPLAY MODEFAULTAC LINE OVERVOLTAGEFLTStatus codeWhen a fault appears, the drive controller trips, the motor follows theprogrammed fault stop (page 100), and the Display screen shows the fault type.Table 21 lists the faults that the drive controller can display.Table 20: Display Mode Status CodesCode Definition Code DefinitionNLPNo Line Power (control power suppliedseparately)CLI Current LimitRDY Drive Ready DCB DC Injection BrakingRUN Drive Running (at speed) NRP No Run Permissive (LI1 open)Forward Direction BRK BrakingACC AcceleratingDEC DeceleratingFLT FaultFault DesignationIN-PHASE LOSSUNDERVOLTAGEAC-LIN.OVERVOL.DRIVE OVERTEMP.MOT. OVERLOADLOSS FOLLOWEROUT. PHASE LOSSDC-BUS OVERVOL.Table 21: Faults Displayed on Display Mode ScreenDescriptionInput Phase Loss: loss of power or blown fuses. A brief loss of input supplyphase (≤ 200 ms) is not detectedUndervoltage:input voltage ≤ 380 V (60 Hz, 460 V) ATV<strong>56</strong>•••N4 orinput voltage ≤ 170 V ATV<strong>56</strong>•••M2 ortemporary voltage loss (t ≥ 200 ms)AC line overvoltage: input voltage to power supply too highinput voltage ≥ 550 V (60 Hz, 460 V) ATV<strong>56</strong>•••N4 orinput voltage ≥ 270 V ATV<strong>56</strong>•••M2Drive overtemperature: heatsink temperature too highMotor overload: thermal trip because of prolonged overload or running in singlephase on the output, or motor power rating too low for applicationLoss of follower: loss of the 4-20 mA or 20-4 mA reference at AI2 inputLoss of an output phaseDC bus overvoltage/overcurrent due to excessive braking or overhauling load© 1996 Square D All Rights Reserved55ηττπ://νιχοντρολσ.χοm
Chapter 5 — ConfigurationBulletin No. 50006-519-01BAccess Levels December 1996Table 21: Faults Displayed on Display Mode Screen (Continued)Fault DesignationSHORT CIRCUIT orSHORT CIRCUIT.GROUND FAULTPRECHARGE FAILINTERNAL FAULTMEMORY FAILUREAUTO-TEST FAILOVERSPEEDSEQUENCE T. OUTDescriptionShort circuit or grounding on drive controller output; may be internal or externalGround fault: short circuit to earth on the output of the drive controllerPrecharge failure: capacitor precharge relay faultInternal fault or missing connections on CL1 and CL2Error in storing to EEPROMMain control board failureWithout a tachometer, fault occurs when output frequency is 20% aboveMaximum Frequency parameter setting for 250 mS.Sequence time-out: sequence input not received after Run command withinprogrammed time. Used with Bypass function. See page 85.Process time-out: process input not received after Run command withinPROCESS TIME OUTprogrammed time. Used with Bypass function. See page 85.DYNAMIC BRAKE Dynamic brake resistor lost or connection open. See page 108.TRANS. SHORT C. orShort circuit in transistorGFOPEN TRANSISTOR Transistor has failed openCONTROL SUPPLY CL1/CL2 not connected. Only recognized upon power-up.--No Fault--No fault recordedACCESS LEVELSTotal LockThe keypad display can be locked to limit access to drive controller configurationand adjustment parameters. Two access levels are available: Total Lock (factorydefault) and Total Unlock.Access levels are selected by positioning the access locking switch on back of thekeypad display (Figure 30 on page 52).When the access locking switch is in locked position, the keypad display is in TotalLock mode. Total Lock is the factory preset condition of the drive controller.In Total Lock mode, the choices available from the Main menu are 2→ I/O Map and3→ Fault History. If Keypad Command is active (page 64), the keypad display canbe used for local command of the drive controller; however, all drive controlleradjustment and configuration parameters are protected from change.▲▼MAIN MENUI/O MAPFAULT HISTORYFigure 34: Main Menu in Total Lock ModeTo change access level when in Total Lock mode:1. If Keypad Command is active, from any point in the Level 1 & 2 Software stopthe drive controller, disconnect the keypad display, and set the access lockingswitch to unlock. If Terminal Command is active, it is not necessary to stop thedrive controller before disconnecting the keypad display.2. Reconnect the keypad display.3. Press ENT and display will return to the Drive Configuration menu. Thedrive controller is now in Total Unlock mode. Press ENT to advance throughthe power-up screens to the Main menu.Total UnlockWhen the access locking switch is in the unlocked position, all drive controlleradjustments and configurations are accessible from the Main menu.<strong>56</strong> © 1996 Square D All Rights Reservedηττπ://νιχοντρολσ.χοm
Bulletin No. 50006-519-01BDecember 1996Chapter 5 — ConfigurationMenu SummaryMENU SUMMARY:USING THISCHAPTERTable 22 is an overview of all sub-menus accessible from the Main menu. Use thetable as a reference for menu index numbers. The menu index numbers can be usedwith the F3 key when it is set to Jump (factory setting) to go directly to theassociated menu. Use the table also as a guide to this <strong>manual</strong>. To find a menudescription in the <strong>manual</strong>, go to the page number indicated in the table.Access LevelTotal Lock Partial Unlock Total UnlockTable 22: Menu SummaryIndexNoMenuPageNo.No Yes [1] Yes [1] 1→ Parameter Setting 58Yes [1] Yes [1] Yes [1] 2→2.1→2.2→I/O MapLogic Input MapAnalog Input Map612.3→2.4→Logic Output MapAnalog Output MapNo No Yes [1]Yes [1] Yes [1] Yes [1] 3→ Fault History 624.1→4.2→One Bar GraphTwo Bar Graphs63644→ Display Configuration624.3→ Scroll, Four Tables64No No Yes 5→ Keypad Configuration 64No Yes YesNo No Yes6→6.1→6.2→6.3→7→7.1→7.2→7.3→7.4→Drive ConfigurationTorque TypeCommand TypeMotor Power (ATV<strong>56</strong>U41 only)General ConfigurationDrive ParametersApplication FunctionsOutput AssignmentsFault Management6667676769697796100No No Yes 8→ Diagnostic Mode 1099→ Drive Initialization112No No Yes9.1→ Total Factory Settings1129.2→ Store User Settings1129.3→ Recall User Settings113[1] Accessible with motor running© 1996 Square D All Rights Reserved57ηττπ://νιχοντρολσ.χοm
Chapter 5 — ConfigurationBulletin No. 50006-519-01B1 →Parameter Setting Menu December 19961→PARAMETERSETTING MENU1‘PARAMETER SETTINGLOW SPEED : 0HzHIGH SPEED : 60HzACCELERATION : 3 sDECELERATION : 3 s†, & ENT to modifyPROFILEDAMPINGMOT. OVERLOADSP GAINOFFSETKPKIPI FLT RATIOPI SET POINTPI SP MANUAL::::::::::20%33%7A+9999+0100%0100%00.0 HzThe functions accessible from the Parameter Setting menu depend not only on thecontrol type selected (page 76) but also on whether or not the drive controller isconfigured for PI Regulator. Factory configuration is Normal control type and noPI Regulator. Table 23 on page 58 illustrates the functions available with thevarious configurations.Table 23: Parameter Setting MenuVariable Torque or Variable Torque Low NoiseNormalNOLDLow SpeedLow SpeedHigh SpeedHigh SpeedAccelerationAccelerationDecelerationDecelerationProfileDampingDampingMotor OverloadMotor Overload SP Gain [1]Offset [1]KP [1]KI [1]PI FLT Ratio [1]PI Set Point [2]PI SP Manual [3][1] Appears only if Yes, Set Point has been selected in the PI Regulator menu (page 88)[2] Appears only if Keypad has been selected for setpoint entry in the Set Point menu (page 89)[2] Appears only if Keypad has been selected for <strong>manual</strong> setpoint entry in the Setpoint Manual menu (page 94)The following sections describe the functions available from the 1→ParameterSetting menu. To change the settings of these parameters, scroll to the parameteron the menu, type in a value, and press ENT.Low SpeedLow Speed corresponds to the lower limit of the speed reference at AI1 or AI2 (seeFigure 35) and limits the minimum commanded running frequency to a valuebetween 0 and High Speed. It does not affect the starting frequency. If the drivecontroller is commanded to run below the programmed Low Speed, the outputwill be limited to the Low Speed value. Factory setting is 0 Hz.58 © 1996 Square D All Rights Reservedηττπ://νιχοντρολσ.χοm
Bulletin No. 50006-519-01BChapter 5 — ConfigurationDecember 1996 1 → Parameter Setting Menuf (Hz)HighSpeedLowSpeed0 V0 mA4 mA20 mAReference10 V20 mA20 mA4 mAFigure 35: Speed ReferenceHigh SpeedAcceleration TimeDeceleration TimeDampingHigh Speed corresponds to the upper limit of the speed reference at AI1 or AI2 (seeFigure 35) and limits the maximum commanded running frequency to a valuebetween Low Speed and Maximum Frequency (set in the 7.12→ControlParameters menu). If the drive controller is commanded to run above theprogrammed High Speed, the output will be limited to the High Speed value.Factory setting is 60 Hz.Acceleration Time is adjustable between 0.1 and 999.9 seconds and represents thetime the drive controller will take to accelerate between 0 Hz and NominalFrequency (set in the 7.11→Motor Parameters menu). Acceleration Timedetermines the base line slope used by the drive controller to accelerate betweenfrequencies. Factory setting is 3 seconds.If the acceleration slope is too steep for the motor to accelerate the connected load,the acceleration slope will be modified to minimize the possibility of a nuisancetrip.Deceleration Time is adjustable between 0.1 and 999.9 seconds and represents thetime the drive controller will take to decelerate between Nominal Frequency (setin the 7.11→Motor Parameters menu) and 0 Hz. Deceleration Time determines thebase line slope used by the drive controller to decelerate between frequencies.Factory setting is 3 seconds.If the deceleration slope is too steep for the motor to decelerate the connected load,the deceleration slope will be modified to minimize the possibility of a nuisancetrip.Damping is available with any drive controller configuration (page 67). Thisparameter adjusts the integral gain of the frequency loop to match the inertialresponse of the load to the frequency response of the drive controller. Theadjustable range varies with the drive controller configuration:• 1 to 100% for NOLD control with either variable torque configuration• 1 to 800% for Normal control with either variable torque configurationWhen Damping is properly adjusted and the drive controller is not in current limitor ramp modification, the motor speed should follow the speed reference rampwithout oscillation and with little overshoot. During steady-state operation withconstant load, the motor speed should remain constant with no oscillation. If themotor load changes, the drive controller should correct the motor speeddisturbance rapidly with little or no oscillation.© 1996 Square D All Rights Reserved59ηττπ://νιχοντρολσ.χοm
Chapter 5 — ConfigurationBulletin No. 50006-519-01B1 →Parameter Setting Menu December 1996The factory preset value of Damping is 20% which corresponds to 1.5 times thefactory set motor inertia for the selected motor power rating. Most applications donot require Damping adjustment.If the motor speed oscillates or overshoots the desired speed during changes in themotor speed reference or during steady-state operation with constant load,Damping is set too low and should be increased.If the motor speed follows the speed reference ramp sluggishly or tends to varyduring steady-state operation with constant load, Damping is set too high andshould be decreased.ProfileProfile is used only when the drive controller is configured for Normal controltype. This parameter shapes the V/Hz profile of the output. Profile can be set to avalue between 0 and 100, factory preset to 20.During changes in speed command, the V/Hz profile becomes linear, intersectingthe Vn and fn points of Figure 36. As a result, there is no reduction in availablemotor torque during speed changes.VVn1000fnfmaxf (Hz)Shaded area denotes zonewithin which drive functionswhen Profile is set between0 and 100.Figure 36: ProfileProfile is not available when NOLD control type is selected.Motor OverloadCAUTIONMOTOR OVERHEATINGThis drive controller does not provide direct thermal protection for the motor. Use of athermal sensor in the motor may be required for protection at all speeds or loadingconditions. Consult motor manufacturer for thermal capability of motor when operatedover desired speed range.Failure to follow this instruction can result in injury or equipment damage.Motor Overload enables the drive controller to protect a standard induction motorfrom overload. This function can replace a conventional thermal overload relay forsingle motor applications; however, multi-motor applications require individualexternal thermal overload motor protection.This function is more effective in protecting a motor operated from a drivecontroller because it considers motor speed as well as time and current in itsprotection algorithm. This is important since most motors applied on drivecontrollers are self-cooled, and their cooling effectiveness declines at lower speeds.The drive controller’s protection algorithm integrates motor current over time,taking into account factors such as stop time and idle time. Two types of motoroverload protection can be selected from the 7.4→Fault Management menu (page100 for details):1. For Self-Cooled Motor (factory setting)2. No thermal protection60 © 1996 Square D All Rights Reservedηττπ://νιχοντρολσ.χοm
Bulletin No. 50006-519-01BChapter 5 — ConfigurationDecember 1996 2 →I/O Map2→I/O MAPMotor Overload can be adjusted from 0.45 to 1.15 times the nominal drivecontroller current, as displayed on the Drive Identification screen. Factory preset is0.9. Adjust Motor Overload value to nominal motor current (see page 70).Return toMain menuESC2‘ I/O MAPLOGIC INPUT MAP ...ANALOG INPUT MAP ...LOGIC OUTPUT MAP...ANALOG OUT. MAP...†, & ENT to selectENT2.1‘LOGIC INPUT MAPIN. ASSIGNMENT SLI1 RUN PERMISSIVELI2 RUN FORWARDLI3 AUTO/MANUALLI4 AUTO RUN2.2‘ANALOG INPUT MAPIN. ASSIGNMENT VAL%AI1 SPEED REF. 1AI2 SPEED REF. 22.3‘LOGIC OUTPUT MAPOUT. ASSIGNMENT SLO1 AT SPEEDLO2 CURRENT LIMITR1 FAULT STATER2 RUNNING STATE2.4‘ANALOG OUT. MAPOUT. ASSIGNMENT VAL%AO1 MOTOR SPEEDAO2 MOT. CURRENTThe I/O map is a series of display-only screens that show the analog and logicinput/output terminal assignments. I/O Map is helpful for determining whichinput/output terminals are assigned to which software functions, and fordisplaying the state of the inputs/outputs while operating the drive controller.The I/O Map consists of four three-column, display-only screens. The left columnof each lists the inputs/outputs, the middle column shows the input/outputfunctions, and the right column displays states or values. I/O states are given as 0(low logic state) or 1 (high logic state). Refer to Chapter 2 for definitions of logic 1and logic 0 for applicable logic I/O. Analog I/O values are given in percentages.See page 99 for base of percentage displayed.© 1996 Square D All Rights Reserved61ηττπ://νιχοντρολσ.χοm
Chapter 5 — ConfigurationBulletin No. 50006-519-01B3 →Fault History December 19963→FAULT HISTORY3‘FAULT HISTORYFAULT NAME STA MIN-PHASE LOSS RDYAC-LIN.OVERVOL RUNMOT. OVERLOAD ACC “ENT to set markerThe Fault History screen displays the last eight faults stored by the drive controller,and run status at time of fault. The most recent fault is displayed first in the list.The arrow (←) under the “M” column is used to mark a fault so that it can befollowed for future observation.Table 24 lists drive controller run status codes. Table 21 on page 55 lists the faultsthat can be displayed on the Fault History Screen.Table 24: Fault History Screen Run Status CodesCodeACCDECRUNBRKRDYDCBCLIFLTCode DefinitionAcceleratingDeceleratingDrive controller running (at speed)Braking (dynamic or regenerative)Drive controller stopped and readyDC injection brakingCurrent limit activeFaultedTroubleshooting4→DISPLAYCONFIGURATIONMENURefer to Chapter 4 for troubleshooting procedure when a fault is displayed. In thecase of an internal drive controller fault, autodiagnostics can be run to locate thefailed component. See the 8→Diagnostic Mode menu on page 109.By default, the Display screen shows reference frequency in bar graph form.SPEED REFER.47.2 HzRUNThe type and number of functions shown can be modified from the 4→DisplayConfiguration menu. Modification is possible while the drive controller is running.4‘ DISPLAY CONFIG.ONE BAR GRAPH “TWO BAR GRAPHSCROLL, 4 TABLES†, & ENT to modify62 © 1996 Square D All Rights Reservedηττπ://νιχοντρολσ.χοm
Bulletin No. 50006-519-01BChapter 5 — ConfigurationDecember 1996 4 →Display Configuration MenuThree display options are available from the 4→Display Configuration screen. Anarrow (←) indicates the active display option.• One function displayed in bar graph form• Two functions displayed in bar graph form• Eleven functions displayed in three tablesThe One Bar Graph and Two Bar Graph choices have sub-menus. From a list ofnine items in these sub-menus, you may select the functions to be displayed. Thelist of functions is the same for both display choices, and is illustrated in the4.1→One Bar Graph menu.4.1→One Bar Graph 4.1‘ONE BAR GRAPHSPEED REFERENCE “OUTPUT FREQUENCY “OUTPUT CURRENTMOTOR TORQUESelect only 1 itemOUTPUT POWEROUTPUT VOLTAGELINE VOLTAGEDC VOLTAGEMOTOR THERMAL STATEMOTOR SPEEDMACHINE SPEED REF.MACHINE SPEEDDRIVE THERMAL STATEPI SET POINTPI FEED BACKESCESCESCESCESCENTENTENTENTENTENTERMOTORRATED SPEEDIN RPM:700ENTERSCALINGFACTOR:1ENTNOTE: Output Frequencyis not acted on byslip compensation.UNITS EDITION AA†, & ENT to selectWhen finished use ESCUse the ▲ and ▼ keys to select a function from the 4.1→One Bar Graph menu andpress ENT.Five functions on the menu have associated screens for entering actual values. Formotor RPM, enter the motor rated speed. The controller will automatically selectthe closest standard motor speed: 700, 900, 1200, 1800, or 3600.For Machine Speed Reference, Machine Speed, PI Set Point, and PI Feedback, firstenter the scale factor that multiplies motor rated speed in Hz to determine theapplication units. The scale factor, programmable from 1 to 100, is factory presetat 1.NOTE: There is only one scaling factor entry available for Machine Speed Reference,Machine Speed, PI Set Point, and PI Feedback. The scaling factor chosen for MachineSpeed, for example, will be the same scaling factor fused for PI Set Point.Second, enter a 4-character label for the application (“ft/s”, for example) in theUnits Edition screen. Using the ▲ (moves up) and ▼ (moves down) keys, scrollamong the alphabetical characters and press ENT to select a character. Eachselected character will appear in the upper band of the screen. Press ESC when youare finished defining the label.When the screen displays one bar, you may use the ▲ and ▼ to display otherfunctions.© 1996 Square D All Rights Reserved63ηττπ://νιχοντρολσ.χοm
Chapter 5 — ConfigurationBulletin No. 50006-519-01B5 →Keypad Configuration Menu December 19964.2→Two Bar GraphsThe 4.2→Two Bar Graphs menu is the same as the 4.1→One Bar Graph menu; youcan, however, make two selections. Figure 37 on page 64 shows the display screenconfigured for Two Bar Graphs. When the ▲ and ▼ keys are used to scroll, the firstbar graph remains fixed, while the other parameters are displayed successively onthe second bar graph.DISPLAY MODEOUT.FREQUENCY:47.2HzOUT. CURRENT:5.1ARUNFigure 37: Display Screen Configured for Two Bar Graphs4.3→ScrollThe Scroll format displays 11 functions in three tables (12 functions for ATV<strong>56</strong>D16to ATV<strong>56</strong>D79 drive controllers). See Figure 38.DISPLAY MODESPEED REFER. :#####HzOUT. FREQ. :#####HzOUT. CURRENT :#####AMOT. TORQUE : ### %1st tableRDY▲▼DISPLAY MODEOUT. POWER :#####kWOUT. VOLTAGE:### VLINE VOLTAGE:### VDC BUS VOLT.:#### VRDY2nd table▲▼DISPLAY MODEMOT.THERMAL S:### %DRIVE THER. S:### %ELAPSED TIME :### h## mRDY3rd table▲Figure 38: Display Screen Configured for Four Table Scroll▼DISPLAY MODEMOTOR SPD. : ####4th tableRDYNOTE: For Motor Thermal State (see first line of third table in Figure 38), if MotorOverload is set to No Thermal Overload in the 7.4→Fault Management menu, ntH will bedisplayed instead of a percentage. Drive Thermal State (second line of third table) appearsonly for ATV<strong>56</strong>D16 to ATV<strong>56</strong>D79 drive controllers.5→KEYPADCONFIGURATIONMENU5‘KEYPAD CONFIG.TERMINAL COMMANDTER/KEY BY LI:...Use the 5→Keypad Configuration menu to configure the drive controller forTerminal Command or to configure a logic input for changing control of the drivecontroller from Terminal Command to Keypad Command.In Terminal Command (factory setting), the drive controller takes referencefrequency, stop, and run commands from its terminal strip connections.64 © 1996 Square D All Rights Reservedηττπ://νιχοντρολσ.χοm
Bulletin No. 50006-519-01BChapter 5 — ConfigurationDecember 1996 5 →Keypad Configuration MenuKeypad Command allows the drive controller to run and receive its referencefrequency from the keypad display.If keypad is removed from drive controller while in keypad command mode, thenthe controller will stop and may trip on serial link fault.Command mode can be set in one of two ways:1. Select TERMINAL COMMAND from the menu. The drive controller willoperate in the TERMINAL COMMAND mode.2. Select TER/KEY by LI from the menu and assign a logic input, LI3 or LI4. Thisenables switching between command modes by logic input. When theassigned logic input is low (state 0), Terminal Command will be active. Whenthe assigned logic input is high (state 1), Keypad Command will be active. Toreassign a logic input, follow the instructions on the screen.NOTE: Keypad Command is only accessible when in Total Lock if TER/KEY by LI has beenselected before locking.Using Keypad CommandModeKeypad Command allows the drive controller to run independently of its logic andanalog inputs. To start the drive controller in Keypad Command, momentarilypress the RUN key. The drive controller will start, following the acceleration ramp.To stop the drive controller, momentarily press the STOP key and the drivecontroller will stop, following the deceleration ramp. The LI1 input remainsactive for an override stop in Keypad Command mode.SPEED REFER.47.2 HzT/KJOGF1 F2 F3 ▲7 8 9 ▼RUN4 5 6 ESC1 2 3 ENT0 . RUN STOPNOTE: When running the drive controller inKeypad Command mode after having been inTerminal Command mode, the drivecontroller will run in the same direction inwhich it was running in Terminal Commandmode. The drive controller cannot becommanded to change the direction of themotor once Keypad Command mode isentered. Make sure that the motor is rotatingin the desired direction before switching fromTerminal Command mode to KeypadCommand mode.Table 25: Display Mode Screen in Keypad Command ModeIn Keypad Command mode, the ▲ key is used to increase reference frequency andthe ▼ key is used to decrease reference frequency. Note that pressing the ENT keyis not necessary—frequency changes automatically upon pressing the ▲ or ▼ keys.A reference frequency can also be entered by pressing the decimal point key,entering a frequency, and pressing the ENT key.The assignment of each function key is displayed on the last line of the DisplayMode screen above the corresponding function key. Table 26 describes theoperation of the function keys in keypad command.© 1996 Square D All Rights Reserved65ηττπ://νιχοντρολσ.χοm
Chapter 5 — ConfigurationBulletin No. 50006-519-01B6 →Drive Configuration Menu December 1996While in Keypad Command mode, 0 Hz reference is treated as a speed. Once theRUN key is pressed, the drive controller is in a “run state.” After pressing RUN,you may select any speed reference (including 0 Hz) and the drive controller willrun at that speed. Pressing the STOP key causes the drive controller to ramp to zerooutput even though the reference remains at a non-zero frequency. Cycling powerresets the reference to zero and causes the drive to be in the “stop state.”Table 26: Operation of Function Keys in Keypad CommandLabelRSTSCRIndicationReset fault is assigned to associatedfunction key.Scroll function is assigned toassociated function key.Action Achieved by Pressing AssociatedFunction KeyPress function key to reset drive controller after a fault.Press function key to scroll through display screens. ▲and ▼ keys are used for this function in TerminalCommand mode.6→DRIVECONFIGURATIONMENUThe 6→Drive Configuration menu can be accessed only if the drive controller isstopped. If the drive controller is running, a message appears:IMPOSSIBLE TOCONFIGURE THE DRIVEWHILE RUNNINGESC to return toMain menuPress ESC to return to the Main menu.6‘DRIVE CONFIG.TORQUE: VARIABLECOMMAND: 2 WIRESMOTOR:60Hz 440-460VPower: 2.2 kW/3 HPESC to quit\F1=HelpThe 6→Drive Configuration menu contains three selections: Torque Type,Command Type, and Motor. “Motor” is a valid selection for the ATV<strong>56</strong>U41 drivecontroller only since this drive controller can be used with a 1, 2, or 3 hp motor.Otherwise, selecting “Motor” calls up a message screen:To modify Motorparameters,please goto menu 7.11ENT to continueTo access Motor Parameters, go to the 7.11→Motor Parameters menu (page 69).66 © 1996 Square D All Rights Reservedηττπ://νιχοντρολσ.χοm
Bulletin No. 50006-519-01BChapter 5 — ConfigurationDecember 1996 6 →Drive Configuration Menu6.1→Torque Type6.1‘TORQUE TYPEVARIABLEVARIABLE LOW NOISE†, & ENT to modify6.1‘TORQUE TYPEDRIVE RATINGVARIABLE IN = 5.8AVARIABLE LOW Imax = 8.0A†, & ENT P = 2.2kWESC To quit ENTSelect type of torque according to the application and press ENT. A window willappear showing the current and power rating of the drive controller. Confirm bypressing ENT. Display returns to the 6→Drive Configuration menu.NOTE: Changing Torque Type or Control Type (in the 7.13→ Control Type menu) resetsthe motor parameters in the 7.11→Motor Parameters menu to the factory settings.6.2→Command Type6.2‘COMMAND TYPE2 WIRE (MAINTAINED3 WIRE (IMPULSE)(start/stop control)†, & ENT to modify\ESC To quit\F1=HelpSelect 2-wire or 3-wire command. The selection affects the operation of LI1. Factorysetting is 2-wire command. See pages 68 and 68 for detailed descriptions of 2-wireand 3-wire command.6.3→Motor Power6.3‘MOTOR POWER(ATV<strong>56</strong>U41 only).75 kW/ 1 HP1.5 kW/ 2 HP2.2 kW/ 3 HP†, & ENT to modifyFor the ATV<strong>56</strong>U41 drive controller with a motor rated less than 3 hp (or 4 hpvariable torque), the 6.3→Motor Power screen can be accessed to select the powerof the motor. This screen is only available on the ATV<strong>56</strong>U41 drive controller.© 1996 Square D All Rights Reserved67ηττπ://νιχοντρολσ.χοm
Chapter 5 — ConfigurationBulletin No. 50006-519-01B6 →Drive Configuration Menu December 19962-Wire CommandThe use of 2-wire command will allow the drive controller to restart withoutoperator intervention after fault reset or restoration of power provided that a runcommand is present. For applications where automatic restarting may pose ahazard to personnel, the use of 2-wire command is not recommended.LI1RunEnableLI2Fwd1010+ Speed Ref- Speed RefFigure 39: Timing Diagram for 2-Wire CommandIf 2-wire command is selected, LI1 is Run Enable and must always be high for thedrive controller to run. If drive controller is running and LI1 goes low, the drivecontroller will freewheel stop.If the drive controller is running and the keypad STOP key is pressed, regardlessof whether the drive is in Keypad or Terminal mode, the drive controller will stop,following the normal ramp.To restart the drive controller, the Run command must be set to low state. Then thedrive controller will restart on the next command to run.For a wiring diagram, refer to Chapter 2.3-Wire CommandThe use of 3-wire command requires operator intervention after fault reset orrestoration of power to restart the drive controller.LI1RunEnableLI2Fwd1010+ Speed Ref- Speed RefFigure 40: Timing Diagram for 3-Wire CommandIf 3-wire command is selected, LI1 is Stop, normally-closed. LI1 must be closed forthe drive controller to run. The forward input must momentarily transition toactive to start the drive controller. If the drive controller is running and LI1 goeslow, the drive controller will stop, following the normal ramp. If the drivecontroller is running and the keypad STOP key is pressed, regardless of whetherthe drive is in Keypad or Terminal mode, the drive controller will stop, followingthe normal ramp.To restart the drive controller, the Run command must be set to low state. Then thedrive controller will restart on the next Run command.Refer to Chapter 2 for wiring diagram.68 © 1996 Square D All Rights Reservedηττπ://νιχοντρολσ.χοm
Bulletin No. 50006-519-01BChapter 5 — ConfigurationDecember 1996 7 → General Configuration Menu7→GENERALCONFIGURATIONMENU7‘GENERAL CONFIG.DRIVE PARAMETERSAPPLICATION FUNC.OUTPUT ASSIGNMENTFAULT MANAGEMENT,† & ENT to selectThe 7→General Configuration menu allows access to four sub-menus:• 7.1→Drive Parameters• 7.2→Application Functions (including input assignments)• 7.3→Output Assignments• 7.4→Fault Management.These menus can be accessed only if the drive controller is stopped.7.1→Drive Parameters7.1‘DRIVE PARAMETERSMOTOR PARAMETERSCONTROL PARAMETERSCONTROL TYPE: NORMAL†, & ENT to modifyThe 7.1→Drive Parameters menu allows access to basic motor and controlparameters, and control type. The menu is accessible only if the drive controller isstopped and in Terminal Command mode (page 64). To verify adjustments, returnto the Display screen by pressing F2, then start the motor. To readjust, stop themotor and return to the desired menu.The parameter choices available on the sub-menus vary depending on the torquetype selected from the 6.1→Torque Type menu, and the control type selected fromthe 7.13→Control Type menu. See Table 27.7.11→Motor Parameters7.11‘MOTOR PARAMETERNOM. CURRENT: ANOMINAL FREQ.: HZNOMINAL VOLT.: VDAMPING: %†, & ENT to modifyROTATION NORM: ABCCURRENT LIMIT ....Use the 7.11→Motor Parameters menu to adjust basic motor parameters. Thefunctions available from this menu vary depending on the type of control selected(page 76). Table 27 shows the functions available from the menu under the varioustypes of control.Adjustments to motor parameters are made either to sub-menus or directly on the7.11→Motor Parameters menu itself. To select a parameter, scroll with the ▲ and ▼keys and press ENT. Adjust the parameter value to the desired setting, then pressENT to confirm.© 1996 Square D All Rights Reserved69ηττπ://νιχοντρολσ.χοm
Chapter 5 — ConfigurationBulletin No. 50006-519-01B7 →General Configuration Menu December 1996Some motor parameters are also accessible from the 1→Parameter Setting menu.Any adjustments made to these parameters from the 7.11→Motor Parametersmenu are also automatically displayed in the Parameter Setting menu.Table 27 shows the selections available from the 7.11→Motor Parameters menuunder the various drive controller configurations.Table 27: 7.11→Motor Parameters MenuVariable TorqueNormalControlNOLDControlNominal CurrentNominal FrequencyNominal VoltageProfileDampingRotation NormalizationCurrent LimitNominal CurrentNominal FrequencyNominal VoltageDampingRotation NormalizationCurrent LimitNominal CurrentNominal Current is the motor nameplate value for full load current. Adjustablefrom 45% to 105% of the drive controller’s current rating, the factory preset valueis 90%. Set Nominal Current to equal the motor full load current. The NominalCurrent parameter does not affect the maximum current that the drive controllercan produce, i.e. Current Limit. However, changing the nominal current parametercan change the value of motor overload current in menu 1. Check and adjust, ifnecessary, the value of motor overload if nominal current is changed.Nominal Frequency7.11‘MOTOR PARAMETERNOM. CURRENTNOMINAL FREQ. 60 HzNOMINAL VOLT.DAMPING†, & ENT to modify\Nominal Frequency corresponds to the point on the V/Hz curve beyond whichvoltage remains virtually constant and only frequency increases. NominalFrequency often corresponds to the base frequency of the motor, which is usuallythe same as the line frequency of the connected power system. Nominal frequencyis fixed at 60 Hz.Nominal Voltage7.11‘MOTOR PARAMETERNOM. CURRENT : ANOMINAL FREQ.NOMINAL VOLT. 460 VDAMPING 460 V†, & ENT to modify\70 © 1996 Square D All Rights Reservedηττπ://νιχοντρολσ.χοm
Bulletin No. 50006-519-01BChapter 5 — ConfigurationDecember 1996 7 → General Configuration MenuNominal Voltage corresponds to the point on the V/Hz curve beyond whichvoltage remains virtually constant and only frequency increases. Nominal Voltageis used with Nominal Frequency to determine the V/Hz baseline. NominalVoltage often corresponds to the base voltage of the motor, which is usually thesame as the line voltage of the connected power system. Nominal voltage is fixedat 460 V for 460 V drive controllers. For 230 V drive controllers, Nominal Voltageis set at 230 V upon first power up, but configurable as either 208 or 230 V.ProfileProfile is used only when the drive controller is configured for Normal controltype. This parameter shapes the V/Hz profile of the output. Profile can be set to avalue between 0 and 100, factory preset to 20. Enter the Profile value directly ontothe 7.11→Motor Parameters menu.During changes in speed command, the V/Hz profile becomes linear, intersectingthe Vn and fn points of Figure 41. As a result, there is no reduction in availablemotor torque during speed changes.VVn1000fnfmaxf (Hz)Shaded area denotes zonewithin which drive functionswhen Profile is set between 0and 100.Figure 41: ProfileProfile is not available when NOLD control type is selected.DampingDamping is available with any drive controller configuration (page 67). Thisparameter adjusts the integral gain of the frequency loop to match the inertialresponse of the load to the frequency response of the drive controller.The adjustable range varies with the drive controller configuration:• 1 to 100% for NOLD control with either variable torque configuration• 1 to 800% for Normal control with either variable torque configurationWhen Damping is properly adjusted and the drive controller is not in current limitor ramp modification, the motor speed should follow the speed reference rampwithout oscillation and with little overshoot. During steady-state operation withconstant load, the motor speed should remain constant with no oscillation. If themotor load changes, the drive controller should correct the motor speeddisturbance rapidly with little or no oscillation.The factory preset value of Damping is 20% which corresponds to 1.5 times thefactory set motor inertia for the selected motor power rating. For mostapplications, no adjustment of Damping should be required.If the motor speed oscillates or overshoots the desired speed during changes in themotor speed reference or during steady-state operation with constant load,Damping is set too low and should be increased. If the motor speed follows thespeed reference ramp sluggishly or tends to vary during steady-state operationwith constant load, Damping is set too high and should be decreased.© 1996 Square D All Rights Reserved71ηττπ://νιχοντρολσ.χοm
Chapter 5 — ConfigurationBulletin No. 50006-519-01B7 →General Configuration Menu December 1996Rotation Normalization7.11‘MOTOR PARAMETERPROFILEDAMPINGROTATION NORM.TORQ.LIMIT MOT ABC†, & ENT to m ACBRewiring the input terminals L1, L2, and L3 will not change the direction of motorshaft rotation; therefore with the Rotation Normalization parameter, direction ofrotation can be inverted from ABC to ACB in order for the motor shaft rotation toagree with the forward and reverse logic inputs. Neither the drive controller northe motor has to be rewired. Select desired phase rotation and press ENT. Factorysetting is ABC, corresponding to U/T1, V/T2, W/T3.Current LimitCURRENT LIMITDEFAULT LIMITBY FREQ. LEV: HzBY LOGIC IN.: ---BY ANALOG IN: ---CURR. LIMIT : ACurrent Limit can be set to a value between 40 to 110% of drive controller outputcurrent. Default value is 110% of drive controller output current. Note that theCurrent Limit value is not affected by the Nominal Current parameter set in the7.11→Motor Parameters menu.CAUTIONUNINTENDED EQUIPMENT ACTIONIf Current Limit is set to less than the no-load current of the motor, unstable operationof the drive controller may result.After adjusting Current Limit, operate the drive controller throughout its speed rangewith expected motor load. Ensure that:• The motor rotates in the correct direction.• Rotation occurs even with small (2-3 Hz) values of speed reference.• The steady-state motor current does not exceed the motor nameplate currentrating.For critical applications that cannot be rotated in the reverse direction such as pumpsequipped with anti-rotation ratchets, uncouple the motor from the load after adjustingCurrent Limit and check the motor for the proper rotation direction when starting.Failure to follow this instruction can result in injury or equipment damage.The value of Current Limit can affect the operation of other drive controllerfunctions. If Current Limit is set to less than the motor no-load current, thenunstable operation of the motor may result. After adjusting Current Limit, operatethe drive controller throughout its speed range. The motor should always start inthe correct direction and should rotate even with low (2-3 Hz) values of speedreference. The steady-state motor current should not exceed the motor nameplatecurrent rating. For critical loads which cannot be rotated in the reverse direction,always uncouple the motor from the load after adjusting Current Limit and checkthe motor for the proper direction of rotation.72 © 1996 Square D All Rights Reservedηττπ://νιχοντρολσ.χοm
Bulletin No. 50006-519-01BChapter 5 — ConfigurationDecember 1996 7 → General Configuration MenuSet Current Limit to Default Limit, or enter a reduced value and select one of theactivation methods:• Frequency Level: when the drive controller exceeds the programmedfrequency level the reduced Current Limit value is activated. To keep thereduced Current Limit value active at all times, set frequency level to 0.• Logic Input: assign a logic input to Current Limit (see Figure 44 on page 74 forprocedure). When the assigned logic input is low (state 0), the Current Limitvalue is the default setting. When it is high (state 1), the Current Limit is thereduced value.• Analog Input: assign an analog input to Current Limit (see Figure 43 on page73 for procedure). The set current limit is ignored and the analog input isscaled so that the adjustment range of current limit is 40% to 110% of the drivecontroller current. This function could be used as a drive current reference formotor torque control.Normal Current LimitReduced Current LimitThresholdMotor FrequencyLIx InputFrequency Thresholdor Logic Input activationAIx InputCurrent LimitFigure 42: Current Limit TimingReassigning Analog andLogic InputsENTESCTo reassign an analog input:CURRENT LIMIT‘AI?AI1 SPEED REFER. 1AI2 SPEED REFER. 2Clear AssignmentSelect INPUT & ENTENTESCREASSIGN ?AI2 SPEED REFERENCE 1’AI2 CURRENT LIMITENT to ConfirmESC to AbortENTESCAI2 SIGNAL TYPE0-20 mA4-20 mA20-4 mAx-20 mA x= 4mAFigure 43: Reassigning Analog Inputs© 1996 Square D All Rights Reserved73ηττπ://νιχοντρολσ.χοm
Chapter 5 — ConfigurationBulletin No. 50006-519-01B7 →General Configuration Menu December 1996ENTESCTo reassign a logic input:AUTO/MANUAL‘ LI?LI3 BYPASSLI4 PRESET SPD LIaClear AssignmentSelect INPUT & ENTENTENTESCREASSIGN ?LI4 PRESET SPD LIa’LI4 AUTO/MANUALENT to ConfirmESC to AbortFigure 44: Reassigning Logic Inputs7.12→Control Parameters7.12‘CONTROL PARAM.MAX. FREQUENCY : 72.0HzLOW SPEEDHIGH SPEEDACCELERATION:::0.0Hz60.0Hz3.0s†, & ENT to modifyDECELERATIONSKIP FREQUENCY::3.0s. . .The 7.12→Control Parameters menu allows access to basic drive controllerparameters. The default or previously programmed values for each parameterappear in the right column of the menu.Adjustments to control parameters are made either to submenus or directly on the7.12→Control Parameter menu. To select a parameter, scroll with the ▲ and ▼ keysand press ENT. Adjust the parameter to desired setting, then press ENT to confirm.The Control Parameters are discussed in detail in the following pages. Someparameters are also accessible from the 1→Parameter Setting menu. Anyadjustments made to these parameters from the 7.12→Control Parameters menuare also displayed in the 1→Parameter Setting menu.Maximum FrequencyCAUTIONMACHINERY OVERSPEED• Some motors and/or loads may not be suited for operation above nameplate motorspeed and frequency. Consult motor manufacturer before operating motor aboverated speed.• Under certain steady-state and transient conditions, the output frequency mayreach 120% of Maximum Frequency setting. Adjust Maximum Frequencyparameter accordingly.Failure to follow this instruction can result in injury or equipment damage.Maximum Frequency clamps the High Speed setting. Maximum Frequency isfixed at 72 Hz.74 © 1996 Square D All Rights Reservedηττπ://νιχοντρολσ.χοm
Bulletin No. 50006-519-01BChapter 5 — ConfigurationDecember 1996 7 → General Configuration MenuLow SpeedLow Speed corresponds to the lower limit of the speed reference at AI1 or AI2 (seeFigure 45) and limits the minimum commanded running frequency to a valuebetween 0 and High Speed. It does not affect the starting frequency. If the drivecontroller is commanded to run below the programmed Low Speed, the outputwill be limited to the Low Speed value. Factory setting is 0 Hz.f (Hz)HighSpeedLowSpeed0 V0 mA4 mA20 mAReference10 V20 mA20 mA4 mAFigure 45: Speed ReferenceHigh SpeedAcceleration TimeDeceleration TimeHigh Speed corresponds to the upper limit of the speed reference at AI1 or AI2 (seeFigure 45) and limits the maximum commanded running frequency to a valuebetween Low Speed and Maximum Frequency. If the drive controller iscommanded to run above the programmed High Speed, the output will be limitedto the High Speed value. Factory setting is 60 Hz.Acceleration Time is adjustable between 0.1 and 999.9 seconds and represents thetime the drive controller will take to accelerate between 0 Hz and NominalFrequency, set in the 7.11→Motor Parameters menu (page 70). Acceleration Timedetermines the base line slope used by the drive controller to accelerate betweenfrequencies. Factory setting is 3 seconds.If the acceleration slope is too steep for the motor to accelerate the connected load,the acceleration slope will be modified to minimize the possibility of a nuisancetrip.Deceleration Time is adjustable between 0.1 and 999.9 seconds and represents thetime the drive controller will take to decelerate between Nominal Frequency, set inthe 7.11→Motor Parameters menu (page 70), and 0 Hz. Deceleration Timedetermines the base line slope used by the drive controller to decelerate betweenfrequencies. Factory setting is 3 seconds.If the deceleration slope is too steep for the motor to decelerate the connected load,the deceleration slope will be modified to minimize the possibility of a nuisancetrip.Skip FrequenciesSKIP FREQUENCYSKIP FREQ. 1: HzSKIP BAND 1: HzSKIP FREQ. 2: HzSKIP BAND 2: HzSF:LSP‘HSP/ B:2or5HzSKIP FREQ. 3: HzSKIP BAND 3: HzENTENTor ESC2 Hz5 Hz© 1996 Square D All Rights Reserved75ηττπ://νιχοντρολσ.χοm
Chapter 5 — ConfigurationBulletin No. 50006-519-01B7 →General Configuration Menu December 1996Skip Frequencies 1, 2, and 3 are used to avoid mechanical resonance. Theadjustable range for skip frequencies is from 0 to 72 Hz. The three skip points mayoverlap each other. Skip Bands of 2 or 5 Hz can be selected.If a reference is set in a skip frequency band, the drive controller will not run in thatband. Ramps are not modified in the skip frequency bands.f (Hz)f3f2f1Figure 46: Skip FrequencyReference7.13→Control Type7.13‘CONTROL TYPENORMALNOLD,† & ENT to modifyNOTE: Changing Control Type resets the motor parameters in menu 7.11 to factorysettings.NormalNOLD (No Load)Normal control is the factory setting. Normal is a sensorless flux vector control. Inorder to create high torque at low speeds, the drive controller maintains a 90°phase relationship between the rotor and stator electromagnetic fields bycontinuously calculating the position of the rotor in relation to the electricalposition of the stator. It is generally applicable on asynchronous motors andprovides good torque performance. When using Normal control, motorhorsepower must be equal to or one horsepower size less than drive controllerhorsepower.For the NOLD control type, the V/Hz profile is linear, intersecting the Vn and fnpoints of Figure 36 on page 60 during changes in speed command or changes inmotor load. During steady-state operation, the slope of the V/Hz line isautomatically adjusted to reduce the voltage on the motor, depending on load, atany given speed. If a motor speed change is commanded or the motor loadchanges, the initial V/Hz profile is immediately reestablished.The NOLD control type differs from the Normal control type in the following way:• Motor voltage reduction can occur even at motor nominal frequency forapplications where the motor load varies.Operation with NOLD control type generally results in reduced audible motornoise without reducing motor RPM. In some cases (particularly with motorswhose horsepower rating is less than 10 hp), improved motor efficiency mayresult. NOLD control should not be used with motors in parallel.76 © 1996 Square D All Rights Reservedηττπ://νιχοντρολσ.χοm
Bulletin No. 50006-519-01BChapter 5 — ConfigurationDecember 1996 7 → General Configuration Menu7.2→Application Functions7.2‘APPLIC. FUNCTIONSPRESET SPEEDSSPEED REFERENCEAUTO/MANUALCONTROLLED STOP†, & ENT to selectSHUTDOWNBYPASSPI REGULATORThis function isnot compatible with:Help F1/ESC ‘ to quitUse the 7.2→Application Functions menu to assign functions to the logic inputsand outputs.The number of functions assignable is limited by the number of inputs/outputsrequired by a function (see Table 28 on page 77), the number of inputs/outputs onthe drive controller available to be reassigned, and by compatibility of the selectedfunctions (see Figure 47 on page 78). The selection of a function which is notcompatible with one already selected causes the message illustrated above toappear on the terminal screen.The drive controller has two logic inputs that can be reassigned. If more inputs/outputs are required, an I/O Extension module can be ordered. Refer to the catalog(document number VD0C06S201_) for more information.Table 28: Logic I/O Required by Application FunctionsApplication FunctionNo. of LI InputsUsed [1]No. of AI InputsUsedNo. of LO or R2Outputs UsedPreset Speeds 1 or 2 0 0Speed Reference 0 1 or 2 0Auto/Manual 1 or 2 0 0Controlled Stop 0 or 1 0 0Shutdown 0 0 0 or 1Bypass 2 0 1PI Regulator 0, 1, or 2 0, 1, 2, or 3 0, 1, 2, or 3[1] The only LI inputs which can be reprogrammed are LI3 and LI4. LI1 is fixed as Run Enable, and LI2 is fixedas Run Forward. If more inputs are required, the I/O Extension Module can be ordered. See catalog(document VD0C06S201_) for more information.© 1996 Square D All Rights Reserved77ηττπ://νιχοντρολσ.χοm
Chapter 5 — ConfigurationBulletin No. 50006-519-01B7 →General Configuration Menu December 1996Read up and across from the ● to identify pairs of incompatible functions.Incompatibilities due to the number of I/O available for reassignment arenot shown.PRESET SPEEDSSPEED REFERENCEAUTO / MANUALCONTROLLED STOPSHUTDOWNBYPASSPI REGULATOR[1][1][1] Shutdown is incompatible with Controlled Stop by Frequency Thresholdand Controlled Stop by Frequency Threshold/Logic Input.Figure 47: Application Function IncompatibilitiesPreset SpeedsPRESET SPEEDSNO1 PRESET SPEED3 PRESET SPEEDESCESC†, & ENT to modifyENT1 PRESET SPEEDLOGIC INPUT a: ----SPEED 1: 5 HzEnter all values‘ ESCENT3 PRESET SPEEDSLOGIC INPUT a: ----LOGIC INPUT b: ----SPEED 1: 5 HzSPEED 2: 10 HzEnter all values‘ESCSPEED 3: 15 HzThis function allows you to program up to preset speeds. If one preset speed isrequired, one logic input must be assigned. Two logic inputs must be assigned ifthree preset speeds are required.The preset speeds are adjustable from 0.1 to 72 Hz. The actual running speed islimited to the setting of High Speed. The programmed values must increaseconsecutively from speeds 1, 2, and 3. If both logic inputs are low, the speed willbe the speed reference, if present, or low speed. The factory preset value for onePreset Speed is 5 Hz, for three Preset Speeds 5, 10, and 15 Hz.Table 29 gives input states for activation of 3 Preset Speeds. If 1 Preset Speed hasbeen selected, the speed is active when the assigned input is high.78 © 1996 Square D All Rights Reservedηττπ://νιχοντρολσ.χοm
Bulletin No. 50006-519-01BChapter 5 — ConfigurationDecember 1996 7 → General Configuration MenuTable 29: Logic Input States for 3 Preset SpeedsInput a Input bLow Speed or Reference 0 0Preset Speed 1 1 0Preset Speed 2 0 1Preset Speed 3 1 1Seven preset speeds can be obtained with the I/O Extension Module. For moreinformation refer to the catalog (document number VD0C06S201_).Speed ReferenceSPEED REFERENCESPEED REF. 1.: AI1SPEED REF. 2 : AI2CLAMP SUM : YES†, & ENT to modifyENTESCAI2 SIGNAL TYPE0-20 mA4-20 mA20-4 mAX-20 mA,X= mAMULTIPLY BY (-1): NOENTNOYESSpeed Reference allows the assignment of the AI1 and AI2 inputs as SpeedReference 1 or Speed Reference 2. Speed Reference also allows you to modify theanalog current input, AI2, for type of signal. The adjustment range is 0-20 mA,4-20 mA, 20-4 mA, or x-20 mA where x can be programmed from 0 to 20 mA inincrements of 0.1 mA. Factory setting for AI2 is 4-20 mA. When Speed Reference isset to x-20 mA, the frequency at which the drive controller will run is determinedas follows:f = ( High Speed – Low Speed) ( Input mA § 20 mA) + Low SpeedWhen the value of AI2 is below x mA, the drive will run at the Low Speed setting.HSPfLSPXmA20mAFigure 48: Speed Reference and Drive Controller FrequencyIf the switch on the control board is set to voltage, AI2 will be a 0-5 V voltage input.Refer to Chapter 2 for location of switch. AI2 in this case must be set on the keypaddisplay for 0-20 mA. The voltage reference input, AI1, cannot be modified. It isfixed as a 0 to 10 VDC input.The two inputs, AI1 and AI2, are summed as a factory default, limited to HighSpeed. However, when Auto/Manual is active the inputs function independentlyand only one is active at a time. It is possible to multiply AI2 by (-1) by selectingYes. In this case, AI2 is subtracted from AI1. If Clamp Sum is set to Yes (factorysetting) and (AI1-AI2) is zero or negative, the drive controller will run at LowSpeed. If Clamp Sum is set to No and (AI1-AI2) is negative, the drive controller willchange direction. See Notes on page 80.© 1996 Square D All Rights Reserved79ηττπ://νιχοντρολσ.χοm
Chapter 5 — ConfigurationBulletin No. 50006-519-01B7 →General Configuration Menu December 1996NOTE: The drive controller cannot be commanded to change the direction of the motoronce the Keypad Command mode is entered. If the direction of motor rotation is reversedwith speed reference summing, the motor will continue to rotate in this direction if KeypadCommand mode is entered. Make sure that the motor is rotating in the desired directionbefore switching from Terminal Command mode to Keypad Command mode.NOTE: If 20-4 mA is selected, user should consider effects of broken wire. If broken wireoccurs when 20-4 mA is selected, drive controller will run at high speed.Auto/ManualAUTO./MANUALNOYES,LOGIC IN.:---AUTO RUN IN. :---†, & ENT to modifyESC to quitAuto/Manual allows switching between Speed Reference 1 and Speed Reference2 by using a logic input. Speed Reference 1 and Speed Reference 2 can beprogrammed to AI1 or AI2 in the Speed Reference screen (see page 79). The Auto/Manual function eliminates the need for mechanical switching of the low levelanalog inputs, and allows the Speed References to act independently instead ofbeing summed.Manual command is defined as Speed Reference 1; Automatic command as SpeedReference 2. When assigned input is high, Auto is active. When it is low, Manual isactive.Auto Run Input is optional. If assigned, it allows the use of a second logic input foran additional 2-wire remote control run command, only active when the drivecontroller is in Auto mode. Local control can be used as either 2-wire or 3-wirecontrol. See Figure 97 on page 163 and Figure 98 on page 164 for interaction ofAuto/Manual and Controlled Stop in 2-wire and 3-wire control.Controlled StopCONTROLLED STOPNOBY LOGIC INPUTBY FREQ. LEVELBY LI / FREQ.LEV.†, & ENT to modifyControlled Stop, which customizes the stopping process, is commanded by:• Logic Input• Frequency Threshold• Frequency Threshold and Logic InputWhen Controlled Stop is activated, the drive controller stops according to one ofthe following methods: Freewheel Stop, Fast Stop, or DC Injection Braking. Toenable Controlled Stop, select a command and stop method as explained on thefollowing pages. Command methods are explained on pages 81 to 85; stopmethods, on pages 82-85. See Figure 97 and Figure 98 in Appendix A for interactionof Auto/Manual and Controlled Stop in 2-wire and 3-wire control.80 © 1996 Square D All Rights Reservedηττπ://νιχοντρολσ.χοm
Bulletin No. 50006-519-01BChapter 5 — ConfigurationDecember 1996 7 → General Configuration MenuControlled Stop Command MethodsBy Logic InputCONT. STOP BY LILOGIC INPUT : ----ACTIVE STATE: LOWSTOP TYPE : FASTFill table/ESC quitENTENTLOWHIGHFREEWHEELFAST STOPDC-INJ.: 70%DC-TIME: 2sWhen Controlled Stop by Logic Input is selected, the activation of the assignedlogic input causes the drive controller to stop, following the selected controlledstop method (Freewheel Stop, Fast Stop, or DC Injection Braking). The controlledstop logic input is only active in Terminal Command mode and is disabled in theKeypad Command mode.To enable Controlled Stop by Logic Input, assign a logic input, define its activestate as logic low (0) or logic high (1), and choose the stop method.By Frequency ThresholdCONT. STOP BY FREQ.L.FREQ. LEVEL :0 HzSTOP TYPE : FASTEnter all values‘ ESCWith Controlled Stop by Frequency Threshold enabled, if a Stop command isinitiated, the drive controller follows the active deceleration ramp until theprogrammed Frequency Threshold is reached. At this point, the drive controllerautomatically begins the programmed controlled stop method. Controlled Stopby Frequency Threshold is active in both Terminal Command and KeypadCommand modes.To enable Controlled Stop by Frequency Threshold, set Frequency Threshold andselect a stopping method (Freewheel Stop, Fast Stop, or DC Injection Braking).By Frequency Threshold /Logic InputCONT.STOP LI/FREQ.L.LOGIC INPUT : ----ACTIVE STATE : LOWSTOP TYPE : FASTFREQ. LEVEL : 0 HzSTOP TYPE : DCTo enable Controlled Stop by Frequency Threshold/Logic Input, assign a logicinput and define its active state. Set the Frequency Threshold and select stoppingmethods for both commands.If both Logic Input and Frequency Threshold commands are selected and active,the stop type for the Logic Input command has priority; however, both commandscan be used in the same stopping sequence.© 1996 Square D All Rights Reserved81ηττπ://νιχοντρολσ.χοm
Chapter 5 — ConfigurationBulletin No. 50006-519-01B7 →General Configuration Menu December 1996Controlled Stop CommandMethods (continued)When Frequency Threshold/Logic Input is selected and the drive controller is inTerminal Command mode, controlled stopping is active both at the frequencythreshold and with the logic input. When the drive controller is in KeypadCommand mode, controlled stopping by frequency threshold is active, butcontrolled stopping by logic input is disabled.At the first command to stop, the drive controller stops following the selectedcontrolled stop method (Freewheel Stop, Fast Stop, or DC Injection Braking). If theother command to stop is given, the drive controller will only stop following thecontrolled stop method corresponding to the second command if the method haspriority as compared to the first method. The order of priority is: Freewheel Stop,Fast Stop, DC Injection Braking.Freewheel Stop1Run Forward0Controlled Stop 1LIx ActiveState High 0Motor SpeedfFigure 49: Freewheel Stop Timing Diagram (2-Wire Command)LI1Run Enable10Run Forward10Controlled StopLIx ActiveState High10Motor SpeedfFigure 50: Freewheel Stop Timing Diagram (3-Wire Command)With Freewheel Stop, the drive controller output is turned off and the motor coaststo a stop. Figure 49 and Figure 50 illustrate the timing sequence for Freewheel Stop.Fast StopWARNINGEXTENDED STOPPING TIMEDeceleration time during fast stop may be automatically extended depending onbraking ability of drive controller. A dynamic brake or mechanical stopping/holdingbrake may be required for consistent stopping times independent of motor loadconditions. Fast Stop does not function during loss of power or drive controller fault.Failure to follow this instruction can result in death, serious injury, or equipmentdamage.82 © 1996 Square D All Rights Reservedηττπ://νιχοντρολσ.χοm
Bulletin No. 50006-519-01BChapter 5 — ConfigurationDecember 1996 7 → General Configuration MenuControlled Stop CommandMethods (continued)Run Forward10Controlled StopLIx ActiveState low10fFrequency OutputFigure 51: Fast Stop Timing Diagram (2-Wire Command)L1Run Enable10Run Forward10Controlled StopLIx ActiveState low10Frequency OutputfFigure 52: Fast Stop Timing Diagram (3-Wire Command)With fast stop, the drive controller decelerates as quickly as possible withoutcausing a nuisance trip. Figure 51 and Figure 52 illustrate timing sequence for FastStop.DC Injection BrakingWARNINGNO HOLDING TORQUE• DC injection braking does not provide holding torque at zero speed.• DC injection braking does not function during loss of power or drive controller fault.• When required, use separate brake function for holding torque.Failure to follow this instruction can result in death, serious injury, or equipmentdamage.CAUTIONMOTOR OVERHEATING AND DAMAGEApplication of DC injection braking for long periods of time can cause motor overheatingand damage. Protect motor from extended periods of DC injection braking.Failure to follow this instruction can result in injury or equipment damage.With DC Injection Braking, DC current is injected in the stator creating a stationarymagnetic pole which brakes the rotor. This method of braking produces maximumtorque at low frequencies.© 1996 Square D All Rights Reserved83ηττπ://νιχοντρολσ.χοm
Chapter 5 — ConfigurationBulletin No. 50006-519-01B7 →General Configuration Menu December 1996Controlled Stop CommandMethods (continued)Two adjustable parameters, DC Injection Level and DC Brake Time, control theoperation of DC Injection Braking. DC Injection Level sets the current level usedfor injection braking. The level is programmable between 50 and 110% of nominaldrive controller current. Factory setting is 70%. Actual braking torque depends onthe motor characteristics. DC Brake Time can be set between 0 and 30 seconds,preset at 2 seconds. If 30.1 seconds is selected, the drive controller brakes for 30seconds at the adjusted level and then continuously at 50% of rated current.1Run Forward0Controlled Stop 1LIx Active 0State HighFrequency outputf0.1 HzDC injectionIdcTdc
Bulletin No. 50006-519-01BChapter 5 — ConfigurationDecember 1996 7 → General Configuration MenuIf the application requires it, a logic output can be assigned to the Shutdownfunction. When dwell time has expired, the drive controller activates the logicoutput to indicate end of functioning at Low Speed.Note that if a Run command is issued during the dwell time, it is not taken intoaccount until the end of the dwell time.f (Hz)LSPt1LI2 0tDwell Time1LO1 0tFigure 55: Shutdown Timing Diagram (2-Wire Command)BypassBYPASSNOYES,DEFINE I/ODELAY TIMESEQUENCE TofPROCESS Tof: s: s: sNOTE: Do not set Bypassfunction if the drive controlleris part of a Class 8839ALTIVAR <strong>56</strong> combinationdevice.ENTESCBYPASS I/OSEQUENCE INPUT :----PROCESS INPUT :----RUN OUT. COMMAND:----Enter all values ‘ESCBypass is used to sequence an output isolation contactor. The output isolationcontactor is commonly used in conjunction with a bypass contactor. The bypasscontactor and associated power circuit components permit starting, running andstopping of the motor directly from line power. Bypass operation requires thewiring scheme illustrated in Figure 58 on page 87.To use Bypass, assign a logic input (LI3 for example) to Sequence Input and relayoutput R2 to Run Output Command. Set time values for Delay Time and SequenceTof (Time Out Fault). If desired, logic input LI4 can be assigned to Process Inputand a time value for Process Tof (Time-out Fault) can be set to verify an optionaluser-defined event. These parameters are described in Table <strong>56</strong>.© 1996 Square D All Rights Reserved85ηττπ://νιχοντρολσ.χοm
Chapter 5 — ConfigurationBulletin No. 50006-519-01B7 →General Configuration Menu December 1996Figure <strong>56</strong>: Bypass ParametersParameter Description Range DefaultDelay TimeRun OutputCommandSequence InputSequence Time-outFaultProcess InputProcess Time-outFaultProgrammable delay time to allow for decay of residualmotor voltage before restarting the drive controller afteroperating directly from line power.This output is active if the drive controller receives a Runcommand and Delay Time has expired. Assign relay R2 toRun Output Command.Used to initiate the acceleration ramp. If this input does notgo high within the time for which Sequence Time-out Faultis set, the drive controller will not start and displays aSequence Time-out Fault. If the Sequence Input goes lowwhile the drive controller is operating, the drive controllerwill fault and freewheel stop.The time period after a run command is received duringwhich the Sequence Input must go high to prevent asequence time-out fault.Verifies the occurrence of a user-defined event after theacceleration ramp has begun. If this input does not go highwithin the time for which the Process Time-out Fault is set,the drive controller will trip on Process Time-out Fault.The time period after the acceleration ramp has begunduring which the Process Input must go high to prevent aProcess Time-out fault.0.2-10 s 2 s— —— —0.2-300 s 5 s— —0.2-300 s 60 sExample Bypass CircuitDescriptionThe bypass scheme shown in Figure 58 on page 87 is an example of integratingelectromechanical devices with the Bypass function and agrees with the operationdescribed in Table <strong>56</strong> and Figure 57. Depending upon the application,modifications to this circuit may be required to achieve the desired performance.Command Type must be set in the 6→Drive Configuration to “2-wire” for ourexample circuit to operate correctly.NOTE: When using the Bypass function, an external overload relay should be present formotor overload protection. The overload relay is required for protection of the motor againstoverload/phase loss when operating from either the line (BYP) or drive controller (AS).Selector switch SW controls the circuit.• With the switch in the AS (Adjustable Speed) position, the motor is run fromthe drive controller.• With the switch in the OFF position, no power is applied to the motor.• With the switch in the BYP (Bypass) position, the motor is run directly from theinput line.The operation at each transition of SW is as follows:1. OFF to AS: SW contact C closes, causing LI2 (Run Forward) to go high whichstarts the Delay Time. If the motor had previously been running in Bypass,then the delay time allows the residual motor voltage to decay. After theDelay Time, the R2 relay (Run Output Command) closes, energizing the I(Isolation) contactor, allowing power to the motor. The I contactor interlockconnected to LI 3 (Sequence Input) allows the drive controller to startaccelerating. The I contactor interlock must close within the Sequence ToFtime or a Sequence Time-out Fault will occur. If the pressure switch contactorconnected to LI4 (Process Input) does not close within the Process ToF time, aProcess Time-out Fault will occur.2. AS to OFF: SW contact C opens, causing LI2 to go low and the drive controllerto decelerate and stop the motor. Then R2 (Run Output Command) opens, deenergizingthe I contactor.86 © 1996 Square D All Rights Reservedηττπ://νιχοντρολσ.χοm
Bulletin No. 50006-519-01BChapter 5 — ConfigurationDecember 1996 7 → General Configuration Menu3. OFF to BYP: SW contact A closes, energizing the B (Bypass) contactor. Motoroverload protection is provided by OL (thermal overload relay) duringrunning in Bypass. SW contact B opens, disabling the I contactor controlcircuit. SW contact D opens. Since LI3 (Sequence Input) goes low as a result,the drive controller cannot start. If the drive controller was still in the processof decelerating the motor when previously in “AS”, the drive controller willinitiate a Sequence Time-out Fault, signalling that an incorrect SW sequencehas occurred. If incorrect SW sequence indication is not desired, theControlled Stop function can be used along with the Bypass function. To useControlled Stop, SW contact D must be connected directly into the LI assignedto Controlled Stop and the I contactor interlock is wired to +24. Use of theControlled Stop function along with the Bypass function requires the additionof an I/O Extension module if a Process Input is used.4. BYP to OFF: SW contact A opens, de-energizing I contactor. The motor stops.Run forward1Run output 0command1Sequence input 0+ ReferenceDT = CEMF Decay TimeSTof = Sequence Time-Out faultPTof = Process Time-Out fault-DT--DT----STof------STof----PTof--PTof-1 Normal Stop2 Freewheel Stop-DT----STof----PTof-Frequency1 12Process input10Normal Sequence Incomplete Process Incomplete SequenceFigure 57: Bypass Timing DiagramASASWOFFBYPIBOLBBIDRIVE CONTROLLERR2AROCR2C+24LI1RUN PERMISSIVECLI2FORWARDDILI3SEQUENCE INPUTLI4PROCESS INPUTContactAS OFF BYPPSIBAXBCDXXXXXPSPumpOLMFigure 58: Bypass Circuit Diagram© 1996 Square D All Rights Reserved87ηττπ://νιχοντρολσ.χοm
Chapter 5 — ConfigurationBulletin No. 50006-519-01B7 →General Configuration Menu December 1996PI RegulatorPI REGULATORNOYES, SET POINTFEED BACKSET POINT MANUALPI PARAMETERSNOTE: Note: The drive controller has thecapability to run in reverse when the PI Regulatorfunction is used. For fan and pump applications inwhich reverse operation is not permissible, selectNO for NEG. VALUES under the PI Parametersscreen (Table 36 on page 95).PI Regulator makes it possible to control a process by adjusting motor speed usinga setpoint input and a feedback input. For example, PI Regulator can be used tocontrol the flow or pressure in a pumping system or the liquid level in a reservoir.PI Regulator requires, at minimum, two analog input ports. Additional analog andlogic input ports are required for other optional PI Regulator functions. Table 30describes the items available from the PI Regulator menu. See Figure 59 on page 88for a block diagram of the PI Regulator function. The menus in this section showfactory settings.Table 30: PI Regulator Menu ItemsMenu ItemNOYES, SET POINTFEED BACKSET POINT MANUALPI PARAMETERSDescriptionPI Regulator function is off.PI Regulator function is on. Selecting this brings up the SET POINTconfiguration menu. The settings under SET POINT must bedefined for PI Regulator to operate. See page 89.Feedback configuration menu. The settings under FEED BACKmust be defined for PI Regulator to operate. See page 90.Manual speed reference/automatic setpoint configuration menu.The settings under SET POINT MANUAL may be configured toallow switching between an automatic setpoint reference and a<strong>manual</strong> speed reference. See page 94.Miscellaneous PI Regulator configuration parameters menu. Thesettings under PI PARAMETERS may be configured to fine tune theoperation of PI Regulator, or to provide analog and logic referenceand status outputs. See page 95.SetpointAI1 - AI4,Keypad-9999 to +9999SP GAIN-9999 to +99990 to 9999REV. ACTIONKI∫dtYes No++ + ErrorΣ Σ -1 1Σ0 to 9999+ -+KPOFFSETFeedback-9999 to +9999FB HIGH ALMAI1 - AI4Auto/ManualLI3 - LI8FB LOW ALM-9999 to +9999SPM Input REV. SPEED(Setpoint Manual)LIx=1 LIx=0-1 1AI1 - AI4,KeypadLIx=0AutoLIx=1ManualAuto/ManualHSPLSPSpeedReferenceNOTE: :An error value of 1 with KP set to100% and KI set to 0 will result in drivecontroller output of 61.8 Hz (if HSP>61.8Hz). An error value of 1 with KP set to 1%and KI set to 140 will result in a drivecontroller output of 61.8 Hz in one second.88 © 1996 Square D All Rights ReservedFigure 59: PI Regulator Block Diagramηττπ://νιχοντρολσ.χοm
Bulletin No. 50006-519-01BChapter 5 — ConfigurationDecember 1996 7 → General Configuration MenuFunction CompatibilityPI Regulator function can only be used when the drive controller is configured for2-wire control. Table 31 lists the functions which are incompatible with the PIRegulator function.Table 31: Functions Incompatible with PI RegulatorFunctionMenu NumberKeypad Configuration Menu 5Command Type: 3-wire 6.2Preset Speeds 7.2Speed Reference 7.2Auto/Manual 7.2Shutdown 7.2Tach. Feedback 7.2NOTE: Tach. Feedback (shaded) is only available when an I/O Extension module is present.Using PI RegulatorTo activate the PI Regulator function, choose “YES, SET POINT” from the PIRegulator menu. The SET POINT menu appears.SET POINTKEYPADSP INPUT : AI1SP GAIN : +9999OFFSET : +0†, & ENT to selectENTESCSP GAIN+9999(+)(-)Table 32: SETPOINT Menu ItemsMenu Item Description RangeKEYPAD Selects the keypad as the means for entering the setpoint. —Enter the setpoint with PI SET POINT in the 1→ParameterSetting menu.SP INPUTSP GAINOFFSETSelects an analog input port as the means for entering thesetpoint.Setpoint scaling adjustment. Range corresponds to %. Forexample: 9999 = 99.99%.Setpoint offset adjustment. Range corresponds to %. Forexample: 9999 = 99.99%.AI1, AI2, AI3,AI4-9999 to +9999-9999 to +9999First, select the means for setpoint entry. Choose KEYPAD for entering the setpointthrough the keypad, or SP INPUT for entering the setpoint through an analoginput port.If KEYPAD is chosen for setpoint entry, enter the setpoint value in PI SET POINTunder the 1→Parameter Setting menu. The setpoint value ranges from 0 to 9999and is a percentage of the setpoint range (where 9999 represents 99.99%). 0 issetpoint minimum, 9999 is setpoint maximum, and 5000 is the middle (50%) of thesetpoint range. Calculate the PI SET POINT value percentage as follows:PI SET POINT=⎛ Setpoint – Min. Process Level------------------------------------------------------------------------------------------------------------ ⎞×9999⎝Max. Process Level – Min. Process Level⎠If setpoint is to be entered through an analog input port, chose the analog inputport based on the type of setpoint signal used (see Table 33).© 1996 Square D All Rights Reserved89ηττπ://νιχοντρολσ.χοm
Chapter 5 — ConfigurationBulletin No. 50006-519-01B7 →General Configuration Menu December 1996Table 33: Analog Input Port RangesAnalog Input Port Input RangeAI10 to 10 VAI20 to 20 mA; 4 to 20 mAAI3 -10 V to 10 V [1]AI40 to 20 mA; 4 to 20 mA[1] AI3 acts as an absolute value when used for PI Regulator.NOTE: The analog inputs (shaded) are available only when an I/O extension moduleis present.Next, calculate the system gain and offset values. System gain and offset aredetermined by the setpoint minimum and maximum process values and thefeedback minimum and maximum process values. Use the following formulas tocalculate system gain and offset, and then enter the values into the drive controllerwith the SP GAIN and OFFSET entries on the SET POINT menu.SP GAIN=⎛ Setpoint Max. – Setpoint Min.------------------------------------------------------------------------------------- ⎞×9999⎝Feedback Max. – Feedback Min. ⎠OFFSET=⎛ Setpoint Min. – Feedback Min.------------------------------------------------------------------------------------- ⎞×9999⎝Feedback Max. – Feedback Min. ⎠Setpoint Min. Process value corresponding to the minimum setpoint signal. Setpoint Min.may either be the maximum process level or the minimum process level,depending on the type of application. Controller will run at low speed atsetpoint minimum.Setpoint Max. Process value corresponding to the maximum setpoint signal. SetpointMax. may either be the maximum process level or the minimum processlevel, depending on the type of application. Controller will run at high speedat setpoint maximum.Feedback Min. Process value at which feedback is minimum.Feedback Max. Process value at which feedback is maximum.9999 Process resolution factor. 9999 corresponds to 99.99%.FeedbackFEED BACKFB INPUT : AI2MIN FEED BACK: +0MAX FEED BACK: +1000LOW LEVEL ALM: +0†, & ENT to selectHIGH LEVEL ALM: +090 © 1996 Square D All Rights Reservedηττπ://νιχοντρολσ.χοm
Bulletin No. 50006-519-01BChapter 5 — ConfigurationDecember 1996 7 → General Configuration MenuTable 34: Feedback Menu ItemsMenu Item Description RangeFB INPUTSelects an analog input port for receiving the AI1,AI2,AI3,AI4feedback signal.MIN FEED BACK Minimum process value for the process -9999 to 9999feedback sensor.MAX FEED BACK Maximum process value for the process -9999 to 9999feedback sensor.LOW LEVEL ALM Process value below which the FB LOW -9999 to 9999ALARM logic output activates.HIGH LEVEL ALM Process value above which the FB HIGHALARM logic output activates.-9999 to 9999NOTE: LOW LEVEL ALM must be set greater than MIN FEED BACK and HIGHLEVEL ALM must be set less than MAX FEED BACK.Select an analog input port for receiving the process feedback signal based on thetype of signal used. See Table 33 on page 90 for specifications of analog input ports.Enter the minimum process value for the process feedback sensor in MIN FEEDBACK and enter the maximum process value for the process feedback sensor inMAX FEED BACK.LOW LEVEL ALM may be configured in conjunction with FB LOW ALARM toannunciate when the process is below an acceptable level. Enter a process valuebetween -9999 and 9999 corresponding to the level in which the feedback lowalarm (FB LOW ALARM) should turn on. Configure the logic output which willannunciate the fault minimum with FB LOW ALARM in the PI Parameters menu(see page 95).HIGH LEVEL ALM may be configured in conjunction with FB HIGH ALARM toannunciate when the process is above an acceptable level. Enter a process valuebetween -9999 and 9999 corresponding to the level in which the feedback highalarm (FB HIGH ALARM) should turn on. Configure the logic output which willannunciate the fault maximum with FB HIGH ALARM in the PI Parameters menu(see page 95).PI Regulator ApplicationExamplesExample 1The drive controller will be used to regulate the level of water in a wet well. Thepump will be pumping water out of the wet well to maintain the level between 8feet and 17 feet. The feedback signal is 0 to 20 mA. At 5 feet the feedback signal is 0mA, and at 20 feet the feedback signal is 20 mA. A 0 to 10 V signal is used for thesetpoint. At 0 V the wet well level is 8 feet, and at 10 V the wet well level is 17 feet.1. Select YES, SET POINT in the PI Regulator menu.2. Select SP INPUT.3. Select AI1 for setpoint input.4. Calculate SP GAIN and OFFSET and enter the values.Setpoint Signal Input on AI1 Corresponding Process Value0 V 8 feet. Setpoint Min.Process value at low speed.10 V 17 feet. Setpoint Max.Process value at high speed.Feedback Signal Input on AI2 Corresponding Process Value0 mA 5 feet. Feedback Min.Process value at minimum feedback.20 mA 20 feet. Feedback Max.Process value at maximum feedback.© 1996 Square D All Rights Reserved91ηττπ://νιχοντρολσ.χοm
Chapter 5 — ConfigurationBulletin No. 50006-519-01B7 →General Configuration Menu December 1996SP GAIN17 – 8= ⎛---------------⎞× 9999 = 6000⎝20 – 5⎠OFFSET8–5= ⎛---------------⎞× 9999 = 2000⎝20 – 5⎠5. Select FEED BACK in the PI Regulator screen.6. Select FB INPUT.7. Select AI2 for feedback input.8. Select MIN FEED BACK.9. Enter 5 for the minimum process level.10. Select MAX FEED BACK.11. Enter 20 for the maximum process level.12. If desired, enter optional LOW LEVEL ALM and HIGH LEVEL ALM values.13. Select YES for REV. ACTION in PI PARAMETERS menu.14. Adjust KP and KI to achieve the best system response.Example 2This example is the same as Example 1, except it uses the keypad as the means forsetpoint entry. The desired setpoint is 12.5 feet.1. Select YES, SET POINT in the PI Regulator menu.2. Select KEYPAD as means for setpoint entry.3. Calculate SP GAIN and OFFSET as illustrated in Example 1 and enter thevalue.4. Select FEED BACK in the PI Regulator screen.5. Select FB INPUT.6. Select AI2 for feedback input.7. Select MIN FEED BACK.8. Enter 8 for the minimum process level.9. Select MAX FEED BACK.10. Enter 17 for the maximum process level.11. If desired, enter optional LOW LEVEL ALM and HIGH LEVEL ALM values.12. Calculate PI SET POINT and enter the value in the 1→Parameter Settingmenu.PI SET POINT12.5 – 8= ⎛--------------------⎞× 9999 = 5000⎝ 17 – 8 ⎠13. Select YES for REV. ACTION in PI PARAMETERS menu.14. Adjust KP and KI to achieve the best system response.Example 3In this example, the drive controller will be used to regulate the volume of waterin a vat. The pump will be pumping water into the vat to maintain the levelbetween 100 m 3 and 10 m 3 . The feedback signal is 0 to 20 mA. At 5 m 3 the feedbacksignal is 0 mA, and at 100 m 3 the feedback signal is 20 mA. A 0 to 10 V signal isused for the setpoint. At 0 V the process level is 100 m 3 , and at 10 V the process levelis 10 m 3 .1. Select YES, SET POINT in the PI Regulator menu.2. Select SP INPUT.92 © 1996 Square D All Rights Reservedηττπ://νιχοντρολσ.χοm
Bulletin No. 50006-519-01BChapter 5 — ConfigurationDecember 1996 7 → General Configuration Menu3. Select AI1 for setpoint input.4. Calculate SP GAIN and OFFSET and enter the values.Setpoint Signal Input on AI1 Corresponding Process Value0 V 100 m 3 . Setpoint Min.Process value at low speed.10 V 10 m 3 . Setpoint Max.Process value at high speed.Feedback Signal Input on AI2 Corresponding Process Value0 mA 5 m 3 . Feedback Min.Process value at minimum feedback.20 mA 10 m 3 . Feedback Max.Process value at maximum feedback.SP GAIN10 – 100= ⎛---------------------⎞× 9999 = – 4615⎝ 200 – 5 ⎠OFFSET100 – 5= ⎛------------------⎞× 9999 = 4871⎝200 – 5⎠5. Select FEED BACK in the PI Regulator screen.6. Select FB INPUT.7. Select AI2 for feedback input.8. Select MIN FEED BACK.9. Enter 10 for the minimum process level.10. Select MAX FEED BACK.11. Enter 100 for the maximum process level.12. If desired, enter optional LOW LEVEL ALM and HIGH LEVEL ALM values.13. Adjust KP and KI to achieve the best system response.Example 4This example is the same as Example 3 except it uses the keypad as the means forsetpoint entry. The desired setpoint point is 55 m 3 .1. Select YES, SET POINT in the PI Regulator menu.2. Select KEYPAD as means for setpoint entry.3. Calculate SP GAIN and OFFSET as in Example 3 and enter the value.4. Select FEED BACK in the PI Regulator screen.5. Select FB INPUT.6. Select AI2 for feedback input.7. Select MIN FEED BACK.8. Enter 10 for the minimum process level.9. Select MAX FEED BACK.10. Enter 100 for the maximum process level.11. If desired, enter optional LOW LEVEL ALM and HIGH LEVEL ALM values.12. Calculate PI SET POINT and enter the value in the 1→Parameter Setting menu.55 – 10PI SET POINT = ⎛---------------------⎞× 9999 = 5000⎝100 – 10⎠13. Adjust KP and KI to achieve the best system response.© 1996 Square D All Rights Reserved93ηττπ://νιχοντρολσ.χοm
Chapter 5 — ConfigurationBulletin No. 50006-519-01B7 →General Configuration Menu December 1996Setpoint Manual SETPOINT MANUALKEYPADSPM INPUT :___AUTO/MANU :___REV. SPEED :___†, & ENT to selectTable 35: SETPOINT MANUAL Menu ItemsMenu Item Description RangeKEYPAD Selects the keypad as the means for entering the <strong>manual</strong> -speed reference. Enter speed reference with PI SP MANUALin the 1→Parameter Setting menu when KEYPAD is selected.SPM INPUT Analog input port used for <strong>manual</strong> speed reference entry. AI1,AI2,AI3,AI4AUTO/MANU Logic input for switching between automatic setpoint and<strong>manual</strong> speed reference. When the logic input is high, Manualis selected. When the logic input is low, Auto is selected.LI3 to LI8REV. SPEEDLogic input for switching between forward and reverse speed.When the logic input is high, the speed reference will bereversed. When the logic input is low, the speed reference willnot be reversed.LI3 to LI8Setpoint Manual provides the capability to <strong>manual</strong>ly control the controller speed.This function is useful for slowly bringing the system up to the desired setpoint,and then switching the setpoint to automatic control.If KEYPAD is chosen as the means for <strong>manual</strong> speed reference entry, enter thespeed reference value in the PI SP MANUAL menu item in the 1→ParameterSetting menu. The PI SP MANUAL range, expressed as Hz, is from low speed tohigh speed.SPM INPUT is the analog input port which will receive the <strong>manual</strong> setpoint signal.Select the SPM INPUT based on the type of signal used. See Table 33 on page 90 forspecifications on the analog input ports.AUTO/MANU configures the logic input port which controls whether the <strong>manual</strong>speed reference or the automatic setpoint is used for setpoint entry. If the logicinput is low, the automatic setpoint will be used. If the logic input is high, the<strong>manual</strong> speed reference will be used.REVERSE SPEED configures the logic input port which controls the direction inwhich the drive controller runs in <strong>manual</strong>. If the logic input is high, the drivecontroller will run in the reverse direction from the direction commanded by the<strong>manual</strong> speed reference.94 © 1996 Square D All Rights Reservedηττπ://νιχοντρολσ.χοm
Bulletin No. 50006-519-01BChapter 5 — ConfigurationDecember 1996 7 → General Configuration MenuPI Parameters PI PARAMETERSKP : 100%KI : 0NEG VALUES : NOREV. ACTION : NO†, & ENT to selectPI FLT RATIO : 100%PI REF OUTPUT : ___PI FB OUTPUT : ___PI ERR OUTPUT : ___PI INTEGRATOR : ___FB LIMIT : ___FB HIGH ALARM : ___FB LOW ALARM : ___Table 36 describes the various PI adjustment parameters available with PIRegulator.Table 36: PI Parameters Menu ItemsMenu Item Description RangeKPProportional gain. Adjusts the speed of the reaction to the feedback loop. 0 to 9999%Range corresponds to %. 9999 corresponds to 99.99%.KIIntegral gain. Adjusts the accuracy of PI regulation. Range corresponds 0 to 9999to per second units.NEG. VALUES Determines if the drive controller will be able to run in both directions orin only one direction.Yes, NoYes: The controller can run in both directions.No: The controller can run in only one direction.REV. ACTIONPI FLT RATIODetermines the response to error (Σ) between setpoint and feedbacksignals.Σ = Setpoint - FeedbackSelection Σ Speed ResponseYes + Speed decrease– Speed increaseNo + Speed increase– Speed decreaseUser defined error limit between desired setpoint and actual processfeedback. Expressed as a percentage of [MAX FEED BACK - MIN FEEDBACK]. If the real error exceeds the PI FLT RATIO, the FB LIMIT logicoutput activates.Yes, No0-100%PI REF OUTPUT Analog output reference proportional to PI setpoint.AO1,AO2,AO3PI FB OUTPUT Analog output reference proportional to feedback AO1,AO2,AO3PI ERR OUTPUT Analog output reference proportional to PI error. PI error is the AO1,AO2,AO3percentage difference between desired setpoint and actual feedbackcompared to the feedback range. The analog output is scaled such that0 (or 4 mA) is proportional to -5%, and 20 mA is proportional to 5%.PI INTEGRATOR Analog output reference proportional to PI integral error.AO1,AO2,AO3FB LIMIT Logic output indicating that PI FLT RATIO has been exceeded. Seedescription of PI FLT RATIO.LO1 to LO4RO1 to RO4FB HIGH ALARM Logic output indicating that HIGH LEVEL ALM has been exceeded. See LO1 to LO4description of HIGH LEVEL ALM on page 91.RO1 to RO4FB LOW ALARM Logic output indicating that the feedback is less than LOW LEVEL ALM. LO1 to LO4See description of LOW LEVEL ALM on page 91.RO1 to RO4© 1996 Square D All Rights Reserved95ηττπ://νιχοντρολσ.χοm
Chapter 5 — ConfigurationBulletin No. 50006-519-01B7 →General Configuration Menu December 1996PI Regulator SettingsConfigurable from the1→Parameter Setting MenuThe following PI Regulator Settings are also configurable in the 1→ParameterSetting menu. (PI SET POINT and PI SP MANUAL are only configurable in the1→Parameter Setting menu.) See descriptions of these settings in the “Using PIRegulator” on pages 89 to 90.• SP GAIN• OFFSET•KP•KI• PI FLT RATIO• PI SET POINT (present in the 1→Parameter Setting menu only when KEYPADis chosen for setpoint entry.)• PI SP MANUAL (present in the 1→Parameter Setting menu only whenKEYPAD is chosen for <strong>manual</strong> speed reference entry.)7.3→Output Assignments7.3‘OUTPUT ASSIGN.LOGIC OUTPUTSANALOG OUTPUTS†, & ENT to selectThe Output Assignment menu allows:• Display of the logic and analog output assignments• Assignment of functions to available outputs (i.e., outputs not previouslyassigned from the 7→General Configuration menu)Logic Output FunctionsLOGIC OUT. FUNCTIONSREADY STATERUNNING STATE “AT SPEED “TERM./KEYPAD†, & ENT to selectAUTO/MANUALCURRENT LIMIT “FAULT STATE “DRIVE THER. AL.LOSS FOLLOWERFREQ. LEV.CURRENT LEV.THERMAL LEV.FB LIMITFB HIGH ALARMFB LOW ALARMESCENTSET LEVEL0 ‘ 200%ENTESCTHERMAL LEV LO?LO1 AT SPEEDLO2 CURRENT LIMITR2 RUNNING STATECLEAR ASSIGNMENTSELECT INPUT & ENTENTESCENTREASSIGN ?LO1 AT SPEED’LO1 THERMAL LEV.ENT to confirmESC to abort96 © 1996 Square D All Rights Reservedηττπ://νιχοντρολσ.χοm
Bulletin No. 50006-519-01BChapter 5 — ConfigurationDecember 1996 7 → General Configuration MenuReady StateRunning StateAt SpeedThis menu displays all functions that can be assigned to the logic outputs andallows reassignment where possible. Only the outputs not previously assignedfrom the 7.2→Application Function menu can be reassigned here. An arrowindicates a function that is already assigned. Output functions can be assigned tomore than one output.The R1 relay is assigned to the Fault State function and cannot be reassigned.Also, the Drive Thermal Alarm function is only available on drive controllersATV<strong>56</strong>D16 to ATV<strong>56</strong>D79. The menus illustrated above show the procedure forreassigning the logic outputs. The logic output functions are described in thefollowing sections.If drive controller is waiting for a Run command and is not in fault state, logicoutput is high or relay is energized.When a Run command is present, DC injection is not enabled, and there is no faulton the drive controller, logic output is high or relay is energized. If Bypass isenabled, the Sequence Input must also be present for Running State to be high orenergized.At Speed (LOx)Reference10FrequencyFigure 60: At SpeedWhen drive controller is commanded to run above zero speed and OutputFrequency is equal to Frequency Reference input signal, logic output is high orrelay is energized.Terminal/KeypadAuto/ManualCurrent LimitFault StateDrive Thermal AlarmLoss of FollowerWhen drive controller is in Keypad Command, logic output is high or relay isenergized. When in Terminal Command, logic output is low or relay is notenergized.When drive controller is in Auto mode of operation, logic output is high or relay isenergized. When in Manual mode of operation, logic output is low or relay is notenergized.When drive controller reaches current limit value (depending on setting in7.11→Motor Parameters), logic output is high or relay is energized.If drive controller is in fault state, logic output is high or relay is energized. The R1relay, already assigned to Fault State, deenergizes upon fault.When the drive controller has reached the thermal alarm, activated a minimum of60 seconds before a drive controller thermal fault is reached, logic output is highor relay is energized. Available only on drive controllers ATV<strong>56</strong>D16 to ATV<strong>56</strong>D79.If current reference at AI2 falls below 3 mA, logic output is high or relay isenergized. Can be used only if AI2 is set for 4-20 mA or 20-4 mA.© 1996 Square D All Rights Reserved97ηττπ://νιχοντρολσ.χοm
Chapter 5 — ConfigurationBulletin No. 50006-519-01B7 →General Configuration Menu December 1996Frequency LevelLevelFrequencyFreq. Level (LOx)10Active HighFigure 61: Frequency LevelCurrent LevelWhen output frequency exceeds the programmed frequency level, logic output ishigh or relay is energized and remains high (or energized) until output frequencyfalls below the programmed frequency level. Frequency level is adjustable from 0to 72 Hz.To indicate with a low logic level, assign a relay output and wire to the correctcontacts.Current LevelMotor CurrentCurrent Level (LOx)10Figure 62: Current LevelWhen drive controller exceeds programmed current level (adjustable from10 to110% of nominal drive controller current) logic output is high or relay is energizedand remains high (or energized) until drive controller falls below the programmedcurrent level.Thermal LevelFB Limit, FB High Alarm,FB Low AlarmWhen thermal motor overload value reaches programmed thermal level(adjustable from 0 to 200% of nominal motor thermal state) logic output is high orrelay is energized and remains high (or energized) until thermal motor overloadvalue falls below thermal level.FB Limit, FB High Alarm, and FB Low Alarm are described in Table 36 on page 95.98 © 1996 Square D All Rights Reservedηττπ://νιχοντρολσ.χοm
Bulletin No. 50006-519-01BChapter 5 — ConfigurationDecember 1996 7 → General Configuration MenuAnalog Output FunctionsANALOG OUT. FUNCTIONSMOT. CURRENT “MOTOR SPEED “MOTOR POWERTHERMAL STATEPI REF OUTPUTPI FB OUTPUTPI ERR OUTPUTPI INTEGRAL†, & ENT to selectMOT. VOLTAGEESCENTTHERM. STATE ‘ AO ?AO1 MOTOR SPEEDAO2 MOT. CURRENTCLEAR ASSIGNMENTSelect OUTPUT & ENTENTESCENTSELECT0-20mA4-20mAReassigning an Analog OutputENTREASSIGN ?AO1:MOTOR SPEEDAO2:THERM. SPEEDENT to confirmESC to abortThe Analog Output Functions menu displays all functions that can be assigned tothe analog outputs and allows reassignment where possible. Only the outputs notpreviously assigned from the 7→General Configuration menu can be reassignedhere. Arrows indicate previously assigned functions, i.e., functions assigned eitherby factory default or reassignment.The menu illustrated above shows the procedure for reassigning the analogoutputs. Note that you may change the output signal scaling factor (factory default0-20 mA) from the Analog Output Functions menu.Motor CurrentMotor SpeedMotor Thermal StateMotor PowerMotor VoltagePI Ref Output, PI FB Output,PI ERR Output, PI Integral20 mA equals 200% of the motor nominal current rating.20 mA equals High Speed. 0 mA or 4 mA equals 0 speed. Slip compensation doesnot act on this output.20 mA equals 200% of the nominal motor thermal state.20 mA equals 200% of the motor nameplate power in variable torque, low noiseconfiguration.20 mA equals 110% of the nominal motor voltage.PI Ref Output, PI FB Output, PI ERR Output, and PI Integral are described in Table36 on page 95.© 1996 Square D All Rights Reserved99ηττπ://νιχοντρολσ.χοm
Chapter 5 — ConfigurationBulletin No. 50006-519-01B7 →General Configuration Menu December 19967.4→Fault Management7.4‘FAULT MANAGEMENTFAULT STOP :FREEW.POWER LOSS : NOAUTO-RESTART : NOCATCH ON FLY : RAMP†, & ENT to modifyMOTOR OVERLOAD ...IN. PHASE FAIL: YESLOSS FOLLOWER :FAULTFOLD BACK : NOFAULT RESET : NODB FAULT : NOOUT. PHASE FLT: YESENTENTFREERAMPCATCH TYPERAMPI LIMITNOThe 7.4→Fault Management menu allows you to program the drive controller fordetecting certain fault states and to specify fault stop methods.NOTE: The user must evaluate the effects of a drive controller fault on the process beingcontrolled and select an appropriate fault management strategy. If a drive controller faultoccurs, applications such as those involving safety-critical aspects of a process (continuityof service under unusual service conditions, emergency braking, etc.) may requireadditional apparatus or control to achieve an appropriate response or level of redundancy.Fault StopDrive Controller RestartMethodsFault Stop determines how the drive controller will stop upon occurrence of afault. On the ALTIVAR <strong>56</strong> freewheel stop is the fixed method of fault stop. (SeeTable 37 on page 101.) In freewheel stop, the drive controller output is turned off,allowing the motor to coast to a stop according to inertia and resistant torque.There are three methods for resetting the drive controller after a fault:• Automatic restart (2-wire command only). See page 102.• Manual reset: removal of all power for longer than 1.0 second, thenreapplication of power.• If input phase failure detection is enabled, an input phase failure lasting longerthan 1.0 second may also initiate a <strong>manual</strong> reset.• Fault reset by logic input or function key (see page 108).In all cases, fault reset cannot occur unless the cause of the fault is no longerpresent. Certain faults, described in Table 37, do not allow an automatic restart.100 © 1996 Square D All Rights Reservedηττπ://νιχοντρολσ.χοm
Bulletin No. 50006-519-01BChapter 5 — ConfigurationDecember 1996 7 →General Configuration MenuTable 37: Fault Stop and Restart MethodsResettable OnlyBy Manual Reset(Removal Of Power)Fault Reset by LI,Function Key, orManual ResetCan be AutomaticallyResetNon-LatchingFaults [1]Fault CausingFreewheel StopShort circuitGround faultPrecharge failureInternal faultMemory failureDynamic brake faultDynamic brake resistor faultAuto-test failureTransistor short circuitOpen transistorLink FaultAC line overvoltageDC bus overvoltageSequence time-out faultOverspeedOutput phase lossDrive overtemperatureMotor overloadLoss of followerProcess time-out faultSerial link faultAC line overvoltageDC bus overvoltageSequence time-out faultOverspeedOutput phase lossDrive overtemperatureMotor overloadLoss of followerProcess time-out faultUndervoltageinput phasefailure[1] When the fault condition is no longer present, the drive controller will automatically restart the motor if theCommand Type is set for 2-wire and the Run Enable and direction inputs are maintained, regardless of the settingof Automatic Restart.The following sections describe the faults programmable from the 7.4→FaultManagement menu.Power Loss7.4‘FAULT MANAGEMENTFAULT STSTOP TYPEPOWER LO FREEAUTO-RES RAMPCATCH ON†, & ENT to modifyDuring loss of input power, certain actions are taken by the drive controller toenable recovery once power is restored. This is possible since the drive controllerlogic remains active for a least one second after power is lost. The actions takendepend on the settings of Power Loss and Input Phase Failure (see page 107).With Power Loss set to FREE (factory setting), the following sequence occurs whenpower is lost or there is a phase failure while the drive controller is running:• The drive controller freewheel stops (independent of the setting of Input PhaseFailure).• The control logic remains active for at least one second by using the powerstored on the drive controller DC bus.• If input power is restored while the control logic is still active, the drivecontroller automatically restarts independent of the Command type (in the6→Drive Configuration menu) selected. If input power is restored when thecontrol logic is no longer active, the drive controller will follow a normalpower-up sequence. Restart of the drive controller requires a run commandand the absence of faults.With power loss set to RAMP, the following sequence occurs when power is lost orthere is a phase failure while the drive controller is running:• When the DC bus voltage reaches 80% of its initial value, the drive controlleris commanded to decelerate following a ramp. The deceleration attempts torecover inertial energy stored in the load to enable the drive controller tooperate the motor for as long as possible during loss of power.• The control logic remains active for at least one second by using the powerstored on the drive controller DC bus.© 1996 Square D All Rights Reserved101ηττπ://νιχοντρολσ.χοm
Chapter 5 — ConfigurationBulletin No. 50006-519-01B7 →General Configuration Menu December 1996• Once the DC bus voltage becomes too low to allow motor operation, the drivecontroller freewheel stops.• If input power is restored while the control logic is still active, the drivecontroller will automatically restart independent of the Command type (in the6→Drive Configuration menu) selected. If input power is restored when thecontrol logic is no longer active, the drive controller will follow a normalpower-up sequence. Restart of the drive controller requires a run commandand the absence of faults.To use the RAMP mode of Power Loss, Input Phase Failure must be set to NO.Otherwise, the drive controller will operate as if Power Loss were set to FREE.The selection of FREE or RAMP depends on the amount and type of disturbancethat the load can tolerate during a power loss. Setting Power Loss to FREE allowsa longer deceleration time but requires the drive controller to resynchronize to themotor once power returns. FREE is generally best suited for installations whichexperience long periods of power loss. Setting power Loss to RAMP deceleratesthe motor more rapidly during power loss and does not require the drivecontroller to resynchronize to the motor. If power is restored while the motor is stillrunning, recovery to commanded speed occurs rapidly. RAMP is generally bestsuited for installations which experience short periods of power loss.Automatic RestartAUTO-RESTARTNOYES, RESTARTS: #DELAY TIME :### s1-5 restarts/time 1-600s/ESC to quitWARNINGUNINTENDED EQUIPMENT ACTION• Automatic restart can only be used for machines or installations that present nodanger for personnel or equipment in the event of automatic restarting.• Equipment operation must conform with national and local safety regulations.Failure to follow this instruction can result in death, serious injury, or equipmentdamage.Enabling Automatic Restart allows up to five restart attempts after the drivecontroller has tripped on a fault. The time between restart attempts isprogrammable from 1 to 600 seconds. The power supply and control commandsmust be maintained for an Automatic restart.To enable Automatic Restart, select Yes, specify the number of restart attempts (1-5) and set time between restart attempts (1-600 s).If the drive controller trips on a fault that is automatically resettable and AutomaticRestart is enabled, the drive controller is locked for the programmed time period,then resets the drive controller if the fault condition has disappeared. Then, ifcommanded to run, the drive controller restarts the motor. If the fault conditionremains during the reset attempt, the drive controller locks for the programmedperiod of time, and the restart command is repeated at the programmed delay timefor the programmed number of restarts (maximum of 5 times) before the drivecontroller trips. See Table 37 on page 101 for faults that can be automatically reset.102 © 1996 Square D All Rights Reservedηττπ://νιχοντρολσ.χοm
Bulletin No. 50006-519-01BChapter 5 — ConfigurationDecember 1996 7 →General Configuration MenuNote that only if the drive controller is configured for 2-wire command will itautomatically restart the motor. If the drive controller is configured for 3-wirecommand, Automatic Restart is not available. For 2-wire and 3-wire command, seepages 68 and 68.Catch On FlyCatch On Fly Set to NO(Refer to Figure 63)Catch on Fly is used to regain control of a spinning load after an event such as lossof power or freewheel stop. For proper operation of this function, the drivecontroller should be configured for 2-wire control. Also, the rotation direction ofthe freewheeling load must be the same as the rotation direction of the drivecontroller.Three possible selections appear for the catch on fly function. These selections areIlimit, Ramp, and NO. NO is the default setting.When commanded to start into a spinning load, the drive controller will reset itsoutput frequency to zero and begin to ramp at the set acceleration ramp rate to thecommanded speed. As the frequency increases, the output current increases untilthe drive controller current limit is reached. The torque produced by the motorcurrent will reduce the speed of the spinning motor to a point where the motorrotational speed matches the drive controller output frequency. Once this occurs,the currents decrease and the drive controller can then accelerate the load to thecommanded speed.The advantage to this control method is that it does not require any usersequencing of the drive controller power or control. In addition, it does not requirethe presence of any residual voltage at the motor for proper operation. Thismethod does have the disadvantage that the change in motor speed duringresynchronization may be unacceptable to some applications since the motorcould be forced to near-zero speed before re-acceleration can occur.NmNspVmImLI110LI2 1 0Current Limit -Nm - Motor SpeedNsp - Commanded SpeedVm - Motor VoltageIm - Motor CurrentLI1 - Run EnableLI2 - Run ForwardGreenPwrLEDOnOffPowerOffPowerOnFigure 63: Catch On Fly Set to NO© 1996 Square D All Rights Reserved103ηττπ://νιχοντρολσ.χοm
Chapter 5 — ConfigurationBulletin No. 50006-519-01B7 →General Configuration Menu December 1996Catch On Fly Set toRAMP (Refer toFigure 64)When commanded to start into a spinning load, the drive controller will use theresidual voltage present at the motor terminals to estimate motor speed. If noresidual voltage is present, then the control method reverts to that described in“Catch On Fly Set to NO.” If residual voltage is present, then the drive controllerinitial output frequency is set to the estimated speed value allowing the motor torapidly synchronize to the drive controller output frequency.The drive controller then increases the motor speed at the set acceleration ramprate to the commanded speed. If a run command is present, the drive controllerwill start in this mode when the LI1 input is cycled from logic 1 to logic 0 and backto logic 1 or, following a brief power outage for which the control logic remainsactive (Green LED on drive controller remains lit). If the control logic becomesinactive during the power outage (Green LED on drive controller goes out), therestart control method reverts to that described in “Catch On Fly Set to NO.”The advantage to this control method is that it produces the least additional speeddisturbance of the three Catch On Fly selections while the motor is synchronizingto the drive controller output. This method does have the disadvantage thatresidual motor voltage must be present for speed estimation to occur.NmNspVmImLI110LI2 1 0Nm - Motor SpeedNsp - CommandedSpeedVm - Motor VoltageIm - Motor CurrentLI1 - Run EnableLI2 - Run ForwardGreen OnPwrLEDOffPowerOffPowerOnFigure 64: Catch On Fly Set to RAMPCatch On Fly Set toILIMIT (Refer toFigure 65)When commanded to start into a spinning load, the drive controller output voltageis reduced and the drive controller output frequency is set to the commandedfrequency. While the voltage is being reduced, the drive controller output voltageis synchronized to the motor. If synchronization is not possible, the restart controlmethod reverts to that described in “Catch On Fly Set to NO.” If synchronizationis possible, the drive controller output voltage is then raised causing the motor torapidly accelerate to commanded speed.Acceleration generally occurs with the drive controller at current limit. Providedthat a run command is present, the drive controller will start following anextended power outage where the control logic is no longer active (Green LED ondrive controller is out). The run command must be activated prior to or during thedrive controller power-up sequence for this mode to be active.The advantage to this control method is that it can resynchronize to commandspeed in the least amount of time of the three Catch on Fly selections, since reaccelerationgenerally occurs with the controller at current limit. Also, this method,which does not require the presence of residual motor voltage, is useful when104 © 1996 Square D All Rights Reservedηττπ://νιχοντρολσ.χοm
Bulletin No. 50006-519-01BChapter 5 — ConfigurationDecember 1996 7 →General Configuration Menuregaining control of high inertia loads after extended power outages. If thecommand speed matches the motor speed, little if any motor disturbance is seenduring restarting. This is useful when restarting a single motor on a movingprocess line.This method does have the disadvantage that the motor torque disturbance duringresynchronization may be unacceptable to some applications, since the motorattempts to accelerate to the commanded speed at the current limit setting of thecontroller.NmNspVmImLI110LI2 1 0Nm - Motor SpeedNsp - CommandedSpeedVm - Motor VoltageIm - Motor CurrentLI1 - Run EnableLI2 - Run ForwardGreen OnPwrLEDOffPowerOffPowerOnFigure 65: Catch On Fly Set to ILIMITMotor OverloadWARNINGMOTOR OVERHEATINGThis drive controller does not provide direct thermal protection for the motor. Use of athermal sensor in the motor may be required for protection at all speeds or loadingconditions. Consult motor manufacturer for thermal capability of motor when operatedover desired speed range.Failure to follow this instruction can result in death, serious injury, or equipmentdamage.MOTOR OVERLOADMOT. SELF COOLEDNO THERMAL PROT.ENTESCMANUAL TUNING OVERLDMIN. SPD at F.L.: %IMAX. at 0 SPD: %Enter all values‘ ESCMotor Overload enables the drive controller to protect a standard asynchronousinduction motor from overload. This function can replace a conventional class 10thermal overload relay for single motor applications; however, multi-motorapplications require individual external thermal overload motor protection.© 1996 Square D All Rights Reserved105ηττπ://νιχοντρολσ.χοm
Chapter 5 — ConfigurationBulletin No. 50006-519-01B7 →General Configuration Menu December 1996This function is more effective in protecting a motor operated from a drivecontroller because it considers motor speed as well as time and current in itsprotection algorithm. This is important since most motors applied on drivecontrollers are self-cooled, and their cooling effectiveness declines at lower speeds.The drive controller’s protection algorithm integrates motor current over time,taking into account factors such as stop time and idle time.Adjustment of Motor OverloadTypes of ProtectionSelf-Cooled MotorNo Thermal ProtectionTo adjust Motor Overload, first select the type of protection in the 7.4 → FaultManagement menu. Two types of protection are available from the MotorOverload screen:1. For Self-Cooled Motor2. No thermal protectionFactory setting is Self-Cooled Motor. Once the type of protection is selected, theMotor Overload current can be set in either the 1 →Parameter Setting menu or inthis screen. Motor Overload can be adjusted from 0.45 to 1.15 times the nominaldrive controller current (see page 54), factory preset is 0.9 times nominal drivecontroller current (see page 70). Adjust Motor Overload value to nominal motorcurrent. The types of protection are discussed in the following section.With this type of motor overload protection, the motor base frequency is assumedto be the same as the nominal rated frequency. Enter the motor full load amps forMotor Overload current value.The overload time–current characteristic is set to allow operation at motor ratedcurrent above 50% of motor base speed. Below 50% of motor base speed, the timecurrentcharacteristic is linearly tapered so that at zero speed, the drive will trip onoverload at continuous operation above 25% of the motor overload setting.The I 2 t curve, which is used to determine when to trip on a motor overheatcondition, emulates a class 10 thermal overload curve.External thermal overload relays are required when more than one motor isconnected to the output or when the motor connected to the drive controller is lessthan half the drive controller rating. When external overload protection isprovided, select “No Thermal Protection.”CAUTIONLOSS OF MOTOR OVERLOAD PROTECTIONWhen using external overload relays connected to drive controller output, the overloadrelays must be capable of operation over the expected range of drive controller outputfrequencies (including direct current). When DC injection braking is used:• The overload relay must be suitable for operation with direct current flowing in themotor.• Do not use overload relays equipped with current transformers for sensing themotor current.Failure to follow this instruction can result in equipment damage.The thermal state of the drive controller is not automatically reset when power isremoved.106 © 1996 Square D All Rights Reservedηττπ://νιχοντρολσ.χοm
Bulletin No. 50006-519-01BChapter 5 — ConfigurationDecember 1996 7 →General Configuration MenuCAUTIONMOTOR OVERHEATINGRepeated reset of the thermal state after a thermal overload can result in thermal stressto the motor.When faults occur, promptly inspect motor and driven equipment for problems (lockedshaft, mechanical overload, etc.) prior to restarting. Also check power supplied to motorfor abnormal conditions (phase loss, phase imbalance, etc.).Failure to follow this instruction can result in damage to the motor.When a thermal overload fault occurs, a screen appears which asks “Do you wantto clear the thermal state?” If NO is selected, the motor overload fault cannot bereset until the thermal state of the motor, as calculated by the motor overloadalgorithm in the drive controller, is less than 100%.If YES is selected, the motor overload fault is restrained. The motor overload faultcan be reset and the drive controller restarted. The restraint of the motor overloadtrip will last for approximately one minute. At the end of one minute, the restraintwill clear and a motor overload trip will occur. This function can be used to allowmaintenance personnel to perform an orderly shut-down of a process in the eventof a motor overload fault. Subsequent restraint is possible, if required. However,repeated use of the restraint function can ultimately lead to motor damage.Input Phase FailureInput Phase Failure is used to detect loss of one or all input phases. When set toYes, if one input phase is lost, the drive controller will trip. If the phase is restoredand the drive controller is in 2-wire command with the Run Enable and directioninputs high, the drive controller will automatically restart the motor, regardless ofthe setting of Automatic Restart. If the phase is restored and the drive controller isin 3-wire command, the drive controller will be reset, but the motor will not start.If more than one phase is lost, the drive will trip on undervoltage.Input phase failure can be inhibited by selecting No when a line contactor is usedwith the drive controller and control power is supplied separately to CL1-CL2, orin special applications when a common DC bus tie is used. When set to No, inputphase loss will be ignored, however undervoltage will be displayed if the DC busvoltage is less than the undervoltage level but sufficient to maintain the drivecontroller power supply. The Fault State relay R1 will remain energized whenevervoltage is present on CL1 and CL2, as long as there are no other faults. Theundervoltage condition must be cleared prior to the drive controller recognizing arun command.Loss of FollowerLOSS FOLLOWERNoGo to:####HzFaultLoss of follower is used with the AI2 input and occurs when the 4-20 mA or 20-4mA reference input is less than 3 mA. The drive controller can be programmed tofault, to run at a preset speed (programmable from Low Speed to High Speed), orto ignore the fault condition (factory preset) when loss of follower is detected.When “Go to ### Hz” is selected, AI2 must be the only assigned speed reference.All other speed references must be de-selected (see “Speed Reference” on page 79).The adjustment range of “Go to ### Hz” is 0.1 to 72 Hz.© 1996 Square D All Rights Reserved107ηττπ://νιχοντρολσ.χοm
0.0 0.1 0.2 0.3 0.4 0.5 0.6 0.7 0.8 0.9 1.0fnChapter 5 — ConfigurationBulletin No. 50006-519-01B7 →General Configuration Menu December 1996Fold BackPercent of preset current limit100 %fn= nominal frequencyFigure 66: Fold BackFold Back is displayed only if the drive controller is configured for variable torque(page 67). Fold Back tapers the current limit curve as shown in Figure 66. Fold Backcan be activated or deactivated from the keypad display.Fault ResetFAULT RESETNOYES,LOGIC IN: ---,† & ENT to modifyESC to quitEnabling Fault Reset allows the drive controller to be reset when in TerminalCommand mode after tripping on certain faults when an assigned logic input ishigh. To enable Fault Reset, select Yes and assign a logic input. The faults resettablewith this function are: Overvoltage, DC-Bus Overvoltage, Output Phase Loss,Drive Overtemperature, Motor Overload, Loss of Follower, Sequence time-outfault, and Process time-out fault. When in Keypad Command mode (page 65) afunction key can be programmed for Fault Reset.Dynamic Brake FaultOutput Phase FaultDB Fault is available on drive controllers with dynamic braking. Enabling thefunction allows the drive controller to protect the resistor and connection bygenerating a fault if the DB resistor connection is open.Output Phase Fault is used to detect a loss of output phase. The fault can beinhibited by setting to No for troubleshooting or when the motor connected to thedrive controller is less than 45% of drive controller power. Output Phase Fault isautomatically disabled when the Bypass function is used or the drive controller isoperated at less than 33% of nominal frequency.NOTE: Output Phase Fault should be left enabled, except for the reasons stated above. If itmust be disabled (either <strong>manual</strong>ly or by the selection of the Bypass function), always supplyan external motor overload relay. Operation with the presence of an Output Phase Faultcan affect the calibration of the Motor Overload Protection function of the drive controller.108 © 1996 Square D All Rights Reservedηττπ://νιχοντρολσ.χοm
Bulletin No. 50006-519-01BChapter 5 — ConfigurationDecember 1996 8 →Diagnostic Mode8→DIAGNOSTICMODE8‘ DIAGNOSTIC MODEAUTODIAGNOSTICLOGIC INPUT TESTANALOG INPUT TESTLOGIC OUTPUT TEST†, & ENT to activateANALOG OUTPUT TESTThe 8→Diagnostic Mode menu allows access to various tests for locating failedcomponents in case of an internal drive controller fault. This menu is accessibleonly when:• The drive controller is stopped• Supply line power (L1, L2 and L3) is disconnected• Control power supply (CL1, CL2) is connectedIf any of these conditions are not met, an error message appears and access to theDiagnostic Mode is denied. Exit the error message screen and return to the Mainmenu by pressing ESC.The motor should be connected when performing tests. The following sectionscover the functions available from the Diagnostic Mode menu.AutodiagnosticsAUTODIAGNOSTICMEM,±15 SUP & SUP FRQTRANSISTORS TEST†, & ENT to activateESC to quitTwo tests are available from the Autodiagnostic Screen. Select either or both of thetests by scrolling with the ▲ and ▼ keys and pressing ENT.1. Memory, ±15 V Supply, and Supply Frequency initiates a test on the ROMmemory, a confirmation of the presence of ± 15 V, and a confirmation of thepresence of supply frequency.2. Transistors Tests initiates a test sequence on the drive controller transistorbridge. Note that the length of time required for this test varies with productsize and the number of transistors in the bridge. While the test is in progressthe Result display (see Figure 67) will report “In Process” on line 2.Memory TestAUTODIAGNOSTICINTERNAL MEMORY :OK±15V SUPPLY :OKFREQ. SUP. DETECT : XOK or X=FAULTESC to quitTransistor TestAUTODIAGNOSTICCELLS TEST:IN PROCESST1:OK T3:OK T5:OKT4:OK T6:X T2:?OK,?=NON TESTED ORX=FAULT ESC to quitFigure 67: Tests Results© 1996 Square D All Rights Reserved109ηττπ://νιχοντρολσ.χοm
Chapter 5 — ConfigurationBulletin No. 50006-519-01B8 →Diagnostic Mode December 1996There are three possible responses for each element of a test:• “OK” indicates that the tested element is good.• “X” indicates that the tested element is defective.• “?” (transistor test only) indicates that the transistor could not be tested.Logic Input TestLOGIC INPUT TESTIN. ASSIGNMENTSLI1 RUN PERMIT 0LI2 RUN FORWARD 1LI3 AUTO/MANUAL 1LI4 --- ------- 0This menu allows you to change the state of the logic inputs to check for goodwiring connections. When the Logic Input Test screen is active, changes made tothe inputs will change input bit status without affecting the state of the drivecontroller.Analog Input TestANALOG INPUT TESTIN. ASSIGNMENT VAL%AI1 SPEED REF. 1 43AI2 --- ------- ###Analog Input Test is similar to Logic Input Test. When this screen is active, you canchange the state of the analog inputs to check for good wiring connections withoutaffecting the state of the drive controller.Logic Output TestLOGIC OUTPUT TESTOUT. ASSIGNMENT SLO1 READY STATE 0LO2 SPEED LEVEL 1R1 FAULT STATE 0†, 1,0 To force &ENTR2 1This menu allows you to change the state of the logic outputs to check for goodwiring connections without affecting drive controller operation.When the Logic Output Test screen is active, all outputs are forced to low (0) stateregardless of actual drive controller settings. Changes then made to the outputswill alter bit status without affecting the state of the drive controller. When youleave the Diagnostic Mode and return to Main menu, the logic outputs resume theprogrammed settings in place before the test sequence.110 © 1996 Square D All Rights Reservedηττπ://νιχοντρολσ.χοm
Bulletin No. 50006-519-01BChapter 5 — ConfigurationDecember 1996 8 →Diagnostic ModeWARNINGUNINTENDED EQUIPMENT ACTIONForcing drive controller logic and analog outputs may cause undesired activation ofconnected equipment.Set the connected equipment to ignore the change of state.Failure to follow this instruction can result in death, serious injury, or equipmentdamage.Analog Output TestANALOG OUTPUT TESTOUT. ASSIGNMENT VAL%AO1 ------------ 0AO2 ------------ 100FORCE:0=MIN,2=FULL†, & ENT to validThis menu allows you to change the value of the analog outputs to check for goodwiring connections without affecting drive controller operation.When the Analog Output Test screen is active, all output values are forced to 0regardless of actual drive controller settings. Changes then made to the outputswill alter the setting without affecting the state of the drive controller. When youleave the Diagnostic Mode and return to Main menu, the analog outputs resumethe programmed settings in place before the test sequence.© 1996 Square D All Rights Reserved111ηττπ://νιχοντρολσ.χοm
Chapter 5 — ConfigurationBulletin No. 50006-519-01B9 →Drive Initialization Menu December 19969→DRIVEINITIALIZATIONMENU9‘ DRIVE INIT.TOTAL FACTORY SETT.USER SETTING STORERECALL USER SETTINGThis menu is only accessible when the drive controller is stopped. It allows theoriginal factory default parameter settings to be restored to the drive controller, orthe user configuration and adjustment settings to be saved to or recalled from amemory card (VW3A66901T).Total Factory SettingsThis selection returns all of the drive controller adjustment and configurationparameters to the original factory default settings.9.1‘TOT.FACTORY SETT.Do you want to changeall the parametersto factory settings?ENT to confirmESC to abortENTTHIS ACTION CLEARS THEACTUAL CONFIGURATIONAND SETTINGSAre you sure?ENT to confirmWARNINGUNINTENDED EQUIPMENT ACTION• Factory default settings will be substituted for present settings when Total FactorySettings is selected and confirmed.• Factory default settings may not be compatible with the application. After returningto total factory settings, verify that default settings are compatible with applicationrequirements.Failure to follow this instruction can result in death, serious injury, or equipmentdamage.Store User SettingsNOTE: The PCMCIA Memory Card cannot transfer files between drive controllers ofdifferent power ratings or between drive controllers which contain different versions ofsoftware. See page 54 to determine controller power rating and software version.Up to 16 configurations can be saved in a PCMCIA memory card (catalog numberVW3A66901T). After selecting Store User Settings, a message will appearprompting you to insert a memory card:PLEASE INSERTTHE MEMORY CARDINTO THE PCMCIACONNECTORENT when readyThe following illustration shows the Store User Settings menu. The black boxescorrespond to configurations already stored in the card. Select an empty box. Inthis example, 1 is selected. To store, press ENT. When the configuration has beensaved, a message will appear indicating whether or not the save operation wassuccessful.112 © 1996 Square D All Rights Reservedηττπ://νιχοντρολσ.χοm
Bulletin No. 50006-519-01BChapter 5 — ConfigurationDecember 1996 9 →Drive Initialization Menu9.3‘STORE USER SETT.1234<strong>56</strong>78910111213141516SELECT FILE NUMB: 11AutomaticSTORE SETTINGSATVFile<strong>56</strong> 1MemoryENT to confirmRecall User SettingsTo download a configuration from a PCMCIA memory card to the drive controller,select Recall User Settings. Install the memory card. A message will appear:9.4‘RECALL USER SETT.This operation changesthe ACTUAL SETTINGSto the USER SETTINGSENT to confirmESC to abort1234Directory<strong>56</strong>78910111213141516SELECT FILE NUMB: 10RECALL SETTINGSATVFile<strong>56</strong> 10MemoryENT to confirmSelect one black box. In the example shown above, “10” is selected. Press ENT todownload. When the configuration has been downloaded, a message will appearindicating whether or not the transfer was successful. If an error was made inselecting a box (file) number, a message will indicate an incompatible or empty file.NOTE: When recalling user settings, the physical configuration and power rating of thedrive controller must match the physical configuration and power rating of the drivecontroller from which the settings were copied. If the physical configuration and powerrating do not match, then a message will indicate an incompatible file.© 1996 Square D All Rights Reserved113ηττπ://νιχοντρολσ.χοm
Chapter 5 — ConfigurationBulletin No. 50006-519-01BNotes December 1996114 © 1996 Square D All Rights Reservedηττπ://νιχοντρολσ.χοm
Bulletin No. 50006-519-01BDecember 1996Chapter 6 — Class 8839 ALTIVAR <strong>56</strong> Combination DevicesContentsChapter 6 — Class 8839 ATV<strong>56</strong> Combination DevicesINTRODUCTION . . . . . . . . . . . . . . . . . . . . . . . . . . . . . . . . . . . . . . . . . . . . . . . . . . . . . . .117CONTROLLER PART NUMBERS . . . . . . . . . . . . . . . . . . . . . . . . . . . . . . . . . . . . . . . . . .118CONTROLLER NAMEPLATE IDENTIFICATION. . . . . . . . . . . . . . . . . . . . . . . . . . . . . . .118TECHNICAL CHARACTERISTICS . . . . . . . . . . . . . . . . . . . . . . . . . . . . . . . . . . . . . . . . .119Specifications . . . . . . . . . . . . . . . . . . . . . . . . . . . . . . . . . . . . . . . . . . . . . . . . . . . . . .122Short-Circuit Withstand Ratings . . . . . . . . . . . . . . . . . . . . . . . . . . . . . . . . . . . . . . . .123DIMENSIONS AND WEIGHTS FOR WALL OR PANEL MOUNTING . . . . . . . . . . . . . . .124HANDLING DRIVE CONTROLLERS . . . . . . . . . . . . . . . . . . . . . . . . . . . . . . . . . . . . . . . .128PRELIMINARY INSPECTION . . . . . . . . . . . . . . . . . . . . . . . . . . . . . . . . . . . . . . . . . . . . .128WIRE ROUTING AND INTERCONNECTION . . . . . . . . . . . . . . . . . . . . . . . . . . . . . . . . .129Wire Class . . . . . . . . . . . . . . . . . . . . . . . . . . . . . . . . . . . . . . . . . . . . . . . . . . . . . . . . .129Noise Class . . . . . . . . . . . . . . . . . . . . . . . . . . . . . . . . . . . . . . . . . . . . . . . . . . . . . . . .129Quiet Wiring 1 (QW1). . . . . . . . . . . . . . . . . . . . . . . . . . . . . . . . . . . . . . . . . . . . .129Quiet Wiring 2 (QW2). . . . . . . . . . . . . . . . . . . . . . . . . . . . . . . . . . . . . . . . . . . . .129Standard Wiring 1 (SW1) . . . . . . . . . . . . . . . . . . . . . . . . . . . . . . . . . . . . . . . . . .129Standard Wiring 2 (SW2) . . . . . . . . . . . . . . . . . . . . . . . . . . . . . . . . . . . . . . . . . .129Standard Wiring 3 (SW3) . . . . . . . . . . . . . . . . . . . . . . . . . . . . . . . . . . . . . . . . . .129Pulse Wiring 1 (PW1). . . . . . . . . . . . . . . . . . . . . . . . . . . . . . . . . . . . . . . . . . . . .129Voltage Class . . . . . . . . . . . . . . . . . . . . . . . . . . . . . . . . . . . . . . . . . . . . . . . . . . . . . .130TERMINAL STRIP LOCATIONS . . . . . . . . . . . . . . . . . . . . . . . . . . . . . . . . . . . . . . . . . . .131POWER WIRING . . . . . . . . . . . . . . . . . . . . . . . . . . . . . . . . . . . . . . . . . . . . . . . . . . . . . . .134CONTROL WIRING . . . . . . . . . . . . . . . . . . . . . . . . . . . . . . . . . . . . . . . . . . . . . . . . . . . . .135SEQUENCE OF OPERATION AND OPTIONS . . . . . . . . . . . . . . . . . . . . . . . . . . . . . . . .138Terminal Command Mode vs. Keypad Command Mode. . . . . . . . . . . . . . . . . . . . . .138POWER CIRCUIT W COMBINATION PACKAGE . . . . . . . . . . . . . . . . . . . . . . . . . . . . . .139POWER CIRCUIT Y BYPASS PACKAGE . . . . . . . . . . . . . . . . . . . . . . . . . . . . . . . . . . . .142POWER CIRCUIT Z REMOTE STARTER BYPASS PACKAGE . . . . . . . . . . . . . . . . . . .146PROPER DRIVE ISOLATION METHOD . . . . . . . . . . . . . . . . . . . . . . . . . . . . . . . . . . . . .150CONTROL CIRCUIT DIAGRAMS . . . . . . . . . . . . . . . . . . . . . . . . . . . . . . . . . . . . . . . . . .151© 1996 Square D All Rights Reserved115ηττπ://νιχοντρολσ.χοm
Chapter 6 — Class 8839 ALTIVAR <strong>56</strong> Combination DevicesBulletin No. 50006-519-01BContents December 1996DANGERHAZARD OF ELECTRIC SHOCK OR BURN• This equipment must be installed and serviced only by qualified electrical personnel.• Turn off power supplying this equipment before working on or inside equipment.• Always use a properly rated voltage sensing device to confirm power is off.• Replace all devices, doors, and covers before turning on power to this equipment.DRIVE ISOLATION HAZARDBefore servicing the drive controller:• Disconnect all power.• Place a “Do Not Turn On” label on drive controller• Lock disconnect in Open position.Before servicing basic power converter when Bypass is selected:• Perform all functions listed above.• Measure voltages at disconnect output to verify they are zero.• Wait 1 minute to allow DC bus to discharge, verify no voltage is present.• Remove line fuses labeled FU1, FU2, and FU3 with tool provided.• Replace cover, then close disconnect.Failure to observe these precautions will result in death or serious injury.116 © 1996 Square D All Rights Reservedηττπ://νιχοντρολσ.χοm
Bulletin No. 50006-519-01BDecember 1996Chapter 6 — Class 8839 ALTIVAR <strong>56</strong> Combination DevicesIntroductionINTRODUCTIONTerminologyThe Class 8839 ALTIVAR <strong>56</strong> drives are combination devices composed of drivecontroller, power circuit box with options, and wall-mountable back pan. TheClass 8839 ALTIVAR <strong>56</strong> drive controllers are available in combination, bypass, orremote starter bypass power circuit configurations.The following terminology is used throughout this chapter and is specific to theClass 8839 ALTIVAR <strong>56</strong> drive controller family.• When used as a component of the Class 8839 ALTIVAR <strong>56</strong> drive controller, theATV<strong>56</strong>U41 through ATV<strong>56</strong>D79 controllers described in Chapters 1 -5 of this instructionbulletin are referred to as Power Converters. This distinction is madeto minimize confusion when discussing installation and adjustment practices.• The combination of the power converter, enclosure, power and control circuitswhich constitutes the Class 8839 product is referred to as the Drive Controlleror Controller.• The combination of the controller and motor is referred to as the Drive.• The power circuit box mounted below the power converter is referred to as theBELE box.• The variable torque rating is referred to as VT.• The variable torque, low noise rating is referred to as VTLN.PrecautionsDANGERHAZARD OF ELECTRIC SHOCK, BURN, OR EXPLOSIONTurn off power supplying this equipment before working inside.Failure to follow this instruction will result in death, personal injury, or electricalshock.Follow these precautions unique to the Class 8839 ALTIVAR <strong>56</strong> drive controller:• The controller is suitable for installation in a Pollution Degree 3 environmentas defined in NEMA ICS1 and IEC 664-1. The expected environment must becompatible with this rating.• When attaching wall-mountable controllers to their mounting surfaces, usefasteners rated for the weight of the apparatus, the expected shock and vibrationof the installation, and the expected environment.• Provide sufficient cooling for expected heat load.© 1996 Square D All Rights Reserved117ηττπ://νιχοντρολσ.χοm
Chapter 6 — Class 8839 ALTIVAR <strong>56</strong> Combination DevicesBulletin No. 50006-519-01BController Part Numbers December 1996CONTROLLER PARTNUMBERSThe controller part number, located on the nameplate attached to the mountingpanel, is coded to describe the configuration and options present. Use Table 38 totranslate the part number into a description of the drive controller.Table 38: Controller Part NumbersField Digit Characteristic Description01 01-03 Controller style <strong>56</strong>U Fan and Pump Drive (US only)02 04 HorsepowerC = 1 hpD = 2 hpE = 3 hpF = 5 hpG = 7.5 hpH = 10 hpJ = 15 hpK = 20 hp03 05 Enclosure type G = Type 1 only04 06 Voltage05 07 Torque/application06 08 Power circuit type07 09 Miscellaneous options2 = 200/208 VAC3 = 230/240 VAC4 = 460/480 VACL = 25 hpM = 30 hpN = 40 hpP = 50 hpQ = 60 hpR = 75 hpS = 100 hpV = Variable torque ratingL = Variable torque, low noise ratingDefines which of 3 pre-engineered power circuits are supplied:W = Combination packageY = Bypass packageZ = Remote starter bypass packageDefines additional selections to configuration:A = Pilot light cluster 1: Power On (Red), Drive Run (Green),Bypass Run (Green), Drive Fault (Yellow)B = Pilot light cluster 2: Power On (Red), Drive Run (Green),Auto Mode (Green), Drive Fault (Yellow)C = Line isolation contactorD = Omit Hand-Off-Auto selector and speed potentiometerE = CSA certificationF = Smoke purge optionCONTROLLERNAMEPLATEIDENTIFICATIONThe nameplate for the Class 8839 ALTIVAR <strong>56</strong> drive controller is located on the lefthand side of the back panel. This nameplate, shown in Figure 68, carries thecontroller class, type, and MOD (options) listing. When identifying or describingClass 8839 ALTIVAR <strong>56</strong> drive controllers, use the data from this nameplate.Options (MOD) codeController type codePermissible input voltageMaximum input current ratingsControl transformerprimary fuses (if used)Power (line) fuse (Bussmann)Line terminations(wire size & terminal torques)Basic power converter model no.Output FrequencyMaximum output rated currentHorsepower ratingControl transformersecondary fuse (if used)Load terminations(wire size & terminal torque)Factory order no.Date codeFigure 68: Controller Nameplate118 © 1996 Square D All Rights Reservedηττπ://νιχοντρολσ.χοm
Bulletin No. 50006-519-01BDecember 1996Chapter 6 — Class 8839 ALTIVAR <strong>56</strong> Combination DevicesTechnical CharacteristicsTECHNICALCHARACTERISTICSTable 39: Variable Torque Class 8839 Enclosed ATV<strong>56</strong> Drive ControllerRatings, 460 VAC ±10%Switching Frequency: <strong>56</strong>UCG4V_ to <strong>56</strong>UPG4V_ = 4 kHz; <strong>56</strong>UQG4V_ to <strong>56</strong>USG4V_ = 2 kHzControllerPart No.Motor Power Input Line Current [1] Output460 V 5,000 A/Current60 Hz 10,000 A [2] 22,000 A [3]Max.TransientCurrent (60 s)hp A A A A<strong>56</strong>UCG4V_ 1 2.7 3.2 2.1 2.3PowerConverterPart No.<strong>56</strong>UDG4V_ 2 4.7 5.7 3.4 3.8 ATV<strong>56</strong>U41N4U<strong>56</strong>UEG4V_ 3 6.5 8 4.8 5.3<strong>56</strong>UFG4V_ 5 9.8 11.9 7.6 8.4 ATV<strong>56</strong>U54N4U<strong>56</strong>UGG4V_ 7.5 14 17 11 12 ATV<strong>56</strong>U72N4U<strong>56</strong>UHG4V_ 10 17.7 21.4 14 15.4 ATV<strong>56</strong>U90N4U<strong>56</strong>UJG4V_ 15 25.1 30.6 21 23 ATV<strong>56</strong>D12N4U<strong>56</strong>UKG4V_ 20 31.8 38.3 27 30 ATV<strong>56</strong>D16N4U<strong>56</strong>ULG4V_ 25 38.7 47 34 38 ATV<strong>56</strong>D23N4U<strong>56</strong>UMG4V_ 30 44 52.4 40 44<strong>56</strong>UNG4V_ 40 57.1 67.6 52 57ATV<strong>56</strong>D33N4U<strong>56</strong>UPG4V_ 50 68.6 81.2 65 72 ATV<strong>56</strong>D46N4U<strong>56</strong>UQG4V_ 60 86.4* 94.6 77 98 ATV<strong>56</strong>D54N4U<strong>56</strong>URG4V_ 75 106* 116 96 116 ATV<strong>56</strong>D64N4U<strong>56</strong>USG4V_ 100 138* 150 124 144 ATV<strong>56</strong>D79N4U[1] Short-circuit current available at controller input.[2] 10,000 AIC denoted by asterisk (*).[3] For controllers with the Remote Starter Bypass power circuit, the short circuit withstand rating depends on theovercurrent protective device in the user-supplied bypass starter. It cannot exceed 22,000 A.Table 40: Variable Torque, Low Noise Class 8839 Enclosed ATV<strong>56</strong> DriveController Ratings, 460 VAC ±10%Switching Frequency: <strong>56</strong>UCG4L_ to <strong>56</strong>UNG4L_ = 10 kHz; <strong>56</strong>UPG4L_ to <strong>56</strong>URG4L_ = 4 kHzControllerPart No.Motor Power Input Line Current [1] Output460 V 5,000 A/Current60 Hz 10,000 A [2] 22,000 A [3]Max.TransientCurrent (60 s)hp A A A A<strong>56</strong>UCG4L_ 1 2.7 3.2 2.1 2.3PowerConverter PartNo.<strong>56</strong>UDG4L_ 2 4.7 5.7 3.4 3.8 ATV<strong>56</strong>U41N4U<strong>56</strong>UEG4L_ 3 6.5 8 4.8 5.3<strong>56</strong>UFG4L_ 5 9.8 11.9 7.6 8.4 ATV<strong>56</strong>U72N4U<strong>56</strong>UGG4L_ 7.5 13.9 16.7 11 12 ATV<strong>56</strong>U90N4U<strong>56</strong>UHG4L_ 10 17.6 21.4 14 15.4 ATV<strong>56</strong>D12N4U<strong>56</strong>UJG4L_ 15 24.8 29.9 21 23 ATV<strong>56</strong>D16N4U<strong>56</strong>UKG4L_ 20 31.9 38.7 27 30 ATV<strong>56</strong>D23N4U<strong>56</strong>ULG4L_ 25 38.7 47 34 38<strong>56</strong>UMG4L_ 30 44 52.4 40 44ATV<strong>56</strong>D33N4U<strong>56</strong>UNG4L_ 40 57.1 67.6 52 57 ATV<strong>56</strong>D46N4U<strong>56</strong>UPG4L_ 50 68.3 80.8 65 72 ATV<strong>56</strong>D54N4U<strong>56</strong>UQG4L_ 60 86.4* 94.6 77 98 ATV<strong>56</strong>D64N4U<strong>56</strong>URG4L_ 75 106* 116 96 116 ATV<strong>56</strong>D79N4U[1] Short-circuit current available at controller input.[2] 10,000 AIC denoted by asterisk (*).[3] For controllers with the Remote Starter Bypass power circuit, the short circuit withstand rating depends on theovercurrent protective device in the user-supplied bypass starter. It cannot exceed 22,000 A.© 1996 Square D All Rights Reserved119ηττπ://νιχοντρολσ.χοm
Chapter 6 — Class 8839 ALTIVAR <strong>56</strong> Combination DevicesBulletin No. 50006-519-01BTechnical Characteristics December 1996Table 41: Variable Torque Class 8839 Enclosed ATV<strong>56</strong> Drive ControllerRatings, 230 VAC ±10%ControllerPart No.Switching Frequency: 4 kHzMotor Power Input Line Current [1] Output230 V5,000 A 22,000 A Current60 Hz[2]Max.TransientCurrent (60 s)hp A A A A<strong>56</strong>UCG3V_ 1 4.9 5.8 4.2 5.1PowerConverterPart No.<strong>56</strong>UDG3V_ 2 8.6 10.2 6.8 8.3 ATV<strong>56</strong>U41M2U<strong>56</strong>UEG3V_ 3 11.8 14 9.6 11.7<strong>56</strong>UFG3V_ 5 17.8 21.2 15.2 18.4<strong>56</strong>UGG3V_ 7.5 25.8 30.6 22 26.6ATV<strong>56</strong>U72M2U<strong>56</strong>UHG3V_ 10 32.7 38.8 28 34 ATV<strong>56</strong>U90M2U<strong>56</strong>UJG3V_ 15 46.2 54.8 42 51 ATV<strong>56</strong>D12M2U<strong>56</strong>UKG3V_ 20 58.7 69.4 54 66<strong>56</strong>ULG3V_ 25 71.5 84.4 68 83ATV<strong>56</strong>D23M2U<strong>56</strong>UMG3V_ 30 81.1 97.7 80 97<strong>56</strong>UNG3V_ 40 102.7 125.9 104 126ATV<strong>56</strong>D33M2U<strong>56</strong>UPG3V_ 50 122.6 151.1 130 158 ATV<strong>56</strong>D46M2U[1] Short-circuit current available at controller input.[2] For controllers with the Remote Starter Bypass power circuit, the short circuit withstand rating depends on theovercurrent protective device in the user-supplied bypass starter. It cannot exceed 22,000 A.Table 42: Variable Torque Class 8839 Enclosed ATV<strong>56</strong> Drive ControllerRatings, 230 VAC ±10%ControllerPart No.Switching Frequency: <strong>56</strong>UCG3L_ to <strong>56</strong>UMG3L_ = 10 Khz; <strong>56</strong>UNG3L_ = 4 kHzMotor Power Input Line Current [1] Output230 V5,000 A 22,000 A Current60 Hz[2]Max.TransientCurrent (60 s)hp A A A A<strong>56</strong>UCG3L_ 1 5.4 6.4 4.2 5.1PowerConverterPart No.<strong>56</strong>UDG3L_ 2 8.8 10.4 6.8 8.3 ATV<strong>56</strong>U41M2U<strong>56</strong>UEG3L_ 3 12 14.3 9.6 11.7<strong>56</strong>UFG3L_ 5 18.3 21.8 15.2 18.4 ATV<strong>56</strong>U72M2U<strong>56</strong>UGG3L_ 7.5 25.8 30.7 22 26.6 ATV<strong>56</strong>U90M2U<strong>56</strong>UHG3L_ 10 32.8 39 28 34 ATV<strong>56</strong>D12M2U<strong>56</strong>UJG3L_ 15 46.5 55.2 42 51 ATV<strong>56</strong>D16M2U<strong>56</strong>UKG3L_ 20 59.6 70.3 54 66 ATV<strong>56</strong>D23M2U<strong>56</strong>ULG3L_ 25 71.7 84.7 68 83<strong>56</strong>UMG3L_ 30 80.8 97.2 80 97ATV<strong>56</strong>D33M2U<strong>56</strong>UNG3L_ 40 102 125.4 104 126 ATV<strong>56</strong>D46M2U[1] Short-circuit current available at controller input.[2] For controllers with the Remote Starter Bypass power circuit, the short circuit withstand rating depends on theovercurrent protective device in the user-supplied bypass starter. It cannot exceed 22,000 A.120 © 1996 Square D All Rights Reservedηττπ://νιχοντρολσ.χοm
Bulletin No. 50006-519-01BDecember 1996Chapter 6 — Class 8839 ALTIVAR <strong>56</strong> Combination DevicesTechnical CharacteristicsTable 43: Variable Torque Class 8839 Enclosed ATV<strong>56</strong> Drive ControllerRatings, 208 VAC ±10%ControllerPart No.Switching Frequency: 4 kHzMotor Power Input Line Current [1] Output208 V5,000 A 8,800 A Current60 Hz[2]Max.TransientCurrent (60 s)hp A A A A<strong>56</strong>UCG2V_ 1 5.3 5.7 4.6 5.1PowerConverterPart No.<strong>56</strong>UDG2V_ 2 9.4 10.2 7.5 8.3 ATV<strong>56</strong>U41M2U<strong>56</strong>UEG2V_ 3 12.9 14 10.6 11.7<strong>56</strong>UFG2V_ 5 19.5 21.1 16.7 18.4<strong>56</strong>UGG2V_ 7.5 28.2 30.6 24.2 26.6ATV<strong>56</strong>U72M2U<strong>56</strong>UHG2V_ 10 35.8 38.7 31 34 ATV<strong>56</strong>U90M2U<strong>56</strong>UJG2V_ 15 50.6 54.7 47 51 ATV<strong>56</strong>D12M2U<strong>56</strong>UKG2V_ 20 64.2 69.3 60 66<strong>56</strong>ULG2V_ 25 77.9 84.4 75 83ATV<strong>56</strong>D23M2U<strong>56</strong>UMG2V_ 30 88 97.7 88 97<strong>56</strong>UNG2V_ 40 112 124.9 114 126ATV<strong>56</strong>D33M2U<strong>56</strong>UPG2V_ 50 134.3 149.3 143 158 ATV<strong>56</strong>D46M2U[1] Short-circuit current available at controller input.[2] For controllers with the Remote Starter Bypass power circuit, the short circuit withstand rating depends on theovercurrent protective device in the user-supplied bypass starter. It cannot exceed 22,000 A.Table 44: Variable Torque Class 8839 Enclosed ATV<strong>56</strong> Drive ControllerRatings, 208 VAC ±10%ControllerPart No.Switching Frequency: <strong>56</strong>UCG2L_ to <strong>56</strong>UMG2L_ = 10 kHz; <strong>56</strong>UNG2L_ = 4 kHzMotor Power Input Line Current [1] Output208 V5,000A 8,800 A Current60 Hz[2]Max.TransientCurrent (60 s)hp A A A A<strong>56</strong>UCG2L_ 1 5.4 5.8 4.6 5.1PowerConverterPart No.<strong>56</strong>UDG2L_ 2 9.6 10.4 7.5 8.3 ATV<strong>56</strong>U41M2U<strong>56</strong>UEG3L_ 3 13.2 14.3 10.6 11.7<strong>56</strong>UFG3L_ 5 20.1 21.8 16.7 18.4 ATV<strong>56</strong>U72M2U<strong>56</strong>UGG3L_ 7.5 28.3 30.6 24.2 26.6 ATV<strong>56</strong>U90M2U<strong>56</strong>UHG3L_ 10 35.9 38.9 31 34 ATV<strong>56</strong>D12M2U<strong>56</strong>UJG3L_ 15 51 55.1 47 51 ATV<strong>56</strong>D16M2U<strong>56</strong>UKG3L_ 20 65.2 70.3 60 66 ATV<strong>56</strong>D23M2U<strong>56</strong>ULG3L_ 25 77.4 84.7 75 83<strong>56</strong>UMG3L_ 30 87.5 97.2 88 97ATV<strong>56</strong>D33M2U<strong>56</strong>UNG3L_ 40 111.3 124.2 114 126 ATV<strong>56</strong>D46M2U[1] Short-circuit current available at controller input.[2] For controllers with the Remote Starter Bypass power circuit, the short circuit withstand rating depends on theovercurrent protective device in the user-supplied bypass starter. It cannot exceed 8,800 A.© 1996 Square D All Rights Reserved121ηττπ://νιχοντρολσ.χοm
Chapter 6 — Class 8839 ALTIVAR <strong>56</strong> Combination DevicesBulletin No. 50006-519-01BSpecifications December 1996SpecificationsTable 45 contains specifications for 460 V and 208/230 V drive controllers.Table 45: SpecificationsInput voltage 460 V ±10%, or 208 V ±10%, or 230 V ±10%Displacement powerfactorApproximately 0.96Input frequency 60 Hz ±2%Output voltageMaximum voltage equal to input line voltageFrequency resolutionFrequency accuracyTemperature drift [2]Frequency range ofpower converterTorque/overtorque See Chapter 3Speed referenceInput AI1: (High Speed/1,024) Hz [1]Input AI2: (High Speed/512) Hz [1]Keypad display: 0.1 Hz incrementsProcessor: 0.015 Hz incrementsOption Module: Input AI3: (High Speed/4,096) Hz [1]Input AI4: (High Speed/4,096) Hz [1]±(0.0075 Hz + 0.00005 times High Speed)Analog inputs: 3 x 10 -4 times High Speed/°C typicalKeypad display: 7 x 10 -7 times High Speed/°C maximumATV<strong>56</strong>U41N4 to D79N4: 0.1 to 72 HzATV<strong>56</strong>U41M2 to D46M2: 0.1 to 72 HzAI1: 0-10 VAI2: 4-20 mA0-5 V with switch on control board0-20 mA, x-20 mA, 20-4 mA with keypad displayManual speed potentiometer to AI1Speed regulationV/f: determined by motor slip, typically 3%SLFV (sensorless flux vector): 1%Efficiency Typically greater than 96%Reference sample time 10 msRampsMotor protectionKeypad displayTemperatureHumidityAcceleration: 0.1 to 999.9 secondsDeceleration: 0.1 to 999.9 secondsClass 10 overload protection with bypass option in addition to controllerinternal electronic thermal protection• Self-diagnostics with full fault messages in three languages• Also refer to Chapter 5Operation: +32 to +104 °F (0 to +40 °C)Storage: -13 to +158 °F (-25 to +70 °C)95% maximum without condensation or dripping waterAltitude≤ 3,300 ft (1,000 m); above this derate by 1.2% for every 300 ft (100 m),max. 6,600 ft (2,000 m)Enclosure Type 1Pollution degree Pollution Degree 3 per NEMA ICS-1 and IEC 664-1Operational test vibrationTransit test to shockConforming to IEC 721-3-3-3M3 amplitude 1.5 mm peak to peak from2 to 9 HzConforming to National Safe Transit Association and International SafeTransit Association test for packages weighing 100 lbs and over• UL Listed per UL 508C under category NMMS as incorporating Class 10electronic and electromechanical overload protectionCodes and standards• CSA Certified (Label is optional)• Conforms to applicable NEMA ICS, NFPA, IEC, and ISO 9001 standards[1] Resolution limited to processor resolution.[2] Drive Controller at operating load and temperature.122 © 1996 Square D All Rights Reservedηττπ://νιχοντρολσ.χοm
Bulletin No. 50006-519-01BDecember 1996Chapter 6 — Class 8839 ALTIVAR <strong>56</strong> Combination DevicesShort-Circuit Withstand RatingsShort-Circuit WithstandRatingsTable 46: Short-Circuit Withstand Rating of Controller Power CircuitsController Part No.<strong>56</strong>UCG2VW to <strong>56</strong>UPG2VW<strong>56</strong>UCG2LW to <strong>56</strong>UNG2LW<strong>56</strong>UCG2VY to <strong>56</strong>UPG2VY<strong>56</strong>UCG2LY to <strong>56</strong>UNG2LY<strong>56</strong>UCG2VZ to <strong>56</strong>UPG2VZ<strong>56</strong>UCG2LZ to <strong>56</strong>UNG2LZ<strong>56</strong>UCG3VW to <strong>56</strong>UPG3VW<strong>56</strong>UCG3LW to <strong>56</strong>UNG3LW<strong>56</strong>UCG3VY to <strong>56</strong>UPG3VY<strong>56</strong>UCG3LY to <strong>56</strong>UNG3LY<strong>56</strong>UCG3VZ to <strong>56</strong>UPG3VZ<strong>56</strong>UCG3LZ to <strong>56</strong>UNG3LZ<strong>56</strong>UCG4VW to <strong>56</strong>UPG4VW<strong>56</strong>UCG4LW to <strong>56</strong>URG4LW<strong>56</strong>UCG4VY to <strong>56</strong>USG4VY<strong>56</strong>UCG4LY to <strong>56</strong>URG4LY<strong>56</strong>UCG4VZ to <strong>56</strong>USG4VZ<strong>56</strong>UCG4LZ to <strong>56</strong>URG4LZShort-CIrcuit WithstandRating (Symmetrical)Bypass Path OvercurrentProtective Device8,800 A —8,800 A Motor Circuit Protector8,800 ADependent upon OCPD by usersuppliedbypass starter [1]22,000 A —22,000 A Motor Circuit Protector22,000 ADependent upon OCPD by usersuppliedbypass starter [1]22,000 A —22,000 A Motor Circuit Protector22,000 ADependent upon OCPD by usersuppliedbypass starter [1][1] OCPD = Overcurrent Protective Device – limited by available short-circuit current rating of user-suppliedbypass starter, ≤ 22,000 A.© 1996 Square D All Rights Reserved123ηττπ://νιχοντρολσ.χοm
AUTOOFFHAND3AFCOFFBYPASSFAULTCAUTIONPOWERFAN & PUMPDRIVEONOFFChapter 6 — Class 8839 ALTIVAR <strong>56</strong> Combination DevicesBulletin No. 50006-519-01BMounting Dimensions & Weights December 1996DIMENSIONS AND WEIGHTS FOR WALL OR PANEL MOUNTINGMOUNTINGD14.50(368.3)12.51(317.6)LIFTING HOLE DETAIL.38(9.6)ALTIVAR <strong>56</strong>LiftingHole2.50(63.5)1.25(31.8)TYP. 2 PLACES39.39(1000.5)CONDUIT ENTRIES - TOP VIEW40.50(1028.6)BALTIVAR41250610 9 8 718.5(469.9)CONDUIT ENTRIES - BOTTOM VIEWA8.35(212.0)9.17(232.9)4.00(100.0)MOUNTING CLEARANCESBHP D Weight A B460 V 230 V 208 V in mm lb kg in mm in mm1 - 7.5 (VT)1 - 5 (VTLN)10 - 15 (VT)7.5 - 10 (VTLN)20 (VT)15 - 20 (VTLN)1 - 3 (VT & VTLN) 1 - 3 (VT & VTLN) 6.60 168 74.5 33.75 - 10 (VT)5 - 7.5 (VTLN)5 - 10 (VT)5 - 7.5 (VTLN)7.68 195 80 36.210 (VTLN) 10 (VTLN) 9.00 229 95 42.9Figure 69: Mounting Information for 1 - 20 hp VT & VTLN, 460 V; 1 - 10 hp VT & VTLN, 208/230 V.500.75012.719.0.500.7501.0012.719.025.4124 © 1996 Square D All Rights Reservedηττπ://νιχοντρολσ.χοm
AUTOOFFHAND234510671098AFCOFFBYPASSFAULTCAUTIONPOWERONOFFBulletin No. 50006-519-01BDecember 1996Chapter 6 — Class 8839 ALTIVAR <strong>56</strong> Combination DevicesMounting Dimensions & WeightsMOUNTING16.73(424.9)LIFTING HOLE DETAIL10.11(2<strong>56</strong>.9)14.50(368.3).38(9.6)ALTIVAR <strong>56</strong>LiftingHole2.50(63.5)1.25(31.8)TYP. 2 PLACESCONDUIT ENTRIES -TOP VIEW44.87(1139.8)45.98(1167.9)BALTIVAR23.49(596.8)CONDUIT ENTRIES - BOTTOM VIEWRA10.45(265.3)11.27(286.3)4.00(100.0)MOUNTING CLEARANCESBHP Weight A B460 V 230 V 208 V lb kg in mm in mm25 (VT) 15 (VT & VTLN) 15 (VT & VTLN) 138 62.3.500.75012.719.0Figure 70: Mounting Information for 25 hp VT, 460 V; 15 hp VT & VTLN, 208/230V.500.7501.0012.719.025.4© 1996 Square D All Rights Reserved125ηττπ://νιχοντρολσ.χοm
AUTOOFFHAND234510671098AFCOFFBYPASSFAULTCAUTIONPOWERONOFFChapter 6 — Class 8839 ALTIVAR <strong>56</strong> Combination DevicesBulletin No. 50006-519-01BMounting Dimensions & Weights December 1996MOUNTING12.21(310.2)16.73(424.9)14.50(368.3)ALTIVAR <strong>56</strong>LiftingHoleLIFTING HOLE DETAIL.38(9.6)2.50(63.5)1.25(31.8)TYP. 2 PLACESCONDUIT ENTRIES - TOP VIEW55.98(1421.9)54.88(1393.8)BALTIVARCONDUIT ENTRIES - BOTTOM VIEW23.49(596.8)ARB10.45(265.3)8.00(200.0)11.27(286.3)MOUNTING CLEARANCESHP Weight A B460 V 230 V 208 V lb kg in mm in mm30 - 50 (VT)25 - 40 (VTLN)20 - 25 (VT & VTLN) 20 - 25 (VT & VTLN) 170 76.9Figure 71: Mounting Information for 30 - 50 hp VT & 25 - 40 hp VTLN, 460 V; 20 - 25 hp VT & VTLN, 208/230 V.500.75012.719.0.500.7501.0012.719.025.4126 © 1996 Square D All Rights Reservedηττπ://νιχοντρολσ.χοm
HANDOFFAUTO241350678OPENMAINSCLOSEFAULTCAUTIONPOWERON250OFFBulletin No. 50006-519-01BDecember 1996Chapter 6 — Class 8839 ALTIVAR <strong>56</strong> Combination DevicesMounting Dimensions & WeightsMOUNTING26.00(660.4)LIFTING HOLE DETAIL12.97(329.5)23.99(609.4)LiftingHole0.<strong>56</strong>(14.3)2.50(63.5)1.25(31.8)63.89(1622.7)TYP. 2 PLACES65.00(1650.9)CONDUIT ENTRIES - TOP VIEWB10 9RCONDUIT ENTRIES - BOTTOM VIEWB11.87(301.4)12.65(321.4)8.00(200.0)MOUNTING CLEARANCESAHP Weight A B460 V 230 V 208 V lb kg in mm in mm60 - 100 (VT)50 - 75 (VTLN)30 - 50 (VT)30 - 40 (VTLN)30 - 50 (VT)30 - 40 (VTLN)275 125Figure 72: Mounting Information for 60 - 100 hp VT & 50-75 hp VTLN, 460 V; 30 - 50 hp VT & 30 - 40 hp VTLN, 208/230 V1.001.252.002.5025.431.7550.8063.50.500.75012.719.0© 1996 Square D All Rights Reserved127ηττπ://νιχοντρολσ.χοm
ALTIVAR <strong>56</strong>FAULTCAUTIONPOWERFAN & PUMPDRIVEALTIVAR <strong>56</strong>FAULTCAUTIONPOWERFAN & PUMPDRIVEChapter 6 — Class 8839 ALTIVAR <strong>56</strong> Combination DevicesBulletin No. 50006-519-01BHandling Drive Controllers December 1996HANDLING DRIVECONTROLLERSDo not remove a drive controller from its packaging until it is at the finalinstallation site. The packaging protects the drive controller and prevents damageto its exterior. Handle the drive controller carefully to avoid damage to the internalcomponents, frame, or exterior. When handling a drive controller, balance itcarefully to keep it from tipping. After removing packaging materials, the drivecontrollers require some type of mechanical lifting. Handle drive controllers:• With a hoist, attaching a spreader bar to the two lifting holes on top of the drivecontroller back panel (see Figure 73).• In a horizontal position, with back of drive controller resting on a pallet.WARNINGHANDLING AND LIFTING HAZARDKeep area below any equipment being lifted clear of all personnel and property. Uselifting method shown in Figure 73.Failure to follow this instruction can result in death, serious injury, or equipmentdamage.To hoist the drive controller, attach a spreader bar to the lifting holes located on topof the drive controller back panel, as shown in Figure 73. Handle the drivecontroller carefully to avoid damage to the internal components, frame, or exterior.Place the drive controller in an upright position.45°MAX.YESSPREADER BARLIFTINGFORCENOLIFTINGFORCEFigure 73: Hoisting Class 8839 ALTIVAR <strong>56</strong> Combination DevicesPRELIMINARYINSPECTIONThe drive controller must be thoroughly inspected before storing or installing.Upon receipt:1. Remove the drive controller from its packaging and visually inspect exteriorfor shipping damage.2. Ensure that the reference number of the drive controller, which appears on thenameplate, agrees with the packaging slip and corresponding purchase order.3. If you find any shipping damage, notify the carrier and your salesrepresentative.4. If you plan to store the drive controller after receipt, replace it in originalpackaging material and observe storage temperature specifications on page 122.128 © 1996 Square D All Rights Reservedηττπ://νιχοντρολσ.χοm
Bulletin No. 50006-519-01BDecember 1996Chapter 6 — Class 8839 ALTIVAR <strong>56</strong> Combination DevicesWiringPrior to installation:1. Open the power converter door and remove access cover located on the drivecontroller BELE box.2. Visually verify that all internal mounting hardware and terminal connectionhardware is properly seated, securely fastened, and undamaged.3. Visually verify that the control board on the power converter is properlyseated, securely fastened, and undamaged. Verify that internal wiringconnections are tight. Inspect all connections for damage.4. Close and secure the drive controller door and replace access cover.CAUTIONEQUIPMENT DAMAGE HAZARDDo not operate or install any drive controller that appears damaged.Failure to follow this instruction can result in injury or equipment damage.WIRE ROUTING ANDINTERCONNECTIONWire ClassNoise ClassQuiet Wiring 1 (QW1)Quiet Wiring 2 (QW2)Standard Wiring 1 (SW1)Standard Wiring 2 (SW2)Standard Wiring 3 (SW3)Pulse Wiring 1 (PW1)The Wire Class describes the compatibility of the field wiring terminal with theconductor material and insulation system. When used in conjunction with therequired conductor current rating and controller rated ambient temperature, theWire Class forms the basis for the selection of a conductor size which will limit thetemperature on the conductor insulation at the field wiring terminal withinacceptable limits. Conductors with operating temperatures exceeding those givenby the Wire Class may be used, but the conductor size must be selected based onthe Wire Class limits.The Noise Class is used to categorize the electromagnetic properties of the voltagesand currents present. Wiring is classified into six categories for selection of wiringmethods and physical segregation purposes.High susceptibility analog and digital control signals. Signals falling under thisclassification include digital communication/network circuits, controller analogI/O and analog process signals.Medium susceptibility, analog and digital control signals. Signals falling under thisclassification include 24 VDC and AC control circuits.Low susceptibility control or power circuits rated less than 600 VAC (250 VDC)and less than 15 A (voltage and current spectra are generally contained within0.05-9 kHz). Signals falling under this classification include 120 VAC controlcircuits.Power circuits rated greater than 15 A (voltage and current spectra are generallycontained within 0.05-9 kHz). Signals falling under this classification include linepower to controllers.Reserved.Control or power circuits whose voltage or current spectra significantly exceed9 kHz. Signals falling under this classification include motor and dynamic brakingcircuits fed from PWM power converters.© 1996 Square D All Rights Reserved129ηττπ://νιχοντρολσ.χοm
Chapter 6 — Class 8839 ALTIVAR <strong>56</strong> Combination DevicesBulletin No. 50006-519-01BWiring December 1996Voltage ClassThe Voltage Class is used to categorize the voltages present into recognizedconductor insulation categories (30, 150, 300, and 600 V) for selection of conductorinsulation voltage rating and physical segregation purposes.Based upon the Noise Class and Voltage Class of the conductors, the wiringmethods in Table 47 should be applied to the drive system.Table 47: Wire Routing and InterconnectionWiring Methods and ConsiderationsNoise Class of Conductors [1]QW1 QW2 SW1 SW2 PW1Conductor Grouping in Wireways/Conduits1. All conductors of 1 or 3 phase AC power circuits must be bundled to minimizeX X Xstray magnetic fields.2. All conductors of a DC power circuit must be bundled to minimize stray magnetic fields. X X X3. When paralleled conductors must be run in separate wireways or conduit, bundle conductors intogroups that minimize stray magnetic fields.X X4. Maintain conductor runs as short and direct as practical. X X X X XSeparation of Circuits1. DO NOT run different Noise Class conductors in the same conduit.X X X X X2. DO NOT run different Voltage Class conductors in same conduit unless all conductors areinsulated for the maximum Voltage Class present.X X X X X3. All PW conductor groups must be individually segregated using metallic conduit. X4. Segregate all conductors by Noise Class. Use the following circuit separation when conductorscan run parallel for more than 12 inches.• Metallic conduit: 3 in between QW to SW/PW X X X X X• Metallic tray: 3 in between SW to PW X X X• Metallic tray: 6 in between QW to SW/PW X X X X X• Against continuous metal surface: 3 in between SW to PW X X X• Against continuous metal surface: 6 in between QW to SW/PW X X X X X• Metallic conduit housing QW: 12 in to non-metallic conduit SW/PW X X X X X• Non-metallic conduit: 3 in between SW to PW X X X• Non-metallic conduit: 24 in between QW to SW/PW X X X X X5. If QW and SW1 wiring must cross SW2 or PW1 wiring, the bundles must cross at right angles. X X X X XCommon Mode Noise Issues1. Provide adjacent signal returns using twisted pair cable.X X2. Galvanically isolate signal and associated signal return path when possible. X XShielding1. Use metallic conduit for all power and control circuits external to the controller enclosure.X X X X X2. Shields must be continuous and equipped with a drain wire. X X X3. DO NOT group different Noise Class conductors within the same shield. X X X X X4. Minimize non-shielded portion of conductor at the ends of shielded cable. X X X X X5. When shielding AC or DC power conductors, group conductors to minimizemagnetic field in shield.X X XGrounding1. Ground shields at one end only (the controller end).X X X X X2. Use separate ground wire for each shield ground. X X X X X3. Provide a ground wire with all conductor groups whether in tray or conduit. X X X4. When multiple grounds must be made to a shielded power cable, the shield must have the sameshort circuit withstand capability as the ground conductor in the power cable.X X X5. Terminate all power grounds and power shield grounds to the controller grounding point or bar. X X X6. Terminate all signal shield grounds to the terminals provided. X X7. Always supply a separate equipment grounding conductor with the controller power feed. DONOT depend upon metallic conduit for ground connection.X X X[1] Resolution limited to processor resolution.130 © 1996 Square D All Rights Reservedηττπ://νιχοντρολσ.χοm
L1 L2 L3<strong>Telemecanique</strong>T1 T2 T3L1 L2 L3<strong>Telemecanique</strong>T1 T2 T3NCNCNCNCBefore Servicing theBefore Servicingselected:Failure to observe these precautions will result in death orserious injury.234Drive Controller:Disconnect All Power.Place a "Do Not Turn On" label on Drive Controller.Lock Disconnect in Open Position.This equipment must be installed andserviced only by qualified electricalpersonnel.Turn off all power supplying thisequipment before working on or insideequipment.Always use a properly rated voltagesensing device to confirm power is off.Replace all devices, doors, and coversbefore turning on power to this equipment.Basic Power ConverterPerform all functions listed above.Measure Voltages at Disconnect Output to verify they are zero.Wait 1 minute to allow DC Bus to discharge, verify no voltage ispresent.Remove Line Fuses labeled FU1, FU2 and FU3 with toolprovided.Replace Cover, then close the disconnect.Before Servicing theBefore Servicingselected:Drive Controller:Disconnect All Power.Place a "Do Not Turn On" label on Drive Controller.Lock Disconnect in Open Position.Basic Power Converter98This equipment must be installed andserviced only by qualified electricalpersonnel.Turn off all power supplying thisequipment before working on or insideequipment.Always use a properly rated voltagesensing device to confirm power is off.Replace all devices, doors, and coversbefore turning on power to this equipment.Perform all functions listed above.Measure Voltages at Disconnect Output to verify they are zero.Wait 1 minute to allow DC Bus to discharge, verify no voltage ispresent.Remove Line Fuses labeled FU1, FU2 and FU3 with toolprovided.Replace Cover, then close the disconnect.Failure to observe these precautions will result in death orserious injury.23498ONTRAVAIL DELAYTELEMECANIQUEwhen Bypass iswhen Bypass isL1 L2 L3XXXXX-XXX-XX1,5-30sXXXXX-XXX-XX53 NO 63 NO53 NO 63 NOTELEMECANIQUE54 NO 64 NO54 NO 64 NOT1 T2 T3NCNCL1 L2 L3TELEMECANIQUET1 T2 T3<strong>Telemecanique</strong>2326TESTA322998 NO 9795 NC 96T1T2RA ESETNCNCBulletin No. 50006-519-01BDecember 1996Chapter 6 — Class 8839 ALTIVAR <strong>56</strong> Combination DevicesTerminal Strip LocationsTERMINAL STRIPLOCATIONSFigures 74 through 78 show terminal strip locations for Class 8839 ALTIVAR <strong>56</strong>combination devices. Tables 48 through 51 list wire size and torque requirements.NOTE: Typicaldevice shownwith options.DANGERHAZARD OF ELECTRIC SHOCK OR BURNLINEL1, L2, L3(SW2)13521DRIVE ISOLATION HAZARDLC1D251001ON24622Fuse BlockFU1FU2FU3OFFLOADHAND1010OPENOFFMAINSAUTO<strong>56</strong>7CLOSEControlTerminals1 - 16(QW1, QW2)1234<strong>56</strong>78910111213141516SPTST1 T2 T31718192021222324252627ControlTerminals17 - 27 (SW1)T1, T2, T3(SW2)GNDGNDFigure 74: Terminal Strip Locations for 1 - 50 hp VT & 1 - 40 hp VTLN, 460 V;1 - 25 hp VT & VTLN, 208/230 V (Power Circuit W)NOTE: Typicaldevice shownwith options.Fuse Block121LC101D25102346522DANGERHAZARD OF ELECTRIC SHOCK OR BURNDRIVE ISOLATION HAZARDFU1 FU2 FU3LINE LOADONOFFL1, L2, L3(SW2)HAND1010AFCOFFOFFAUTO<strong>56</strong>7BYPASSControlTerminals1 - 15(QW1, QW2)12344<strong>56</strong>789101112131415SPTS1LC1DXX023LA4 DT 2U01LC1DXX0LA1DNXXLA1DNXX4<strong>56</strong>21221243LR2DXX01222 4 6 T3<strong>56</strong>STOP21161718192021222324252627282930313233ControlTerminals16 - 33(SW1)T1, T2, T3(SW2)GNDGNDFigure 75: Terminal Strip Locations for 1 - 50 hp VT & 1 - 40 hp VTLN, 460 V;1 - 25 hp VT & VTLN, 208/230 V (Power Circuit Y or Z)© 1996 Square D All Rights Reserved131ηττπ://νιχοντρολσ.χοm
1 L1 3 L2 5 L3LC1DXX11<strong>Telemecanique</strong>2 T1 4 T2 6 T31 L1 3 L2 5 L3LC1DXX11<strong>Telemecanique</strong>2 T1 4 T2 6 T3A221NC13NO14NO22NCA2A221NC13NO14NO22NCA2HANDOFFAUTOHANDOFFAUTO1234512344<strong>56</strong>7891011121314152341512344<strong>56</strong>789101112131415166067079889OPENMAINSCLOSEAFCOFFBYPASS1LC1DXX11<strong>Telemecanique</strong>1718192021222324252627JJS-150161718192021222324252627282930313233JJS-150ONTRAVAILDELAYTELEMECANIQUE53 NO 63 NO<strong>Telemecanique</strong>LA1DN2054 NO 64 NO1,5-30sLA4 DT 2UL1 3 L2 5 L32 T1 4 T2 6 T3A221NC13NO14NO22NCA21 L1 2 L2 3 L3<strong>Telemecanique</strong>ALR2D3361RA ESTOP STESTET23269829NO3297NC95 962 T1 4 T2 6 T31LC1DXX11<strong>Telemecanique</strong>TELEMECANIQUEL1 3 L2 5 L353 NO 63 NO<strong>Telemecanique</strong>LA1DN2054 NO 64 NO2 T1 4 T2 6 T3LA4 D4 2UA221NC13NO14NO22NCA2250AKAL36250XXM250AKAL36250XXM250ON250ONOFFOFFChapter 6 — Class 8839 ALTIVAR <strong>56</strong> Combination DevicesBulletin No. 50006-519-01BTerminal Strip Locations December 1996NOTE: Typicaldevice shownwith options.CIRCUIT BREAKERL1, L2, L3(SW2)10ControlTerminals1 - 16(QW1, QW2)10SPRTST1T2T3GNDControlTerminals17 - 27(SW1)T1, T2, T3(SW2)Fuse BlockGNDFigure 76: Terminal Strip Locations for 60 - 100 hp VT & 50 - 75 hp VTLN, 460 V;30 - 50 hp VT & 30 - 40 hp VTLN, 208/230 V (Power Circuit W)NOTE: Typicaldevice shownwith options.CIRCUIT BREAKERL1, L2, L3(SW2)10ControlTerminals1 - 15(QW1, QW2)10T1, T2, T3(SW2)ControlTerminals16 - 33 (SW1)GNDSPRTSFuse BlockGNDFigure 77: Terminal Strip Locations for 60 hp VT & 50 - 60 hp VTLN, 460 V(Power Circuit Y or Z)132 © 1996 Square D All Rights Reservedηττπ://νιχοντρολσ.χοm
53 NO 61 NC 71 NO 83 NC<strong>Telemecanique</strong>LA1DN2254 NO 62 NC 72 NO 84 NCHANDOFFAUTO2341512344<strong>56</strong>78910111213141<strong>56</strong>0789AFCOFFBYPASS1617181920212223242526272829303132332326TEST98A29NO3297STOP95NC96ARESETOVERLOAD RELAYLR2 XXXX53 NO 61 NC 71 NO 83<strong>Telemecanique</strong>LA1DN2254 NO 62 NC 72 NO 84NCNC250AKAL36250XXMON250OFFBulletin No. 50006-519-01BDecember 1996Chapter 6 — Class 8839 ALTIVAR <strong>56</strong> Combination DevicesTerminal Strip LocationsNOTE: Typicaldevice shownwith options.CIRCUIT BREAKERL1, L2, L310ControlTerminals1 - 15(QW1, QW2)10SPRTSGNDControlTerminals16 - 33 (SW1)T1, T2, T3(SW2)Fuse BlockJJS-225GNDFigure 78: Terminal Strip Locations for 75 - 100 hp VT & 75 hp VTLN, 460 V;30 - 50 hp VT & 30 - 40 hp VTLN, 208/230 V (Power Circuit Y or Z)© 1996 Square D All Rights Reserved133ηττπ://νιχοντρολσ.χοm
Chapter 6 — Class 8839 ALTIVAR <strong>56</strong> Combination DevicesBulletin No. 50006-519-01BPower Wiring December 1996POWER WIRINGTable 48: Power Terminal Strip CharacteristicsTerminal Function CharacteristicGND208 VAC ±10% (<strong>56</strong>U•G2•• units)L1230 VAC ±10% (<strong>56</strong>U•G3•• units)3-phase power supplyL2460 VAC ±10% (<strong>56</strong>U•G4•• units)L347 to 63 HzT10 to 208 VAC (<strong>56</strong>U•G2•• units)T2Output Connections to motor 0 to 230 VAC (<strong>56</strong>U•G3•• units)T30 to 460 VAC (<strong>56</strong>U•G4•• units)Table 49: Power Terminal Wire RangeClass 8839 Drive Controller TypeTerminalsL1, L2, L3 (Line) T1, T2, T3 (Load) GNDMax.WireSize(AWG)TerminalTorque(lb-in)Max.WireSize(AWG)TerminalTorque(lb-in)Max.WireSize(AWG)TerminalTorque(lb-in)208/230 VAC 460 VAC<strong>56</strong>UCG2/3*W to <strong>56</strong>UFG2/3*W <strong>56</strong>UCG4*W to <strong>56</strong>UHG4*W 4 35 2/0 120 4 35<strong>56</strong>UGG2/3*W to <strong>56</strong>UHG2/3*W <strong>56</strong>UJG4*W to <strong>56</strong>UKG4*W 1/0 80 2/0 120 4 35<strong>56</strong>UJG2/3*W to <strong>56</strong>ULG2/3*W <strong>56</strong>ULG4*W to <strong>56</strong>UPG4VW 1/0 80 2/0 120 1/0 45<strong>56</strong>UPG4LW 1/0 80 4/0 150 1/0 45<strong>56</strong>UMG2/3*W to <strong>56</strong>UPG2/3*W <strong>56</strong>UQG4*W to <strong>56</strong>USG4*W 350 250 4/0 150 1/0 45<strong>56</strong>UCG2/3*Y to <strong>56</strong>UFG2/3*Y<strong>56</strong>UCG2/3*Z to <strong>56</strong>UFG2/3*Z<strong>56</strong>UGG2/3*Y<strong>56</strong>UGG2/3*Z<strong>56</strong>UHG2/3*Y<strong>56</strong>UHG2/3*Z<strong>56</strong>UJG2/3*Y to <strong>56</strong>ULG2/3*Y<strong>56</strong>UJG2/3*Z to <strong>56</strong>ULG2/3*Z<strong>56</strong>UMG2/3*Y to <strong>56</strong>UNG2/3*Y<strong>56</strong>UMG2/3*Z to <strong>56</strong>UNG2/3*Z<strong>56</strong>UPG2/3*Y<strong>56</strong>UPG2/3*Z<strong>56</strong>UCG4*Y to <strong>56</strong>UHG4*Y<strong>56</strong>UCG4*Z to <strong>56</strong>UHG4*Z<strong>56</strong>UJG4*Y<strong>56</strong>UJG4*Z<strong>56</strong>UKG4*Y<strong>56</strong>UKG4*Z<strong>56</strong>ULG4*Y to <strong>56</strong>UPG4*Y<strong>56</strong>ULG4*Z to <strong>56</strong>UPG4*Z<strong>56</strong>UQG4*Y<strong>56</strong>UQG4*Z<strong>56</strong>URG4*Y<strong>56</strong>URG4*Z<strong>56</strong>USG4*Y<strong>56</strong>USG4*Z4 35 8 15 4 351/0 80 8 15 4 351/0 80 6 15 4 351/0 80 1/0 75 1/0 45350 250 1/0 75 1/0 45350 250 3/0 200 1/0 45350 250 3/0 200 1/0 45134 © 1996 Square D All Rights Reservedηττπ://νιχοντρολσ.χοm
Bulletin No. 50006-519-01BDecember 1996Chapter 6 — Class 8839 ALTIVAR <strong>56</strong> Combination DevicesControl WiringCONTROL WIRINGTable 50: Control Terminal Strip Characteristics (Power Circuit W)Terminal [1] [2] Function Characteristics1 LO1 (Logic Output 1) 24 V, 200 mA max. [5]2 LO2 (Logic Output 2) 24 V, 200 mA max. [5]3 COM (Logic Common) 0 V4 +24 (+24 V Control Supply)5 LI1 (Logic Input 1)6 LI2 (Logic Input 2)7 LI3 (Logic Input 3)Minimum: 12 V; Maximum: 30 VQuiescent current: 15 mA typicalIs = 210 mA max. [5]24 V, 10 mAState 0: V < 5 V; State 1: V > 12 V; Vmax = 30 V24 V, 10 mA;State 0: V < 5 V; State 1: V > 12 V; Vmax = 30 V24 V, 10 mA;State 0: V < 5 V; State 1: V > 12 V; Vmax = 30 V8 LI4 (Logic Input 4)24 V, 10 mA;State 0: V < 5 V; State 1: V > 12 V; Vmax = 30 V9 +10 V Reference Supply 10 V, Is = 10 mA max.10 AI1 (Analog Input 1: Speed Reference Voltage) 0-10 V, Z = 30 kΩ11 COM (Speed Reference Common) 0 V12 GND, S (Ground/Shield)13 AI2 (Analog Input 2: Speed Reference Current) 4-20 mA [6] , Z = 250 Ω14 COM (Analog Common) 0 V15 AO1 (Analog Output 1)0-20 mA, 12 V max. (programmable as 4-20 mAw/ keypad display)16 Auxiliary Terminal [7] Terminal jumpered to Terminal 417 +115 V (Control Transformer) [7]18 115 V Rated Terminal [7]19 GND (Control Transformer) [7]2021120 V SPR Relay Coil 21 [7] 115-120 V/60 Hz supply (user-supplied)222324 [4]25R1 Relay, N.C. Contact (Fault Relay Output)R2 Relay, N.O. Contact (Run Relay Output)26Auxiliary Contact (AFC Mode Status)27[7][1] See control circuit diagrams on pages 151 and 152.Minimum: 10 mA, 24 VDCMaximum inductive load of:• 2.0 A, 120 VAC; Max: 0.10 J/operation,80 operations/minute• 1.0 A, 220 VAC; Max: 0.25 J/operation,25 operations/minute• 2.0 A, 24 VAC; Max: 0.10 J/operation,80 operations/minuteArc suppression provided by varistors in parallelw/ relay contacts.Minimum: 10 mA, 24 VDCMaximum inductive load of:• 2.0 A, 120 VAC; Max: 0.10 J/operation,80 operations/minute• 1.0 A, 220 VAC; Max: 0.25 J/operation,25 operations/minute• 2.0 A, 24 VAC; Max: 0.10 J/operation,80 operations/minuteArc suppression provided by varistors in parallelw/ relay contacts.• 15 A, 125 VAC• 10 A, 250 VAC[2] All terminals are rated 600 V, 30 A (Class 9080, Type GM6). Maximum wire size for all terminals is 10 AWG (2.5 mm 2 ).[3] Relay coil deenergizes on fault.[4] Contact state with drive controller deenergized.[5] Total current of +24 V internal supply is 210 mA. Available current of the two logic outputs can be calculated as follows: eachinput requires 10 mA, each analog output requires 20 mA and the typical quiescent current of LOP is 15 mA.[6] 0-20 mA, x-20 mA, 20-4 mA programmable with keypad display. 0-5 V (Z = 30 kΩ) selectable with switch on control board.[7] Available only when options are included.© 1996 Square D All Rights Reserved135ηττπ://νιχοντρολσ.χοm
Chapter 6 — Class 8839 ALTIVAR <strong>56</strong> Combination DevicesBulletin No. 50006-519-01BControl Wiring December 1996Table 51: Control Terminal Strip Characteristics (Power Circuits Y & Z)Terminal [1] [2] Function Characteristics1 LO1 (Logic Output 1) 24 V, 200 mA max. [5]2 LO2 (Logic Output 2) 24 V, 200 mA max. [5]3 COM (Logic Common) 0 V4 +24 (+24 V Control Supply)5 LI1 (Logic Input 1)6 LI2 (Logic Input 2)7 LI3 (Logic Input 3)Minimum: 12 V; Maximum: 30 VQuiescent current: 15 mAtypicalIs = 210 mA max. [5]24 V, 10 mA;State 0: V < 5 V; State 1: V > 12 V; Vmax = 30 V24 V, 10 mA;State 0: V < 5 V; State 1: V > 12 V; Vmax = 30 V24 V, 10 mAState 0: V < 5 V; State 1: V > 12 V; Vmax = 30 V8 LI4 (Logic Input 4)24 V, 10 mAState 0: V < 5 V; State 1: V > 12 V; Vmax = 30 V9 +10 V Reference Supply 10 V, Is = 10 mA max.10AI1 (Analog Input 1: SpeedReference Voltage)0 - 10 V, Z = 30 kΩ11 COM (Speed Reference Common) 0 V12 GND, S (Ground/Shield)13AI2 (Analog Input 2: SpeedReference Current)4 - 20 mA [6] , Z = 250 Ω14 COM (Analog Common) 0 V15 AO1 (Analog Output 1)16 +115 V (Control Transformer)17 [8] +115 V Rated Terminal1819AFC Mode Select2021Bypass Mode Select222324 [3]25Freeze/Fire Stat Interlocks [7]Bypass Run, N.O. Contact [7]0 - 20 mA, 12 V max. (programmable as 4-20 mAw/ keypad display)Normally jumpered or N.C. SPR contact whenoption is supplied.Normally jumpered or N.C. SPR contact whenoption is supplied.Normally jumpered or N.C. SPR contact whenoption is supplied. Provision for user-suppliedN.C. Freeze/Fire state contact.Minimum: 10 mA, 24 VDCMaximum inductive load of:• 2.0 A, 120 VAC; Max: 0.10 J/operation,80 operations/minute• 1.0 A, 220 VAC; Max: 0.25 J/operation,25 operations/minute• 2.0 A, 24 VAC; Max: 0.10 J/operation,80 operations/minuteArc suppression provided by varistors in parallelw/ relay contacts.[1] See control circuit diagrams on pages 153 - 1<strong>56</strong>.[2] All terminals are rated 600 V, 30 A (Class 9080, Type GM6). Maximum wire size for all terminals is 10 AWG(2.5 mm 2 ). Tightening torque 7 - 8 lb-in (0.8 - 0.9 N•m).[3] Relay coil deenergizes on fault.[4] Contact state with drive controller deenergized.[5] Total current of +24 V internal supply is 210 mA. Available current of the two logic outputs can be calculated asfollows: each input requires 10 mA, each analog output requires 20 mA and the typical quiescent current ofLOP is 15 mA.[6] 0 - 20 mA, x - 20 mA, 20 - 4 mA programmable with keypad display. 0 - 5 V (Z = 30 kΩ) selectable with switchon control board.[7] Available only when options are included.[8] On when bypass contactor is energized.136 © 1996 Square D All Rights Reservedηττπ://νιχοντρολσ.χοm
Bulletin No. 50006-519-01BDecember 1996Chapter 6 — Class 8839 ALTIVAR <strong>56</strong> Combination DevicesControl WiringTable 51: Control Terminal Strip Characteristics (Power Circuits Y & Z)Terminal [1] [2] Function Characteristics26 [7]2728 [3]2930 [4]3132 [7]33120 V SPR Relay Coil (if used) 115 - 120 V / 60 Hz supply (user-supplied)R1 Relay, N.C. Contact (Fault RelayOutput)R2 Relay, N.O. Contact (Run RelayOutput)Auxiliary Contact (AFC Mode Status)Minimum: 10 mA, 24 VDCMaximum inductive load of:• 2.0 A, 120 VAC; Max: 0.10 J/operation,80 operations/minute• 1.0 A, 220 VAC; Max: 0.25 J/operation,25 operations/minute• 2.0 A, 24 VAC; Max: 0.10 J/operation,80 operations/minuteArc suppression provided by varistors in parallelw/ relay contacts.Minimum: 10 mA, 24 VDCMaximum inductive load of:• 2.0 A, 120 VAC; Max: 0.10 J/operation,80 operations/minute• 1.0 A, 220 VAC; Max: 0.25 J/operation,25 operations/minute• 2.0 A, 24 VAC; Max: 0.10 J/operation,80 operations/minuteArc suppression provided by varistors in parallelw/ relay contacts.• 15 A, 125 VAC• 10 A, 250 VAC[1] See control circuit diagrams on pages 153 - 1<strong>56</strong>.[2] All terminals are rated 600 V, 30 A (Class 9080, Type GM6). Maximum wire size for all terminals is 10 AWG(2.5 mm 2 ). Tightening torque 7 - 8 lb-in (0.8 - 0.9 N•m).[3] Relay coil deenergizes on fault.[4] Contact state with drive controller deenergized.[5] Total current of +24 V internal supply is 210 mA. Available current of the two logic outputs can be calculated asfollows: each input requires 10 mA, each analog output requires 20 mA and the typical quiescent current ofLOP is 15 mA.[6] 0 - 20 mA, x - 20 mA, 20 - 4 mA programmable with keypad display. 0 - 5 V (Z = 30 kΩ) selectable with switchon control board.[7] Available only when options are included.[8] On when bypass contactor is energized.© 1996 Square D All Rights Reserved137ηττπ://νιχοντρολσ.χοm
Chapter 6 — Class 8839 ALTIVAR <strong>56</strong> Combination DevicesBulletin No. 50006-519-01BOperation Sequence & Options December 1996SEQUENCE OFOPERATION ANDOPTIONSTerminal Command Modevs. Keypad Command ModeThis section describes basic sequences of controller operation for the three preengineeredpower circuit configurations and available options. The options are:• Power Circuit W: combination package• Power Circuit Y: bypass package• Power Circuit Z: remote starter bypass packageIn order for factory and/or user supplied pilot devices and controls to berecognized, the Class 8839 ALTIVAR <strong>56</strong> combination drive controller is factoryconfigured to operate in the Terminal Command mode. Switching from TerminalCommand mode to Keypad Command mode will disable power converter logicinputs. Factory and/or user-provided control devices will be ignored. For thisreason, do not operate the Class 8839 ALTIVAR <strong>56</strong> drive controller in the KeypadCommand mode.Consult the factory configuration listing on the applicable control circuit diagram(pages 151 to 1<strong>56</strong>), and refer to Chapter 5 before reprogramming logic inputs,outputs, torque types, or control types. Changing certain factory settings willadversely affect the performance of the Class 8839 ALTIVAR <strong>56</strong> drive controller.WARNINGUNINTENDED EQUIPMENT OPERATION• Controller has been factory programmed. Alteration of factory programming maycreate incompatibilities with supplied controller configuration.• Read and understand Chapter 5 as well as programming information on applicablecontroller schematics, Figures 91 - 96.• If the power converter unit is re-initialized using the TOTAL or PARTIAL FACTORYSETTING function, the power converter must be re-programmed per theprogramming instructions on applicable controller schematics, Figures 91 - 96.• If the power converter unit or the main control board of the power converter isreplaced, the power converter must be re-programmed per the programminginstructions on applicable controller schematics, Figures 91 - 96.Failure to observe these instructions can result in death, serious injury, orequipment damage.138 © 1996 Square D All Rights Reservedηττπ://νιχοντρολσ.χοm
Bulletin No. 50006-519-01BDecember 1996Chapter 6 — Class 8839 ALTIVAR <strong>56</strong> Combination DevicesPower Circuit W Combination PackagePOWER CIRCUIT WCOMBINATIONPACKAGEOperator Controls –General Arrangement andOperationAdjustable Speed OperationFreeze/Fire Stats Interlocks(if used)MOD B07Group 2 Pilot Light Cluster(if used)MOD C07Line Isolation Contactor(if used)The Combination Package is designed for running the motor strictly from thepower converter. The Combination Package consists of line fuses, 120 V fusedcontrol transformer (when control options are present), motor circuit protectordisconnect with means for locking in the open position, and a Hand-Off-Autoswitch with <strong>manual</strong> speed potentiometer.Operator controls are located on the front of the BELE box cover unless option D07is included. Option D07 omits the Hand-Off-Auto switch and <strong>manual</strong> speedpotentiometer, and no operator controls are present on the BELE box cover. If optionB07 is included, a pilot light cluster is also present on the front of the BELE box cover.The Hand-Off-Auto switch and <strong>manual</strong> speed potentiometer control the operationof the power converter which is factory configured to operate in terminalcommand mode.To operate the controller, the controller disconnect switch located on the front ofthe BELE box must be in the closed position. There are three modes of operationwith the Hand-Off-Auto switch: Hand, Off, and Auto.Hand mode is for local control. As soon as Hand mode is entered, the powerconverter is placed in running mode. In Hand mode, the speed potentiometermounted on the BELE box is used to control the speed of the controller.Off mode commands the power converter to stop the motor by either following theprogrammed deceleration ramp (factory setting) or by freewheel stopping.Auto mode is for remote control. In Auto mode, the power converter is placed inrunning mode as soon as a user-supplied run contact is closed between controllerterminals TB5 and TB8. In Auto mode, motor speed is varied by adjusting the usersuppliedauto speed reference signal (4-20 mA) supplied to the terminals TB13 (+),TB11 (-), and TB12 (Shield) in the BELE box. Refer to Chapter 5 for scaling of thissignal.Terminals TB4 and TB5 are dedicated terminals for accepting a user-suppliedfreeze/fire stat interlock (normally closed). The power converter will stopoperation if the connection between TB4 and TB5 is opened. Remove the factoryjumper wire located on these terminals before installing interlock.This pilot light cluster provides visual indication of protective functions and circuitstatus. Listed below are the four pilot lights provided and their functions.1. Power On (Red): illuminates whenever mains power is applied to thecontroller. The LED is rated 120 V.2. AFC Run (Green): illuminates whenever LO1 is high (programmed forrunning state) to annunciate a drive run condition. The LED is rated 24 V.3. Auto Mode (Green): illuminates whenever the drive is running in the Automode. The LED is sequenced by the Hand-Off-Auto selector switch and israted 24 V.4. AFC Fault (Yellow): illuminates whenever LO2 (programmed for fault state)is high to annunciate a drive fail condition. This light is normally not lighteduntil a controller protective circuit has caused an abnormal shutdown. TheLED is rated 24 V.MOD C07 provides a line isolation contactor factory wired between the line fuses(FU1, FU2, and FU3) and the power converter (L1, L2, and L3). An Open-Close switchis provided on the controller door for controlling the contactor. The line isolationcontactor is energized whenever the Open-Close switch is in the closed position.© 1996 Square D All Rights Reserved139ηττπ://νιχοντρολσ.χοm
Chapter 6 — Class 8839 ALTIVAR <strong>56</strong> Combination DevicesBulletin No. 50006-519-01BPower Circuit W Combination Package December 1996MOD D07Omit Hand-Off-Auto Switchand Manual SpeedPotentiometer (if used)MOD D07 omits the Hand-Off-Auto selector switch and <strong>manual</strong> speedpotentiometer. It is used when the user prefers to supply external control devices.There are a number of ways to sequence the operation of the power converterwhen the Hand-Off-Auto switch and <strong>manual</strong> speed potentiometer are not present.Figures 79 - 82 show recommended sequencing diagrams for commonly usedcontrol methods.Figure 79 can be used for applications in which the power converter start/stopoperation is controlled by a user-supplied Auto contact, and the speed is controlledby a user-supplied 0 - 10 VDC speed reference signal.0 - 10 VDC Signal+–TB10(AI1)TB11(COM)Remote 0 - 10 V Speed SignalAuto Start Contactor Jumper **TB12(S)TB6(LI2)TB16TB4FreezestatTB5* Jumper(+24 V) (LI1)Figure 79: Speed Reference #1 Signal (0 - 10 VDC) OnlyFigure 80 can be used for applications in which the power converter start/stopoperation is controlled by a user-supplied Auto contact, and the speed is controlledby a user-supplied 4 - 20 mA DC speed reference signal.4 - 20 mA+–TB13(AI2)TB11(COM)GNDTB12(S)TB7Remote 4 - 20 mA Speed SignalTB8(LI4)*Jumper(LI3)TB16 * JumperTB26Auto StartTB5(LI1)*JumperTB4*Jumper(+24 V)TB27Figure 80: Speed Reference #2 Signal (4 - 20 mA) OnlyFigure 81 can be used for applications in which the power converter start/stopoperation is controlled by a user-supplied Auto contact, and the speed is controlledby a user-supplied remote speed potentiometer.140 © 1996 Square D All Rights Reservedηττπ://νιχοντρολσ.χοm
Bulletin No. 50006-519-01BDecember 1996Chapter 6 — Class 8839 ALTIVAR <strong>56</strong> Combination DevicesPower Circuit W Combination PackageHiTB9(+10 VDC)2.5 kΩWiperLowTB10(AI1)TB11(COM)Remote Speed PotentiometerAuto Start Contactor Jumper **TB12(S)TB6(LI2)TB16TB4(+24 V)Freezestat* JumperTB5(LI1)Figure 81: Remote Manual Speed Potentiometer Reference OnlyFigure 82 can be used for applications in which the power converter start/stopoperation is controlled by a user-supplied Hand-Off-Auto switch, and the speed iscontrolled by a user-supplied speed potentiometer (Hand mode) and a usersupplied4 - 20 mA DC speed reference signal (Auto mode).HandOffAutoTB6(LI2)TB7(LI3)TB16 *TB4(+24 V)2.5 kΩHiWiperLowTB9(+10 VDC)TB10(AI1)TB11(COM)TB12TB26*Remote Speed Potentiometer(S)TB27*FreezestatRemote HOAAuto StartContactTB8(LI4)TB5(LI1)* JumperFigure 82: Remote Wired Hand-Off-Auto and Manual Speed PotentiometerMOD E07CSA Certification (if used)MOD F07Smoke Purge Option (if used)MOD E07 provides a Canadian Standards Association (CSA) certification labelwhen required by local code requirements.MOD F07 provides a smoke purge operating mode controlled by a user-supplied120 VAC signal applied between terminals TB20 and TB21. When 120 VAC issupplied to TB20 and TB21, the drive controller runs the motor at 60 Hz. Thejumper between terminals TB4 and TB16 must be removed before using this mode.© 1996 Square D All Rights Reserved141ηττπ://νιχοντρολσ.χοm
Chapter 6 — Class 8839 ALTIVAR <strong>56</strong> Combination DevicesBulletin No. 50006-519-01BPower Circuit Y Bypass Package December 1996POWER CIRCUIT YBYPASS PACKAGEOperator Controls —General Arrangement andOperationAdjustable Speed OperationBypass OperationFreeze/Fire StatsInterlock (if used)The Bypass Package allows you to run the motor from the power converter or fromfull voltage line power (bypass mode). The motor can be run in the bypass modein the unlikely event the power converter becomes inoperative. The BypassPackage consists of IEC rated isolation and bypass contactors with Class 10overloads, line fuses, 120 V control transformer, motor circuit protector disconnectwith means for locking in the open position, AFC-Off-Bypass switch, Hand-Off-Auto switch, and a <strong>manual</strong> speed potentiometer. A 7/16", 1/2", or 9/16" sockethand tool is included for removing line fuses to isolate the power converter duringservicing. See “PROPER DRIVE ISOLATION METHOD” on page 150.Operator controls are located on the front of the BELE box cover unless option D07is included. Option D07 omits the Hand-Off-Auto switch and <strong>manual</strong> speedpotentiometer, and no operator controls are present on the BELE box cover. Ifoption A07 or B07 is included, a pilot light cluster is also present on the front of theBELE box cover.The AFC-Off-Bypass switch allows you to select either adjustable speed operationof the motor through the power converter (AFC position) or line power operationof the motor (Bypass position).The Hand-Off-Auto switch and <strong>manual</strong> speed potentiometer control the operationof the power converter which is factory configured to operate in terminalcommand mode.To control the operation of the motor with the power converter, the controllerdisconnect switch located on the front of the BELE box must be in the closedposition and the AFC-Off-Bypass switch must be in the AFC position. There arethree modes of operation with the Hand-Off-Auto switch: Hand, Off, and Auto.Hand mode is for local control. As soon as Hand mode is entered, the powerconverter is placed in running mode. In Hand mode, the speed potentiometermounted on the BELE box is used to control the speed of the controller.Off mode commands the power converter to stop the motor by either following theprogrammed deceleration ramp (factory setting) or by freewheel stopping.Auto mode is for remote control. In Auto mode, the power converter is placed inrunning mode as soon as a user-supplied run contact is closed between controllerterminals TB4 and TB8. In Auto mode, motor speed is varied by adjusting the usersuppliedauto speed reference signal (4 - 20 mA) supplied to the terminals TB13 (+),TB11 (–), and TB12 (Shield) in the BELE box. Refer to Chapter 5 for scaling of thissignal.To control the operation of the motor with line power, the controller disconnectswitch located on the front of the BELE box must be in the closed position and theAFC-Off-Bypass switch must be in the Bypass position. If the AFC-Off-Bypassselector switch is placed in the Bypass position, motor operation is transferred toline power. If the selector switch is moved to the Off position, the bypass contactoropens and the motor will stop.Terminals TB22 and TB23 are dedicated terminals for accepting a user-suppliedfreeze/fire stat interlock (normally closed). The drive output isolation contactorand drive bypass contactor open if the connection between terminals TB22 andTB23 is opened. As a result, the motor will stop. Remove the factory jumper wirelocated on these terminals prior to installation of interlock.142 © 1996 Square D All Rights Reservedηττπ://νιχοντρολσ.χοm
Bulletin No. 50006-519-01BDecember 1996Chapter 6 — Class 8839 ALTIVAR <strong>56</strong> Combination DevicesPower Circuit Y Bypass PackageMOD A07Group 1 Pilot Light Cluster(if used)MOD B07Group 2 Pilot Light Cluster(if used)MOD C07Line Isolation Contactor(if used)MOD D07Omit Hand-Off-Auto Switchand Manual SpeedPotentiometer (if used)This pilot light cluster provides visual indication of protective functions and circuitstatus. Listed below are the four pilot lights provided and their functions.1. Power On (Red): illuminates whenever mains power is applied to thecontroller. The LED is rated 120 V.2. AFC Run (Green): illuminates whenever LO1 is high (programmed forrunning state) to annunciate a drive run condition. The LED is rated 24 V.3. Bypass Run (Green): illuminates whenever the bypass contactor coil isenergized and the motor is running from line power. The LED is rated 120 V.4. AFC Fault (Yellow): illuminates whenever LO2 (programmed for fault state)is high to annunciate a drive fail condition. This light is normally not lighteduntil a controller protective circuit has caused an abnormal shutdown. TheLED is rated 24 V.This pilot light cluster provides visual indication of protective functions and circuitstatus. Listed below are the four pilot lights provided and their functions.1. Power On (Red): illuminates whenever mains power is applied to thecontroller. The LED is rated 120 V.2. AFC Run (Green): illuminates whenever LO1 is high (programmed forrunning state) to annunciate a drive run condition. The LED is rated 24 V.3. Auto Mode (Green): illuminates whenever the drive is running in Auto mode.The LED is sequenced by the Hand-Off-Auto selector switch and is rated 24 V.4. AFC Fault (Yellow): illuminates whenever LO2 (programmed for fault state)is high to annunciate a drive fail condition. This light is normally not lighteduntil a controller protective circuit has caused an abnormal shutdown. TheLED is rated 24 V.MOD C07 provides a line isolation contactor factory wired between the line fuses(FU1, FU2, and FU3) and the power converter (L1, L2, and L3). The line isolationcontactor is energized whenever the AFC-OFF-Bypass switch is in the AFC position.MOD D07 omits the Hand-Off-Auto selector switch and <strong>manual</strong> speedpotentiometer. It is used when the user prefers to supply external control devices.There are a number of ways to sequence the operation of the power converterwhen the Hand-Off-Auto switch and <strong>manual</strong> speed potentiometer are not present.Figures 83 - 86 show the recommended sequencing diagrams for commonly usedcontrol methods.The diagram shown in Figure 83 can be used for applications in which the powerconverter start/stop operation is controlled by a user-supplied Auto contact, andthe speed is controlled by a user-supplied 0 - 10 VDC speed reference signal.© 1996 Square D All Rights Reserved143ηττπ://νιχοντρολσ.χοm
Chapter 6 — Class 8839 ALTIVAR <strong>56</strong> Combination DevicesBulletin No. 50006-519-01BPower Circuit Y Bypass Package December 19960 - 10 VDC Signal+–TB10(AI1)TB11(COM)Remote 0 - 10 V Speed SignalAuto Start Contactor Jumper **TB12(S)TB4(+24 V)TB6(LI2)Figure 83: Speed Reference #1 Signal (0-10 VDC) OnlyThe diagram shown in Figure 84 can be used for applications in which the powerconverter start/stop operation is controlled by a user-supplied Auto contact, andthe speed is controlled by a user-supplied 4 - 20 mA DC speed reference signal.4 -20 mA+—TB13(AI2)TB11(COM)GNDTB12(S)Remote 4 - 20 mA Speed SignalTB4(+24 V)TB4* Jumper(+24 V)TB32Auto StartTB8(LI4)*JumperTB7(LI3)*JumperTB33Figure 84: Speed Reference #2 Signal (4-20 mA) OnlyThe diagram shown in Figure 85 can be used for applications in which the powerconverter start/stop operation is controlled by a user-supplied Auto contact, andthe speed is controlled by a user-supplied remote speed potentiometer.HiTB9(+10 VDC)2.5 kΩWiperLowTB10(AI1)TB11(COM)Remote Speed PotentiometerTB12(S)TB4(+24 V)Auto Start Contactor Jumper **TB6(LI2)Figure 85: Remote Manual Speed Potentiometer Reference Only144 © 1996 Square D All Rights Reservedηττπ://νιχοντρολσ.χοm
Bulletin No. 50006-519-01BDecember 1996Chapter 6 — Class 8839 ALTIVAR <strong>56</strong> Combination DevicesPower Circuit Y Bypass PackageThe diagram shown in Figure 86 can be used for applications in which the powerconverter start/stop operation is controlled by a user-supplied Hand-Off-Autoswitch, and speed is controlled by a user-supplied speed potentiometer (for Handmode) and a user-supplied 4 - 20 mA DC speed reference signal (for Auto mode).HandOffAutoTB6TB7TB4(LI2)(LI3)(+24 V)2.5 kΩHiWiperLowTB9(+10 VDC)TB10(AI1)TB11(COM)TB12TB32* JumperRemote Speed Potentiometer(S)TB33Remote HOAAuto StartContactTB4TB8(+24 V)(LI4)Figure 86: Remote Wired Hand-Off-Auto and Manual Speed PotentiometerMOD E07CSA Certification (if used)MOD F07Smoke Purge Option (if used)MOD E07 Provides a Canadian Standards Association (CSA) certification labelwhen required by local code requirements.MOD F07 provides a smoke purge operating mode controlled by a user-supplied120 VAC signal applied between terminals TB26 and TB27. When 120 VAC issupplied to TB26 and TB27, motor operation is transferred to line power (if notoperating in this mode already). The jumpers between terminals TB18 and TB19,TB20 and TB21, and TB22 and TB23 must be removed before using this mode.© 1996 Square D All Rights Reserved145ηττπ://νιχοντρολσ.χοm
Chapter 6 — Class 8839 ALTIVAR <strong>56</strong> Combination DevicesBulletin No. 50006-519-01BPower Circuit Z Remote Starter Bypass Package December 1996POWER CIRCUIT ZREMOTE STARTERBYPASS PACKAGEOperator Controls —General Arrangement andOperationAdjustable Speed OperationBypass OperationFreeze/Fire Stats Interlocks(if used)The Remote Starter Bypass Package allows you to run the motor from the powerconverter or from a user-supplied, separately-mounted full or reduced voltagestarter (bypass mode). The motor can be run in the bypass mode in the unlikelyevent the power converter becomes inoperative.The Remote Starter Bypass Package consists of IEC rated isolation and transfercontactors with Class 10 overloads, line fuses, 120 V control transformer, motorcircuit protector disconnect with means for locking in the open position, AFC-Off-Bypass switch, Hand-Off-Auto switch, and a <strong>manual</strong> speed potentiometer. A7/16", 1/2", or 9/16" socket hand tool is included for removing line fuses to isolatethe power converter during servicing. See “PROPER DRIVE ISOLATIONMETHOD” on page 150.Operator controls are located on the front of the BELE box cover unless option D07is included. Option D07 omits the Hand-Off-Auto switch and <strong>manual</strong> speedpotentiometer, and no operator controls are present on the BELE box cover. Ifoption A07 or B07 is included, a pilot light cluster will also be present on the frontof the BELE box cover. The AFC-Off-Bypass switch allows you to select eitheradjustable speed operation of the motor through the power converter (AFCposition), or to transfer control of the motor to a user-supplied, remote-mountedfull or reduced voltage starter (Bypass position). The Hand-Off-Auto switch and<strong>manual</strong> speed potentiometer control operation of the power converter which isfactory configured for terminal command mode.To control the operation of the motor with the power converter, the controllerdisconnect switch located on the front of the BELE box must be in the closedposition, and the AFC-Off-Bypass switch must be in the AFC position. There arethree modes of operation with the Hand-Off-Auto switch: Hand, Off, and Auto.Hand mode is for local control. As soon as Hand mode is entered, the powerconverter is placed in running mode. In Hand mode, the speed potentiometermounted on the BELE box is used to control the speed of the controller.Off mode commands the power converter to stop the motor by either following theprogrammed deceleration ramp (factory setting) or by freewheel stopping.Auto mode is for remote control and places the power converter in a running modeas soon as a user-supplied run contact is closed between controller terminals TB4and TB8. In Auto mode, motor speed is varied by adjusting the user-supplied autospeed reference signal (4 - 20 mA) supplied to the terminals TB13 (+), TB11 (–), andTB12 (Shield) in the BELE box. Refer to Chapter 5 for scaling of this signal.To control the operation of the motor with a user-supplied, separately-mountedstarter, the AFC-Off-Bypass switch must be in the Bypass position. When the AFC-Off-Bypass selector switch is placed in the Bypass position, motor operation istransferred to the user-supplied starter. If the selector switch is moved to the Offposition, the transfer contactor will open and the motor will stop.Terminals TB22 and TB23 are dedicated terminals for accepting a user-suppliedfreeze/fire stat interlock (normally closed). The drive output isolation contactorand transfer contactor will open if the connection between terminals TB22 andTB23 is opened. As a result, the motor will stop. Remove the factory jumper wirelocated on these terminals prior to installation of interlock.146 © 1996 Square D All Rights Reservedηττπ://νιχοντρολσ.χοm
Bulletin No. 50006-519-01BDecember 1996Chapter 6 — Class 8839 ALTIVAR <strong>56</strong> Combination DevicesPower Circuit Z Remote Starter Bypass PackageMOD A07Group 1 Pilot Light Cluster(if used)MOD B07Group 2 Pilot Light Cluster(if used)MOD C07Line Isolation Contactor(if used)MOD D07Omit Hand-Off-Auto Switchand Manual SpeedPotentiometer (if used)The pilot light cluster provides visual indication of protective functions and circuitstatus. Listed below are the four pilot lights provided and their functions.1. Power On (Red): illuminates whenever mains power is applied to thecontroller. The LED is rated 120 V.2. AFC Run (Green): illuminates whenever LO1 is high (programmed forrunning state) to annunciate a drive run condition. The LED is rated 24 V.3. Bypass Run (Green): illuminates whenever the transfer contactor coil isenergized and the motor is running from a user-supplied separately mountedstarter. The LED is rated 120 V.4. AFC Fault (Yellow): illuminates whenever LO2 (programmed for fault state)is high to annunciate a drive fail condition. This light is normally not lighteduntil a controller protective circuit has caused an abnormal shutdown. TheLED is rated 24 V.This pilot light cluster provides visual indication of protective functions and circuitstatus. Listed below are the four pilot lights provided and their functions.1. Power On (Red): illuminates whenever mains power is applied to thecontroller. The LED is rated 120 V.2. AFC Run (Green): illuminates whenever LO1 is high (programmed forrunning state) to annunciate a drive run condition. The LED is rated 24 V.3. Auto Mode (Green): illuminates whenever the drive is running in Auto mode.The LED is sequenced by the Hand-Off-Auto selector switch and is rated 24 V.4. AFC Fault (Yellow): illuminates whenever LO2 (programmed for fault state)is high to annunciate a drive fail condition. This light is normally not lighteduntil a controller protective circuit has caused an abnormal shutdown. TheLED is rated 24 V.MOD C07 provides a line isolation contactor factory wired between the line fuses(FU1, FU2, and FU3) and the power converter (L1, L2, and L3). The line isolationcontactor is energized whenever the AFC-OFF-Bypass is in the AFC position.MOD D07 omits the Hand-Off-Auto selector switch and <strong>manual</strong> speedpotentiometer. It is used when the user prefers to supply external control devices.There are a number of ways to sequence the operation of the power converterwhen the Hand-Off-Auto switch and <strong>manual</strong> speed potentiometer are not present.Figures 87 - 90 show recommended sequencing diagrams for commonly usedcontrol methods.Figure 87 can be used for applications in which the power converter start/stopoperation is controlled by a user-supplied Auto contact, and the speed is controlledby a user-supplied 0 - 10 VDC speed reference signal.© 1996 Square D All Rights Reserved147ηττπ://νιχοντρολσ.χοm
Chapter 6 — Class 8839 ALTIVAR <strong>56</strong> Combination DevicesBulletin No. 50006-519-01BPower Circuit Z Remote Starter Bypass Package December 19960 - 10 VDC Signal+–TB10(AI1)TB11(COM)Remote 0 - 10 V Speed SignalAuto Start Contactor Jumper **TB12(S)TB4(+24 V)TB6(LI2)Figure 87: Speed Reference #1 Signal (0-10 VDC) OnlyFigure 88 can be used for applications in which the power converter start/stopoperation is controlled by a user-supplied Auto contact, and the speed is controlledby a user-supplied 4-20 mA DC speed reference signal.4 - 20 mA+–TB13(AI2)TB11(COM)GNDTB12(S)Remote 4 - 20 mA Speed SignalTB4(+24 V)TB4*Jumper(+24 V)TB32Auto StartTB8(LI4)*JumperTB7(LI3)*JumperTB33Figure 88: Speed Reference #2 Signal (4-20 mA) OnlyFigure 89 can be used for applications in which the power converter start/stopoperation is controlled by a user-supplied Auto contact, and the speed is controlledby a user-supplied remote speed potentiometer.HiTB9(+10 VDC)2.5 kΩWiperLowTB10(AI1)TB11(COM)Remote Speed PotentiometerTB12(S)TB4(+24 V)Auto Start Contactor Jumper **TB6(LI2)Figure 89: Remote Manual Speed Potentiometer Reference Only148 © 1996 Square D All Rights Reservedηττπ://νιχοντρολσ.χοm
Bulletin No. 50006-519-01BDecember 1996Chapter 6 — Class 8839 ALTIVAR <strong>56</strong> Combination DevicesPower Circuit Z Remote Starter Bypass PackageFigure 90 can be used for applications in which the power converter start/stopoperation is controlled by a user-supplied Hand-Off-Auto switch, and speed iscontrolled by a user-supplied speed potentiometer (for Hand mode) and a usersupplied4-20 mA DC speed reference signal (for Auto mode).HandOffAutoTB6TB7TB4(LI2)(LI3)(+24 V)2.5 kΩHiWiperLowTB9(+10 VDC)TB10(AI1)TB11(COM)TB12TB32* JumperRemote Speed Potentiometer(S)TB33Remote HOAAuto StartContactTB4TB8(+24 V)(LI4)Figure 90: Remote Wired Hand-Off-Auto and Manual Speed PotentiometerMOD E07CSA Certification (if used)MOD F07Smoke Purge (if used)MOD E07 provides a Canadian Standards Association (CSA) certification labelwhen required by local code requirements.MOD F07 provides a smoke purge operating mode controlled by a user-supplied120 VAC signal applied between terminals TB26 and TB27. When 120 VAC issupplied to TB26 and TB27, motor operation will be transferred to a user-supplied,separately-mounted starter (if not operating in this mode already). The jumpersbetween terminals TB18 and TB19, TB20 and TB21, and TB22 and TB23 must beremoved before using this mode.© 1996 Square D All Rights Reserved149ηττπ://νιχοντρολσ.χοm
Chapter 6 — Class 8839 ALTIVAR <strong>56</strong> Combination DevicesBulletin No. 50006-519-01BProper Drive Isolation Method December 1996PROPER DRIVEISOLATION METHODTo properly isolate the power converter for service or repair and still operate thecontroller in Bypass mode, it is necessary to remove the line fuses installed in theBELE box. This procedure applies to Bypass and Remote Starter Bypass Packageunits (Power Circuits Y and Z).A 7/16", 1/2", or 9/16" socket hand tool is attached in the BELE box and providedfor line fuse removal. Before performing any maintenance or service on thecontroller, review the following precautions and follow all precautions designatedon the controller equipment.DANGERHAZARD OF ELECTRIC SHOCK OR BURN• This equipment must be installed and serviced only by qualified electrical personnel.• Turn off power supplying this equipment before working on or inside equipment.• Always use a properly rated voltage sensing device to confirm power is off.• Replace all devices, doors, and covers before turning on power to this equipment.DRIVE ISOLATION HAZARDBefore servicing the drive controller:• Disconnect all power.• Place a “Do Not Turn On” label on drive controller• Lock disconnect in Open position.Before servicing basic power converter when Bypass is selected:• Perform all functions listed above.• Measure voltages at disconnect output to verify they are zero.• Wait 1 minute to allow DC bus to discharge, verify no voltage is present.• Remove line fuses labeled FU1, FU2, and FU3 with tool provided.• Replace cover, then close disconnect.Failure to observe these precautions will result in death or serious injury.150 © 1996 Square D All Rights Reservedηττπ://νιχοντρολσ.χοm
Bulletin No. 50006-519-01BDecember 1996Chapter 6 — Class 8839 ALTIVAR <strong>56</strong> Combination DevicesControl Circuit DiagramsCONTROL CIRCUIT DIAGRAMSSPRCOMBINATION PACKAGE W/ OPTIONSPOWER CIRCUIT W1415COMAO1AFC+10VAI1SPR4109MANUALSPEED POT.2.5kNOTES:1 PILOT LIGHT OPTION GROUP 2RED PWR ONGREEN AFC RUNGREEN AUTO MODEYELLOW AFC FAULTPLACE JUMPER BETWEEN TB-16 AND TB-26CONFIGURE CONTROLLER FUNCTIONS:MENU 7.3 LO1 = RUNNING STATEMENU 7.3 LO2 = FAULT STATEPL32 CONTROL TRANSFORMER SHOWN FOR 460V PRIMARY.FOR 230 V PRIMARY, JUMPER H2-H3 IS REMOVEDAND JUMPERS H1-H3 and H2-H4 ARE INSTALLED.FOR 208 V PRIMARY, REFER TO DETAIL A.3USER-SUPPLIED FREEZE/FIRE STAT INTERLOCKCONTACT (REMOVE JUMPER BETWEEN TERMINALSTB4 & TB5 IF USED)4 ALTERNATE WIRING FOR SMOKE PURGE RELAY (SPR) OPTION SHOWN DOTTED (REMOVE JUMPER BETWEENTERMINALS 4 & 16 IF USED)CONFIGURE CONTROLLER FUNCTIONS AS FOLLOWS:G27AUTOMODEMENU 1 DAMPING = 100%MENU 6.1 TORQUE TYPE = VARIABLE OR VARIABLE LOW NOISEMENU 6.2 COMMAND TYPE 2-WIRE (MAINTAINED)MENU 7.12 LOW SPEED = 3 HZMENU 7.12 ACCELERATION = 10 SECMENU 7.12 DECELERATION = 10 SECMENU 7.13 CONTROL TYPE = NOLDMENU 7.2 AUTO MANUAL = L13AUTO RUN INPUT = L14SPEED REFERENCE 2 = AI2MENU 7.3 R2 = RUNNING STATES1HAND OFFXXX16AUTOGROUP 2PL2AFC RUNG(5)4 SPRFREEZE/FIRESTAT INTERLOCK3261LCAFC FAULT4(6)YPL4SPR5 4FU367321SPRAUTO START CONTACT(SUPPLIED BY OTHERS)8AO2COMLO2LO1+24VLOPLI1LI2LI3LI4CL1CL2L1L2L3FAULTSIGNALRUNNINGSTATEU/T1V/T2W/T3COMAI2SR1BR1CR1AR2BR2CR2A11–+13GND1222N.C. AFCFAULT CONTACT23 (CLOSES ON FAULT)2425N.O. AFCRUN CONTACT(CLOSES WHENAFC RUNNING)GNDAUTO SPEED REF4-20 mADC SIGNALTSSPRUSER CONNECTIONSTBLI4LI1+24**LI2LI3+10AI1COMSHLDAI2COMAO1R1R285416679101112131415(IF USED)202122232425USER SUPPLIEDAUTO START CONTACTFREEZE/FIRE STAT INTERLOCK(*REMOVE JUMPER IF USED)(ALTERNATE USER-SUPPLIED WIRING WHENMOD D07 IS USED)OFFHAND AUTOSPEED POT5k– AUTO SPEED REFERENCE+ 4-20 mADC SIGNAL (INPUT z = 250)– PROGRAMMABLE ANALOG OUTPUT+ (REFER TO USER'S MANUAL)FROMPOWERSUPPLYOPTIONAL SMOKE PURGE RELAY(120 VAC WILL RUN MOTOR AT FULL SPEED)(** REMOVE JUMPER IF USED)FAULT CONTACT(CLOSES ON FAULT)RUN CONTACT(CLOSES WHEN AFC RUNS)L1L2L3FU5(H1)2(3)(1)LCLC(4)(2)(IF USED)460V(H3) (H2)FU1FU6(H4)1T(X1) 115V (X2)FU2208 VAC1-25 hp VT1-25 hp VTLN30-50 hp VT30-40 hp VTLNGROUP 2230 VAC1-40 hp VT1-30 hp VTLN50 hp VT40 hp VTLN460 VAC1-60 hp VT1-60 hp VTLN75-100 hp VT75 hp VTLNT1T2T3TOMOTORTRANSFORMER VA100 VA200 VA300 VA208V TRANSFORMER CONNECTION(H1) 208V (H2)1T(X2) 115V (X1)GNDDETAIL A17FU4GNDS2CLOSE OPENX18RPL1PWR ON1TSLCLINE CONTACTOR OPTION(IF USED)19REF: 52010-475-01ASPRFigure 91: Combination Package “Power Circuit W” with Options© 1996 Square D All Rights Reserved151ηττπ://νιχοντρολσ.χοm
Chapter 6 — Class 8839 ALTIVAR <strong>56</strong> Combination DevicesBulletin No. 50006-519-01BControl Circuit Diagrams December 1996NOTES:1 CONTROL TRANSFORMER SHOWN FOR 460V PRIMARY.FOR 230V PRIMARY, JUMPER H2-H3 IS REMOVEDAND JUMPERS H1-H3 & H2-H4 ARE INSTALLEDFOR 208V PRIMARY, REFER TO DETAIL A2 USER SUPPLIED FREEZE/FIRE STAT INTERLOCKCONTACT (REMOVE JUMPER BETWEEN TERMINALSTB4 & TB5 IF USED)CONFIGURE CONTROLLER FUNCTIONS AS FOLLOWS:MENU 1 DAMPING = 100%MENU 6.1 TORQUE TYPE = VARIABLE OR VARIABLE LOW NOISEMENU 6.2 COMMAND TYPE 2-WIRE (MAINTAINED)MENU 7.12 LOW SPEED = 3 HZMENU 7.12 ACCELERATION = 10 SECMENU 7.12 DECELERATION = 10 SECMENU 7.13 CONTROL TYPE = NOLDMENU 7.2 AUTO MANUAL = LI3AUTO RUN INPUT = LI4SPEED REFERENCE 2 = AI2MENU 7.3 R2 = RUNNING STATECOMBINATION PACKAGE W/O OPTIONSPOWER CIRCUIT WAFC MODE STATUS26(CLOSES WHEN AUTOMODE IS SELECTED)27S1OFFHAND AUTOXXX16FREEZE/FIRESTAT INTERLOCK2451415AUTO START CONTACT(SUPPLIED BY OTHERS)673218COMAO1AO2COMLO2LO1+24VLOPLI1LI2LI3LI4L1AFCU/T1+10VAI1COMAI2SFAULT R1CSIGNALRUNNINGSTATER1BR1AR2BR2CR2A222324251011–+1312GNDN.C. AFCFAULT CONTACT(CLOSES ON FAULT)N.O. AFCRUN CONTACT(CLOSES WHENAFC RUNNING)9MANUALSPEED POT2.5 kAUTO SPEED REF4 - 20 mADC SIGNAL(INPUT Z=250L2V/T2L3W/T3CL1GNDCL2USERCONNECTIONSFU3LI4LI1+24LI2LI3+10AI1COMSHLDAI2COMAO1TB85416679101112131415*USER SUPPLIEDAUTO START CONTACTFREEZE/FIRE STAT INTERLOCK(* REMOVE JUMPER IF USED)(ALTERNATE USER SUPPLIED OFFWIRING WHEN MOD HAND AUTOD07 IS USED)SPEED POT2.5kAUTO SPEED REFERENCE–4 - 20 mADC SIGNAL+(INPUT Z=250)– PROGRAMMABLE ANALOG OUTPUT+ (REFER TO USERS MANUAL)FROMPOWERSUPPLYL1L2L3CBFU2FU1T1T2T3TOMOTORR1R2222324252627FAULT CONTACT(CLOSES ON FAULT)RUN CONTACT(CLOSES WHEN AFC RUNS)AFC MODE STATUS(CLOSES WHEN AFC IS IN AUTO MODE)(USER SUPPLIED WITH D07 MOD)REF: 52010-475-02Figure 92: Combination Package “Power Circuit W” without Options152 © 1996 Square D All Rights Reservedηττπ://νιχοντρολσ.χοm
Bulletin No. 50006-519-01BDecember 1996Chapter 6 — Class 8839 ALTIVAR <strong>56</strong> Combination DevicesControl Circuit Diagrams1 PILOT LIGHT CLUSTER (A07) RED PWR ONGREEN AFC RUNGREEN BYP RUNYELLOW AFC FAULTCONFIGURE CONTROLLER FUNCTIONS:MENU 7.3 LO1 = RUNNING STATEMENU 7.3 LO2 = FAULT STATE2345NOTES:PILOT LIGHT CLUSTER (B07)RED PWR ONGREEN AFC RUNGREEN AUTO MODEYELLOW AFC FAULTPLACE JUMPER BETWEEN TB-4 & TB-32CONFIGURE CONTROLLER FUNCTIONS:MENU 7.3 LO1 = RUNNING STATEMENU 7.3 LO2 = FAULT STATECONTROL TRANSFORMER SHOWN FOR 460V PRIMARY.FOR 230V PRIMARY, JUMPER H2-H3 IS REMOVED ANDJUMPERS H1-H3 & H2-H4 ARE INSTALLED FOR 208VPRIMARY, REFER TO DETAIL ADELAY TIMER TR IS CONNECTED ACROSS COILTERMINALS A1 & A2 ON IC CONTACTOR FOR ALLCONTACTORS EXCEPT THOSE WITH PART #S LC1FXXX.FOR THESE, TR IS CONNECTED IN SERIES WITHCOIL TERMINAL A1.FUSES FU7 & FU8 SUPPLIED ONLY ON 50-100HP @460 VAC OR 30-50HP @ 208/230 VAC.CONFIGURE CONTROLLER FUNCTIONS AS FOLLOWS:MENU 1 DAMPING = 100%MENU 6.1 TORQUE TYPE = VARIABLE OR VARIABLE LOW NOISEMENU 6.2 COMMAND TYPE 2-WIRE (MAINTAINED)MENU 7.12 LOW SPEED = 3 HZMENU 7.12 ACCELERATION = 10 SECMENU 7.12 DECELERATION = 10 SECMENU 7.13 CONTROL TYPE = NOLDMENU 7.2 AUTO MANUAL = LI3AUTO RUN INPUT = LI4SPEED REFERENCE 2 = AI2MENU 7.3 R2 = RUNNING STATEBYPASS PACKAGE W/ OPTIONSPOWER CIRCUIT Y2PL CLUSTERAUTOMODEGPL3X1PL CLUSTERAFC RUNGPL2S12OFFHAND AUTO33 32 4(5)(3)XXLCLCAFC FAULT4YPL4(6)(4)ICFU3FU21415AUTO START CONTACT(SUPPLIED BY OTHERS)321<strong>56</strong>78COMAO1AO2COMLO2LO1+24VLOPLI1LI2LI3LI4L2L3CL1CL2L1AFCU/T1V/T2W/T3+10VAI1COMAI2SFAULT R1CSIGNALRUNNINGSTATER1BR1AR2BR2CR2A28MANUALSPEEDPOT2.5K11–+1312SHLDN.C. AFCFAULT CONTACT29(CLOSES ON FAULT)3031910N.O. AFCRUN CONTACT(CLOSES WHENAFC RUNNING)GND(5) IC (6)(3) IC (4)AUTO SPEED REF4 - 20 mADC SIGNAL(1)LC(2)FU1(1)IC(2)USERCONNECTIONSCB(IF USED)ISOLATION CONTACTOR (IC)TBLI4 8+24 4LI2LI3+10AI1COMSHLDAI2COMAO1679101112131415USER SUPPLIEDAUTO START CONTACT(ALTERNATE USER SUPPLIED OFFWIRING WHEN MOD HAND AUTOD07 IS USED)SPEED POT2.5 kAUTO SPEED REFERENCE–4 - 20 mADC SIGNAL+(INPUT Z=250)– PROGRAMMABLE ANALOG OUTPUT+ (REFER TO USERS MANUAL)FROMPOWERSUPPLYL1L2L35 FU7FU8(1) BC (2)(3) BC (4)(5) BC (6)BYPASS CONTACTOR (BC)(1)(3)(5)OLOLOLT1T2T3TOMOTORTSBCSPR (IF USED)R1R222232425262728293031*FREEZE/FIRE STAT INTERLOCK(* REMOVE JUMPER IF USED)BYPASS RUN CONTACT(CLOSES WHEN BYPASS IS RUNNING)OPTIONAL SMOKE PURGE RELAY(120VAC WILL RUN MOTOR AT FULL SPEED)FAULT CONTACT(CLOSES ON FAULT)RUN CONTACT(CLOSES WHEN AFC RUNS)208V TRANSFORMER CONNECTION(H1)(X2)208V115VGNDDETAIL A(H2)(X1)1T16FU5(H1)3FU4460V(H3) (H2)(X1)115VPL CLUSTER PL CLUSTERGND1RBYP RUNPL1BC 17PWR ONGS21 2OFFPL3AFC BYPASS 18SPR19 BCX34X(X2)(H4)1TFU6208 VAC1-25 hp VT1-25 hp VTLN30-50 hp VT30-40 hp VTLN20SPR21SPR230 VAC1-40 hp VT1-30 hp VTLN50 hp VT40 hp VTLNIC36TR460 VAC1-60 hp VT1-60 hp VTLN75-100 hp VT75 hp VTLN42 SECTSLCICTSBCOPTIONAL SMOKE PURGERELAY SPR (REMOVE JUMPERSBETWEEN 18 & 19, 20 & 21, AND22 & 23 IF USED)TRANSFORMER VA100 VA35200 VA300 VA(IF USED)OLSPR2223FREEZE/FIRESTAT INTERLOCKS(REMOVE JUMPERBETWEEN TERMINALS22 & 23 IF USED)REF: 52010-475-03Figure 93: Bypass Package “Power Circuit Y” with Options© 1996 Square D All Rights Reserved153ηττπ://νιχοντρολσ.χοm
Chapter 6 — Class 8839 ALTIVAR <strong>56</strong> Combination DevicesBulletin No. 50006-519-01BControl Circuit Diagrams December 1996BYPASS PACKAGE W/O OPTIONSPOWER CIRCUIT Y1415COMAO1AFC+10VAI1910MANUALSPEEDPOT2.5KNOTES:AO2COM12CONTROL TRANSFORMER SHOWN FOR 460V PRIMARY.FOR 230V PRIMARY, JUMPER H2-H3 IS REMOVED ANDJUMPERS H1-H3 & H2-H4 ARE INSTALLED FOR 208VPRIMARY, REFER TO DETAIL A.DELAY TIMER TR IS CONNECTED ACROSS COIL TERMINALSA1 & A2 ON IC CONTACTOR FOR ALL CONTACTORS EXCEPTTHOSE WITH PART #S LC1FXXX. FOR THESE, TR ISCONNECTED IN SERIES WITH COIL TERMINAL A1.321COMLO2LO1AI2S11–+1312SHLDAUTO SPEED REF4 - 20 mADC SIGNAL3FUSES FU7 & FU8 SUPPLIED ONLY ON 50-100HP @ 460 VACOR 30-50HP @ 208/230 VAC.4+24VLOPFAULTSIGNALR1BR1C2829N.C. AFCFAULT CONTACT(CLOSES ON FAULT)CONFIGURE CONTROLLER FUNCTIONS AS FOLLOWS:MENU 1 DAMPING = 100%MENU 6.1 TORQUE TYPE = VARIABLE OR VARIABLE LOW NOISEMENU 6.2 COMMAND TYPE 2-WIRE (MAINTAINED)MENU 7.12 LOW SPEED = 3 HZOFFHAND AUTOX4IC<strong>56</strong>LI1LI2R1AR2BMENU 7.12 ACCELERATION = 10 SECMENU 7.12 DECELERATION = 10 SECX7LI3RUNNINGSTATER2C30N.O. AFCRUN CONTACTMENU 7.13 CONTROL TYPE = NOLDMENU 7.2 AUTO MANUAL = LI3AUTO RUN INPUT = LI4SPEED REFERENCE 2 = AI232AFC MODE STATUS(CLOSES WHEN AUTOMODE IS SELECTED)X8AUTO START CONTACT(SUPPLIED BY OTHERS)LI4R2A31(CLOSES WHENAFC RUNNING)MENU 7.3 R2 = RUNNING STATE33L1U/T1L2V/T2L3W/T3USERCONNECTIONSCL1GNDLI4+24TB84USER SUPPLIEDAUTO START CONTACTFU3CL2(5) IC (6)LI26(ALTERNATE USER SUPPLIEDWIRING WHEN MODD07 IS USED)OFFHAND AUTOFU2FU1(3) IC (4)(1) IC (2)LI37+10AI1910SPEED POT2.5 k L1CBISOLATION CONTACTOR (IC)COMSHLDAI2COMAO11112131415AUTO SPEED REFERENCE–4 - 20 mADC SIGNAL+(INPUT Z=250)– PROGRAMMABLE ANALOG OUTPUT+ (REFER TO USERS MANUAL)FROMPOWERSUPPLYL2L32223*FREEZE/FIRE STAT INTERLOCK(* REMOVE JUMPER IF USED)(1)BC(2)(1)OLT1BC242526BYPASS RUN CONTACT(CLOSES WHEN BYPASS RUNNING)3 FU7FU8(3)BC(4)(3)OLT2TOMOTORR1R227282930313233FAULT CONTACT(CLOSES ON FAULT)RUN CONTACT(CLOSES WHEN AFC RUNS)AFC MODE STATUS(CLOSES WHEN AFC IS IN AUTO MODE)(USER SUPPLIED WITH D07 MOD)FU5(H1)(H3)460V(H2)FU6(H4)208 VAC1-25 hp VT1-25 hp VTLN(5)BC(6)BYPASS CONTACTOR (BC)230 VAC1-40 hp VT1-30 hp VTLN50 hp VT40 hp VTLN460 VAC1-60 hp VT1-60 hp VTLN75-100 hp VT75 hp VTLN(5) OLTRANSFORMER VA100 VA200 VAT3208V TRANSFORMER CONNECTION11T30-50 hp VT30-40 hp VTLN300 VA(X1)115V(X2)(H1)208V(H2)FU4GND1TBC17(X2)115V(X1)16GNDDETAIL AOFFAFC BYPASSXBC18 19 34TR22 SECIC35OL2223X20 21IC36TSBCFREEZE/FIRESTAT INTERLOCKS(REMOVE JUMPERBETWEEN TERMINALS22 & 23 IF USED)REF: 52010-475-04Figure 94: Bypass Package “Power Circuit Y” without Options154 © 1996 Square D All Rights Reservedηττπ://νιχοντρολσ.χοm
Bulletin No. 50006-519-01BDecember 1996Chapter 6 — Class 8839 ALTIVAR <strong>56</strong> Combination DevicesControl Circuit DiagramsNOTES:1 PILOT LIGHT OPTION GROUP 1RED PWR ONGREEN AFC RUNGREEN BYP RUNYELLOW AFC FAULTREMOTE STARTER BYPASS W/ OPTIONSPOWER CIRCUIT Z1415COMAO1AFC+10VAI1910MANUALSPEEDPOT2.5KCONFIGURE CONTROLLER FUNCTIONS:AO2COM2MENU 7.3 LO1 = RUNNING STATEMENU 7.3 LO2 = FAULT STATEPILOT LIGHT OPTION GROUP 2RED PWR ONGREEN AFC RUNGREEN AUTO MODEYELLOW AFC FAULTPLACE JUMPER BETWEEN TB-4 & TB-32PL CLUSTER2AUTOMODEGPL31PL CLUSTERAFC RUNG2AFC FAULTYPL4321COMLO2LO1AI2S11–+1312SHLDAUTO SPEED REF4 - 20 mADC SIGNAL3CONFIGURE CONTROLLER FUNCTIONS:MENU 7.3 LO1 = RUNNING STATEMENU 7.3 LO2 = FAULT STATECONTROL TRANSFORMER SHOWN FOR 460V PRIMARY.FOR 230V PRIMARY, JUMPER H2-H3 IS REMOVEDAND JUMPERS H1-H3 & H2-H4 ARE INSTALLEDFOR 208V PRIMARY, REFER TO DETAIL APL2S1OFFHAND AUTO4+24VLOPFAULTSIGNALR1BR1C28N.C. AFC29 FAULT CONTACT(CLOSES ON FAULT)4DELAY TIMER TR IS CONNECTED ACROSS COIL TERMINALSA1 & A2 ON IC CONTACTOR FOR ALL CONTACTORS EXCEPTTHOSE WITH PART #S LC1FXXX. FOR THESE, TR IS CONNECTEDIN SERIES WITH COIL TERMINAL A1.XX33 32 4IC<strong>56</strong>LI1LI2R1AR2B5FUSES FU7 & FU8 SUPPLIED ONLY ON 50-100HP @ 460 VACOR 30-50HP @ 208/230 VAC.X78LI3LI4RUNNINGSTATER2CR2A30N.O. AFCRUN CONTACT(CLOSES WHEN31 AFC RUNNING)CONFIGURE CONTROLLER FUNCTIONS AS FOLLOWS:AUTO START CONTACT(SUPPLIED BY OTHERS)MENU 1 DAMPING = 100%MENU 6.1 TORQUE TYPE = VARIABLE OR VARIABLE LOW NOISEL1U/T1MENU 6.2 COMMAND TYPE 2-WIRE (MAINTAINED)MENU 7.12 LOW SPEED = 3 HZL2V/T2MENU 7.12 ACCELERATION = 10 SECMENU 7.12 DECELERATION = 10 SECL3W/T3MENU 7.13 CONTROL TYPE = NOLDMENU 7.2 AUTO MANUAL = LI3CL1GNDAUTO RUN INPUT = LI4CL2SPEED REFERENCE 2 = AI2(5)LC(6)FU3(5) IC (6)MENU 7.3 R2 = RUNNING STATE(3)LC(4)FU2(3) IC (4)(1)LC(2)FU1(1) IC (2)USERCONNECTIONSCB(IF USED)ISOLATION CONTACTOR (IC)TBLI4 8+24 4USER SUPPLIEDAUTO START CONTACTL1LI2LI367(ALTERNATE USER SUPPLIEDWIRING WHEN MODD07 IS USED)OFFHAND AUTOFROMPOWERSUPPLYL2L3+10 9AI1 10COM 11SHLD 12AI2 13COM 14AO1 15SPEED POT2.5 kAUTO SPEED REFERENCE–4 - 20 mADC SIGNAL+(INPUT Z=250)– PROGRAMMABLE ANALOG OUTPUT+ (REFER TO USERS MANUAL)FROMREMOTE STARTER5 FU7FU8S1S2S3(1)(3)(5)TCTCTC(2)(4)(6)(1)(3)(5)OLOLOLT1T2T3TOMOTORTSTCSPR (IF USED)R122 FREEZE/FIRE STAT INTERLOCK*23(* REMOVE JUMPER IF USED)24TRANSFER RUN CONTACT25(CLOSES WHEN TC CONTACTOR IS CLOSED)26OPTIONAL SMOKE PURGE RELAY27(120VAC WILL RUN MOTOR AT FULL SPEED)28FAULT CONTACT29(CLOSES ON FAULT)FU5(H1)3460V(H3) (H2)FU6(H4)1TTRANSFER CONTACTOR (TC)208 VAC1-25 hp VT1-25 hp VTLN30-50 hp VT30-40 hp VTLN230 VAC1-40 hp VT1-30 hp VTLN50 hp VT40 hp VTLN460 VAC1-60 hp VT1-60 hp VTLN75-100 hp VT75 hp VTLNTRANSFORMER VA100 VA200 VA300 VAR23031RUN CONTACT(CLOSES WHEN AFC RUNS)(X1)115V(X2)FU4GNDPL CLUSTERPL CLUSTER1R208V TRANSFORMER CONNECTION(H1) 208V (H2)1T115V(X2)(X1)GNDDETAIL A16BYP RUNPL1TSTC 17PWR ONGLCS21 2PL3OFFTRAFC BYPASS 18 SPR 19 TC4IC34 352 SECXXTSSPR2021 IC36TCOPTIONAL SMOKE PURGESPR RELAY SPR (REMOVEJUMPERS BETWEEN 18 & 19, 20 & 21, AND 22 & 23 IF USED)(IF USED)SPROL22 23FREEZE/FIESTATE INTERLOCKS(REMOVE JUMPER BETWEEN TERMINALS 22 & 23IF USED)REF: 52010-475-05Figure 95: Remote Starter Bypass Package “Power Circuit Z” with Options© 1996 Square D All Rights Reserved155ηττπ://νιχοντρολσ.χοm
Chapter 6 — Class 8839 ALTIVAR <strong>56</strong> Combination DevicesBulletin No. 50006-519-01BControl Circuit Diagrams December 1996NOTES:CONTROL TRANSFORMER SHOWN FOR 460V PRIMARY.1 FOR 230V PRIMARY, JUMPER H2-H3 IS REMOVED ANDJUMPERS H1-H3 & H2-H4 ARE INSTALLED FOR 208VPRIMARY, REFER TO DETAIL AREMOTE STARTER BYPASS W/O OPTIONSPOWER CIRCUIT Z1415COMAO1AFC+10VAI1910MANUALSPEEDPOT2.5K2DELAY TIMER TR IS CONNECTED ACROSS COIL TERMINALSA1 & A2 ON IC CONTACTOR FOR ALL CONTACTORSEXCEPT THOSE WITH PART #S LC1FXXX. FOR THESE, TR ISCONNECTED IN SERIES WITH COIL TERMINAL A1.3AO2COMCOM11–2LO2AI2+13AUTO SPEED REF4 - 20 mADC SIGNAL3FUSES FU7 & FU8 SUPPLIED ONLY ON 50-100HP @ 460 VACOR 30-50HP @ 208/230 VAC.1LO1SSHLD12CONFIGURE CONTROLLER FUNCTIONS AS FOLLOWS:MENU 1 DAMPING = 100%MENU 6.1 TORQUE TYPE = VARIABLE OR VARIABLE LOW NOISEMENU 6.2 COMMAND TYPE 2-WIRE (MAINTAINED)4+24VLOPFAULTSIGNALR1BR1C28N.C. AFC29 FAULT CONTACT(CLOSES ON FAULT)MENU 7.12 LOW SPEED = 3 HZMENU 7.12 ACCELERATION = 10 SECMENU 7.12 DECELERATION = 10 SECMENU 7.13 CONTROL TYPE = NOLDOFFHAND AUTOX4IC<strong>56</strong>LI1LI2R1AR2BMENU 7.2 AUTO MANUAL = LI3AUTO RUN INPUT = LI4SPEED REFERENCE 2 = AI2MENU 7.3 R2 = RUNNING STATE32AFC MODE STATUS(CLOSES WHEN AUTOMODE IS SELECTED)X78AUTO START CONTACT(SUPPLIED BY OTHERS)LI3LI4RUNNINGSTATER2CR2A30N.O. AFCRUN CONTACT(CLOSES WHEN31 AFC RUNNING)33L1U/T1L2V/T2L3W/T3CL1GNDCL2FU3(5) IC (6)USERCONNECTIONSTBLI4 8+24 4USER SUPPLIEDAUTO START CONTACTFU2FU1(3) IC (4)(1) IC (2)LI2 6LI3 7+10 9AI1 10COM 11SHLD 12AI2 13COM 14AO1 15(ALTERNATE USER SUPPLIEDWIRING WHEN MODD07 IS USED)OFFHAND AUTOSPEED POT2.5 kAUTO SPEED REFERENCE–4 - 20 mADC SIGNAL+(INPUT Z=250)– PROGRAMMABLE ANALOG OUTPUT+ (REFER TO USERS MANUAL)FROMPOWERSUPPLYL1L2L3CB3 FU7FU8(1)TC(2)ISOLATION CONTACTOR (IC)(1)OLS1T1TC2223242526*FREEZE/FIRE STAT INTERLOCK(* REMOVE JUMPER IF USED)TRANSFER RUN CONTACT(CLOSES WHEN TC CONTACTOR IS CLOSED)FROMREMOTESTARTERS2S3(3)(5)TCTC(4)(6)(3)(5)OLOLT2T3TOMOTORR1R227282930313233FAULT CONTACT(CLOSES ON FAULT)RUN CONTACT(CLOSES WHEN AFC RUNS)AFC MODE STATUS(CLOSES WHEN AFC IS IN AUTO MODE)(USER SUPPLIED WITH D07 MOD)FU5(H1)(H3)460V(H2)FU6(H4)208 VAC1-25 hp VT1-25 hp VTLNTRANSFER CONTACTOR (TC)230 VAC1-40 hp VT1-30 hp VTLN50 hp VT40 hp VTLN460 VAC1-60 hp VT1-60 hp VTLN75-100 hp VT75 hp VTLNTRANSFORMER VA100 VA200 VA11T30-50 hp VT30-40 hp VTLN300 VA(X1)115V(X2)208V TRANSFORMER CONNECTIONFU4GND(H1)208V(H2)TC171T16(X2)GND115V(X1)AFCXOFFBYPASS 18 19TC34TR22 SECICOL35 22 23X2021IC36TSTCFREEZE/FIRESTAT INTERLOCKS(REMOVE JUMPERBETWEEN TERMINALS22 & 23 IF USED)REF: 52010-475-06Figure 96: Remote Starter Bypass Package “Power Circuit Z” “without Options1<strong>56</strong> © 1996 Square D All Rights Reservedηττπ://νιχοντρολσ.χοm
Bulletin No. 50006-519-01BDecember 1996Chapter 6 — Class 8839 ALTIVAR <strong>56</strong> Combination DevicesNotes© 1996 Square D All Rights Reserved157ηττπ://νιχοντρολσ.χοm
Chapter 6 — Class 8839 ALTIVAR <strong>56</strong> Combination DevicesBulletin No. 50006-519-01BNotes December 1996158 © 1996 Square D All Rights Reservedηττπ://νιχοντρολσ.χοm
Bulletin No. 50006-519-01BAppendix A — Parameter SummaryDecember 1996 1 → Parameter Setting MenuAppendix A — Parameter SummaryThis Appendix contains a general summary and description of parameters. Referto Chapter 5 for complete explanations of the parameters and applicableprecautions.1→PARAMETERSETTING MENUParameter Range Factory Setting DescriptionLow Speed 0 to High Speed 0 Hz Low speed setting.High SpeedLow Speed toMaximum FrequencyAcceleration 0.1 to 999.9 s 3 sDeceleration 0.1 to 999.9 s 3 sDampingNOLD: 1 to 100%;Normal: 1 to 800%60 Hz High speed setting.20%Profile 0 to 100 20MotorOverload0.45 to 1.15 timesnominal drive controllercurrent0.9 times nominaldrive controllercurrentLength of time to accelerate from zerospeed to nominal frequency.Length of time to decelerate fromnominal frequency to zero speed.Matches the response of the load to thefrequency response of the drivecontroller by adjusting the integral gainof the frequency loop.Shapes the V/Hz profile of the output forvariable torque applications in normalcontrol type.Takes speed, time and current intoaccount to calculate thermal overloadstate.SP Gain -9999 to +9999 +9999 System gain in PI RegulatorOffset -9999 to +9999 +0 System offset in PI RegulatorKP 0 to 9999 100 Proportional gain in PI RegulatorKI 0 to 9999 0 Integral gain in PI RegulatorLimitation of error between desiredPI FLT RATIO 0 to 100% 100%setpoint and actual process feedbackPI SET POINT -9999 to +9999 0 Setpoint in PI RegulatorPI SPMANUAL0 to High Speed 0 HzManual speed reference with PIRegulator2→I/O MAP2.1→Logic Input MapLogic Input Factory Setting ReassignableLI1 Run enable NoLI2 Run forward NoLI3 Auto/<strong>manual</strong> YesLI4 Auto run Yes2.2→Analog Input MapAnalog Input Factory Setting ReconfigurableAI1 Speed reference1 NoAI2 Speed reference 2 Yes© 1996 Square D All Rights Reserved159ηττπ://νιχοντρολσ.χοm
Appendix A — Parameter SummaryBulletin No. 50006-519-01B6 → Drive Configuration Menu December 19962.3→Logic Output MapLogic Input Factory Setting ReassignableLO1 At speed YesLO2 Current limit YesR1 Fault NoR2 Running state Yes2.4→Analog Output MapAnalog Output Factory Setting ReassignableAO1 Motor speed YesAO2 Motor current Yes6→DRIVECONFIGURATIONMENUParameter Range Factory Setting DescriptionTorque TypeCommandTypeMotor Power(ATV<strong>56</strong>U41only)VariableVariable Low Noise2-wire (maintained)3-wire (impulse).75 kW / 1 hp1.5 kW / 2 hp2.2 kW / 3 hpVariable2-wire2.2 kW / 3 hpType of Torque.Type of control circuit which is wired intothe drive controller, affecting operationof the Forward and Reverse inputs.Used to select motor power forATV<strong>56</strong>U41 drive controller.7→GENERALCONFIGURATIONMENU7.11→Motor ParametersParameter Range Factory Setting DescriptionNominalCurrentNominalFrequencyNominalVoltage45 to 105% of drivecontroller current rating90%60 Hz 60 Hz460 V(ATV<strong>56</strong>•••N4 units)208-230 V(ATV<strong>56</strong>•••M2 units)Profile 0 to 100 20DampingRotationNormalizationCurrent LimitNOLD: 1 to 100%;Normal: 1 to 800%ABC,ACBDefault limit,Alternate value:40 -110% of nominal drivecontroller currentCurrent limit by frequencyadjustable from 0.1-72 Hz460 V forATV<strong>56</strong>•••N4 units230 V forATV<strong>56</strong>•••M2 units20%ABCDefault value:110%Motor nameplate value for fullload current.Point on the V/Hz curve beyondwhich voltage remains virtuallyconstant and only frequencyincreases.Point on the V/Hz curve beyondwhich voltage remains virtuallyconstant and only frequencyincreases.Shapes the V/Hz profile of theoutput for variable torqueapplications in normal controltype.Matches the response of theload to the frequency responseof the drive controller byadjusting the integral gain ofthe frequency loop.Inverts direction of motorrotation without rewiring.Allows alternate current limitvalue by frequency level, logicinput or analog input.160 © 1996 Square D All Rights Reservedηττπ://νιχοντρολσ.χοm
Bulletin No. 50006-519-01BAppendix A — Parameter SummaryDecember 1996 7 → General Configuration Menu7.12→Control ParametersParameter Range Factory Setting DescriptionMaximumFrequency72 Hz 72 Hz Maximum output frequency.Low Speed 0 to High Speed 0 Hz Low speed setting.High SpeedLow Speed toMaximum FrequencyAcceleration 0.1 to 999.9 s 3 sDeceleration 0.1 to 999.9 sSkipFrequenciesLow speed to 72 HzSkip bands: 2 or 5 Hz60 Hz High speed setting.3 sNoneLength of time to accelerate from zerospeed to nominal frequency.Length of time to decelerate fromnominal frequency to zero.Drive controller reference will not stopon the skip frequency which causesmechanical resonance. Up to 3 can beprogrammed.7.13→Control TypeControl Type Range Factory SettingVariable Torque:Normal,NOLDNormal© 1996 Square D All Rights Reserved161ηττπ://νιχοντρολσ.χοm
Appendix A — Parameter SummaryBulletin No. 50006-519-01B7 → General Configuration Menu December 19967.2→Application FunctionsParameter Range Factory Setting DescriptionPresetSpeedsSpeedReferenceAuto/ManualControlledStopShutdownNo1 Preset speed3 Preset speeds72 Hz0-20 mA4-20 mA20-4 mAx-20 mANoYes, Logic inputNoBy Logic inputBy Frequency level0.1-72 HzBy LI /Frequency level0.1-72 HzStopping Methods:Freewheel stopFast stopDC injectionNoYesDwell time: 0.1 to 60 sBypass NoYes, Define I/ODelay time: 0.2 to 10 sSequence Time-outFault: 0.2 to 300 s.Process Time-out Fault:0.2 s to 300 s.PI Regulator NoYes, Set PointFeed BackSet Point ManualPI ParametersNo(When presetspeeds areselected, factorysettings are 5, 10and 15 Hz)Input 1 Input 20 0 Low/reference speed1 0 Preset Speed 10 1 Preset Speed 21 0 Preset Speed 34-20 mA Modification of AI2 for the type of signal.NoNoFreewheel stopNo1 sNo2 s5 s5 sNoAllows switching between AI1 and AI2by logic command. AI1 is <strong>manual</strong>reference. AI2 is automatic. See FigureA-1 and Figure A-2.Allows frequency threshold and LogicInput to work together to tailor thestopping process.Allows drive controller to dwell at lowspeed for a time adjustable between 1and 30 seconds before completelystopping.Used to run machine at full speed whenthe drive must be taken off line forservice or repair. Allows for isolation ofthe motor by means of a contactorinstalled between the drive and themotor with a special commandsequence.Used for controlling level or flow of aprocess with setpoint and feedbackinputs162 © 1996 Square D All Rights Reservedηττπ://νιχοντρολσ.χοm
Bulletin No. 50006-519-01BAppendix A — Parameter SummaryDecember 1996 7 → General Configuration MenuRun EnableLI1Run ForwardT/KKeypadStopKeypadRunAuto/ManualAutoRunControlledStopKeypad RefAuto RefManual RefOutput:Manual RefAuto Ref10101010101010100Not ConfiguredFigure 97: Auto/Manual in 2-Wire Command with Controlled Stop Active High© 1996 Square D All Rights Reserved163ηττπ://νιχοντρολσ.χοm
Appendix A — Parameter SummaryBulletin No. 50006-519-01B7 → General Configuration Menu December 1996Run EnableLI1Run ForwardT/KKeypadStopKeypadRunAuto/ManualAutoRunControlledStopOutput:Keypad RefAuto RefManual RefJog RefJog RefManual RefAuto Ref10101010101010100Not ConfiguredFigure 98: Auto/Manual in 3-Wire Command with Controlled Stop Active High164 © 1996 Square D All Rights Reservedηττπ://νιχοντρολσ.χοm
Bulletin No. 50006-519-01BDecember 1996Appendix B — Menu SummaryAppendix B — Menu SummaryThis Appendix contains a summary of Level 1 and 2 Configuration Softwaremenus. Use it as a quick reference for menu flow and contents. Refer to Chapter 5for complete explanations of the menus.© 1996 Square D All Rights Reserved165ηττπ://νιχοντρολσ.χοm
Appendix B — Menu SummaryBulletin No. 50006-519-01BDecember 19961234<strong>56</strong>789MAIN MENUPARAMETER SETTINGI/O MAPFAULT HISTORYDISPLAY CONFIG.KEYPAD CONFIG.DRIVE CONFIG.GENERAL CONFIG.DIAGNOSTIC MODEDRIVE INIT.1‘PARAMETER SETTINGLOW SPEEDHIGH SPEEDACCELERATIONDECELERATIONDAMPINGPROFILEMOTOR OVERLOAD7‘GENERAL CONFIG.DRIVE PARAMETERSAPPLICATION FUNC.OUTPUT ASSIGNMENTFAULT MANAGEMENT,† & ENT to select8‘DIAGNOSTIC MODEAUTODIAGNOSTICLOGIC INPUT TESTANALOG INPUT TESTLOGIC OUTPUT TEST,† & ENT to activateANALOG OUTPUT TEST2‘I/O MAPLOGIC INPUT MAPANALOG INPUT MAPLOGIC OUTPUT MAPANALOG OUTPUT MAP9‘DRIVE INIT.TOTAL FACTORY SETT.USER SETTING STORERECALL USER SETTING3‘FAULT HISTORYFAULT NAME STA MIN-PHASE LOSS RDYAC-LIN.OVERVOL RUNMOT.OVERLOAD ACC “ENT to set marker4‘DISPLAY CONFIG.ONE BAR GRAPHTWO BAR GRAPHSCROLL, 4 TABLES,† & ENT to modify5‘KEYPAD CONFIG.TERMINAL COMMANDTER/KEY BY LI:__6‘DRIVE CONFIG.TORQUE: VARIABLECOMMAND: 2 WIRESMOTOR:60HZ 460V,† & ENT to modify\ESC to quit\F1=Help166 © 1996 Square D All Rights Reservedηττπ://νιχοντρολσ.χοm
Bulletin No. 50006-519-01BDecember 1996Appendix B — Menu Summary7.1‘DRIVE PARAMETERSMOTOR PARAMETERSCONTROL PARAMETERSCONTROL TYPE:NORMAL,† & ENT‘choose7.2‘APPLICATION FUNC.PRESET SPEEDSSPEED REFERENCEAUTO/MANUALCONTROLLED STOP,† & ENT to selectSHUTDOWNBYPASSPI REGULATOR7.3‘OUTPUT ASSIGN.LOGIC OUTPUTSANALOG OUTPUTSLOGIC OUT. FUNCTIONSREADY STATERUNNING STATEAT SPEEDTERM./KEYPAD,† & ENT to selectAUTO/MANUALCURRENT LIMITFAULT STATEDRIVE THER. AL.LOSS FOLLOWERFREQ LEV.CURRENT LEV.THERMAL LEV.7.11‘MOTOR PARAMETERSNOM. CURRENTNOMINAL FREQ.NOMINAL VOLT.,† & ENT to modifyPROFILEDAMPINGROTATION NORM.CURRENT LIMIT7.12‘CONTROL PARAM.MAX. FREQUENCYLOW SPEEDHIGH SPEEDACCELERATION,† & ENT to modifyDECELERATIONSKIP FREQUENCY,† & ENT to select7.4‘FAULT MANAGEMENTFAULT STOP :FREEW.POWER LOSS : NOAUTO-RESTART: NOCATCH ON FLY: RAMP,† & ENT to modifyMOTOR OVERLOAD ...IN PHASE FAIL: YESLOSS FOLLOWER:FAULTFOLD BACK : NOFAULT RESET : NODB FAULT : NOOUT.PHASE FLT: YESANALOG OUT.FUNCTIONSMOT. CURRENTMOTOR SPEEDTHERM. STATE,† & ENT to selectMOT. VOLTAGE7.13‘CONTROL TYPENORMALNOLD,† & ENT to modify© 1996 Square D All Rights Reservedηττπ://νιχοντρολσ.χοm167
Appendix B — Menu SummaryBulletin No. 50006-519-01BDecember 1996168 © 1996 Square D All Rights Reservedηττπ://νιχοντρολσ.χοm
Bulletin No. 50006-519-01BDecember 1996Appendix C — Spare Parts ListAppendix C — Spare PartsReplacement of spare parts requires the use of special tools and installationprocedures not included with the spare parts kits. Before replacing any spare part,consult the Adjustable Frequency Drive Controller Service and TroubleshootingManual, bulletin no.VD0C06S701_. Spare parts must be removed and installedonly by qualified electrical personnel familiar with the Service andTroubleshooting Manual.Spare Parts ListDescription Rating Drive Controller Reference No.Adjustable Frequency DriveController Service andTroubleshooting Manual— ATV<strong>56</strong> all sizes VD0C06S701Control Kit (with control basketand keypad)—ATV<strong>56</strong>U41N4 to D79N4ATV<strong>56</strong>U41M2 to D46M2VX4-A<strong>56</strong>CK1VX4-A<strong>56</strong>CK1Programming Keypad — ATV<strong>56</strong> all sizes Consult factoryRemovable Control TerminalStrips (for J1, J12, J13)— ATV<strong>56</strong> all sizes VZ3-N006Power Boards — ATV<strong>56</strong>U41N4 VX5-A<strong>56</strong>U41N4— ATV<strong>56</strong>U54N4 VX5-A<strong>56</strong>U54N4— ATV<strong>56</strong>U72N4 VX5-A<strong>56</strong>U72N4— ATV<strong>56</strong>U90N4 VX5-A<strong>56</strong>U90N4— ATV<strong>56</strong>D12N4 VX5-A<strong>56</strong>D12N4— ATV<strong>56</strong>D16N4 VX5-A<strong>56</strong>D16N4— ATV<strong>56</strong>D23N4 VX5-A<strong>56</strong>D23N4— ATV<strong>56</strong>D33N4 VX5-A66D33N4— ATV<strong>56</strong>D46N4 VX5-A66D46N4— ATV<strong>56</strong>D54N4 VX5-A66D54N4— ATV<strong>56</strong>D64N4 VX5-A66D64N4— ATV<strong>56</strong>D79N4 VX5-A66D79N4— ATV<strong>56</strong>U41M2 VX5-A<strong>56</strong>U41M2— ATV<strong>56</strong>U72M2 VX5-A<strong>56</strong>U72M2— ATV<strong>56</strong>U90M2 VX5-A<strong>56</strong>U90M2— ATV<strong>56</strong>D12M2 VX5-A<strong>56</strong>D12M2— ATV<strong>56</strong>D16M2 VX5-A<strong>56</strong>D16M2— ATV<strong>56</strong>D23M2 VX5-A66D23M2— ATV<strong>56</strong>D33M2 VX5-A66D33M2— ATV<strong>56</strong>D46M2 VX5-A66D46M2Gate Driver Boards — ATV<strong>56</strong>D16N4 VX5-A66103— ATV<strong>56</strong>D23N4 VX5-A66104— ATV<strong>56</strong>D33N4 VX5-A<strong>56</strong>105— ATV<strong>56</strong>D46N4 VX5-A<strong>56</strong>106— ATV<strong>56</strong>D54N4 VX5-A<strong>56</strong>107— ATV<strong>56</strong>D64N4 VX5-A<strong>56</strong>108— ATV<strong>56</strong>D79N4 VX5-A<strong>56</strong>109— ATV<strong>56</strong>D12M2 VX5-A66112— ATV<strong>56</strong>D16M2 VX5-A66113— ATV<strong>56</strong>D23M2 VX5-A<strong>56</strong>107— ATV<strong>56</strong>D33M2 VX5-A<strong>56</strong>108— ATV<strong>56</strong>D46M2 VX5-A<strong>56</strong>109Filter Boards — ATV<strong>56</strong>D16N4, D23N4 VX4-A66103— ATV<strong>56</strong>D33N4, D46N4 VX4-A66104— ATV<strong>56</strong>D54N4 to D79N4 VX4-A66105— ATV<strong>56</strong>D12M2, D16M2 VX4-A66103— ATV<strong>56</strong>D23M2, D33M2 VX4-A66104— ATV<strong>56</strong>D46M2 VX4-A66105© 1996 Square D All Rights Reserved169ηττπ://νιχοντρολσ.χοm
Appendix C — Spare Parts ListBulletin No. 50006-519-01BDecember 1996Spare Parts List (Continued)Description Rating Drive Controller Reference No.Control Power Transformer — ATV<strong>56</strong>D33N4 to D79N4 VY1-ADA604— ATV<strong>56</strong>D23M2, D46M2 VY1-ADA614Screws for mounting powercomponents— ATV<strong>56</strong>D16N4, D23N4 VY1-ADV603— ATV<strong>56</strong>D33N4, D46N4 VY1-ADV604— ATV<strong>56</strong>D54N4 to D79N4 VY1-ADV6052 IGBT Modules 50 A / 1200 V ATV<strong>56</strong>D16N4 VZ3-lM2050M120175 A / 1200 V ATV<strong>56</strong>D23N4 VZ3-lM2075M1201100 A / 1200 V ATV<strong>56</strong>D33N4 VZ3-lM2100M1201150 A / 1200 V ATV<strong>56</strong>D46N4, D54N4 VZ3-lM2150M1201200 A / 1200 V ATV<strong>56</strong>D64N4 VZ3-lM2200M1201300 A / 1200 V ATV<strong>56</strong>D79N4 VZ3-lM2300M120175 A / 600 V ATV<strong>56</strong>D12M2 VZ3-IM2075M0601100 A / 600 V ATV<strong>56</strong>D16M2 VZ3-IM2100M0601150 A / 600 V ATV<strong>56</strong>D23M2 VZ3-IM2150M0601200 A / 600 V ATV<strong>56</strong>D33M2 VZ3-IM2200M0601300 A / 600 V ATV<strong>56</strong>D46M2 VZ3-IM2300M0601DB Transistor Modules 20 A / 1200 V ATV<strong>56</strong>D16N4, D23N4 VZ3-lM1025M100150 A / 1200 V ATV<strong>56</strong>D33N4, D46N4 VZ3-lM2050M120175 A / 1200 V ATV<strong>56</strong>D54N4 VZ3-lM2100M1201150 A / 1200 V ATV<strong>56</strong>D64N4, D79N4 VZ3-lM2150M120160 A / 600 V ATV<strong>56</strong>D12M2, D16M2 VZ3-IM1060M060175 A / 600 V ATV<strong>56</strong>D23M2 VZ3-IM2075M0601100 A / 600 V ATV<strong>56</strong>D33M2 VZ3-IM2100M0601150 A / 600 V ATV<strong>56</strong>D46M2 VZ3-IM2150M06016-Diode Rectifier 75 A / 1600 V ATV<strong>56</strong>D16N4, D23N4 VZ3-DM6075M160175 A / 1600 V ATV<strong>56</strong>D12M2, D16M2 VZ3-DM6075M16012-Diode Rectifier 80 A / 1600 V ATV<strong>56</strong>D33N4 VZ3-DM2080M1606100 A / 1600 V ATV<strong>56</strong>D46N4 VZ3-DM2100M1601160 A / 1600 V ATV<strong>56</strong>D54N4 to D79N4 VZ3-DM2160M160680 A / 1600 V ATV<strong>56</strong>D23M2 VZ3-DM2080M1606100 A / 1600 V ATV<strong>56</strong>D33M2 VZ3-DM2100M1601160 A / 1600 V ATV<strong>56</strong>D46M2 VZ3-DM2160M1606Fan Sub-Assemblies Flow 10 CFM ATV<strong>56</strong>U41N4, U54N4 VZ3-V661Flow 20 CFM ATV<strong>56</strong>U72N4 VZ3-V662Flow 44 CFM ATV<strong>56</strong>U90N4, D12N4 VZ3-V663Flow 94 CFM ATV<strong>56</strong>D16N4, D23N4 VZ3-V664Flow 200 CFM ATV<strong>56</strong>D33N4 to D79N4 VZ3-V665Board Fan ATV<strong>56</strong>D33N4 to D79N4 VZ3-V6654Flow 20 CFM ATV<strong>56</strong>U41M2 VZ3-V662Flow 44 CFM ATV<strong>56</strong>U72M2, U90M2 VZ3-V663Flow 94 CFM ATV<strong>56</strong>D12M2, D16M2 VZ3-V664Flow 200 CFM ATV<strong>56</strong>D23M2, D46M2 VZ3-V665Board Fan ATV<strong>56</strong>D23N4 to D46M2 VZ3-V6654Precharge Resistors 33 Ω / 8.5 W ATV<strong>56</strong>D16N4, D23N4 VZ3-R033W00910 Ω / 25 W ATV<strong>56</strong>D33N4, D46N4 VZ3-R010W02510 Ω / 480 W ATV<strong>56</strong>D54N4, D79N4 VZ3-R010W48133 Ω / 8.5 W ATV<strong>56</strong>D12M2, D16M2 VZ3-R033W00910 Ω / 25 W ATV<strong>56</strong>D23M2, D33M2 VZ3-R010W02510 Ω / 480 W ATV<strong>56</strong>D46M2 VZ3-R010W481Discharge Resistor 5 kΩ / 40 W ATV<strong>56</strong>D33N4 to D79N4 VZ3-R5K0W0405 kΩ / 40 W ATV<strong>56</strong>D23M2 to D46M2 VZ3-R5K0W040Capacitor 1500µF/450 V ATV<strong>56</strong>D16N4, D23N4 VY1-ADC152V4504700µF/450 V ATV<strong>56</strong>D33N4, D46N4 VY1-ADC472V4501500µF/450 V ATV<strong>56</strong>D12M2, D16M2 VY1-ADC152V4504700µF/450 V ATV<strong>56</strong>D23M2, D33M2 VY1-ADC472V450170 © 1996 Square D All Rights Reservedηττπ://νιχοντρολσ.χοm
Bulletin No. 50006-519-01BDecember 1996Appendix C — Spare Parts ListSpare Parts List (Continued)Description Rating Drive Controller Reference No.Capacitor Sub-Assemblies— ATV<strong>56</strong>D54N4 VY1-ADC605(contain 1 capacitor and1 balancing resistor)— ATV<strong>56</strong>D64N4, D79N4 VY1-ADC606(contains 6 capacitors and6 balancing resistors)— ATV<strong>56</strong>D46M2 VY1-ADC605Current Sensors (2) — ATV<strong>56</strong>D33N4 to D46N4 VY1-A66104— ATV<strong>56</strong>D54N4 to D79N4 VY1-A66105— ATV<strong>56</strong>D23M2 VY1-A66104— ATV<strong>56</strong>D33M2, D46M2 VY1-A66105© 1996 Square D All Rights Reserved171ηττπ://νιχοντρολσ.χοm
Appendix C — Spare Parts ListBulletin No. 50006-519-01BDecember 1996172 © 1996 Square D All Rights Reservedηττπ://νιχοντρολσ.χοm
Bulletin No. 50006-519-01BDecember 1996ALTIVAR <strong>56</strong> Fan and Pump Drive User’s ManualIndexAAC line overvoltage 55ACC 55, 62acceleration 5, 34, 122acceleration time 59, 75access levels <strong>56</strong>total lock <strong>56</strong>total unlock <strong>56</strong>access locking switch 52, <strong>56</strong>AC-LIN. OVERVOL 45additional controllers 18additional motor 39AFC-off-bypass switch 142, 146AI1/AI2 terminals 22–23, 26, 135–136AI2modifying signal type 79analog input test 110analog inputs 23displaying 61analog output test 111analog outputs 23, 26assigning functions to 99displaying 61AO1/AO2 terminals 23, 26application functions menu 77at speed 97auto contact 140, 143–144, 147–148auto/manu 94auto/<strong>manual</strong> 77, 80, 97autodiagnostics 109automatic restart 102AUTO-TEST FAIL 46auto-test failure <strong>56</strong>Bbar graphsdisplaying 62–64bele box 117brake output 99brakingDC injection 34, 36dynamic 47branch circuit 16, 28BRK 55, 62bus capacitor voltage 42bypass 39, 77, 85, 87, 142, 146Ccable 17capacitance 17capacitorscharge relay fault 46DC bus 42power factor correction 17Catch on Fly 103caution LED 11, 19, 44circuit diagramscontrol 28, 151–1<strong>56</strong>logic inputs 24logic outputs 25CL1/CL2 terminals 20–21CL21/CL22 terminals 20–21class 8839 combination devices 117bypass 142, 144–145combination 139–140remote starter bypass 146–148CLI 55, 62COM terminal 23–25command typemenu 67selecting 67component failurelocating 109compression lug kit 21condensation 10, 13conduitentries 6entry plate 18constant torque 38contactorsisolation 29line 30–31output 39continuous duty 37controlboard 22circuit diagrams 28, 151–1<strong>56</strong>bypass 153–154combination 151–152remote starter bypass 155–1<strong>56</strong>external devices 140–141, 143–145,147–148© 1996 Square D All Rights Reservedηττπ://νιχοντρολσ.χοmterminals 23, 135–137three-wire 28two-wire 28–29types 34–35, 37–39voltage supply 20wiring precaution 17control parameter menu 74controlled stop 77, 80by frequency threshold 81by frequency threshold & logic input81by logic input 81controllersdimensions 6–7, 124–127disconnect switch 142, 146handling 8, 128inspection 8, 128installation 9specifications 3–4, 122weight 7, 124–127CSA label 141, 145, 149currentlevel 98limit 72, 97nominal 34overcurrent 45ratings 3–4, 119–121CUSTOM. FAULT 47Ddamping 58–59, 71DB Resistor 47DC bus LED 19, 42, 44DC bus overvoltage 55DC bus voltage 20, 42DC injection braking 34, 36, 83DCB 55, 62DC-BUS OVERVOL 45DEC 55, 62deceleration 5, 34, 122deceleration time 59, 75delay time 86derating 37diagnostic mode menu 109dimensionscontroller 7, 124–127recess mounting 13disconnect switch 10, 142, 146173
ALTIVAR <strong>56</strong> Fan and Pump Drive User’s ManualBulletin No. 50006-519-01BIndex October 1997display configuration menu 62display screen 53, 55displaying faults 62drive configuration 66downloading 113menu 53storing 112drive controllerfunctionsdisplaying 62identification menu 53initialization menu 112nameplate information 53, 118overtemperature 55parameters 69, 74status codes 55, 62thermal alarm 97driving torque 38dynamic brake 46, <strong>56</strong>fault 108EenclosuresNEMA Type 1 (IP30) 10NEMA Type 12 (IP54) 12sizing 12environment 5, 9, 13, 122equipment requirements 30external control devices 140–141, 143–145, 147–148Ffactory default settingsrestoring 112fan 10also see ventilation 10flow rates 11fast stop 83faultdescriptions 55detectionprogramming 100displaying fault type55history menu 62LED 19, 44management menu 100reset 100, 108state 97stop methods 100troubleshooting procedure 62types ofcontrol board 46DB Resistor 47displaying 62dynamic braking 46fault relay 23ground 46input phase loss 45, 47internal connection 46LEDs 11, 44memory failure 46messages 45, 47overheating 36overload 45overspeed 47overtemperature 45overvoltage 45precharge fail 46relay 23short circuit 46signal 46tachogenerator 47undervoltage 45user-defined 47FB high alarm 95FB input 91FB limit 95FB low alarm 95FEEDBACK LOSS 47feedback menu 91FLT 55, 62fold back 108freewheel stop 82freeze/fire stat interlock 139, 142, 146frequencylevel 1 98loop gain 59, 71output 34range 5, 122specifications 4, 122switching 3–4FU1/FU2/FU3 line fuses 139, 143, 147function keysin keypad command 66fusescontrol 30line 150line power 30power 28transformer 30Ggeneral configuration menu 69grounding 18, 130GND terminals 20–21, 134GROUND FAULT 46, <strong>56</strong>Hhandling 8, 128hand-off-auto switch 139, 142, 146omitted 140, 143, 147user-supplied 141, 145, 149heat sink 13help menu 51high level alarm 91high speed 59, 75high torque control 34hoisting 8, 128II/O extension module 77, 79I/O map 61index numbers 51, 57inductors 17IN-PHASE LOSS 45input phase failure 107input phase loss 55inputslogic 23–24phase fault 45, 47speed reference 5, 23, 26, 122supply 23inspection 8, 128installation 9INTERNAL FAULT 46, <strong>56</strong>isolation contactor 29174 © 1996 Square D All Rights Reservedηττπ://νιχοντρολσ.χοm
Bulletin No. 50006-519-01BDecember 1996ALTIVAR <strong>56</strong> Fan and Pump Drive User’s ManualIndexJJ1 terminals 23, 27J12 terminals 22–23, 25J13 terminals 22–23, 26J2 terminal 20jump to menu 51Kkeypaddisplay 50connection to drive controller 52locking <strong>56</strong>mounting in enclosure door 52remote handheld use 52command 51, <strong>56</strong>, 65configuration menu 64keysarrow 50ENT 50ESC 50function (F1, F2, F3) 51numeric 50RUN 52STOP 51STOP and RUN key cover 51selecting 89, 94KI 95KP 95LL1/L2/L3 terminals 20–21, 134languageselecting 53LCD 50LEDs 11, 19, 42, 44LI1/LI2/LI3/LI4 terminals 23–24lightning arrestors 17line contactor 30–31line fusesremoving 150line isolation contactor 139, 143, 147LO1/LO2/LOP terminals 23, 25, 135–136local command <strong>56</strong>logic input test 110logic inputs 23–24assigning functions to 77displaying 61logic output test 110logic outputs 25assigning functions to 97displaying 61loss of follower 55, 97, 107LOSS FOLLOWER 46low level alarm 91low speed 58, 75Mmain menu 54maintenance 44max. feed back 91maximum frequency 74mechanical resonance 76memory failure 46, <strong>56</strong>menusapplication functions 77command type 67control parameters 74diagnostic mode 109display configuration 62display screen 53, 55drive configuration 53drive Identification 53drive initialization 112drive parameters 69fault history 62fault management 100general configuration 69help 51I/O Map 61index number 51index numbers 57jump to 51keypad configuration 64language 53main 54motor parameters 69motor power 67one bar graph 63output assignment 96overview 57parameter setting 58torque type 67two bar graph 64© 1996 Square D All Rights Reservedηττπ://νιχοντρολσ.χοmmin. feed back 91MODA07 143, 147B07 139, 143, 147C07 139, 143, 147D07 140, 143, 147E07 141, 145, 149F07 141, 145, 149motorcurrent 99overload 55, 58adjustment 106MOT. OVERLOAD 45overload protection 60, 105for self-cooled motor 106parametersadjusting 69menu 69powerselecting 67speed 99adjusting 139, 142thermal state 99typescontinuous duty 37multiple 39noise 35overload fault 45overload protection 39overspeed 38overtorque 37self-ventilating 37speed range 37timing sequence 39torque 35, 37mountingdimensions 7, 124–127NEMA Type 1 (IP30) 10NEMA Type 12 (IP54) 12recess 13multiple controllers 18Nnameplate 16, 118neg. values 95NLP 55noise class 129NOLD control 35, 37–38175
ALTIVAR <strong>56</strong> Fan and Pump Drive User’s ManualBulletin No. 50006-519-01BIndex October 1997nominalcurrent 34, 70nominal frequency 70nominal output frequency 34nominal output voltage 34nominal voltage 71normal control 34–35, 37–38, 76NRP 55Ooffset 89calculating 90one bar graph menu 63open transistor <strong>56</strong>open-close switch 139operator controlsAFC-off-bypass switch 142, 146hand-off-auto switch 139, 142, 146speed potentiometer 139, 142, 146optionscompression lug kit 21recess mounting kit 13outputsanalog 23, 26assignment menu 96contactor 39customer supply 23logic 23, 25motor 20phase fault 108phase loss 47, 55OUT PHASE LOSS 47power 20relay 23, 27wiring 17overcurrent 45overheating 36overloadfault 45protection 39relay 36–37, 106overspeed 38, 47, <strong>56</strong>overtemperature 45overtorque 37overvoltage 45PPA/PB terminals 20–21parameter setting menu 58partial factory settings 112parts list 14, 30, 32, 169PCMCIA carddownloading from 113storing to 112phasefault 45, 47loss 47, 55rotation 72PI (proportional-integralerr output 95FB output 95feed back 88, 90FLT ratio 95integrator 95parameters 95ref output 95Regulator 77regulator 88application examples 91–93function compatibility 89using the function 89set point 88–89SP <strong>manual</strong> 88, 94pilot lightsgroup 1 143, 147group 2 139, 143, 147powercircuit W 139–140circuit Y 142, 144–145circuit Z 146–148control 45converter 117fuses 28input line 43LED 19, 44loss fault 101ratings 3–4, 119–121suppliescontrol 20input line 20logic inputs 24logic outputs 25precharge failure 46, <strong>56</strong>preset speeds 77–78preventive maintenance 44processinput 86time out <strong>56</strong>time-out fault 86profile 58, 60, 70–71programmable relay 23RR1/R2 terminals 135, 137R1A/R1B/R1C terminals 23R2A/R2B/R2C terminals 23ramp time 34ratings 3208 V 121230 V 4, 120460 V 3, 119ready state 97RDY 55, 62recess mounting 13reference inputs 23reference signal10 VDC 140, 143, 1474-20 mA 140–141, 144, 146, 149relayscapacitor charge 46fault 23, 27outputs 27overload 36–37programmable 23terminals 23reset after fault 100rev. action 95rev. speed 94reverse direction 99ROM memorytesting 109rotation normalization 72RST(reset fault) 66RUN 55, 62command 139, 142contact 146output command 86running state 97176 © 1996 Square D All Rights Reservedηττπ://νιχοντρολσ.χοm
Bulletin No. 50006-519-01BDecember 1996ALTIVAR <strong>56</strong> Fan and Pump Drive User’s ManualIndexSS terminal 23safety label 2SCR 66scroll function 66sensorsthermal 11sequenceinput 86time out <strong>56</strong>time-out fault 86service factor 37setpoint (SP)automatic 94gain 89, 90input 89menu 89setpoint <strong>manual</strong> (SPM) 94shielding 17, 130shock resistance 5short circuit 46, <strong>56</strong>, 123shutdown 77, 84skip frequencies 76smoke purge option 141, 145, 149solenoids 17spare parts 169specifications 3–5, 122speedcontrolling 140–141, 143–149potentiometer<strong>manual</strong> 139, 142, 146omitted 140, 143, 147remote 140, 144, 148user-supplied 141, 145, 149range 26, 37reference 77, 79<strong>manual</strong> 94inputs 5, 23, 26, 122start/stop command 140–141, 143–145,147–148store user settings 112supplycontrol 45frequency, testing for 109input (external) 24input line 43switching between AI1 and AI2 80TT1/T2/T3 terminals 20–21, 134tachogenerator 47terminal command 51selecting 65terminal/keypad 97terminals+/– 20–21, 43+10 23, 26+24 24–25analog outputs 26control 23, 135–137logic inputs 24logic outputs 25power 20–21, 134terminal strips 19, 23, 131–133thermallevel 1 98limit 11overload 36, 45overload fault 107protection 34, 60, 105three-wire control 28timing sequence 39torqueconstant 38driving 38motor 35, 37overtorque 37tightening 21typeselecting 67menu 67variable 3–4, 38total factory setting 112transformer fuses 30transient suppressors 30–31transistor bridgetesting 109troubleshooting 45, 47two bar graph menu 64two-wire control 28–29UU/V/W terminals 20–21undervoltage 45, 55© 1996 Square D All Rights Reservedηττπ://νιχοντρολσ.χοmVV/Hz profile 60, 71variable torque 3–4, 38ventilation 10, 13, 37vibration resistance 5voltage+10 V supply 23, 26+24 V supply 23–25bus capacitor 42class 130control 20DC bus 20input line 4, 20, 122logic inputs 24output 34reference input 79setting 53volts/frequency 34Wweight 7, 124–127wiringchecking connections 110class 129control 17, 28, 135–137general practices 16, 130power terminals 21, 134wire size 21, 134Numerics+/– terminals 20–21, 43+10 terminal 23, 26+24 terminal 23–2510 VDC reference signal 140, 143, 1472-wire command 682-wire control 28–293-wire command 683-wire control 284-20 mA reference signal 140–141, 144,146, 149177
50006-519-01B December 1996 Printed in USA FPCReplaces Bulletin No. 50006-519-01A dated 11/96© 1996 Square D All Rights Reservedηττπ://νιχοντρολσ.χοm