Hams in Space!
Hams in Space! - Free and Open Source Software
Hams in Space! - Free and Open Source Software
- No tags were found...
Create successful ePaper yourself
Turn your PDF publications into a flip-book with our unique Google optimized e-Paper software.
with the design of pr<strong>in</strong>ted hairp<strong>in</strong> bandpass<br />
filters. Filters were designed with manufactur<strong>in</strong>g<br />
tolerances taken <strong>in</strong>to consideration to<br />
provide broad, flat passbands and steep slopes.<br />
Manufactur<strong>in</strong>g irregu larities which were once<br />
fatal now have little effect. These filters also<br />
have no tun<strong>in</strong>g requi red , or even possible.<br />
The entire no-tune transverter is available<br />
<strong>in</strong> two forms as kits from Down East Micro<br />
wave. One version is a dedicated S-band<br />
rece ive converter (the SHF-240 IK). The second<br />
is a transverter, which has the same receiver<br />
and also a 10 mW transmit section<br />
(SHF-2304). Ifyou are go<strong>in</strong>g to build someth<strong>in</strong>g<br />
like this anyway, get the transverter and<br />
help get more amate ur activity on l3cm.<br />
Even barefoot, IOmW is adequate for local<br />
co ntacts. You can always add transmit power<br />
later. Remember, as amateur rad io operators,<br />
we either usc those frequencies or we<br />
may lose them. The commercial gu ys arc<br />
always hungry for spectrum. and ours loo ks<br />
tasty. Both units use a 2 meter IF (Intermediate<br />
Frequency) . {Ed. Note: See the February<br />
91 issue of73 for a review ofthese kits.I<br />
Construction H<strong>in</strong>ts<br />
As the photos show, construction of these<br />
devices is straightforward . Build the local<br />
oscillator first. You must follow the recommended<br />
layout and use good construction<br />
techniques. Keep the leads short and solder<br />
the jo<strong>in</strong>ts well . Be sure to ground the one pad<br />
that is noted as requ ir<strong>in</strong>g through-the-board<br />
ground<strong>in</strong>g . Also, pay attention to the orientation<br />
of the transistors and MMICs. The<br />
Avamck MSA-04 series has the dot on the<br />
output, whi le the MCl MAR series has the<br />
dot on the <strong>in</strong>put. The tota l tune-up requirements<br />
are to tweak a 10 pF trimmer for maxi <br />
mum lO output. Photo A shows a co mplete<br />
and function<strong>in</strong> g local oscillator.<br />
A common compla<strong>in</strong>t deal s with the d ifficulty<br />
of <strong>in</strong>stall<strong>in</strong>g chip capacitors. To do this<br />
right, you need a small (1 5 watt ) solder<strong>in</strong>g<br />
iron with a small tip, tweezers, a too thpick.<br />
and a mag nify<strong>in</strong>g glass. The last item is a<br />
suggestion that I learned through experience .<br />
S<strong>in</strong>ce I passed a ce rta<strong>in</strong> magic age, I f<strong>in</strong>d I<br />
can't see far away with my glasses off. and I<br />
can'I see close up with them on. So I bought a<br />
set of Sears headband-mounted b<strong>in</strong>ocular<br />
magnifiers . These are only 2 1 h power, but<br />
they ' re perfect for ge tt<strong>in</strong>g parts <strong>in</strong> the right<br />
place.<br />
To mount the chip ca ps (now that you can<br />
see them) , first lightly t<strong>in</strong> one circuit board<br />
pad. Don't t<strong>in</strong> both or the chip may not sit flat<br />
on the board. Then place the chip cap where<br />
you want it with the tweezers. Hold it <strong>in</strong> place<br />
with the toothpick and remove the tweezers .<br />
Touch the iron to the pre-t<strong>in</strong>ned circuit board<br />
trace . Flow the solde r onto the end ofthe cap.<br />
Then solder the other end of the cap. Resolder<br />
the first end if needed to <strong>in</strong>su re a good<br />
connection.<br />
Construction ofthe converter board itselfis<br />
probably even eas ier than build<strong>in</strong>g the l O<br />
(l ocal Oscillator). The hard part, at least on<br />
the early boards, is that you must usc th<strong>in</strong><br />
brass foil to co nnect the MMIC gro und leads<br />
and several pads to the ground plane side of<br />
24 73AmareurRadio Today. March , 1991<br />
the circuit board . I found that the best way to<br />
ground the M MICs is to cut pieces of brass<br />
foil abou t IA " long and as wide as the MMI C<br />
ground pads, the n make a 90 degree bend<br />
back about 3/32" from one end. Slip the long<br />
end through the board hole from the circuit<br />
side (usc the mag nifiers to make absolutely<br />
sure that there arc no shorts to the <strong>in</strong>put or<br />
output pads). then hold it <strong>in</strong> place by putt<strong>in</strong>g<br />
an awl <strong>in</strong>to the hole. This will form the brass<br />
to the hole ar the top, allow<strong>in</strong>g you 10 <strong>in</strong>sert<br />
the M MIC down <strong>in</strong>to the hole <strong>in</strong> the board,<br />
where it belongs.<br />
While hold<strong>in</strong>g the foil <strong>in</strong> the hole with the<br />
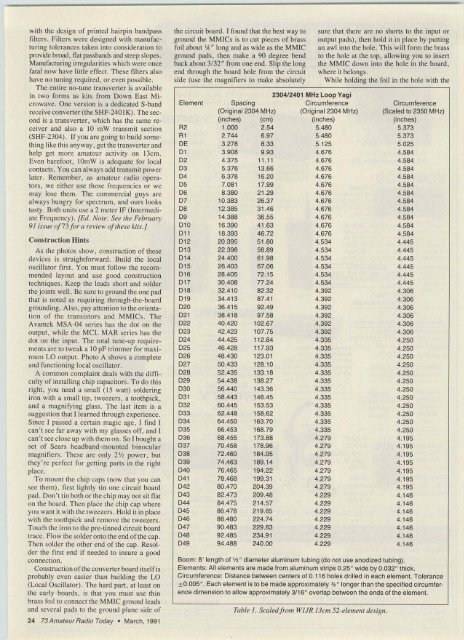
2304/2401 MHz Loop Vagi<br />
Element Spac<strong>in</strong>g Circumference Circumference<br />
(Orig<strong>in</strong>al 2304 MHz) (Orig<strong>in</strong>al 2304 MHz) (Scaled to 2350 MHz)<br />
(i nches) (em) (<strong>in</strong>ches) (<strong>in</strong>ches)<br />
R2 1.000 2.54 5.480 5.373<br />
Rl 2.744 6.97 5.480 5.373<br />
DE 3.278 8.33 5.125 5.025<br />
01 3.908 9.93 4.676 4.584<br />
02 4.375 11 .11 4.676 4.584<br />
03 5.376 13.66 4.676 4.584<br />
04 6.378 16.20 4.676 4 .584<br />
05 7.081 17.99 4.676 4.584<br />
DB 8.380 21.29 4.676 4.584<br />
07 10.383 26.37 4.676 4.584<br />
08 12.385 31.46 4.676 4.584<br />
09 14.388 36.55 4.676 4.584<br />
010 16.390 41 .63 4.676 4.584<br />
0 11 18.393 46.72 4.676 4.584<br />
012 20.395 51.80 4.534 4.445<br />
013 22.398 56.89 4.534 4.445<br />
014 24.400 61.98 4.534 4.445<br />
015 26.403 67.06 4.534 4.445<br />
01B 28.405 72.15 4.534 4.445<br />
017 30.408 77.24 4.534 4.445<br />
018 32.410 82.32 4.392 4.306<br />
019 34.413 87.41 4.392 4.306<br />
020 36.415 92.49 4.392 4.306<br />
021 38.4 18 97.58 4.392 4.306<br />
022 40.420 102.67 4.392 4.306<br />
023 42.423 107.75 4.392 4.306<br />
024 44.425 11 2.84 4.335 4.250<br />
025 46.428 117.93 4.335 4.250<br />
02B 48.430 123.01 4.335 4.250<br />
027 50.433 128.1 0 4.335 4.250<br />
028 52.435 133.18 4.335 4.250<br />
029 54.438 138.27 4.335 4.250<br />
030 56.440 143.36 4.335 4.250<br />
031 58.443 148.45 4.335 4.250<br />
032 60.445 153.53 4.335 4.250<br />
033 62.448 158.62 4.335 4.250<br />
034 64.450 163.70 4.335 4.250<br />
035 66.453 168.79 4.335 4.250<br />
03B 68.455 173.88 4.279 4.195<br />
037 70.458 178.96 4.279 4.195<br />
038 72.460 184.05 4.279 4.195<br />
039 74.463 189.14 4.279 4. 195<br />
040 76.465 194.22 4.279 4.195<br />
041 78.468 199.31 4.279 4.195<br />
042 80.470 204.39 4.279 4.195<br />
043 82.473 209.48 4.229 4. 146<br />
044 84.475 214.57 4.229 4.146<br />
045 86.478 219.65 4.229 4.146<br />
04B 88.480 224.74 4.229 4.146<br />
047 90.483 229 .83 4.229 4.146<br />
048 92.485 234.91 4.229 4.146<br />
049 94.488 240.00 4.229 4.146<br />
Boom: 8' length of lh w diameter alum<strong>in</strong>um tub<strong>in</strong>g (do not use anodized tub<strong>in</strong>g).<br />
Elements: All e lements are made from alum<strong>in</strong>um strips 0.25 w<br />
wide byO.032" thick.<br />
Circumference: Distance between centers of 0.116 holes drilled <strong>in</strong> each element. Tolerance<br />
± 0.D05". Each element is to be made approximately ~" longer than the specified circumference<br />
dime nsion to allow approximately 3/16" overlap between the ends of the element.<br />
Table I . Scaledfrom W/JR 13cm 52-element design.


