burnish
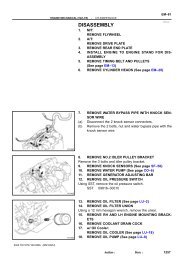
REASSEMBLY
REASSEMBLY
- No tags were found...

You also want an ePaper? Increase the reach of your titles
YUMPU automatically turns print PDFs into web optimized ePapers that Google loves.
STEERING<br />
–<br />
POWER STEERING GEAR (4WD and PRE RUNNER)<br />
SR–85<br />
SR05J–04<br />
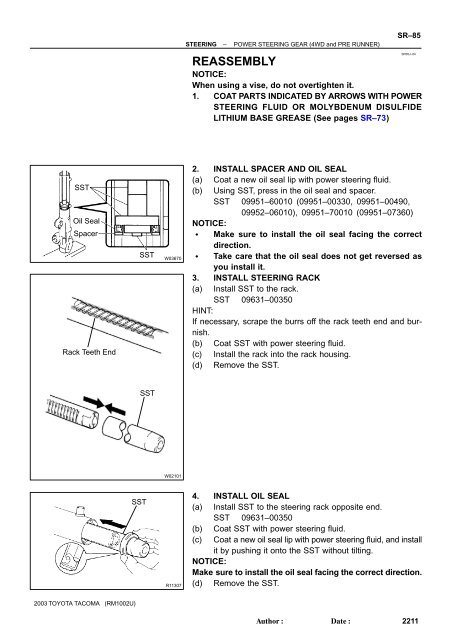
REASSEMBLY<br />
NOTICE:<br />
When using a vise, do not overtighten it.<br />
1. COAT PARTS INDICATED BY ARROWS WITH POWER<br />
STEERING FLUID OR MOLYBDENUM DISULFIDE<br />
LITHIUM BASE GREASE (See pages SR–73)<br />
SST<br />
Oil Seal<br />
Spacer<br />
Rack Teeth End<br />
SST<br />
W03670<br />
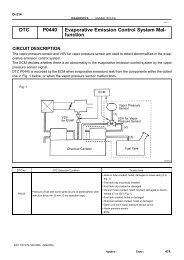
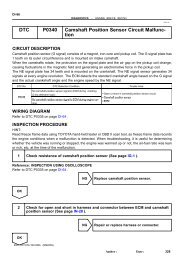
2. INSTALL SPACER AND OIL SEAL<br />
(a) Coat a new oil seal lip with power steering fluid.<br />
(b) Using SST, press in the oil seal and spacer.<br />
SST 09951–60010 (09951–00330, 09951–00490,<br />
09952–06010), 09951–70010 (09951–07360)<br />
NOTICE:<br />
Make sure to install the oil seal facing the correct<br />
direction.<br />
Take care that the oil seal does not get reversed as<br />
you install it.<br />
3. INSTALL STEERING RACK<br />
(a) Install SST to the rack.<br />
SST 09631–00350<br />
HINT:<br />
If necessary, scrape the burrs off the rack teeth end and <strong>burnish</strong>.<br />
(b) Coat SST with power steering fluid.<br />
(c) Install the rack into the rack housing.<br />
(d) Remove the SST.<br />
SST<br />
W02101<br />
SST<br />
R11307<br />
4. INSTALL OIL SEAL<br />
(a) Install SST to the steering rack opposite end.<br />
SST 09631–00350<br />
(b) Coat SST with power steering fluid.<br />
(c) Coat a new oil seal lip with power steering fluid, and install<br />
it by pushing it onto the SST without tilting.<br />
NOTICE:<br />
Make sure to install the oil seal facing the correct direction.<br />
(d) Remove the SST.<br />
2003 TOYOTA TACOMA (RM1002U)<br />
Author:<br />
Date:<br />
2211
SR–86<br />
STEERING<br />
–<br />
POWER STEERING GEAR (4WD and PRE RUNNER)<br />
SST<br />
Fulcrum Length<br />
R13733<br />
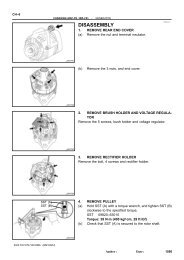
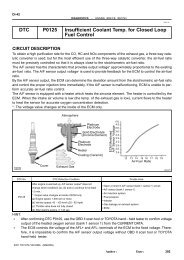
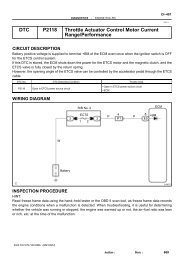
5. INSTALL CYLINDER END STOPPER<br />
(a) Coat a new O–ring with power steering fluid, and install<br />
it to the cylinder end stopper.<br />
(b) Using SST, torque the cylinder end stopper.<br />
SST 09922–10010<br />
Torque: 59 N·m (597 kgf·cm, 43 ft·lbf)<br />
NOTICE:<br />
Use SST 09922–10010 in the direction shown in the illustration.<br />
HINT:<br />
Use a torque wrench with a fulcrum length of 345 mm (13.58<br />
in.).<br />
(c)<br />
Using a punch and hammer, stake the rack housing.<br />
R13481<br />
SST<br />
6. AIR TIGHTNESS TEST<br />
(a) Install SST to the unions of the rack housing.<br />
SST 09631–12071<br />
(b) Apply 53 kPa (400 mmHg, 15.75 in.Hg) of vacuum for<br />
about 30 seconds.<br />
(c) Check that there is no change in the vacuum.<br />
If there is change in the vacuum, check the installation of the oil<br />
seals.<br />
R13482<br />
Vinyl Tape<br />
7. INSTALL CONTROL VALVE ASSEMBLY<br />
(a) Coat the teflon rings with power steering fluid.<br />
(b) To prevent oil seal lip damage, wind vinyl tape on the serrated<br />
part of the control valve shaft.<br />
(c) Install the control valve assembly into the control valve<br />
housing.<br />
NOTICE:<br />
Be careful not to damage the teflon rings and oil seal lip.<br />
W01755<br />
2003 TOYOTA TACOMA (RM1002U)<br />
Author:<br />
Date:<br />
2212
STEERING<br />
–<br />
POWER STEERING GEAR (4WD and PRE RUNNER)<br />
SR–87<br />
SST<br />
(d) Coat a new O–ring with power steering fluid, and install<br />
it to the bearing guide nut.<br />
(e) Using SST, install the bearing guide nut.<br />
SST 09631–20060<br />
Torque: 25 N·m (250 kgf·cm, 18 ft·lbf)<br />
NOTICE:<br />
Be careful not to damage the oil seal lip.<br />
R13845<br />
R13713<br />
(f) Using a punch, stake the bearing guide nut.<br />
8. INSTALL CONTROL VALVE HOUSING WITH CON-<br />
TROL VALVE ASSEMBLY<br />
(a) Coat a new O–ring with power steering fluid, and install<br />
it to the control valve housing.<br />
(b) Align the matchmarks on the control valve housing and<br />
rack housing, and install the control valve housing with<br />
the control valve assembly to the rack housing.<br />
(c) Install the 2 bolts.<br />
Torque: 18 N·m (185 kgf·cm, 13 ft·lbf)<br />
9. INSTALL DUST COVER<br />
10. INSTALL RACK GUIDE SEAT, RACK GUIDE, RACK<br />
GUIDE SPRING AND RACK GUIDE SPRING CAP<br />
(a) Install the rack guide seat to the rack guide.<br />
(b) Apply sealant to 2 or 3 threads of the rack guide spring<br />
cap.<br />
Sealant:<br />
Part No. 08833–00080, THREE BOND 1344,<br />
LOCTITE 242 or equivalent<br />
(c) Temporarily install the rack guide, rack guide spring and<br />
rack guide spring cap.<br />
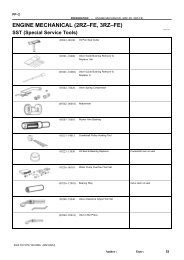
19°<br />
11. ADJUST TOTAL PRELOAD<br />
(a) To prevent the steering rack teeth from damaging the oil<br />
seal lip, temporarily install the RH and LH rack ends.<br />
(b) Torque the rack guide spring cap.<br />
Torque: 25 N·m (250 kgf·cm, 18 ft·lbf)<br />
(c) Return the cap 19°.<br />
W03417<br />
2003 TOYOTA TACOMA (RM1002U)<br />
Author:<br />
Date:<br />
2213
SR–88<br />
STEERING<br />
–<br />
POWER STEERING GEAR (4WD and PRE RUNNER)<br />
SST<br />
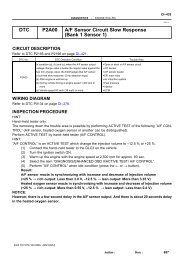
(d)<br />
(e)<br />
Using SST, turn the control valve shaft right and left 1 or<br />
2 times.<br />
SST 09616–00011<br />
Loosen the cap until the rack guide spring is not functioning.<br />
W03418<br />
SST<br />
(f)<br />
Using SST and a torque wrench, tighten the cap until the<br />
preload is within specification.<br />
SST 09616–00011<br />
Preload (turning):<br />
0.5 – 1.7 N·m (4.7 – 17.2 kgf·cm, 4.1 – 14.9 in.·lbf)<br />
W03419<br />
SST<br />
Fulcrum<br />
Length<br />
Rack Groove<br />
W03420<br />
12. INSTALL RACK GUIDE SPRING CAP LOCK NUT<br />
(a) Apply sealant to 2 or 3 threads of the rack guide spring<br />
cap lock nut.<br />
Sealant:<br />
Part No.08833–00080, THREE BOND 1344,<br />
LOCTITE 242 or equivalent<br />
(b) Holding the rack guide spring cap rotating, and using<br />
SST, install the lock nut.<br />
SST 09922–10010<br />
Torque: 51 N·m (521 kgf·cm, 38 ft·lbf)<br />
NOTICE:<br />
Use SST 09922–10010 in the direction shown in the illustration.<br />
HINT:<br />
Use a torque wrench with a fulcrum length of 345 mm (13.58<br />
in.).<br />
(c) Recheck the total preload.<br />
Preload (turning):<br />
0.5 – 1.7 N·m (4.7 – 17.2 kgf·cm, 4.1 – 14.9 in.·lbf)<br />
(d) Remove the RH and LH rack ends.<br />
13. INSTALL RH AND LH CLAW WASHERS AND RACK<br />
ENDS<br />
(a) Install a new claw washer, and temporarily install the rack<br />
end.<br />
HINT:<br />
Align the claws of the claw washer with the steering rack<br />
grooves.<br />
R13898<br />
2003 TOYOTA TACOMA (RM1002U)<br />
Author:<br />
Date:<br />
2214
STEERING<br />
–<br />
POWER STEERING GEAR (4WD and PRE RUNNER)<br />
SR–89<br />
SST<br />
Fulcrum<br />
Length<br />
R13754<br />
Brass Bar<br />
(b) Using a spanner to hold the steering rack steady, and using<br />
SST, torque the rack end.<br />
SST 09922–10010<br />
Torque: 76 N·m (770 kgf·cm, 56 ft·lbf)<br />
NOTICE:<br />
Use SST 09922–10010 in the direction shown in the illustration.<br />
HINT:<br />
Use a torque wrench with a fulcrum length of 345 mm (13.58<br />
in.).<br />
(c) Using a brass bar and hammer, stake the claw washer.<br />
NOTICE:<br />
Avoid any impact to the rack.<br />
(d) Employ the same manner described above to the other<br />
side.<br />
R13669<br />
R13710<br />
14. INSTALL RH AND LH RACK BOOTS, CLAMPS AND<br />
CLIPS<br />
(a) Ensure that the steering rack hole is not clogged with<br />
grease.<br />
HINT:<br />
If the steering rack hole is clogged, the pressure inside the boot<br />
will change after it is assembled and the steering wheel is<br />
turned.<br />
2 mm<br />
(0.08 in.)<br />
or less<br />
W00452<br />
(b) Install the rack boot, dip and a new damp.<br />
NOTICE:<br />
Be careful not to damage or twist the boot.<br />
(c) Tighten a new clamp with the screw, as shown in the illustration.<br />
15. INSTALL RH AND LH TIE ROD ENDS AND LOCK NUTS<br />
(a) Screw the lock nut and tie rod end onto the rack end until<br />
the matchmarks are aligned.<br />
(b) After adjusting toe–in, torque the nut (See page<br />
SA–10).<br />
Torque: 55 N·m (560 kgf·cm, 41 ft·lbf)<br />
16. INSTALL 2 TURN PRESSURE TUBES<br />
(a) Install 2 new union seats to the rack housing.<br />
(b) Install 2 new union seats to the control valve housing.<br />
2003 TOYOTA TACOMA (RM1002U)<br />
Author:<br />
Date:<br />
2215
SR–90<br />
STEERING<br />
–<br />
POWER STEERING GEAR (4WD and PRE RUNNER)<br />
SST<br />
Fulcrum Length<br />
(c) Using SST, install the 2 turn pressure tubes.<br />
SST 09023–38200<br />
Torque: 23 N·m (235 kgf·cm, 17 ft·lbf)<br />
HINT:<br />
Use a torque wrench with a fulcrum length of 300 mm<br />
(11.81 in.).<br />
This torque value is effective in case that SST is parallel<br />
to a torque wrench.<br />
F14679<br />
2003 TOYOTA TACOMA (RM1002U)<br />
Author:<br />
Date:<br />
2216
![F RELAY LOCATIONS [Engine Compartment] [Instrument Panel] 20](https://img.yumpu.com/53634281/1/184x260/f-relay-locations-engine-compartment-instrument-panel-20.jpg?quality=85)