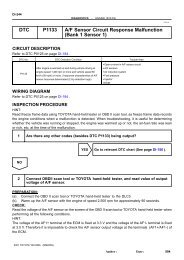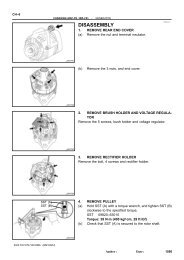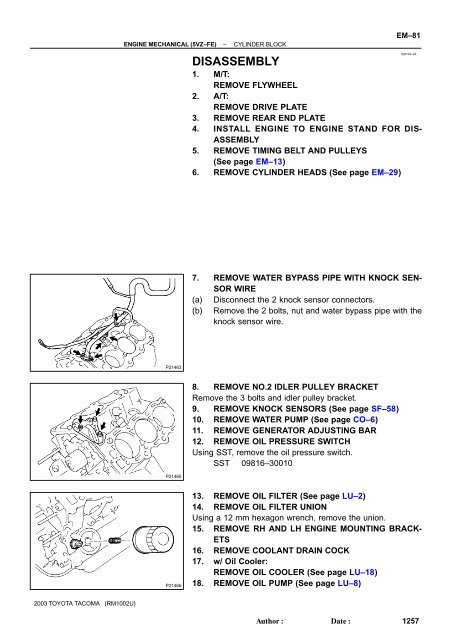
DISASSEMBLY
EM–81
EM–81
- No tags were found...

You also want an ePaper? Increase the reach of your titles
YUMPU automatically turns print PDFs into web optimized ePapers that Google loves.
ENGINE MECHANICAL (5VZ–FE)<br />
–<br />
CYLINDER BLOCK<br />
EM–81<br />
EM104–04<br />
<strong>DISASSEMBLY</strong><br />
1. M/T:<br />
REMOVE FLYWHEEL<br />
2. A/T:<br />
REMOVE DRIVE PLATE<br />
3. REMOVE REAR END PLATE<br />
4. INSTALL ENGINE TO ENGINE STAND FOR DIS-<br />
ASSEMBLY<br />
5. REMOVE TIMING BELT AND PULLEYS<br />
(See page EM–13)<br />
6. REMOVE CYLINDER HEADS (See page EM–29)<br />
7. REMOVE WATER BYPASS PIPE WITH KNOCK SEN-<br />
SOR WIRE<br />
(a) Disconnect the 2 knock sensor connectors.<br />
(b) Remove the 2 bolts, nut and water bypass pipe with the<br />
knock sensor wire.<br />
P21463<br />
P21465<br />
8. REMOVE NO.2 IDLER PULLEY BRACKET<br />
Remove the 3 bolts and idler pulley bracket.<br />
9. REMOVE KNOCK SENSORS (See page SF–58)<br />
10. REMOVE WATER PUMP (See page CO–6)<br />
11. REMOVE GENERATOR ADJUSTING BAR<br />
12. REMOVE OIL PRESSURE SWITCH<br />
Using SST, remove the oil pressure switch.<br />
SST 09816–30010<br />
P21466<br />
13. REMOVE OIL FILTER (See page LU–2)<br />
14. REMOVE OIL FILTER UNION<br />
Using a 12 mm hexagon wrench, remove the union.<br />
15. REMOVE RH AND LH ENGINE MOUNTING BRACK-<br />
ETS<br />
16. REMOVE COOLANT DRAIN COCK<br />
17. w/ Oil Cooler:<br />
REMOVE OIL COOLER (See page LU–18)<br />
18. REMOVE OIL PUMP (See page LU–8)<br />
2003 TOYOTA TACOMA (RM1002U)<br />
Author:<br />
Date:<br />
1257
EM–82<br />
ENGINE MECHANICAL (5VZ–FE)<br />
–<br />
CYLINDER BLOCK<br />
19. REMOVE REAR OIL SEAL RETAINER<br />
(a) Remove the 6 bolts and retainer.<br />
(b) Using a screwdriver, remove the oil seal retainer by plying<br />
the portions between the oil seal retainer and main bearing<br />
cap.<br />
EM5228<br />
20. CHECK CONNECTING ROD THRUST CLEARANCE<br />
Using a dial indicator, measure the thrust clearance while moving<br />
the connecting rod back and forth.<br />
Standard thrust clearance:<br />
0.150 – 0.330 mm (0.0059 – 0.0130 in.)<br />
Maximum thrust clearance: 0.380 mm (0.0150 in.)<br />
If the thrust clearance is greater than maximum, replace the<br />
connecting rod assembly.<br />
P20859<br />
21. REMOVE CONNECTING ROD CAPS AND CHECK OIL<br />
CLEARANCE<br />
(a) Check the matchmarks on the connecting rod and cap are<br />
aligned to ensure correct order.<br />
(b) Remove the 2 connecting rod cap nuts.<br />
A06834<br />
Plastigage<br />
P20865<br />
(c) Using a plastic–faced hammer, lightly tap the connecting<br />
rod bolts and lift off the connecting rod cap.<br />
HINT:<br />
Keep the lower bearing inserted with the connecting rod cap.<br />
(d) Cover the connecting rod bolts with a short piece of hose<br />
to protect the crankshaft from damage.<br />
(e) Clean the crank pin and bearing.<br />
(f) Check the crank pin and bearing for pitting and scratches.<br />
If the crank pin or bearing is damaged, replace the bearings.<br />
If necessary, grind or replace the crankshaft.<br />
(g) Lay a strip of Plastigage across the crank pin.<br />
(h) Install the connecting rod cap with the 2 nuts<br />
(See page EM–98).<br />
NOTICE:<br />
Do not turn the crankshaft.<br />
(i) Remove the 2 nuts and connecting rod cap<br />
(See step (b) and (c) above).<br />
P20864<br />
2003 TOYOTA TACOMA (RM1002U)<br />
Author:<br />
Date:<br />
1258
ENGINE MECHANICAL (5VZ–FE)<br />
–<br />
CYLINDER BLOCK<br />
EM–83<br />
(j)<br />
Measure the Plastigauge at its widest point.<br />
Standard oil clearance:<br />
P20863<br />
STD<br />
U/S 0.25<br />
0.024 – 0.053 mm (0.0009 – 0.0021 in.)<br />
0.023 – 0.069 mm (0.0009 – 0.0027 in.)<br />
Maximum oil clearance: 0.08 mm (0.0031 in.)<br />
If the oil clearance is greater than maximum, replace the bearings.<br />
If necessary, grind or replace the crankshaft.<br />
Mark<br />
1, 2 or 3<br />
Mark<br />
1, 2 or 3<br />
P01284<br />
HINT:<br />
If using a standard bearing, replace with one having the same<br />
number marked on the connecting rod cap. There are 3 sizes<br />
of standard bearings, marked ”1”, ”2” and ”3” accordingly.<br />
Reference<br />
Standard bearing center wall thickness:<br />
(k)<br />
Mark ”1”<br />
Mark ”2”<br />
Mark ”3”<br />
1.484 – 1.488 mm (0.0584 – 0.0586 in.)<br />
1.488 – 1.492 mm (0.0586 – 0.0587 in.)<br />
1.492 – 1.496 mm (0.0587 – 0.0589 in.)<br />
Completely remove the Plastigauge.<br />
P00884<br />
22. REMOVE PISTON AND CONNECTING ROD AS-<br />
SEMBLIES<br />
(a) Using a ridge reamer, remove the all carbon from the top<br />
of the cylinder.<br />
(b) Cover the connecting rod bolts with a short piece of hose<br />
to protect the crankshaft from damage.<br />
(c) Push the piston, connecting rod assembly and upper<br />
bearing through the top of the cylinder block.<br />
HINT:<br />
Keep the bearings, connecting rod and cap together.<br />
Arrange the piston and connecting rod assemblies in correct<br />
order.<br />
2003 TOYOTA TACOMA (RM1002U)<br />
Author:<br />
Date:<br />
1259
EM–84<br />
ENGINE MECHANICAL (5VZ–FE)<br />
–<br />
CYLINDER BLOCK<br />
8<br />
5<br />
2<br />
P20860<br />
23. CHECK CRANKSHAFT THRUST CLEARANCE<br />
Using a dial indicator, measure the thrust clearance while prying<br />
the crankshaft back and forth with a screwdriver.<br />
Standard thrust clearance:<br />
0.020 – 0.220 mm (0.0008 – 0.0087 in.)<br />
Maximum thrust clearance: 0.300 mm (0.0118 in.)<br />
If the thrust clearance is greater than maximum, replace the<br />
thrust washers as a set.<br />
Thrust washer thickness:<br />
2.440 – 2.490 mm (0.0961 – 0.0980 in.)<br />
24. REMOVE MAIN BEARING CAP AND CHECK OIL<br />
CLEARANCE<br />
(a) Uniformly loosen and remove the main bearing cap bolts,<br />
in several passes, in the sequence shown.<br />
3<br />
6<br />
7<br />
4<br />
1<br />
A07422<br />
P21453<br />
(b) Using a screwdriver, pry out the main bearing cap and remove<br />
the main bearing cap, lower main bearings and lower<br />
thrust washers (No.2 journal position of main bearing<br />
cap only).<br />
HINT:<br />
Keep the lower main bearings and lower thrust washers together<br />
with the main bearing cap.<br />
(c) Lift out the crankshaft.<br />
HINT:<br />
Keep the upper main bearings and upper thrust washers together<br />
with the cylinder block.<br />
(d) Clean each main journal and bearing.<br />
(e) Check each main journal and bearing for pitting and<br />
scratches.<br />
If the journal or bearing is damaged, replace the bearings. If<br />
necessary, grind or replace the crankshaft.<br />
(f) Place the crankshaft on the cylinder block.<br />
Plastigage<br />
(g) Lay a strip of Plastigage across each journal.<br />
(h) Install the main bearing cap with the 8 bolts (See page<br />
EM–98).<br />
NOTICE:<br />
Do not turn the crankshaft.<br />
(i) Remove the 8 bolts and main bearing cap<br />
(See step (a) and (b) above).<br />
EM4968<br />
2003 TOYOTA TACOMA (RM1002U)<br />
Author:<br />
Date:<br />
1260
ENGINE MECHANICAL (5VZ–FE)<br />
–<br />
CYLINDER BLOCK<br />
EM–85<br />
(j)<br />
Measure the Plastigauge at its widest point.<br />
Standard clearance:<br />
No.1<br />
STD<br />
U/S 0.25<br />
0.020 – 0.038 mm (0.0008 – 0.0015 in.)<br />
0.019 – 0.059 mm (0.0007 – 0.0023 in.)<br />
EM4969<br />
Others<br />
STD<br />
U/S 0.25<br />
0.024 – 0.042 mm (0.0009 – 0.0017 in.)<br />
0.023 – 0.063 mm (0.0009 – 0.0025 in.)<br />
Maximum clearance: 0.08 mm (0.0031 in.)<br />
HINT:<br />
If replacing the cylinder block subassembly, the bearing standard<br />
clearance will be:<br />
No.1<br />
Others<br />
0.010 – 0.049 mm (0.0004 – 0.0020 in.)<br />
0.014 – 0.053 mm (0.0006 – 0.0021 in.)<br />
If the oil clearance is greater than maximum, replace the bearings.<br />
If necessary, grind or replace the crankshaft.<br />
No.1<br />
No.2<br />
No.3<br />
No.4<br />
Mark F<br />
No.1<br />
No.2<br />
No.3<br />
No.4<br />
Mark 1, 2 or 3<br />
Mark 1, 2, 3, 4 or 5<br />
Mark<br />
0, 1, or 2<br />
No.4<br />
Crank Pin<br />
HINT:<br />
If using a standard bearing, replace with one having the same<br />
number. If the number of the bearing cannot be determined, select<br />
the correct bearing by adding together the numbers imprinted<br />
on the cylinder block and crankshaft, then selecting the<br />
bearing with the same number as the total. There are 5 sizes<br />
of standard bearings, marked ”1”, ”2”, ”3”, ”4” and ”5” accordingly.<br />
Number marked<br />
Cylinder block<br />
1 2 3<br />
Crankshaft<br />
0 1 2 0 1 2 0 1 2<br />
Use bearing<br />
1 2 3 2 3 4 3 4 5<br />
EXAMPLE: Cylinder block ”2” + Crankshaft ”1”<br />
= Total number 3 (Use bearing ”3”)<br />
No.3 Crank Pin<br />
Z04969<br />
2003 TOYOTA TACOMA (RM1002U)<br />
Author:<br />
Date:<br />
1261
EM–86<br />
ENGINE MECHANICAL (5VZ–FE)<br />
–<br />
CYLINDER BLOCK<br />
Reference<br />
Standard sized bearing center wall thickness:<br />
No.1 Mark ”1” 1.991 – 1.994 mm (0.0784 – 0.0785 in.)<br />
Mark ”2”<br />
1.994 – 1.997 mm (0.0785 – 0.0786 in.)<br />
Mark ”3”<br />
1.997 – 2.000 mm (0.0786 – 0.0787 in.)<br />
Mark ”4”<br />
2.000 – 2.003 mm (0.0787 – 0.0789 in.)<br />
Mark ”5”<br />
2.003 – 2.006 mm (0.0789 – 0.0790 in.)<br />
Others Mark ”1” 1.989 – 1.992 mm (0.0783 – 0.0784 in.)<br />
Mark ”2”<br />
1.992 – 1.995 mm (0.0784 – 0.0785 in.)<br />
Mark ”3”<br />
1.995 – 1.998 mm (0.0785 – 0.0787 in.)<br />
Mark ”4”<br />
1.998 – 2.001 mm (0.0787 – 0.0788 in.)<br />
Mark ”5”<br />
2.001 – 2.004 mm (0.0788 – 0.0789 in.)<br />
Cylinder block main journal bore diameter:<br />
Mark ”1”<br />
Mark ”2”<br />
Mark ”3”<br />
68.010 – 68.016 mm (2.6776 – 2.6778 in.)<br />
68.016 – 68.022 mm (2.6778 – 2.6780 in.)<br />
68.022 – 68.028 mm (2.6780 – 2.6783 in.)<br />
Crankshaft main journal diameter:<br />
Mark ”0”<br />
Mark ”1”<br />
Mark ”2”<br />
63.996 – 64.000 mm (2.5195 – 2.5197 in.)<br />
63.990 – 63.996 mm (2.5193 – 2.5195 in.)<br />
63.985 – 63.990 mm (2.5191 – 2.5193 in.)<br />
(k) Completely remove the Plastigauge.<br />
25. REMOVE CRANKSHAFT<br />
(a) Lift out the crankshaft.<br />
(b) Remove the upper main bearings and upper thrust washers<br />
from the cylinder block.<br />
HINT:<br />
Arrange the main bearings and thrust washers in correct order.<br />
26. CHECK FIT BETWEEN PISTON AND PISTON PIN<br />
Try to move the piston back and forth on the piston pin.<br />
If any movement is felt, replace the piston and pin as a set.<br />
P21454<br />
27. REMOVE PISTON RINGS<br />
(a) Using a piston ring expander, remove the 2 compression<br />
rings.<br />
(b) Remove the 2 side rails and oil ring by hand.<br />
HINT:<br />
Arrange the piston rings in the correct order only.<br />
P21446<br />
2003 TOYOTA TACOMA (RM1002U)<br />
Author:<br />
Date:<br />
1262
ENGINE MECHANICAL (5VZ–FE)<br />
–<br />
CYLINDER BLOCK<br />
EM–87<br />
28. DISCONNECT CONNECTING ROD FROM PISTON<br />
(a) Using a small screwdriver, pry out the 2 snap rings.<br />
P21451<br />
(b)<br />
Gradually heat the piston to about 60°C (140°F).<br />
P01031<br />
(c) Using a plastic–faced hammer and brass bar, lightly tap<br />
out the piston pin and remove the connecting rod.<br />
HINT:<br />
The piston and pin are a matched set.<br />
Arrange the pistons, pins, rings, connecting rods and<br />
bearings in the correct order.<br />
P01030<br />
2003 TOYOTA TACOMA (RM1002U)<br />
Author:<br />
Date:<br />
1263
![F RELAY LOCATIONS [Engine Compartment] [Instrument Panel] 20](https://img.yumpu.com/53634281/1/184x260/f-relay-locations-engine-compartment-instrument-panel-20.jpg?quality=85)