DISASSEMBLY
DISASSEMBLY
DISASSEMBLY
- No tags were found...

You also want an ePaper? Increase the reach of your titles
YUMPU automatically turns print PDFs into web optimized ePapers that Google loves.
CH–6<br />
CHARGING (2RZ–FE, 3RZ–FE)<br />
–<br />
GENERATOR<br />
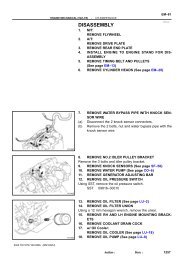
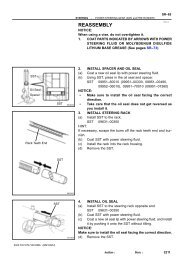
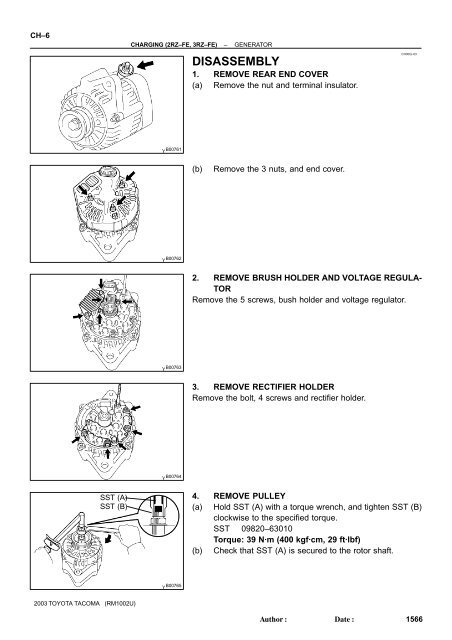
<strong>DISASSEMBLY</strong><br />
1. REMOVE REAR END COVER<br />
(a) Remove the nut and terminal insulator.<br />
CH00Q–03<br />
B00761<br />
(b)<br />
Remove the 3 nuts, and end cover.<br />
B00762<br />
2. REMOVE BRUSH HOLDER AND VOLTAGE REGULA-<br />
TOR<br />
Remove the 5 screws, bush holder and voltage regulator.<br />
B00763<br />
3. REMOVE RECTIFIER HOLDER<br />
Remove the bolt, 4 screws and rectifier holder.<br />
B00764<br />
SST (A)<br />
SST (B)<br />
4. REMOVE PULLEY<br />
(a) Hold SST (A) with a torque wrench, and tighten SST (B)<br />
clockwise to the specified torque.<br />
SST 09820–63010<br />
Torque: 39 N·m (400 kgf·cm, 29 ft·lbf)<br />
(b) Check that SST (A) is secured to the rotor shaft.<br />
B00765<br />
2003 TOYOTA TACOMA (RM1002U)<br />
Author:<br />
Date:<br />
1566
CHARGING (2RZ–FE, 3RZ–FE)<br />
–<br />
GENERATOR<br />
CH–7<br />
(c)<br />
(d)<br />
Mount SST (C) in a vise.<br />
Install the generator to SST (C).<br />
SST (C)<br />
P04210<br />
SST (C)<br />
SST (A)<br />
(e) To loosen the pulley nut, turn SST (A) in the direction<br />
shown in the illustration.<br />
NOTICE:<br />
To prevent damage to the rotor shaft, do not loosen the<br />
pulley nut more than one–half of a turn.<br />
(f) Remove the generator from SST (C).<br />
Turn<br />
P04394<br />
SST (A)<br />
SST (B)<br />
(g)<br />
(h)<br />
Turn SST (B) and remove SST (A and B).<br />
Remove the pulley nut and pulley.<br />
B00766<br />
5. REMOVE RECTIFIER END FRAME<br />
(a) Remove the 4 nuts.<br />
B00767<br />
SST<br />
(b) Using SST, remove the rectifier end frame.<br />
SST 09286–46011<br />
6. REMOVE ROTOR FROM DRIVE END FRAME<br />
B00768<br />
2003 TOYOTA TACOMA (RM1002U)<br />
Author:<br />
Date:<br />
1567
![F RELAY LOCATIONS [Engine Compartment] [Instrument Panel] 20](https://img.yumpu.com/53634281/1/184x260/f-relay-locations-engine-compartment-instrument-panel-20.jpg?quality=85)