Lab 8.2.6 Deleting VLAN Configurations
Lab 8.2.6 Deleting VLAN Configurations
Lab 8.2.6 Deleting VLAN Configurations
- No tags were found...

Create successful ePaper yourself
Turn your PDF publications into a flip-book with our unique Google optimized e-Paper software.
<strong>Lab</strong> <strong>8.2.6</strong> <strong>Deleting</strong> <strong>VLAN</strong> <strong>Configurations</strong><br />
Objective<br />
• Create a basic switch configuration and verify it.<br />
• Create two <strong>VLAN</strong>s.<br />
• Name the <strong>VLAN</strong>s and assign multiple member ports to them.<br />
• Remove an interface from a <strong>VLAN</strong> and Delete a <strong>VLAN</strong><br />
• Understand why it is not possible to delete <strong>VLAN</strong> 1.<br />
Background/Preparation<br />
When managing a switch, the Management Domain is always <strong>VLAN</strong> 1. The Network Administrator's<br />
workstation must have access to a port in the <strong>VLAN</strong> 1 Management Domain. All ports are assigned<br />
to <strong>VLAN</strong> 1 by default. This lab will also help demonstrate how to remove an interface from and<br />
existing <strong>VLAN</strong> and how to delete an entire <strong>VLAN</strong>.<br />
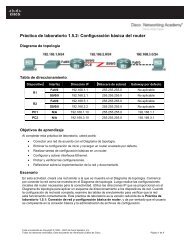
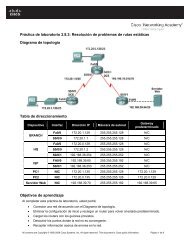
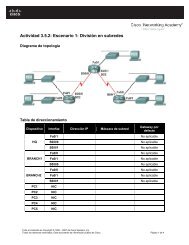
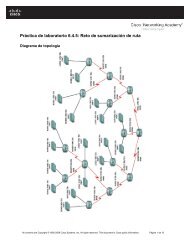
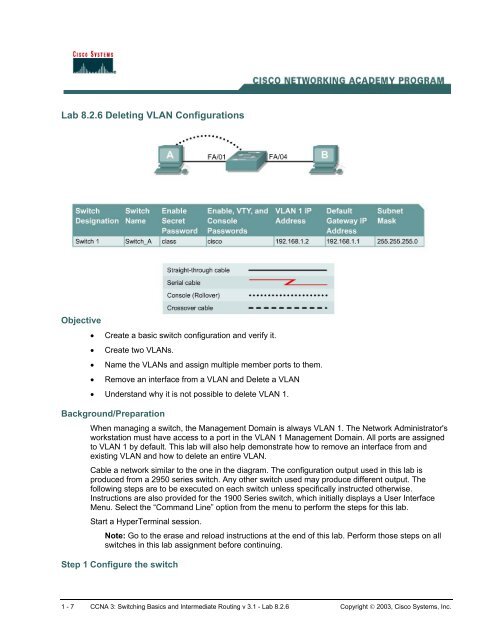
Cable a network similar to the one in the diagram. The configuration output used in this lab is<br />
produced from a 2950 series switch. Any other switch used may produce different output. The<br />
following steps are to be executed on each switch unless specifically instructed otherwise.<br />
Instructions are also provided for the 1900 Series switch, which initially displays a User Interface<br />
Menu. Select the “Command Line” option from the menu to perform the steps for this lab.<br />
Start a HyperTerminal session.<br />
Note: Go to the erase and reload instructions at the end of this lab. Perform those steps on all<br />
switches in this lab assignment before continuing.<br />
Step 1 Configure the switch<br />
1 - 7 CCNA 3: Switching Basics and Intermediate Routing v 3.1 - <strong>Lab</strong> <strong>8.2.6</strong> Copyright © 2003, Cisco Systems, Inc.
Configure the hostname, access and command mode passwords, as well as the management LAN<br />
settings. These values are shown in the chart. If problems occur while performing this configuration,<br />
refer to the Basic Switch Configuration lab.<br />
Step 2 Configure the hosts attached to the switch<br />
Configure the hosts to use the same subnet for the address, mask, and default gateway as on the<br />
switch.<br />
Step 3 Verify connectivity<br />
a. To verify that the hosts and switch are correctly configured, ping the switch from the hosts.<br />
b. Were the pings successful? __________________________________________________<br />
c. If the answer is no, troubleshoot the host and switch configurations.<br />
Step 4 Display the <strong>VLAN</strong> interface information<br />
a. On Switch_A, type the command show vlan at the Privileged EXEC prompt as follows:<br />
Switch_A#show vlan<br />
1900:<br />
Switch_A#show vlan-membership<br />
b. Which ports belong to the default <strong>VLAN</strong>? ________________________________________<br />
Step 5 Create and name two <strong>VLAN</strong>s<br />
Enter the following commands to create and name two <strong>VLAN</strong>s:<br />
Switch_A#vlan database<br />
Switch_A(vlan)#vlan 2 name <strong>VLAN</strong>2<br />
Switch_A(vlan)#vlan 3 name <strong>VLAN</strong>3<br />
Switch_A(vlan)#exit<br />
1900:<br />
Switch_A#configure terminal<br />
Switch_A(config)#vlan 2 name <strong>VLAN</strong>2<br />
Switch_A(config)#vlan 3 name <strong>VLAN</strong>3<br />
Step 6 Assign ports to <strong>VLAN</strong> 2<br />
Assigning ports to <strong>VLAN</strong>s must be done from the interface mode. Enter the following commands to<br />
add ports 4, 5 and 6 to <strong>VLAN</strong> 2.<br />
Switch_A#configure terminal<br />
Switch_A(config)#interface fastethernet 0/4<br />
Switch_A(config-if)#switchport mode access<br />
Switch_A(config-if)#switchport access vlan 2<br />
Switch_A(config-if)#interface fastethernet 0/5<br />
Switch_A(config-if)#switchport mode access<br />
Switch_A(config-if)#switchport access vlan 2<br />
Switch_A(config-if)#interface fastethernet 0/6<br />
Switch_A(config-if)#switchport mode access<br />
2 - 7 CCNA 3: Switching Basics and Intermediate Routing v 3.1 - <strong>Lab</strong> <strong>8.2.6</strong> Copyright © 2003, Cisco Systems, Inc.
1900:<br />
Switch_A(config-if)#switchport access vlan 2<br />
Switch_A(config-if)#end<br />
Switch_A#configure terminal<br />
Switch_A(config)#interface Ethernet 0/4<br />
Switch_A(config-if)#vlan static 2<br />
Switch_A(config-if)#interface Ethernet 0/5<br />
Switch_A(config-if)#vlan static 2<br />
Switch_A(config-if)#interface Ethernet 0/6<br />
Switch_A(config-if)#vlan static 2<br />
Switch_A(config)#end<br />
Step 7 Display the <strong>VLAN</strong> interface information<br />
a. On Switch_A, type the command show vlan at the Privileged EXEC prompt as follows:<br />
Switch_A#show vlan<br />
1900:<br />
Switch_A#show vlan-membership<br />
b. Are ports 4 through 6 assigned to <strong>VLAN</strong> 2? _______________________________________<br />
Step 8 Assign Ports to <strong>VLAN</strong> 3<br />
Switch_A#configure terminal<br />
Switch_A(config-if)#interface fastethernet 0/7<br />
Switch_A(config-if)#switchport mode access<br />
Switch_A(config-if)#switchport access vlan 3<br />
Switch_A(config-if)#interface fastethernet 0/8<br />
Switch_A(config-if)#switchport mode access<br />
Switch_A(config-if)#switchport access vlan 3<br />
Switch_A(config-if)#interface fastethernet 0/9<br />
Switch_A(config-if)#switchport mode access<br />
Switch_A(config-if)#switchport access vlan 3<br />
Switch_A(config-if)#end<br />
Step 9 Display the <strong>VLAN</strong> Interface Information<br />
a. On Switch_A, type the command show vlan at the Privileged EXEC prompt.<br />
Switch_A#show vlan<br />
b. Are ports 7-9 assigned to <strong>VLAN</strong> 3? _____________________________________________<br />
Step 10 Test the <strong>VLAN</strong>s<br />
Ping from the host in port 0/4 to the host in port 0/1.<br />
a. Was the ping successful? _____________________________________________<br />
Why? _____________________________________________<br />
3 - 7 CCNA 3: Switching Basics and Intermediate Routing v 3.1 - <strong>Lab</strong> <strong>8.2.6</strong> Copyright © 2003, Cisco Systems, Inc.
Ping from the host in port 0/1 to the host in port 0/4.<br />
b. Was the ping successful? _____________________________________________<br />
Why? _____________________________________________<br />
Ping from the host in port 0/4 to the switch IP 192.168.1.2.<br />
c. Was the ping successful? _____________________________________________<br />
d. Why? _____________________________________________<br />
Ping from the host in port 0/1 to the switch IP 192.168.1.2.<br />
d. Was the ping successful? _____________________________________________<br />
Why? _____________________________________________<br />
Step 11 Delete a Host from a <strong>VLAN</strong><br />
To remove a host from a <strong>VLAN</strong>, use the no form of the switchport commands in the port interface<br />
configuration mode.<br />
Switch_A#configure terminal<br />
Switch_A(config)#interface fastethernet 0/4<br />
Switch_A(config-if)#no switchport access vlan 2<br />
1900:<br />
Switch_A#configure terminal<br />
Switch_A(config)#interface Ethernet 0/4<br />
Switch_A(config-if)#no vlan-membership 2<br />
Switch_A(config-if)#end<br />
Step 12 Display the <strong>VLAN</strong> Interface Information<br />
a. On Switch_A, type the command show vlan at the Privileged EXEC prompt.<br />
Switch_A#show vlan<br />
b. Is port 0/4 removed from <strong>VLAN</strong> 2? _____________________________________________<br />
Step 13 Delete a <strong>VLAN</strong><br />
a. To remove an entire <strong>VLAN</strong>, enter the <strong>VLAN</strong> database mode and use the negative form of the<br />
command.<br />
Switch_A#vlan database<br />
Switch_A(vlan)#no vlan 3<br />
<strong>Deleting</strong> <strong>VLAN</strong> 3<br />
Switch_A(vlan)#exit<br />
1900:<br />
Switch_A#config terminal<br />
Switch_A(config)#interface ethernet 0/7<br />
Switch_A(config-if)#no vlan 3<br />
Switch_A(config-if)#exit<br />
4 - 7 CCNA 3: Switching Basics and Intermediate Routing v 3.1 - <strong>Lab</strong> <strong>8.2.6</strong> Copyright © 2003, Cisco Systems, Inc.
Step 14 Display the <strong>VLAN</strong> Interface Information<br />
a. On Switch_A, type the command show vlan at the Privileged EXEC prompt.<br />
Switch_A#show vlan<br />
b. Is <strong>VLAN</strong> 3 removed? _______________________________________________________<br />
c. What happened to the ports that were released from <strong>VLAN</strong> 3? ______________________<br />
Step 15 Delete <strong>VLAN</strong> 1<br />
a. Try to delete <strong>VLAN</strong> 1, which is the default <strong>VLAN</strong>, the same way that you deleted <strong>VLAN</strong> 3.<br />
Switch_A#vlan database<br />
Switch_A(vlan)#no vlan 1<br />
A default <strong>VLAN</strong> may not be deleted.<br />
Switch_A(vlan)#exit<br />
1900:<br />
Switch_A#config t<br />
Switch_A(config)#no vlan 1<br />
Switch_A(config)#no vlan 1<br />
^<br />
% Invalid input detected at '^' marker.<br />
Switch_A(config)#exit<br />
b. The default <strong>VLAN</strong> cannot be deleted.<br />
Once the steps are completed, logoff by typing exit, and turn all the devices off. Then remove and<br />
store the cables and adapter.<br />
5 - 7 CCNA 3: Switching Basics and Intermediate Routing v 3.1 - <strong>Lab</strong> <strong>8.2.6</strong> Copyright © 2003, Cisco Systems, Inc.
Erasing and Reloading the Switch<br />
For the majority of the labs in CCNA 3 and CCNA 4 it is necessary to start with an unconfigured<br />
switch. Use of a switch with an existing configuration may produce unpredictable results. These<br />
instructions allow preparation of the switch prior to performing the lab so previous configuration<br />
options do not interfere. The following is the procedure for clearing out previous configurations and<br />
starting with an unconfigured switch. Instructions are provided for the 2900, 2950, and 1900 Series<br />
switches.<br />
2900 and 2950 Series Switches<br />
1. Enter into the Privileged EXEC mode by typing enable.<br />
If prompted for a password, enter class (if that does not work, ask the instructor).<br />
Switch>enable<br />
2. Remove the <strong>VLAN</strong> database information file.<br />
Switch#delete flash:vlan.dat<br />
Delete filename [vlan.dat]?[Enter]<br />
Delete flash:vlan.dat? [confirm] [Enter]<br />
If there was no <strong>VLAN</strong> file, this message is displayed.<br />
%Error deleting flash:vlan.dat (No such file or directory)<br />
3. Remove the switch startup configuration file from NVRAM.<br />
Switch#erase startup-config<br />
The responding line prompt will be:<br />
Erasing the nvram filesystem will remove all files! Continue? [confirm]<br />
Press Enter to confirm.<br />
The response should be:<br />
Erase of nvram: complete<br />
4. Check that <strong>VLAN</strong> information was deleted.<br />
Verify that the <strong>VLAN</strong> configuration was deleted in Step 2 using the show vlan command. If<br />
previous <strong>VLAN</strong> configuration information (other than the default management <strong>VLAN</strong> 1) is still<br />
present it will be necessary to power cycle the switch (hardware restart) instead of issuing the<br />
reload command. To power cycle the switch, remove the power cord from the back of the<br />
switch or unplug it. Then plug it back in.<br />
If the <strong>VLAN</strong> information was successfully deleted in Step 2, go to Step 5 and restart the switch<br />
using the reload command.<br />
5. Software restart (using the reload command)<br />
6 - 7 CCNA 3: Switching Basics and Intermediate Routing v 3.1 - <strong>Lab</strong> <strong>8.2.6</strong> Copyright © 2003, Cisco Systems, Inc.
Note: This step is not necessary if the switch was restarted using the power cycle method.<br />
a. At the Privileged EXEC mode enter the command reload.<br />
Switch(config)#reload<br />
The responding line prompt will be:<br />
System configuration has been modified. Save? [yes/no]:<br />
b. Type n and then press Enter.<br />
The responding line prompt will be:<br />
Proceed with reload? [confirm] [Enter]<br />
The first line of the response will be:<br />
Reload requested by console.<br />
After the switch has reloaded, the line prompt will be:<br />
Would you like to enter the initial configuration dialog? [yes/no]:<br />
c. Type n and then press Enter.<br />
The responding line prompt will be:<br />
Press RETURN to get started! [Enter]<br />
1900 Series Switches<br />
1. Remove <strong>VLAN</strong> Trunking Protocol (VTP) information.<br />
#delete vtp<br />
This command resets the switch with VTP parameters set to factory<br />
defaults.<br />
All other parameters will be unchanged.<br />
Reset system with VTP parameters set to factory defaults, [Y]es or<br />
[N]o?<br />
Enter y and press Enter.<br />
2. Remove the switch startup configuration from NVRAM.<br />
#delete nvram<br />
This command resets the switch with factory defaults. All system parameters will revert to their<br />
default factory settings. All static and dynamic addresses will be removed.<br />
Reset system with factory defaults, [Y]es or [N]o?<br />
Enter y and press Enter.<br />
7 - 7 CCNA 3: Switching Basics and Intermediate Routing v 3.1 - <strong>Lab</strong> <strong>8.2.6</strong> Copyright © 2003, Cisco Systems, Inc.