Chapter 3 Lab A" Securing Administrative Access Using AAA and RADIUS
Chapter 3: Lab A" Securing Administrative Access Using AAA and ...
Chapter 3: Lab A" Securing Administrative Access Using AAA and ...
- No tags were found...

You also want an ePaper? Increase the reach of your titles
YUMPU automatically turns print PDFs into web optimized ePapers that Google loves.
<strong>Chapter</strong> 3: <strong>Lab</strong> A" <strong>Securing</strong> <strong>Administrative</strong> <strong>Access</strong> <strong>Using</strong> <strong>AAA</strong> <strong>and</strong><br />
<strong>RADIUS</strong><br />
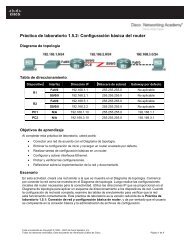
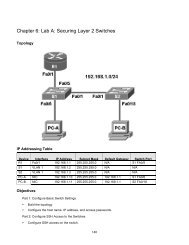
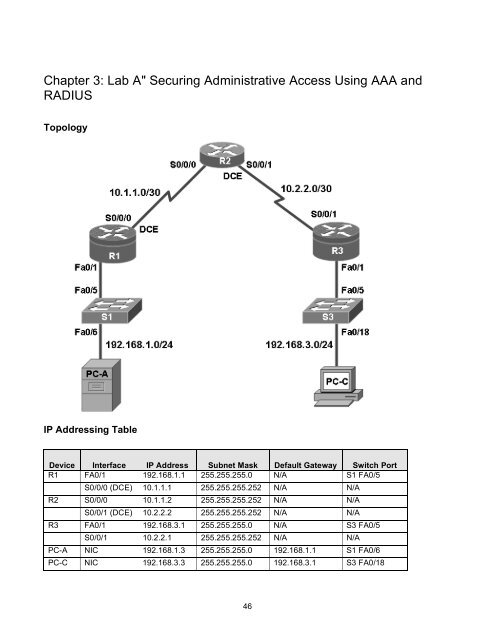
Topology<br />
IP Addressing Table<br />
Device Interface IP Address Subnet Mask Default Gateway Switch Port<br />
R1 FA0/1 192.168.1.1 255.255.255.0 N/A S1 FA0/5<br />
S0/0/0 (DCE) 10.1.1.1 255.255.255.252 N/A N/A<br />
R2 S0/0/0 10.1.1.2 255.255.255.252 N/A N/A<br />
S0/0/1 (DCE) 10.2.2.2 255.255.255.252 N/A N/A<br />
R3 FA0/1 192.168.3.1 255.255.255.0 N/A S3 FA0/5<br />
S0/0/1 10.2.2.1 255.255.255.252 N/A N/A<br />
PC-A NIC 192.168.1.3 255.255.255.0 192.168.1.1 S1 FA0/6<br />
PC-C NIC 192.168.3.3 255.255.255.0 192.168.3.1 S3 FA0/18<br />
46
Objectives<br />
Part 1: Basic Network Device Configuration<br />
• Configure basic settings such as host name, interface IP addresses, <strong>and</strong> access passwords.<br />
• Configure static routing.<br />
Part 2: Configure Local Authentication<br />
• Configure a local database user <strong>and</strong> local access for the console, vty, <strong>and</strong> aux lines.<br />
• Test the configuration.<br />
Part 3: Configure Local Authentication <strong>Using</strong> <strong>AAA</strong><br />
• Configure the local user database using Cisco IOS.<br />
• Configure <strong>AAA</strong> local authentication using Cisco IOS.<br />
• Configure <strong>AAA</strong> local authentication using SDM.<br />
• Test the configuration.<br />
Part 4: Configure Centralized Authentication <strong>Using</strong> <strong>AAA</strong> <strong>and</strong> <strong>RADIUS</strong><br />
• Install a <strong>RADIUS</strong> server on a computer.<br />
• Configure users on the <strong>RADIUS</strong> server.<br />
• Configure <strong>AAA</strong> services on a router to access the <strong>RADIUS</strong> server for authentication using Cisco IOS.<br />
• Configure <strong>AAA</strong> services on a router to access the <strong>RADIUS</strong> server for authentication using SDM.<br />
• Test the <strong>AAA</strong> <strong>RADIUS</strong> configuration.<br />
Background<br />
The most basic form of router access security is to create passwords for the console, vty, <strong>and</strong> aux lines. A<br />
user is prompted for only a password when accessing the router. Configuring a privileged EXEC mode enable<br />
secret password further improves security, but still only a basic password is required for each mode of<br />
access.<br />
In addition to basic passwords, specific usernames or accounts with varying privilege levels can be defined in<br />
the local router database that can apply to the router as a whole. When the console, vty, or aux lines are<br />
configured to refer to this local database, the user is prompted for a username <strong>and</strong> a password when using<br />
any of these lines to access the router.<br />
Additional control over the login process can be achieved using Authentication, Authorization, <strong>and</strong> Accounting<br />
(<strong>AAA</strong>). For basic authentication, <strong>AAA</strong> can be configured to access the local database for user logins, <strong>and</strong><br />
fallback procedures can also be defined. However, this approach is not very scalable because it must be<br />
configured on every router. To take full advantage of <strong>AAA</strong> <strong>and</strong> achieve maximum scalability, it is used in<br />
conjunction with an external TACACS+ or <strong>RADIUS</strong> server database. When a user attempts to login, the<br />
router references the external server database to verify that the user is logging in with a valid username <strong>and</strong><br />
password.<br />
In this lab, you build a multi-router network <strong>and</strong> configure the routers <strong>and</strong> hosts. You use various CLI<br />
comm<strong>and</strong>s <strong>and</strong> SDM tools to configure routers with basic local authentication <strong>and</strong> local authentication using<br />
<strong>AAA</strong>. You install <strong>RADIUS</strong> software on an external computer <strong>and</strong> use <strong>AAA</strong> to authenticate users with the<br />
<strong>RADIUS</strong> server.<br />
47
Note: The router comm<strong>and</strong>s <strong>and</strong> output in this lab are from a Cisco 1841 with Cisco IOS Release 12.4(20)T<br />
(Advance IP image). Other routers <strong>and</strong> Cisco IOS versions can be used. See the Router Interface Summary<br />
table at the end of the lab to determine which interface identifiers to use based on the equipment in the lab.<br />
Depending on the router model <strong>and</strong> Cisco IOS version, the comm<strong>and</strong>s available <strong>and</strong> output produced might<br />
vary from what is shown in this lab.<br />
Note: Make sure that the routers <strong>and</strong> switches have been erased <strong>and</strong> have no startup configurations.<br />
Required Resources<br />
• 3 routers with SDM 2.5 installed (Cisco 1841 with Cisco IOS Release 12.4(20)T1 or comparable)<br />
• 2 switches (Cisco 2960 or comparable)<br />
• PC-A: Windows XP, Vista, or Windows Server with <strong>RADIUS</strong> server software available<br />
• PC-C: Windows XP or Vista<br />
• Serial <strong>and</strong> Ethernet cables as shown in the topology<br />
• Rollover cables to configure the routers via the console<br />
Part 1. Basic Network Device Configuration<br />
In Part 1 of this lab, you set up the network topology <strong>and</strong> configure basic settings, such as the interface IP<br />
addresses, static routing, device access, <strong>and</strong> passwords.<br />
All steps should be performed on routers R1 <strong>and</strong> R3. Only steps 1, 2, 3 <strong>and</strong> 6 need to be performed on R2.<br />
The procedure for R1 is shown here as an example.<br />
Step 1: Cable the network as shown in the topology.<br />
Attach the devices shown in the topology diagram, <strong>and</strong> cable as necessary.<br />
Step 2: Configure basic settings for each router.<br />
a. Configure host names as shown in the topology.<br />
b. Configure the interface IP addresses as shown in the IP addressing table.<br />
c. Configure a clock rate for the routers with a DCE serial cable attached to their serial interface.<br />
R1(config)#interface S0/0/0<br />
R1(config-if)#clock rate 64000<br />
d. To prevent the router from attempting to translate incorrectly entered comm<strong>and</strong>s as though they were<br />
host names, disable DNS lookup.<br />
R1(config)#no ip domain-lookup<br />
Step 3: Configure static routing on the routers.<br />
Configure a static default route from R1 to R2 <strong>and</strong> from R3 to R2.<br />
Configure a static route from R2 to the R1 LAN <strong>and</strong> from R2 to the R3 LAN.<br />
48
Step 4: Configure PC host IP settings.<br />
Configure a static IP address, subnet mask, <strong>and</strong> default gateway for PC-A <strong>and</strong> PC-C, as shown in the IP<br />
addressing table.<br />
Step 5: Verify connectivity between PC-A <strong>and</strong> R3.<br />
a. Ping from R1 to R3.<br />
Were the ping results successful? _____<br />
If the pings are not successful, troubleshoot the basic device configurations before continuing.<br />
b. Ping from PC-A on the R1 LAN to PC-C on the R3 LAN.<br />
Were the ping results successful? _____<br />
If the pings are not successful, troubleshoot the basic device configurations before continuing.<br />
Note: If you can ping from PC-A to PC-C, you have demonstrated that static routing is configured <strong>and</strong><br />
functioning correctly. If you cannot ping but the device interfaces are up <strong>and</strong> IP addresses are correct,<br />
use the show run <strong>and</strong> show ip route comm<strong>and</strong>s to help identify routing protocol-related problems.<br />
Step 6: Save the basic running configuration for each router.<br />
Use the Transfer > Capture text option in HyperTerminal or some other method to capture the running<br />
configs for each router. Save the three files so that they can be used to restore configs later in the lab.<br />
Step 7: Configure <strong>and</strong> encrypt passwords on R1 <strong>and</strong> R3.<br />
Note: Passwords in this task are set to a minimum of 10 characters but are relatively simple for the<br />
benefit of performing the lab. More complex passwords are recommended in a production network.<br />
For this step, configure the same settings for R1 <strong>and</strong> R3. Router R1 is shown here as an example.<br />
a. Configure a minimum password length.<br />
Use the security passwords comm<strong>and</strong> to set a minimum password length of 10 characters.<br />
R1(config)#security passwords min-length 10<br />
b. Configure the enable secret password on both routers.<br />
R1(config)#enable secret cisco12345<br />
c. Configure the basic console, auxiliary port, <strong>and</strong> vty lines.<br />
d. Configure a console password <strong>and</strong> enable login for router R1. For additional security, the exectimeout<br />
comm<strong>and</strong> causes the line to log out after 5 minutes of inactivity. The logging synchronous<br />
comm<strong>and</strong> prevents console messages from interrupting comm<strong>and</strong> entry.<br />
Note: To avoid repetitive logins during this lab, the exec timeout can be set to 0 0, which prevents it<br />
from expiring. However, this is not considered a good security practice.<br />
R1(config)#line console 0<br />
R1(config-line)#password ciscoconpass<br />
R1(config-line)#exec-timeout 5 0<br />
49
R1(config-line)#login<br />
R1(config-line)#logging synchronous<br />
e. Configure a password for the aux port for router R1.<br />
R1(config)#line aux 0<br />
R1(config-line)#password ciscoauxpass<br />
R1(config-line)#exec-timeout 5 0<br />
R1(config-line)#login<br />
f. Configure the password on the vty lines for router R1.<br />
R1(config)#line vty 0 4<br />
R1(config-line)#password ciscovtypass<br />
R1(config-line)#exec-timeout 5 0<br />
R1(config-line)#login<br />
g. Encrypt the console, aux, <strong>and</strong> vty passwords.<br />
R1(config)#service password-encryption<br />
h. Issue the show run comm<strong>and</strong>. Can you read the console, aux, <strong>and</strong> vty passwords? Why or why<br />
not? ________________________________________________________________________<br />
Step 8: Configure a login warning banner on routers R1 <strong>and</strong> R3.<br />
a. Configure a warning to unauthorized uses using a message-of-the-day (MOTD) banner with the<br />
banner motd comm<strong>and</strong>. When a user connects to the router, the MOTD banner appears before the<br />
login prompt. In this example, the dollar sign ($) is used to start <strong>and</strong> end the message.<br />
R1(config)#banner motd $Unauthorized access strictly prohibited <strong>and</strong><br />
prosecuted to the full extent of the law$<br />
R1(config)#exit<br />
b. Issue the show run comm<strong>and</strong>. What does the $ convert to in the output? _____________________<br />
c. Exit privileged EXEC mode using the disable or exit comm<strong>and</strong> <strong>and</strong> press Enter to get started.<br />
Does the MOTD banner look like what you expected? _____<br />
Note: If it does not, just recreate it using the banner motd comm<strong>and</strong>.<br />
Step 9: Save the basic configurations.<br />
Save the running configuration to the startup configuration from the privileged EXEC prompt.<br />
R1#copy running-config startup-config<br />
Part 2. Configure Local Authentication<br />
In Part 2 of this lab, you configure a local username <strong>and</strong> password <strong>and</strong> change the access for the console, aux,<br />
<strong>and</strong> vty lines to reference the router’s local database for valid usernames <strong>and</strong> passwords. Perform all steps on R1<br />
<strong>and</strong> R3. The procedure for R1 is shown here.<br />
Step 1: Configure the local user database.<br />
a. Create a local user account with MD5 hashing to encrypt the password.<br />
R1(config)#username user01 secret user01pass<br />
50
. Exit global configuration mode <strong>and</strong> display the running configuration. Can you read the user’s<br />
password? ________________________<br />
Step 2: Configure local authentication for the console line <strong>and</strong> login.<br />
a. Set the console line to use the locally defined login usernames <strong>and</strong> passwords.<br />
R1(config)#line console 0<br />
R1(config-line)#login local<br />
b. Exit to the initial router screen that displays: R1 con0 is now available, Press RETURN to get started.<br />
c. Log in using the user01 account <strong>and</strong> password previously defined.<br />
d. What is the difference between logging in at the console now <strong>and</strong> previously?<br />
________________________________________________________________________________<br />
e. After logging in, issue the show run comm<strong>and</strong>. Were you able to issue the comm<strong>and</strong>? Why or why not?<br />
__________________________________<br />
f. Enter privileged EXEC mode using the enable comm<strong>and</strong>. Were you prompted for a password? Why or<br />
why not? ______________________________________________________________________<br />
Step 3: Test the new account by logging in from a Telnet session.<br />
a. From PC-A, establish a Telnet session with R1.<br />
PC-A>telnet 192.168.1.1<br />
b. Were you prompted for a user account? Why or why not? __________________________________<br />
c. What password did you use to login? _________________________<br />
d. Set the vty lines to use the locally defined login accounts.<br />
R1(config)#line vty 0 4<br />
R1(config-line)#login local<br />
e. From PC-A, telnet R1 to R1 again.<br />
PC-A>telnet 192.168.1.1<br />
f. Were you prompted for a user account? Why or why not? _________________________________<br />
g. Log in as user01 with a password of user01pass.<br />
h. While connected to R1 via Telnet, access privileged EXEC mode with the enable comm<strong>and</strong>.<br />
i. What password did you use? ____________________________<br />
j. For added security, set the aux port to use the locally defined login accounts.<br />
R1(config)#line aux 0<br />
R1(config-line)#login local<br />
k. End the Telnet session with the exit comm<strong>and</strong>.<br />
51
Step 4: Save the configuration on R1.<br />
a. Save the running configuration to the startup configuration from the privileged EXEC prompt.<br />
R1#copy running-config startup-config<br />
b. Use HyperTerminal or another means to save the R1 running configuration from Parts 1 <strong>and</strong> 2 of this<br />
lab <strong>and</strong> edit it so that it can be used to restore the R1 config later in the lab.<br />
Note: Remove all occurrences of “- - More - -.” Remove any comm<strong>and</strong>s that are not related to the items<br />
you configured in Parts 1 <strong>and</strong> 2 of the lab, such as the Cisco IOS version number, no service pad, <strong>and</strong> so<br />
on. Many comm<strong>and</strong>s are entered automatically by the Cisco IOS software. Also replace the encrypted<br />
passwords with the correct ones specified previously.<br />
Step 5: Perform steps 1 through 4 on R3 <strong>and</strong> save the configuration.<br />
a. Save the running configuration to the startup configuration from the privileged EXEC prompt.<br />
R3#copy running-config startup-config<br />
b. Use HyperTerminal or another means to save the R3 running configuration from Parts 1 <strong>and</strong> 2 of this<br />
lab <strong>and</strong> edit it so that it can be used to restore the R3 config later in the lab.<br />
Part 3. Configure Local Authentication <strong>Using</strong> <strong>AAA</strong> on R3<br />
Task 1. Configure the Local User Database <strong>Using</strong> Cisco IOS<br />
Note: If you want to configure <strong>AAA</strong> using SDM, go to Task 3.<br />
Step 1: Configure the local user database.<br />
a. Create a local user account with MD5 hashing to encrypt the password.<br />
R3(config)#username Admin01 privilege 15 secret Admin01pass<br />
b. Exit global configuration mode <strong>and</strong> display the running configuration. Can you read the user’s password?<br />
_________________________________________________________________<br />
Task 2. Configure <strong>AAA</strong> Local Authentication <strong>Using</strong> Cisco IOS<br />
Step 1: Enable <strong>AAA</strong> services.<br />
a. On R3, enable services with the global configuration comm<strong>and</strong> aaa new-model. Because you are<br />
implementing local authentication, use local authentication as the first method, <strong>and</strong> no authentication as<br />
the secondary method.<br />
If you were using an authentication method with a remote server, such as TACACS+ or <strong>RADIUS</strong>, you<br />
would configure a secondary authentication method for fallback if the server is unreachable.<br />
Normally, the secondary method is the local database. In this case, if no usernames are configured in<br />
the local database, the router allows all users login access to the device.<br />
b. Enable <strong>AAA</strong> services.<br />
R3(config)#aaa new-model<br />
52
Step 2: Implement <strong>AAA</strong> services for console access using the local database.<br />
a. Create the default login authentication list by issuing the aaa authentication login default<br />
method1[method2][method3] comm<strong>and</strong> with a method list using the local <strong>and</strong> none keywords.<br />
R3(config)#aaa authentication login default local none<br />
Note: If you do not set up a default login authentication list, you could get locked out of the router <strong>and</strong><br />
be forced to use the password recovery procedure for your specific router.<br />
b. Exit to the initial router screen that displays: R3 con0 is now available, Press RETURN to get<br />
started.<br />
c. Log in to the console as Admin01 with a password of Admin01pass. Remember that passwords are<br />
case-sensitive. Were you able to log in? Why or why not?<br />
_______________________________________________________________________________<br />
Note: If your session with the console port of the router times out, you might have to log in using the<br />
default authentication list.<br />
d. Exit to the initial router screen that displays: R3 con0 is now available, Press RETURN to get<br />
started.<br />
e. Attempt to log in to the console as baduser with any password. Were you able to log in? Why or why<br />
not? ____________________________________________________________________________<br />
f. If no user accounts are configured in the local database, which users are permitted to access the<br />
device? __________________________________________________________________________<br />
Step 3: Create a <strong>AAA</strong> authentication profile for Telnet using the local database.<br />
a. Create a unique authentication list for Telnet access to the router. This does not have the fallback of no<br />
authentication, so if there are no usernames in the local database, Telnet access is disabled. To create an<br />
authentication profile that is not the default, specify a list name of TELNET_LINES <strong>and</strong> apply it to the vty lines.<br />
R3(config)#aaa authentication login TELNET_LINES local<br />
R3(config)#line vty 0 4<br />
R3(config-line)#login authentication TELNET_LINES<br />
b. Verify that this authentication profile is used by opening a Telnet session from PC-C to R3.<br />
PC-C>telnet 192.168.3.1<br />
Trying 192.168.10.1 ... Open<br />
c. Log in as Admin01 with a password of Admin01pass. Were you able to login? Why or why not?<br />
_______________________________________________________________________________<br />
d. Exit the Telnet session with the exit comm<strong>and</strong>, <strong>and</strong> telnet to R3 again.<br />
e. Attempt to log in as baduser with any password. Were you able to login? Why or why not?<br />
_______________________________________________________________________________<br />
Task 3. (Optional) Configure <strong>AAA</strong> Local Authentication <strong>Using</strong> Cisco SDM<br />
You can also use SDM to configure the router to support <strong>AAA</strong>.<br />
53
Note: If you configured R3 <strong>AAA</strong> authentication using Cisco IOS comm<strong>and</strong>s in Tasks 1 <strong>and</strong> 2, you can skip<br />
this task. If you performed Tasks 1 <strong>and</strong> 2 <strong>and</strong> you want to perform this task, you should restore R3 to its basic<br />
configuration. See Part 4, Step 1 for the procedure to restore R3 to its basic configuration.<br />
Even if you do not perform this task, read through the steps to become familiar with the SDM process.<br />
Step 1: Implement <strong>AAA</strong> services <strong>and</strong> HTTP router access prior to starting SDM.<br />
a. From the CLI global config mode, enable a new <strong>AAA</strong> model.<br />
R3(config)#aaa new-model<br />
b. Enable the HTTP server on R3 for SDM access.<br />
R3(config)#ip http server<br />
Note: For maximum security, enable secure http server using the ip http<br />
secure-server comm<strong>and</strong>.<br />
Step 2: <strong>Access</strong> SDM <strong>and</strong> set comm<strong>and</strong> delivery preferences.<br />
a. Open a browser on PC-C <strong>and</strong> start SDM by entering the R3 IP address 192.168.3.1 in the address field.<br />
b. Log in with no username <strong>and</strong> the enable secret password cisco12345.<br />
c. In the Password Needed – Networking dialog box, enter cisco12345 in the Password field <strong>and</strong> click Yes.<br />
d. Configure SDM to allow you to preview the comm<strong>and</strong>s before sending them to the router. Select Edit ><br />
Preferences.<br />
e. In the User Preferences window, check the Preview comm<strong>and</strong>s before delivering to router check box<br />
<strong>and</strong> click OK.<br />
Step 3: Create an administrative user with SDM.<br />
a. Click the Configure button at the top of the screen.<br />
b. Select Additional Tasks > Router <strong>Access</strong> > User Accounts/View.<br />
c. In the User Accounts/View window, click Add.<br />
d. In the Add an Account window, enter Admin01 in the Username field.<br />
e. Enter the password Admin01pass in the New Password <strong>and</strong> Confirm New Password fields. (Remember,<br />
passwords are case-sensitive.)<br />
f. Confirm that the Encrypt Password using MD5 Hash Algorithm check box is checked.<br />
g. Select 15 from the Privilege Level drop-down list <strong>and</strong> click OK.<br />
54
h. In the Deliver Configuration to Router window, make sure that the Save running config to router’s<br />
startup config check box is checked, <strong>and</strong> click Deliver.<br />
i. In the Comm<strong>and</strong>s Delivery Status window, click OK.<br />
Step 4: Create a <strong>AAA</strong> method list for login.<br />
a. Click the Configure button at the top of the screen.<br />
b. Select Additional Tasks > <strong>AAA</strong> > Authentication Policies > Login.<br />
c. In the Authentication Login window, click Add.<br />
d. In the Add a Method List for Authentication Login window, verify that Default is in the Name field.<br />
55
e. Click Add in the Methods section.<br />
f. In the Select Method List(s) for Authentication Login window, choose local <strong>and</strong> click OK. Take note of the<br />
other methods listed, which include <strong>RADIUS</strong> (group radius) <strong>and</strong> TACACS+ (group tacacs+).<br />
56
g. Click OK to close the window.<br />
h. Repeat steps 4f <strong>and</strong> 4g, <strong>and</strong> choose none as a second authentication method.<br />
i. In the Deliver Configuration to Router window, make sure that the Save running config to router's startup<br />
config checkbox is checked, <strong>and</strong> click Deliver. In the Comm<strong>and</strong>s Delivery Status window, click OK.<br />
j. What comm<strong>and</strong> was delivered to the router?<br />
________________________________________________________________________________<br />
Step 5: Verify the <strong>AAA</strong> username <strong>and</strong> profile for console login.<br />
a. Exit to the initial router screen that displays: R3 con0 is now available, Press RETURN to get started.<br />
b. Log in to the console as Admin01 with a password of Admin01pass. Were you able to login? Why or why<br />
not? _________________________________________________________________________<br />
c. Exit to the initial router screen that displays: R3 con0 is now available, Press RETURN to get started.<br />
d. Attempt to log in to the console as baduser. Were you able to login? Why or why not?<br />
________________________________________________________________________________<br />
e. If no user accounts are configured in the local database, which users are permitted to access the device?<br />
__________________________________________________________________________<br />
f. Log in to the console as Admin01 with a password of Admin01pass. <strong>Access</strong> privileged EXEC mode using<br />
the enable secret password cisco12345 <strong>and</strong> then show the running config. What comm<strong>and</strong>s are associated<br />
with the SDM session?<br />
57
__________________________________________________________________________<br />
__________________________________________________________________________<br />
__________________________________________________________________________<br />
Task 4. Observe <strong>AAA</strong> Authentication <strong>Using</strong> Cisco IOS Debug<br />
In this task, you use the debug comm<strong>and</strong> to observe successful <strong>and</strong> unsuccessful authentication attempts.<br />
Step 1: Verify that the system clock <strong>and</strong> debug time stamps are configured correctly.<br />
a. From the R3 user or privileged EXEC mode prompt, use the show clock comm<strong>and</strong> to determine<br />
what the current time is for the router. If the time <strong>and</strong> date are incorrect, set the time from privileged<br />
EXEC mode with the comm<strong>and</strong> clock set HH:MM:SS DD month YYYY. An example is provided<br />
here for R3.<br />
R3#clock set 14:15:00 26 December 2008<br />
b. Verify that detailed time-stamp information is available for your debug output using the show run<br />
comm<strong>and</strong>. This comm<strong>and</strong> displays all lines in the running config that include the text “timestamps”.<br />
R3#show run | include timestamps<br />
service timestamps debug datetime msec<br />
service timestamps log datetime msec<br />
c. If the service timestamps debug comm<strong>and</strong> is not present, enter it in global config mode.<br />
R3(config)#service timestamps debug datetime msec<br />
R3(config)#exit<br />
d. Save the running configuration to the startup configuration from the privileged EXEC prompt.<br />
R3#copy running-config startup-config<br />
Step 2: Use debug to verify user access.<br />
a. Activate debugging for <strong>AAA</strong> authentication.<br />
R3#debug aaa authentication<br />
<strong>AAA</strong> Authentication debugging is on<br />
b. Start a Telnet session from PC-C to R3.<br />
c. Log in with username Admin01 <strong>and</strong> password Admin01pass. Observe the <strong>AAA</strong> authentication events in<br />
the console session window. Debug messages similar to the following should be displayed.<br />
R3#<br />
Dec 26 14:36:42.323: <strong>AAA</strong>/BIND(000000A5): Bind i/f<br />
Dec 26 14:36:42.323: <strong>AAA</strong>/AUTHEN/LOGIN (000000A5): Pick method list<br />
'default'<br />
d. From the Telnet window, enter privileged EXEC mode. Use the enable secret password of cisco12345.<br />
Debug messages similar to the following should be displayed. In the third entry, note the username<br />
(Admin01), virtual port number (tty194), <strong>and</strong> remote Telnet client address (192.168.3.3). Also note that<br />
the last status entry is “PASS.”<br />
R3#<br />
Dec 26 14:40:54.431: <strong>AAA</strong>: parse name=tty194 idb type=-1 tty=-1<br />
Dec 26 14:40:54.431: <strong>AAA</strong>: name=tty194 flags=0x11 type=5 shelf=0 slot=0<br />
adapter=0 port=194 channel=0<br />
58
Dec 26 14:40:54.431: <strong>AAA</strong>/MEMORY: create_user (0x64BB5510)<br />
user='Admin01' ruser=' NULL' ds0=0 port='tty194' rem_addr='192.168.3.3'<br />
authen_type=ASCII service=ENABLE priv=15 initial_task_id='0', vrf=<br />
(id=0)<br />
Dec 26 14:40:54.431: <strong>AAA</strong>/AUTHEN/START (2467624222): port='tty194'<br />
list='' action=LOGIN service=ENABLE<br />
Dec 26 14:40:54.431: <strong>AAA</strong>/AUTHEN/START (2467624222): non-console enable<br />
– default to enable password<br />
Dec 26 14:40:54.431: <strong>AAA</strong>/AUTHEN/START (2467624222): Method=ENABLE<br />
R3#<br />
Dec 26 14:40:54.435: <strong>AAA</strong>/AUTHEN(2467624222): Status=GETPASS<br />
R3#<br />
Dec 26 14:40:59.275: <strong>AAA</strong>/AUTHEN/CONT (2467624222): continue_login<br />
(user='(undef)')<br />
Dec 26 14:40:59.275: <strong>AAA</strong>/AUTHEN(2467624222): Status=GETPASS<br />
Dec 26 14:40:59.275: <strong>AAA</strong>/AUTHEN/CONT (2467624222): Method=ENABLE<br />
Dec 26 14:40:59.287: <strong>AAA</strong>/AUTHEN(2467624222): Status=PASS<br />
Dec 26 14:40:59.287: <strong>AAA</strong>/MEMORY: free_user (0x64BB5510) user='NULL'<br />
ruser='NULL' port='tty194' rem_addr='192.168.3.3' authen_type=ASCII<br />
service=ENABLE priv=15 v<br />
rf= (id=0)<br />
e. From the Telnet window, exit privileged EXEC mode using the disable comm<strong>and</strong>. Try to enter<br />
privileged EXEC mode again, but use a bad password this time. Observe the debug output on R3, noting<br />
that the status is “FAIL” this time.<br />
Dec 26 15:46:54.027: <strong>AAA</strong>/AUTHEN(2175919868): Status=GETPASS<br />
Dec 26 15:46:54.027: <strong>AAA</strong>/AUTHEN/CONT (2175919868): Method=ENABLE<br />
Dec 26 15:46:54.039: <strong>AAA</strong>/AUTHEN(2175919868): password incorrect<br />
Dec 26 15:46:54.039: <strong>AAA</strong>/AUTHEN(2175919868): Status=FAIL<br />
Dec 26 15:46:54.039: <strong>AAA</strong>/MEMORY: free_user (0x6615BFE4) user='NULL'<br />
ruser='NULL'<br />
port='tty194' rem_addr='192.168.3.3' authen_type=ASCII service=ENABLE<br />
priv=15 v<br />
rf= (id=0)<br />
f. From the Telnet window, exit the Telnet session to the router. Then try to open a Telnet session to the<br />
router again, but this time try to log in with the username Admin01 <strong>and</strong> a bad password. From the console<br />
window, the debug output should look similar to the following.<br />
Dec 26 15:49:32.339: <strong>AAA</strong>/AUTHEN/LOGIN (000000AA): Pick method list<br />
'default'<br />
What message was displayed on the Telnet client screen? ________________________________<br />
g. Turn off all debugging using the undebug all comm<strong>and</strong> at the privileged EXEC prompt.<br />
Part 4. Configure Centralized Authentication <strong>Using</strong> <strong>AAA</strong> <strong>and</strong> <strong>RADIUS</strong>.<br />
In Part 4 of the lab, you install <strong>RADIUS</strong> server software on PC-A. You then configure router R1 to access the<br />
external <strong>RADIUS</strong> server for user authentication. The freeware server WinRadius is used for this section of the<br />
lab.<br />
Task 1. Restore Router R1 to Its Basic Settings<br />
To avoid confusion as to what was already entered <strong>and</strong> the <strong>AAA</strong> <strong>RADIUS</strong> configuration, start by restoring<br />
router R1 to its basic configuration as performed in Parts 1 <strong>and</strong> 2 of this lab.<br />
59
Step 1: Erase <strong>and</strong> reload the router.<br />
a. Connect to the R1 console, <strong>and</strong> log in with the username Admin01 <strong>and</strong> password Admin01pass.<br />
b. Enter privileged EXEC mode with the password cisco12345.<br />
c. Erase the startup config <strong>and</strong> then issue the reload comm<strong>and</strong> to restart the router.<br />
Step 2: Restore the basic configuration.<br />
a. When the router restarts, enter privileged EXEC mode with the enable comm<strong>and</strong>, <strong>and</strong> then enter<br />
global config mode. Use the HyperTerminal Transfer > Send File function, cut <strong>and</strong> paste or use another<br />
method to load the basic startup config for R1 that was created <strong>and</strong> saved in Part 2 of this lab.<br />
b. Test connectivity by pinging from host PC-A to PC-C. If the pings are not successful, troubleshoot the<br />
router <strong>and</strong> PC configurations until they are.<br />
c. If you are logged out of the console, log in again as user01 with password user01pass, <strong>and</strong> access<br />
privileged EXEC mode with the password cisco12345.<br />
d. Save the running config to the startup config using the copy run start comm<strong>and</strong>.<br />
Task 2. Download <strong>and</strong> Install a <strong>RADIUS</strong> Server on PC-A<br />
There are a number of <strong>RADIUS</strong> servers available, both freeware <strong>and</strong> for cost. This lab uses WinRadius, a<br />
freeware st<strong>and</strong>ards-based <strong>RADIUS</strong> server that runs on Windows XP <strong>and</strong> most other Windows operating<br />
systems. The free version of the software can support only five usernames.<br />
Step 1: Download the WinRadius software.<br />
a. Create a folder named WinRadius on your desktop or other location in which to store the files.<br />
b. Download the latest version from http://www.suggestsoft.com/soft/itconsult2000/winradius/.<br />
The publisher asks that you provide your email address <strong>and</strong> send them feedback after you install <strong>and</strong><br />
try WinRadius. You may skip the survey if desired.<br />
c. Save the downloaded zip file in the folder you created in Step 1a, <strong>and</strong> extract the zipped files to the<br />
same folder. There is no installation setup. The extracted WinRadius.exe file is executable.<br />
d. You may create a shortcut on your desktop for WinRadius.exe.<br />
Step 2: Configure the WinRadius server database.<br />
a. Start the WinRadius.exe application. WinRadius uses a local database in which it stores user<br />
information. When the application is started for the first time, the following messages are displayed<br />
Please go to “Settings/Database <strong>and</strong> create the ODBC for your <strong>RADIUS</strong><br />
database.<br />
Launch ODBC failed.<br />
60
. Select Settings > Database from the main menu <strong>and</strong> the following screen is displayed. Click the<br />
Configure ODBC automatically button <strong>and</strong> then click OK. You should see a message that the ODBC<br />
was created successfully. Exit WinRadius <strong>and</strong> restart the application for the changes to take effect.<br />
c. When WinRadius starts again, you should see messages similar to the following displayed.<br />
d. On which ports is WinRadius listening for authentication <strong>and</strong> accounting?<br />
_______________________________________________________________________________<br />
61
Step 3: Configure users <strong>and</strong> passwords on the WinRadius server.<br />
Note: The free version of WinRadius can support only five usernames. The usernames are lost if you exit<br />
the application <strong>and</strong> restart it. Any usernames created in previous sessions must be recreated. Note that<br />
the first message in the previous screen shows that zero users were loaded. No users had been created<br />
prior to this, but this message is displayed each time WinRadius is started, regardless of whether users<br />
were created or not.<br />
a. From the main menu, select Operation > Add User.<br />
b. Enter the username RadUser with a password of RadUserpass. Remember that passwords are casesensitive.<br />
c. Click OK. You should see a message on the log screen that the user was added successfully.<br />
Step 4: Clear the log display.<br />
From the main menu, select Log > Clear.<br />
Step 5: Test the new user added using the WinRadius test utility.<br />
a. A WinRadius testing utility is included in the downloaded zip file. Navigate to the folder where you<br />
unzipped the WinRadius.zip file <strong>and</strong> locate the file named RadiusTest.exe.<br />
b. Start the RadiusTest application, <strong>and</strong> enter the IP address of this <strong>RADIUS</strong> server (192.168.1.3),<br />
username RadUser, <strong>and</strong> password RadUserpass as shown. Do not change the default <strong>RADIUS</strong> port<br />
number of 1813 <strong>and</strong> the <strong>RADIUS</strong> password of WinRadius.<br />
62
c. Click Send <strong>and</strong> you should see a Send <strong>Access</strong>_Request message indicating the server at 192.168.1.3,<br />
port number 1813, received 44 hexadecimal characters. On the WinRadius log display, you should also<br />
see a message indicating that user RadUser was authenticated successfully.<br />
d. Close the RadiusTest application.<br />
Task 3. Configure R1 <strong>AAA</strong> Services <strong>and</strong> <strong>Access</strong> the <strong>RADIUS</strong> Server <strong>Using</strong> Cisco<br />
IOS<br />
Note: If you want to configure <strong>AAA</strong> using SDM, go to Task 5.<br />
Step 1: Enable <strong>AAA</strong> on R1.<br />
Use the aaa new-model comm<strong>and</strong> in global configuration mode to enable <strong>AAA</strong>.<br />
R1(config)#aaa new-model<br />
Step 2: Configure the default login authentication list.<br />
a. Configure the list to first use <strong>RADIUS</strong> for the authentication service, <strong>and</strong> then none. If no <strong>RADIUS</strong><br />
server can be reached <strong>and</strong> authentication cannot be performed, the router globally allows access without<br />
authentication. This is a safeguard measure in case the router starts up without connectivity to an active<br />
<strong>RADIUS</strong> server.<br />
R1(config)#aaa authentication login default group radius none<br />
b. You could alternatively configure local authentication as the backup authentication method instead.<br />
Note: If you do not set up a default login authentication list, you could get locked out of the router <strong>and</strong> need to<br />
use the password recovery procedure for your specific router.<br />
63
Step 3: Specify a <strong>RADIUS</strong> server.<br />
Use the radius-server host hostname key key comm<strong>and</strong> to point to the <strong>RADIUS</strong> server. The<br />
hostname parameter accepts either a host name or an IP address. Use the IP address of the <strong>RADIUS</strong><br />
server, PC-A (192.168.1.3). The key is a secret password shared between the <strong>RADIUS</strong> server <strong>and</strong> the<br />
<strong>RADIUS</strong> client (R1 in this case) <strong>and</strong> used to authenticate the connection between the router <strong>and</strong> the<br />
server before the user authentication process takes place. The <strong>RADIUS</strong> client may be a Network <strong>Access</strong><br />
Server (NAS), but router R1 plays that role in this lab. Use the default NAS secret password of WinRadius<br />
specified on the <strong>RADIUS</strong> server (see Task 2, Step 5). Remember that passwords are case-sensitive.<br />
R1(config)#radius-server host 192.168.1.3 key WinRadius<br />
Task 4. Test the <strong>AAA</strong> <strong>RADIUS</strong> Configuration<br />
Step 1: Verify connectivity between R1 <strong>and</strong> the computer running the <strong>RADIUS</strong> server.<br />
Ping from R1 to PC-A.<br />
R1#ping 192.168.1.3<br />
If the pings were not successful, troubleshoot the PC <strong>and</strong> router configuration before continuing.<br />
Step 2: Test your configuration.<br />
a. If you restarted the WinRadius server, you must recreate the user RadUser with a password of<br />
RadUserpass by selecting Operation > Add User.<br />
b. Clear the log on the WinRadius server by selecting Log > Clear from the main menu.<br />
c. On R1, exit to the initial router screen that displays: R1 con0 is now available, Press RETURN to get<br />
started.<br />
d. Test your configuration by logging in to the console on R1 using the username RadUser <strong>and</strong> the<br />
password of RadUserpass. Were you able to gain access to the user EXEC prompt <strong>and</strong>, if so, was there<br />
any delay? ________________________________________________________________<br />
e. Exit to the initial router screen that displays: R1 con0 is now available, Press RETURN to get<br />
started.<br />
f. Test your configuration again by logging in to the console on R1 using the nonexistent username of<br />
Userxxx <strong>and</strong> the password of Userxxxpass. Were you able to gain access to the user EXEC prompt?<br />
Why or why not? ________________________________________________________________<br />
g. Were any messages displayed on the <strong>RADIUS</strong> server log for either login? _____<br />
h. Why was a nonexistent username able to access the router <strong>and</strong> no messages are displayed on the<br />
<strong>RADIUS</strong> server log screen? ________________________________________________________<br />
i. When the <strong>RADIUS</strong> server is unavailable, messages similar to the following are typically displayed after<br />
attempted logins.<br />
*Dec 26 16:46:54.039: %<strong>RADIUS</strong>-4-<strong>RADIUS</strong>_DEAD: <strong>RADIUS</strong> server<br />
192.168.1.3:1645,1646 is not responding.<br />
*Dec 26 15:46:54.039: %<strong>RADIUS</strong>-4-<strong>RADIUS</strong>_ALIVE: <strong>RADIUS</strong> server<br />
192.168.1.3:1645,1646 is being marked alive.<br />
64
Step 3: Troubleshoot router-to-<strong>RADIUS</strong> server communication.<br />
a. Check the default Cisco IOS <strong>RADIUS</strong> UDP port numbers used on R1 with the radius-server host<br />
comm<strong>and</strong> <strong>and</strong> the Cisco IOS Help function.<br />
R1(config)#radius-server host 192.168.1.3 ?<br />
acct-port UDP port for <strong>RADIUS</strong> accounting server (default is 1646)<br />
alias 1-8 aliases for this server (max. 8)<br />
auth-port UDP port for <strong>RADIUS</strong> authentication server (default is 1645)<br />
< Output omitted ><br />
b. Check the R1 running configuration for lines containing the comm<strong>and</strong> radius. The following<br />
comm<strong>and</strong> display all running config lines that include the text “radius”.<br />
R1#show run | incl radius<br />
aaa authentication login default group radius none<br />
radius-server host 192.168.1.3 auth-port 1645 acct-port 1646 key 7<br />
097B47072B04131B1E1F<br />
< Output omitted ><br />
c. What are the default R1 Cisco IOS UDP port numbers for the <strong>RADIUS</strong> server?<br />
________________________________________________________________________________<br />
Step 4: Check the default port numbers on the WinRadius server on PC-A.<br />
From the WinRadius main menu select Settings > System.<br />
What are the default WinRadius UDP port numbers? _____________________________________<br />
Note: The early deployment of <strong>RADIUS</strong> was done using UDP port number 1645 for authentication <strong>and</strong> 1646<br />
for accounting, which conflicts with the datametrics service. Because of this conflict, RFC 2865 officially<br />
assigned port numbers 1812 <strong>and</strong> 1813 for <strong>RADIUS</strong>.<br />
Step 5: Change the <strong>RADIUS</strong> port numbers on R1 to match the WinRadius server.<br />
Unless specified otherwise, the Cisco IOS <strong>RADIUS</strong> configuration defaults to UDP port numbers 1645 <strong>and</strong><br />
1646. Either the router Cisco IOS port numbers must be changed to match the port number of the <strong>RADIUS</strong><br />
65
server or the <strong>RADIUS</strong> server port numbers must be changed to match the port numbers of the Cisco IOS<br />
router. In this step, you modify the IOS port numbers to those of the <strong>RADIUS</strong> server, which are specified in<br />
RFC 2865.<br />
Remove the previous configuration using the following comm<strong>and</strong>.<br />
R1(config)#no radius-server host 192.168.1.3 auth-port 1645 acct-port<br />
1646<br />
Issue the radius-server host comm<strong>and</strong> again <strong>and</strong> this time specify port numbers 1812 <strong>and</strong> 1813,<br />
along with the IP address <strong>and</strong> secret key for the <strong>RADIUS</strong> server.<br />
R1(config)#radius-server host 192.168.1.3 auth-port 1812 acct-port 1813<br />
key WinRadius<br />
Step 6: Test your configuration by logging into the console on R1.<br />
a. Exit to the initial router screen that displays: R1 con0 is now available, Press RETURN to get started.<br />
b. Log in again with the username of RadUser <strong>and</strong> password of RadUserpass. Were you able to<br />
login? Was there any delay this time?<br />
_______________________________________________________<br />
c. The following message should display on the <strong>RADIUS</strong> server log.<br />
User (RadUser) authenticate OK.<br />
d. Exit to the initial router screen that displays: R1 con0 is now available, Press RETURN to get started.<br />
e. Log in again using an invalid username of Userxxx <strong>and</strong> the password of Userxxxpass. Were you<br />
able to login?<br />
_________________________________________________________________________<br />
What message was displayed on the router? ___________________________________________<br />
The following messages should display on the <strong>RADIUS</strong> server log.<br />
Reason: Unknown username<br />
User (Userxxx) authenticate failed<br />
66
Step 7: Create an authentication method list for Telnet <strong>and</strong> test it.<br />
a. Create a unique authentication method list for Telnet access to the router. This does not have the<br />
fallback of no authentication, so if there is no access to the <strong>RADIUS</strong> server, Telnet access is<br />
disabled. Name the authentication method list TELNET_LINES.<br />
R1(config)#aaa authentication login TELNET_LINES group radius<br />
b. Apply the list to the vty lines on the router using the login authentication comm<strong>and</strong>.<br />
R1(config)#line vty 0 4<br />
R1(config-line)#login authentication TELNET_LINES<br />
c. Telnet from PC-A to R1, <strong>and</strong> log in with the username RadUser <strong>and</strong> the password of RadUserpass.<br />
Were you able to gain access to log in? _______________________________________________<br />
d. Exit the Telnet session, <strong>and</strong> telnet from PC-A to R1 again. Log in with the username Userxxx <strong>and</strong> the<br />
password of Userxxxpass. Were you able to log in? ______________________________________<br />
Task 5. (Optional) Configure R1 <strong>AAA</strong> Services <strong>and</strong> <strong>Access</strong> the <strong>RADIUS</strong> Server<br />
<strong>Using</strong> SDM<br />
You can also use SDM to configure the router to access the external <strong>RADIUS</strong> server.<br />
Note: If you configured R1 to access the external <strong>RADIUS</strong> server using Cisco IOS in Task 3, you can skip<br />
this task. If you performed Task 3 <strong>and</strong> you want to perform this task, restore the router to its basic<br />
configuration as described Task 1 of this part, except log in initially as RadUser with the password<br />
RadUserpass. If the <strong>RADIUS</strong> server is unavailable at this time, you will still be able to log in to the console.<br />
If you do not perform this task, read through the steps to become familiar with the SDM process.<br />
Step 1: Implement <strong>AAA</strong> services <strong>and</strong> HTTP router access prior to starting SDM.<br />
a. From the CLI global config mode, enable a new <strong>AAA</strong> model.<br />
R1(config)#aaa new-model<br />
b. Enable the HTTP server on R1.<br />
R1(config)#ip http server<br />
Step 2: <strong>Access</strong> SDM <strong>and</strong> enable the comm<strong>and</strong> preview option.<br />
a. Open a browser on PC-A. Start SDM by entering the R1 IP address 192.168.1.1 in the address field.<br />
b. Log in with no username <strong>and</strong> the enable secret password cisco12345.<br />
c. In the Password Needed – Networking dialog box, enter cisco12345 in the Password field <strong>and</strong> click Yes.<br />
d. Configure SDM to allow you to preview comm<strong>and</strong>s before sending them to the router. Select Edit ><br />
Preferences.<br />
e. In the User Preferences window, check the Preview comm<strong>and</strong>s before delivering to router check box<br />
<strong>and</strong> click OK.<br />
67
Step 3: Configure R1 <strong>AAA</strong> to access the Win<strong>RADIUS</strong> server.<br />
a. Click the Configure button at the top of the screen.<br />
b. Select Additional Tasks > <strong>AAA</strong> > <strong>AAA</strong> Servers <strong>and</strong> Groups > <strong>AAA</strong> Servers.<br />
c. In the <strong>AAA</strong> Servers window, click Add.<br />
d. In the Add <strong>AAA</strong> Server window, verify that <strong>RADIUS</strong> is in the Server Type field.<br />
e. In the Server IP or Host field, enter the IP address of PC-A, 192.168.1.3.<br />
f. Change the Authorization Port from 1645 to 1812, <strong>and</strong> change the Accounting Port from 1646 to 1813 to<br />
match the <strong>RADIUS</strong> server port number settings.<br />
g. Check the Configure Key check box.<br />
h. Enter WinRadius in both the New Key <strong>and</strong> Confirm Key fields.<br />
i. In the Deliver Configuration to Router window, click Deliver, <strong>and</strong> in the Comm<strong>and</strong>s Delivery Status window,<br />
click OK.<br />
68
j. What comm<strong>and</strong> was delivered to the router?<br />
________________________________________________________________________________<br />
Step 4: Configure the R1 <strong>AAA</strong> login method list for <strong>RADIUS</strong>.<br />
a. Click the Configure button at the top of the screen.<br />
b. Select Additional Tasks > <strong>AAA</strong> > Authentication Policies > Login.<br />
c. In the Authentication Login window, click Add.<br />
d. In the Select Method List(s) for Authentication Login window, choose group radius <strong>and</strong> click OK.<br />
e. In the Select Method List(s) for Authentication Login window, choose local as a second method<br />
<strong>and</strong> click OK.<br />
f. In the Deliver Configuration to Router window, click Deliver <strong>and</strong> in the Comm<strong>and</strong>s Delivery Status<br />
window, click OK.<br />
69
g. What comm<strong>and</strong>(s) were delivered to the router?<br />
________________________________________________________________________________<br />
Step 5: Test your configuration.<br />
If you restarted the <strong>RADIUS</strong> server, you must recreate the user RadUser with a password of<br />
RadUserpass by selecting Operation > Add User.<br />
a. Clear the log on the WinRadius server by selecting Log > Clear.<br />
b. Test your configuration by opening a Telnet session from PC-A to R1.<br />
C:>telnet 192.168.1.1<br />
c. At the login prompt, enter the username RadUser defined on the <strong>RADIUS</strong> server <strong>and</strong> a password of<br />
RadUserpass.<br />
d. Were you able to login to R1? _____<br />
Task 6. Reflection<br />
Why would an organization want to use a centralized authentication server rather than configuring users<br />
<strong>and</strong> passwords on each individual router?<br />
________________________________________________________________________________<br />
________________________________________________________________________________<br />
________________________________________________________________________________<br />
________________________________________________________________________________<br />
Contrast local authentication <strong>and</strong> local authentication with <strong>AAA</strong>.<br />
____________________________________________________________________________________<br />
____________________________________________________________________________________<br />
____________________________________________________________________________________<br />
____________________________________________________________________<br />
Based on the Academy online course content, web research, <strong>and</strong> the use of <strong>RADIUS</strong> in this lab, compare<br />
<strong>and</strong> contrast <strong>RADIUS</strong> with TACACS+.<br />
____________________________________________________________________________________<br />
____________________________________________________________________________________<br />
____________________________________________________________________________________<br />
____________________________________________________________________________________<br />
____________________________________________________________________________________<br />
____________________________________________________________<br />
70
Router Interface Summary Table<br />
Router Model Ethernet Interface<br />
#1<br />
1700 Fast Ethernet 0<br />
(FA0)<br />
1800 Fast Ethernet 0/0<br />
(FA0/0)<br />
2600 Fast Ethernet 0/0<br />
(FA0/0)<br />
2800 Fast Ethernet 0/0<br />
(FA0/0)<br />
Router Interface Summary<br />
Ethernet Interface<br />
#2<br />
Fast Ethernet 1<br />
(FA1)<br />
Fast Ethernet 0/1<br />
(FA0/1)<br />
Fast Ethernet 0/1<br />
(FA0/1)<br />
Fast Ethernet 0/1<br />
(FA0/1)<br />
Serial Interface<br />
#1<br />
Serial 0 (S0)<br />
Serial 0/0/0<br />
(S0/0/0)<br />
Serial 0/0 (S0/0)<br />
Serial 0/0/0<br />
(S0/0/0)<br />
Serial Interface<br />
#2<br />
Serial 1 (S1)<br />
Serial 0/0/1<br />
(S0/0/1)<br />
Serial 0/1 (S0/1)<br />
Serial 0/0/1<br />
(S0/0/1)<br />
Note: To find out how the router is configured, look at the interfaces to identify the type of router<br />
<strong>and</strong> how many interfaces the router has. There is no way to effectively list all the combinations of<br />
configurations for each router class. This table includes identifiers for the possible combinations of<br />
Ethernet <strong>and</strong> Serial interfaces in the device. The table does not include any other type of interface,<br />
even though a specific router may contain one. An example of this might be an ISDN BRI interface.<br />
The string in parenthesis is the legal abbreviation that can be used in Cisco IOS comm<strong>and</strong>s to<br />
represent the interface.<br />
71