PLATE
DHS Plate
DHS Plate
- No tags were found...

Create successful ePaper yourself
Turn your PDF publications into a flip-book with our unique Google optimized e-Paper software.
DHS <strong>PLATE</strong><br />
DHS <strong>PLATE</strong><br />
DHS PLAK<br />
The key in<br />
orthopaedic<br />
sciences<br />
SURGICAL TECHNIQUE<br />
CERRAHÝ TEKNÝK<br />
IMPLANTS & INSTRUMENTS<br />
ÝMPLANTLAR VE EL ALETLERÝ
CONTENTS<br />
ÝÇÝNDEKÝLER<br />
DHS <strong>PLATE</strong><br />
Introduction 2<br />
Giriþ<br />
DHS Plate 3<br />
DHS Plak<br />
Lag Screw 4<br />
Çivi<br />
Compression Screw 4<br />
Çektirme Civatasý<br />
DHS Locking Compression Plate 5<br />
DHS Kilitli Kompresyon Plaðý<br />
Reduce the fracture 6<br />
Kýrýk Bölgesini Toparlamak<br />
Fix the DHS Plate onto the Shaft 10<br />
DHS Plaðýn Þafta Sabitlenmesi<br />
Locking Screws for the Locking DHS Plate 11<br />
Kilitli DHS Plak için Kilitli Vidalarýn Gönderilmesi<br />
Instruments&Trays 12<br />
El Aletleri&Tavalar<br />
SURGICAL TECHNIQUE / CERRAHÝ TEKNÝK<br />
IMPLANTS & INSTRUMENTS / ÝMPLANTLAR VE EL ALETLERÝ
DHS <strong>PLATE</strong><br />
Introduction<br />
Giriþ<br />
The DHS plate is primarly indicated for intertrochanteric fractures. However, it can<br />
be also find applications in selected sub-trochanteric fractures, mid cervical and low subcapital<br />
fractures of the femoral neck. A complete range of angled plate is available from<br />
130º to 140º in 5º increments. They are used in conjuction with large diameter sliding lag<br />
screws. The barrel of the plate is available in two lenghts, 38 mm for normal adult use and<br />
25 mm for smaller adult pediatric surgery (special request). If needed, added compression<br />
can be applied to the fractures site by means of the compression screws.<br />
DHS Plak birincil olarak intertrochanterik kýrýklarda kullanýlmak üzere üretilmiþ olmasýna<br />
raðmen femoral boyun kýsmýndaki sub-trochanteric, mid-cervical ve sub-capital kýrýklarda<br />
da kullanýlabilir. 130 dereceden 140 dereceye kadar 5 derecelik farklarla çeþitleri vardýr.<br />
DHS/DCS çivisiyle birlikte kullanýlýrlar. Plaðýn boyun kýsmý 2 farklý boyda üretilmektedir;<br />
yetiþkinler için 38 mm ve çocuklar için 25 mm (özel istek üzerine temin edilebilir). Gerekli<br />
olduðunda çektirme civatasý ile kýrýk bölgeye ilave çektirme yapýlabilir.<br />
SURGICAL TECHNIQUE / CERRAHÝ TEKNÝK<br />
IMPLANTS & INSTRUMENTS / ÝMPLANTLAR VE EL ALETLERÝ 2
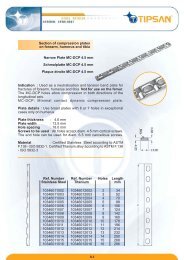
DHS <strong>PLATE</strong><br />
DHS Plate<br />
DHS Plak<br />
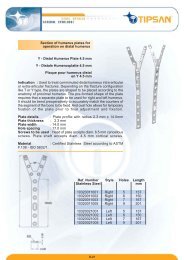
135º<br />
Ref. Number<br />
Stainless Steel<br />
10402001001<br />
10402001002<br />
10402001003<br />
10402001004<br />
10402001005<br />
10402001006<br />
10402001007<br />
10402001008<br />
10402001009<br />
10402001010<br />
10402001011<br />
10402001012<br />
10402001013<br />
10402001014<br />
10402001015<br />
Ref. Number<br />
Titanium<br />
10402002002<br />
10402002003<br />
10402002004<br />
10402002005<br />
10402002006<br />
10402002007<br />
10402002008<br />
Holes<br />
2<br />
3<br />
4<br />
5<br />
6<br />
7<br />
8<br />
9<br />
10<br />
11<br />
12<br />
13<br />
14<br />
15<br />
16<br />
Length<br />
Lmm<br />
50<br />
66<br />
82<br />
98<br />
114<br />
130<br />
146<br />
162<br />
178<br />
194<br />
210<br />
226<br />
242<br />
258<br />
274<br />
130º<br />
10402041004<br />
10402041005<br />
10402041007<br />
10402041008<br />
10402041010<br />
4<br />
5<br />
7<br />
8<br />
10<br />
82<br />
98<br />
130<br />
146<br />
178<br />
140º 10402011003<br />
10402011004<br />
10402011005<br />
4<br />
5<br />
6<br />
82<br />
98<br />
114<br />
Plate details<br />
: Designed for maximum strenght from one piece, forged.<br />
Plate thickness : 5.6 mm<br />
Plate width<br />
: 18.0 mm<br />
Hole spacing<br />
: 16.0 mm<br />
Screws to be used : All holes accept diam. 4.5 mm cortical screws. End of<br />
holes also accept diam. 6.5 mm cancellous screws. All plates are slotted to accept a<br />
tension device.ü<br />
Plak Detaylarý<br />
: Maksimum dayanýklýlýk için tek parça olarak tasarlanmýþtýr,<br />
dövülmüþ materyalden üretilmiþtir.<br />
Plak Kalýnlýðý<br />
: 5,6 mm<br />
Plak geniþliði<br />
: 18 mm<br />
Delik Aralýðý<br />
: 16 mm<br />
Kullanýlan Vidalar : Tüm deliklere 4,5 mm kortikal vida uygulanabilir. Spongious<br />
deliklerde 6,5 mm spongious vida kullanýlýr. Plak üzerindeki tüm kortikal vida delikleri<br />
gerdirmeye uygun olacak þekilde DCP yapýdadýr.<br />
SURGICAL TECHNIQUE / CERRAHÝ TEKNÝK<br />
IMPLANTS & INSTRUMENTS / ÝMPLANTLAR VE EL ALETLERÝ<br />
3
DHS <strong>PLATE</strong><br />
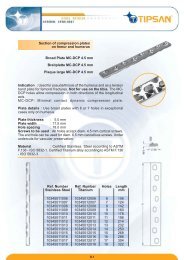
Lag Screw<br />
DHS/DCS Çivisi<br />
Cannulated to receive the guide wires with a slot to make rotation impossible.<br />
Partially threaded heavy duty lag screw for use with DHS and DCS plates. Buttress thread<br />
from provides enhanced pull-out resistance in cancellous bone. Opposing flats along<br />
shark engage with machined flats within plate barrel to prevent rotation. Tapered tip<br />
permits easier insertion.<br />
Dönmeyi ortadan kaldýrma amacýyla üzerine yarýk açýlmýþ ve kýlavuz telini içine<br />
göndermek için kanüllü yapýda imal edilmiþtir. DHS ve DCS plaklarla birlikte kullanýlmak<br />
üzere, uç kýsmý yivli ve dayanýklý yapýdadýr. Diþ yapýsý Spongios kemik yapýsý içinde çektirmeyi<br />
saðlamak amacýyla özel olarak tasarlanmýþtýr. Çivinin yivli olmayan kýsmýnda bulunan<br />
düzleþtirilmiþ kýsýmlar dönmeye engel olmak için plaðýn iç tarafýndaki düz bölgelere uygun<br />
þekilde tasarlanmýþtýr. Çivinin sivriltilmiþ uç kýsmý uygulamayý kolaylaþtýrýr.<br />
Compression Screw<br />
Çektirme Civatasý<br />
Provides mechanical compression at the fracture site when used in conjuction with<br />
DHS and DCS Lagscrew.<br />
DHS DCS çivisiyle birlikte kýrýk bölgesinde kullanýldýðýnda mekanik çektirmeyi saðlar.<br />
Ref. Number<br />
Stainless Steel<br />
Lag Screw<br />
Çivi<br />
Ref. Number<br />
Titanium<br />
10801141001 10801142001<br />
10401141002 10401142002<br />
10401141003 10401142003<br />
10401141004 10401142004<br />
10401141005 10401142005<br />
10401141006 10401142006<br />
10401141007 10401142007<br />
10401141008 10401142008<br />
10401141009 10401142009<br />
10401141010 10401142010<br />
10401141011 10401142011<br />
10401141012 10401142012<br />
10401141013 10401142013<br />
10401141014 10401142014<br />
10401141015 10401142015<br />
10401141016 10401142016<br />
10401141017 10401142017<br />
SURGICAL TECHNIQUE / CERRAHÝ TEKNÝK<br />
Length<br />
Lmm<br />
50<br />
55<br />
60<br />
65<br />
70<br />
75<br />
80<br />
85<br />
90<br />
95<br />
100<br />
105<br />
110<br />
115<br />
120<br />
125<br />
130<br />
IMPLANTS & INSTRUMENTS / ÝMPLANTLAR VE EL ALETLERÝ 4<br />
Ref. Number<br />
Stainless Steel<br />
Compression Screw<br />
Çektirme Civatasý<br />
Ref. Number<br />
Titanium<br />
Length<br />
Lmm<br />
10808051001 10808052001 31
DHS <strong>PLATE</strong><br />
DHS Locking Compression Plate<br />
DHS Kilitli Kompresyon Plak<br />
Plate details<br />
: Designed for maximum strenght from one piece, forged.<br />
Plate thickness : 6.5 mm<br />
Plate width<br />
: 19.0 mm<br />
Hole spacing<br />
: 16.0 mm<br />
Screws to be used : All DCP holes accept diameter 4.5 mm cortical screw and other<br />
holes accept 4.5 mm locking screw.<br />
Plak Detaylarý<br />
: Maksimum dayanýklýlýk için tek parça olarak tasarlanmýþtýr,<br />
dövülmüþ materyalden üretilmiþtir.<br />
Plak Kalýnlýðý<br />
: 6.5 mm<br />
Plak geniþliði<br />
: 19.0 mm<br />
Delik Aralýðý<br />
: 16.0 mm<br />
Kullanýlan Vidalar : Tüm DCP deliklere 4.5 mm kortikal vida, diðer deliklere 4.5 mm<br />
kilitli vida uygulanabilir.<br />
Ref. Number<br />
Titanium<br />
Holes<br />
Length<br />
Lmm<br />
Material<br />
Malzeme<br />
10402202004<br />
10402202005<br />
10402202006<br />
10402202007<br />
10402202008<br />
10402202009<br />
10402202010<br />
10402202011<br />
10402202012<br />
C e r t i f i e d Stainless Steel according to ASTM F 138 and ISO 5832-1 or c e r t i<br />
f i e d tiitanium alloy according to ASTM F 136 and ISO 5832/3.<br />
ASTM F 138 ve ISO 5832-1’e göre sertifikalý paslanmaz çelikten veya ASTM F 136 ve<br />
ISO 5832-3’e göre sertifikalý titanyum alaþýmdan imal edilmiþtir.<br />
Please Note : This document is intended as a guide for the surgeon only. There are multiple<br />
techniques for the insertion of DHS Plate and, as with any surgical procedure, a surgeon<br />
should be thoroughly trained and beware that this procedure is appropriate for the patient<br />
before proceeding.<br />
Not: Bu doküman cerrahlar için bir klavuz niteliðindedir. DHS Plak uygulanmasý için çoklu<br />
teknikler mevcuttur ve diðer cerrahi iþlemlerde olduðu gibi cerrah derinlemesine eðitimli<br />
olmalý ve iþlemin hastaya uygun olduðundan emin olmalýdýr.<br />
SURGICAL TECHNIQUE / CERRAHÝ TEKNÝK<br />
IMPLANTS & INSTRUMENTS / ÝMPLANTLAR VE EL ALETLERÝ<br />
5<br />
4<br />
5<br />
6<br />
7<br />
8<br />
9<br />
10<br />
11<br />
12<br />
82<br />
98<br />
114<br />
130<br />
146<br />
162<br />
178<br />
194<br />
210
DHS <strong>PLATE</strong><br />
Reduce the Fracture<br />
Kýrýk Bölgesini Toparlamak<br />
During the operation image<br />
intensification must be used. Determine<br />
anteversion by placing a Guide Pin<br />
(Ref:10807091102) anteriorly along the femoral<br />
neck, using the appropriate Angle Guide for<br />
DHS 135° (Ref:10608061135). Gently hammer<br />
the pin into the femoral head. This anteversion<br />
pin will later allow correct placement of the<br />
central guide pin in the center of the femoral<br />
head.<br />
Operasyonun uygulanmasý sýrasýnda<br />
görüntüleme cihazý kullanýlmalýdýr. Kýlavuz telini<br />
femur baþýna doðru anterior bölgesinden<br />
yerleþtirin. Bunu yaparken Açý Kýlavuzunu<br />
kullanýnýz (Ref:10608061135). Teli yavaþça<br />
femoral kafanýn içine doðru gönderiniz. Bu<br />
antreversion kýlavuz teli sonraki adýmlarda<br />
kalibreli ucu yivli klavuz telini femoral kafadaki<br />
doðru yere yerleþtirmenizi saðlayacaktýr.<br />
Align the appropriate Angle Guide for<br />
DHS 135° along the axis of the femoral shaft,<br />
and place it on the femur. Point the guide<br />
tube toward the center of the femoral head.<br />
Insert a Guide Pin through the appropriate<br />
Angle Guide for DHS 135°, parallel to the<br />
anteversion pin and directed toward the<br />
center of the femoral head.<br />
Açý Kýlavuzunu femoral þaft ekseni<br />
boyunca hizalayýnýz ve femura yerleþtiriniz.<br />
Açý Kýlavuz deliðini femoral kafanýn merkezine<br />
doðru çeviriniz. 2. Kýlavuz Telini Açý Kýlavuzuna<br />
doðru, anteversion teline paralel olacak ve<br />
femoral kafanýn merkezine doðru yönlenecek<br />
þekilde saplayýnýz.<br />
SURGICAL TECHNIQUE / CERRAHÝ TEKNÝK<br />
IMPLANTS & INSTRUMENTS / ÝMPLANTLAR VE EL ALETLERÝ 6
DHS <strong>PLATE</strong><br />
Confirm placement of the Guide Pin<br />
under image intensification. It must lie along<br />
the axis of the femoral neck in both the A-P<br />
and lateral views, and parallel to the<br />
anteversion pin. The Guide pin will therefore<br />
need to be inserted to the subchondral bone<br />
or up to a maximum distance of 5 mm away.<br />
If its position is incorrect, insert a new Guide<br />
Pin. Remove and discard the anteversion pin.<br />
Görüntüleme cihazýyla kýlavuz telinin<br />
yerini doðrulayýnýz. Klavuz teli A-P ve lateral<br />
görünümlerde femoral boyun ekseni boyunca<br />
uzanmalý ve anteversion teline de paralel<br />
olmalýdýr. Klavuz teli subkondral kemiðe veya<br />
en fazla 5mm uzaklýða yerleþtirilmelidir. Eðer<br />
pozisyonu yanlýþ ise yeni bir kýlavuz teli<br />
saplayýnýz. Anteversiyon telini ve Açý Kýlavuzunu<br />
yerinden sökünüz.<br />
Slide the Direct Measuring Device<br />
(Ref:10608061002) over the guide pin to<br />
determine guide pin insertion depth.<br />
Calibration on the measuring device provides<br />
a direct reading.<br />
Derinlik ölçme aletini (Ref:10608061002)<br />
kýlavuz teli üzerinde kaydýrýnýz ve kýlavuz telinin<br />
saplama derinliðini tespit ediniz. Ölçüm<br />
cihazýndaki cetvel kesin bir deðer verecektir.<br />
To calculate reaming depth, tapping<br />
depth and lag screw length, subtract 10 mm<br />
from the reading. For example:<br />
a. Direct reading . . . . .. . . . . . . . . . . . . 105 mm<br />
b. Reamer setting . . . . . . . . . . . . . . . . . . 95 mm<br />
c. Tapping depth (optional) . .. . . . . . . 95 mm<br />
Lag screw length . . . . . . . . . . . . . . . . . 95 mm<br />
Oyma derinliði, tap derinliði ve takýlacak<br />
çivi uzunluðunu hesaplarken; okuduðunuz<br />
deðerden 10 mm düþünüz. Örneðin:<br />
a. Okunan deðer . . . . . . . . . . . . 105mm<br />
b. Oyucuda ayarlanan . . . . . . . . . . . . . . .95mm<br />
c. Tap derinliði (opsiyonel) . . . . . . . . . . . 95mm<br />
Çivi Uzunluðu . . . . . . . . . . . . . . . . . . . . . . . 95mm<br />
7<br />
SURGICAL TECHNIQUE / CERRAHÝ TEKNÝK<br />
IMPLANTS & INSTRUMENTS / ÝMPLANTLAR VE EL ALETLERÝ
DHS <strong>PLATE</strong><br />
Assemble the appropriate DHS Triple<br />
Reamer (Ref:10610051002). Set the reamer to<br />
the correct depth. Insert the DHS Triple Reamer<br />
into the Power Drive using the Large Quick<br />
Coupling attachment. Slide the reamer over<br />
the guide pin to simultaneously drill for the<br />
lag screw, ream for the plate barrel, and<br />
countersink for the plate/barrel junction to<br />
the preset depth. When reaming in dense<br />
bone, continuously irrigate the DHS Triple<br />
Reamer to prevent thermal necrosis.<br />
DHS Oyucuyu uygun derinliðe ayarlayýn<br />
ve matkabýn içine yerleþtirin. Oyucuyu kýlavuz<br />
telinin üzerinden kaydýrýn ve takýlacak çivi için<br />
delik açma iþlemine baþlayýn. Plaðýn tüp kýsmý<br />
için oyma iþlemine devam edin ve plak/tüp<br />
deliði baðlantýsý için önceden belirlenmiþ<br />
derinliðe kadar oyma iþlemini gerçekleþtirin.<br />
If necessary, tap to the predetermined<br />
depth using the Tap (Ref:10606121001)<br />
Assembly. Tapping depth can be seen<br />
through the window in the Guide Sleeve Short<br />
(Ref:10606125011).<br />
Eðer gerekli ise önceden belirlenmiþ<br />
olan derinliðe kadar teplemek için Guide<br />
Sleeve Short (Ref:10606125011) ve<br />
Tap(Ref:10606121001) kullanýlýr<br />
SURGICAL TECHNIQUE / CERRAHÝ TEKNÝK<br />
IMPLANTS & INSTRUMENTS / ÝMPLANTLAR VE EL ALETLERÝ 8
DHS <strong>PLATE</strong><br />
Select the Lag Screw and assemble<br />
the Lag Screw Insertion Assembly<br />
(Ref:10601071004-10601071003-10601071001).<br />
Slide the assembly over the guide pin and<br />
into the reamed hole. Seat the Guide Sleeve<br />
Long in the hole to center and stabilize the<br />
assembly. Insert the lag screw by turning the<br />
handle clockwise, until the zero mark on the<br />
assembly aligns with the lateral cortex. The<br />
threaded tip of the lag screw now lies 10 mm<br />
from the joint surface. The lag screw may be<br />
inserted an additional 5 mm in porotic bone,<br />
for increased holding power and additional<br />
controlled collapse.<br />
Doðru uzunluktaki çiviyi seçin ve<br />
uygulanacak çiviyi Wrench Screw’e monte<br />
edin. (Ref: 10601071004-10601071003-<br />
10601071001). Guide Sleeve Long’u deliðe<br />
yerleþtirin ve montajý sabitleyin. Wrench Screw’i<br />
saat yönünde üzerindeki skala 0 noktasýna<br />
gelene kadar çevirerek çiviyi saplayýnýz ve<br />
lateral korteks ile ayný hizaya getiriniz. Bu<br />
durumda çivinin yivli kýsmý eklem yüzeyinin<br />
10mm içine girmiþtir. Çivinin tutunmasýný<br />
güçlendirmek için çivi kemiðin 5 mm daha<br />
içine sokulabilir.<br />
Before removing the assembly, align<br />
the handle so it is in the same plane as the<br />
femoral shaft (parallel to the femoral shaft<br />
axis when viewed laterally). This allows proper<br />
placement of the DHS Plate onto the lag<br />
screw.<br />
Lateral görünümünde görüldüðü gibi<br />
montajý sökmeden önce, T-Handle’ýn tutacak<br />
kýsmý ile femoral shaft ekseni birbirine paralel<br />
olmalýdýr. Bu durum DHS plaðýnýn, çivisinin<br />
üzerine düzgün olarak yerleþtirilmesini saðlar.<br />
9<br />
SURGICAL TECHNIQUE / CERRAHÝ TEKNÝK<br />
IMPLANTS & INSTRUMENTS / ÝMPLANTLAR VE EL ALETLERÝ
DHS <strong>PLATE</strong><br />
Remove the Wrench Screw and Guide<br />
Sleeve Long. Slide the appropriate DHS Plate<br />
onto the guide shaft/lag screw assembly until<br />
it contacts the lateral cortex. Loosen and<br />
remove the Coupling Screw and Guide Shaft<br />
and withdraw the DHS/DCS Guide Pin.<br />
Wrench Screw’i ve Guide Sleeve<br />
Long’u yerinden sökünüz. Guide Shaft’ý çiviye<br />
monte ediniz. Bu iþlemi gerçekleþtirirken çivinin<br />
üzerindeki yarýklarla Guide Shaft üzerindeki<br />
çýkýntýlarýn karþýlýklý gelmesine dikkat ediniz.<br />
Coupling Screew’i Guide Shaft içinden<br />
göndererek çiviye sabitleyiniz. DHS plaðý Guide<br />
Shaft/Coupling Screew/Çivi montajýnýn<br />
üzerinde plak lateral kortekse temas edene<br />
kadar kaydýrýnýz. Coupling Screw’i ve Guide<br />
Shaft’ý gevþeterek çýkartýnýz ve kýlavuz telini<br />
yerinden sökünüz.<br />
Gently seat the plate with the Impactor<br />
(Ref:10607081001).<br />
Plaðý Ýmpactor ile yavaþça yerine<br />
oturtunuz. (Ref:10607081001)<br />
Fix the DHS Plate onto the Shaft<br />
DHS Plaðýn Þafta Sabitlenmesi<br />
Fix the DHS Plate to the femur with 4.5<br />
mm Cortex Screws.<br />
4,5 mm kortikal vidalarý kullanarak DHS<br />
plaðý femura sabitleyiniz.<br />
SURGICAL TECHNIQUE / CERRAHÝ TEKNÝK<br />
IMPLANTS & INSTRUMENTS / ÝMPLANTLAR VE EL ALETLERÝ 10
DHS <strong>PLATE</strong><br />
Locking Screws for the Locking DHS Plate<br />
Kilitli DHS Plak için Kilitli Vidalarýn Gönderilmesi<br />
For further, intraoperation compression<br />
of the trochanteric fracture, the Compression<br />
Screw may be inserted into the lag screw.<br />
The Compression Screw may be used in<br />
unstable fractures to prevent disengagement<br />
of the lag screw from the plate barrel in nonweightbearing<br />
patients.<br />
Trokanterik kýrýklarda operasyon<br />
sýrasýnda çektirme yapmak için çektirme<br />
civatasý çivinin içine yerleþtirilir. Vücut aðýrlýðýný<br />
taþýyamayacak hastalardaki dengesiz<br />
kýrýklarda çektirme civatasý çivinin plak<br />
boynundan çýkmasýný engellemek için<br />
kullanýlabilir.<br />
1. Carefully screw the LCP drill sleeve into the desired LCP hole until it is gripped completely<br />
by the thread.<br />
2. Drill the screw hole using the drill bit.<br />
3. Use the screw lenght gauge to determine the screw length.<br />
4. Insert the self-tapping locking screws with a 4.5 torque screwdriver until 4 Nm torque<br />
limiting.<br />
1. Drill Sleeve 4.5mm’yi LCP deliðinden tamamen sýkýca tutunana kadar gönderiniz.<br />
2. Vida deliðini drill bit kullanarak deliniz.<br />
3. Vida derinlik ölçer'i kullanarak vida boyunu belirleyiniz.<br />
4. Self-tapping’li kilitli vidayý 4 Nm limite kadar 4.5’luk Tork Anahtarý ile yerleþtiriniz.<br />
1<br />
3<br />
2<br />
11<br />
4<br />
SURGICAL TECHNIQUE / CERRAHÝ TEKNÝK<br />
IMPLANTS & INSTRUMENTS / ÝMPLANTLAR VE EL ALETLERÝ
DHS <strong>PLATE</strong><br />
Instruments & Trays / El Aletleri ve Tavalar<br />
tray 1<br />
tava 1<br />
tray 2<br />
tava 2<br />
10601071001<br />
10601071002<br />
10601071003<br />
10601075011<br />
10601071004<br />
10604071001<br />
10606121001<br />
10606125011<br />
10607081001<br />
10608061001<br />
10608061002<br />
10608061095<br />
10608061135<br />
10610051001<br />
10807091102<br />
SURGICAL TECHNIQUE / CERRAHÝ TEKNÝK<br />
IMPLANTS & INSTRUMENTS / ÝMPLANTLAR VE EL ALETLERÝ<br />
12<br />
Wrench<br />
Anahtar<br />
Coupling Screw<br />
Baðlantý Vidasý-Uzun<br />
Guide Shaft<br />
Gayd Þaft<br />
Guide Sleeve Long<br />
Gayd Kovaný-Uzun<br />
Coupling Screw<br />
Baðlantý Vidasý-Kýsa<br />
T-Handle<br />
T-Tutucu<br />
Tap<br />
Tep<br />
Guide Sleeve Short<br />
Gayd Kovaný-Kýsa<br />
Impactor<br />
Çakýcý<br />
Drill Guide<br />
Dril Gayd<br />
Measuring Device<br />
Ölçüm Cihazý<br />
Angled Guide 95 °<br />
95 ° Açýlý Gayd<br />
Angled Guide 135 °<br />
135 ° Açýlý Gayd<br />
DCS Triple Reamer<br />
DSC Üçlü Oyucu<br />
10610051002 DHS Triple Reamer<br />
DHS Üçlü Oyucu<br />
10807031201 Trocar Kirschner Wire<br />
Trokar Kirschner Teli<br />
Calibrated Threaded Kirschner Wire<br />
Kalibreli Ucu Yivli Kirschner Teli
Revision 02 / Printed in TURKEY - 09/11 - TIPSAN Design<br />
The products being manufactured by TIPSAN A.S. has been certified from SZUTEST (Strojírensk•<br />
Zkušební Ústav) for EC certificate (CE 1015) according to Annex II. 3 and II.4 of Council Directive<br />
93/42/EEC concerning medical devices<br />
Kemalpasa Cd. 7404/1 Sk. No: 3 Pinarbasi - IZMIR - TURKEY<br />
Tel: +90 232 479 56 54 Fax: +90 232 479 58 27<br />
marketing@tipsan.com.tr www.tipsan.com.tr