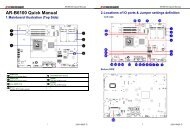
AR-B6005 Quick Manual
Download - Acrosser
Download - Acrosser

Create successful ePaper yourself
Turn your PDF publications into a flip-book with our unique Google optimized e-Paper software.
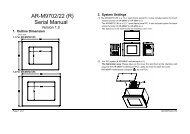
<strong>AR</strong>-<strong>B6005</strong> <strong>Quick</strong> <strong>Manual</strong><br />
<strong>AR</strong>-<strong>B6005</strong> <strong>Quick</strong> <strong>Manual</strong><br />
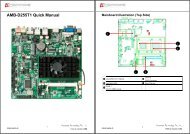
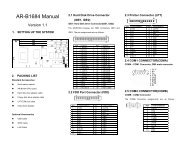
15. CN4 16. AUDIO1<br />
22. SATA_PWR1 23. SATA1 (SATA device connector #1)<br />
To connect SATA device:<br />
SATA_PWR1 SATA Device Power Connector<br />
1.Attach either end of the signal cable to the<br />
RJ45 Ethernet Connector with 1 port<br />
of External USB Connector<br />
Color<br />
Blue<br />
Green<br />
SIGNAL<br />
Remote Switch<br />
Line Out<br />
PIN SIGNAL<br />
1 +12V<br />
2 GND<br />
3 +3.3V<br />
SATA connector on motherboard<br />
Attach the other end to the SATA device.<br />
2. Attach the SATA power cable to the SATA<br />
Pink<br />
MIC IN<br />
4 +5V<br />
device and connect the other end<br />
from the power supply<br />
17. LED2 (Power State) 18. FUSE1 (Fuse connector)<br />
LED SIGNAL<br />
G PIC LED<br />
G HDD LED<br />
Y Power LED<br />
PIN DEFINE<br />
1,2 Fuse Out<br />
3,4 Fuse In<br />
19. PWR2 (Power Input Terminal Block<br />
Connector)<br />
20. PIC1 (PIC Programming connector)<br />
PIN<br />
DEFINE<br />
1 12V / 24V<br />
PIC programming connector<br />
2 IGN<br />
3 GND<br />
7<br />
220010424-G<br />
8<br />
220010424-G