
You also want an ePaper? Increase the reach of your titles
YUMPU automatically turns print PDFs into web optimized ePapers that Google loves.
Quick-Change Installation and Operation Manual<br />
Document #9610-20-1058-27<br />
12. Remove the two M6 set screws from the clamp on the actuator and apply Loctite 222 ® and replace.<br />
Tighten to 25 in-lbs.<br />
13. Loosen the three M8 socket head cap screws holding the Clamp Mounting and Actuator to the Mounting<br />
Module or Shield Offset.<br />
14. Adjust the Debris Shield height so that it clears the <strong>Tool</strong> Changer <strong>Tool</strong> Plate and utility lines.<br />
15. Tighten the three M8 socket head cap screws holding the Clamp Mounting and Actuator to the Mounting<br />
Module or Shield Offset to 250 in-lbs.<br />
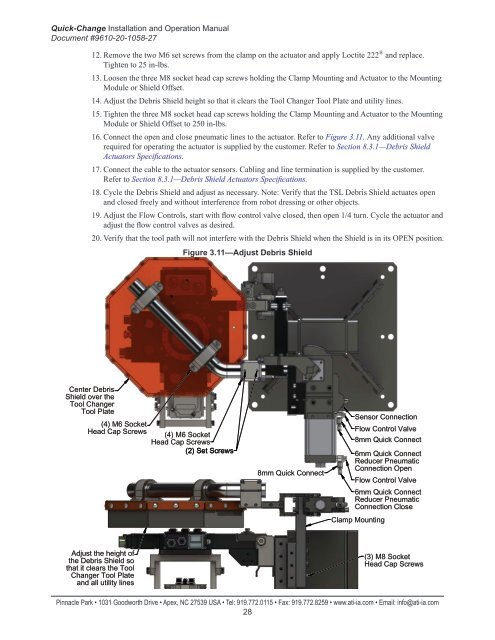
16. Connect the open and close pneumatic lines to the actuator. Refer to Figure 3.11. Any additional valve<br />
required for operating the actuator is supplied by the customer. Refer to Section 8.3.1—Debris Shield<br />
Actuators Specifications.<br />
17. Connect the cable to the actuator sensors. Cabling and line termination is supplied by the customer.<br />
Refer to Section 8.3.1—Debris Shield Actuators Specifications.<br />
18. Cycle the Debris Shield and adjust as necessary. Note: Verify that the <strong>TSL</strong> Debris Shield actuates open<br />
and closed freely and without interference from robot dressing or other objects.<br />
19. Adjust the Flow Controls, start with flow control valve closed, then open 1/4 turn. Cycle the actuator and<br />
adjust the flow control valves as desired.<br />
20. Verify that the tool path will not interfere with the Debris Shield when the Shield is in its OPEN position.<br />
Figure 3.11—Adjust Debris Shield<br />
Center Debris<br />
Shield over the<br />
<strong>Tool</strong> Changer<br />
<strong>Tool</strong> Plate<br />
(4) M6 Socket<br />
Head Cap Screws<br />
(4) M6 Socket<br />
Head Cap Screws<br />
(2) Set Screws<br />
8mm Quick Connect<br />
Sensor Connection<br />
Flow Control Valve<br />
8mm Quick Connect<br />
6mm Quick Connect<br />
Reducer Pneumatic<br />
Connection Open<br />
Flow Control Valve<br />
6mm Quick Connect<br />
Reducer Pneumatic<br />
Connection Close<br />
Clamp Mounting<br />
Adjust the height of<br />
the Debris Shield so<br />
that it clears the <strong>Tool</strong><br />
Changer <strong>Tool</strong> Plate<br />
and all utility lines<br />
(3) M8 Socket<br />
Head Cap Screws<br />
Pinnacle Park • 1031 Goodworth Drive • Apex, NC 27539 USA • Tel: 919.772.0115 • Fax: 919.772.8259 • www.ati-ia.com • Email: info@ati-ia.com<br />
28