Viva Brighton Issue #45 November 2016

Create successful ePaper yourself
Turn your PDF publications into a flip-book with our unique Google optimized e-Paper software.
WE TRY...<br />
...........................................<br />
Macramé workshop<br />
Knot the best read, but fun to do<br />
First, a disclaimer. Some things in life are so much<br />
more fun to do than they are to read about (in<br />
the same way that going on your own holiday is<br />
immeasurably more fun than looking at somebody<br />
else’s holiday photos). This is certainly true of the<br />
macramé-plant-hanger workshop I recently got to<br />
try out and, whilst I’m duty bound to attempt an<br />
explanation, I guarantee that you’ll have a lot more<br />
fun if you just put down this magazine and book<br />
yourself onto the next workshop. Every time you see<br />
an asterisk, I want you to remember that.<br />
Yes, I’d coveted those macramé plant hangers that<br />
you see in the hipster hotels of Instagram-land. But<br />
I’d also been aware that any attempt to teach myself<br />
to make one would end in temper-tears. So I was<br />
keen to be shown, by textiles graduate and macramé<br />
master Harriet Brooks from Posh Totty.<br />
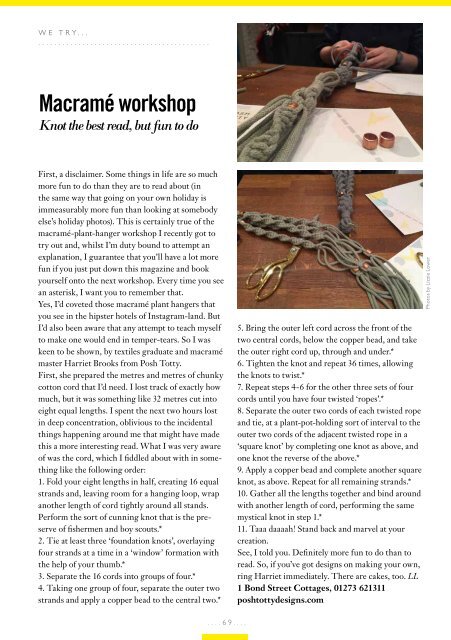
First, she prepared the metres and metres of chunky<br />
cotton cord that I’d need. I lost track of exactly how<br />
much, but it was something like 32 metres cut into<br />
eight equal lengths. I spent the next two hours lost<br />
in deep concentration, oblivious to the incidental<br />
things happening around me that might have made<br />
this a more interesting read. What I was very aware<br />
of was the cord, which I fiddled about with in something<br />
like the following order:<br />
1. Fold your eight lengths in half, creating 16 equal<br />
strands and, leaving room for a hanging loop, wrap<br />
another length of cord tightly around all stands.<br />
Perform the sort of cunning knot that is the preserve<br />
of fishermen and boy scouts.*<br />
2. Tie at least three ‘foundation knots’, overlaying<br />
four strands at a time in a ‘window’ formation with<br />
the help of your thumb.*<br />
3. Separate the 16 cords into groups of four.*<br />
4. Taking one group of four, separate the outer two<br />
strands and apply a copper bead to the central two.*<br />
5. Bring the outer left cord across the front of the<br />
two central cords, below the copper bead, and take<br />
the outer right cord up, through and under.*<br />
6. Tighten the knot and repeat 36 times, allowing<br />
the knots to twist.*<br />
7. Repeat steps 4-6 for the other three sets of four<br />
cords until you have four twisted ‘ropes’.*<br />
8. Separate the outer two cords of each twisted rope<br />
and tie, at a plant-pot-holding sort of interval to the<br />
outer two cords of the adjacent twisted rope in a<br />
‘square knot’ by completing one knot as above, and<br />
one knot the reverse of the above.*<br />
9. Apply a copper bead and complete another square<br />
knot, as above. Repeat for all remaining strands.*<br />
10. Gather all the lengths together and bind around<br />
with another length of cord, performing the same<br />
mystical knot in step 1.*<br />
11. Taaa daaaah! Stand back and marvel at your<br />
creation.<br />
See, I told you. Definitely more fun to do than to<br />
read. So, if you’ve got designs on making your own,<br />
ring Harriet immediately. There are cakes, too. LL<br />
1 Bond Street Cottages, 01273 621311<br />
poshtottydesigns.com<br />
Photos by Lizzie Lower<br />
....69....