- Page 1 and 2:
Revit MEP 2009 Imperial Tutorial Ap
- Page 3:
Portions relating to JPEG © Copyri
- Page 6 and 7:
Placing Spaces . . . . . . . . . .
- Page 8 and 9:
Adding Views to Sheets . . . . . .
- Page 10 and 11:
Managing Linked Building Models . .
- Page 13 and 14:
Introduction This introduction help
- Page 15 and 16:
■ For File name, enter the new fi
- Page 17 and 18:
There are 2 types of model elements
- Page 19 and 20:
■ System families include walls,
- Page 21 and 22:
The Options Bar The Type Selector t
- Page 23 and 24:
The Design Bar is located on the le
- Page 25 and 26:
The Status Bar ■ The browser is o
- Page 27 and 28:
In addition, context-sensitive help
- Page 29 and 30:
9 If you use a mouse that has a whe
- Page 31 and 32:
Some commands, such as Move and Cop
- Page 33:
Express Workshop 23
- Page 36 and 37:
Creating a Secondary Supply Air Sys
- Page 38 and 39:
28 | Chapter 2 Express Workshop Dir
- Page 40 and 41:
20 While pressing CTRL, move the cu
- Page 42 and 43:
A network layout solution displays
- Page 44 and 45:
■ Verify that Only is selected.
- Page 46 and 47:
Add an end cap 6 Press ESC twice to
- Page 48 and 49:
Ductwork is automatically created t
- Page 50 and 51:
The cursor displays as the air hand
- Page 52 and 53:
A vertical section of duct is creat
- Page 54 and 55:
In the Element Properties dialog, u
- Page 56 and 57:
The selected system maintains its a
- Page 58 and 59:
Dataset ■ Click File menu ➤ Ope
- Page 60 and 61:
50 | Chapter 2 Express Workshop The
- Page 62 and 63:
15 Press ESC to clear the sketch gr
- Page 64 and 65:
Modify a circuit The sketch graphic
- Page 66 and 67:
The modified circuit is highlighted
- Page 68 and 69:
The Options Bar displays the select
- Page 70 and 71:
Verify the switch system 26 Move th
- Page 72 and 73:
The top part of the tag for the lig
- Page 74 and 75:
2 On the Options Bar, click (Create
- Page 76 and 77:
9 Select the wire shown. The tick m
- Page 78 and 79:
68 | Chapter 2 Express Workshop 20
- Page 80 and 81:
70 | Chapter 2 Express Workshop 26
- Page 82 and 83:
The temporary label shows the circu
- Page 84 and 85:
The reorganized circuit structure i
- Page 87 and 88:
Mechanical Systems In this tutorial
- Page 89 and 90:
7 On the Basic tab of the Design Ba
- Page 91 and 92:
20 Click to place the space. Only t
- Page 93 and 94:
Enter Office, and press ENTER. 26 D
- Page 95 and 96:
■ Verify that Radius is cleared.
- Page 97 and 98:
47 Click OK. The space is renamed E
- Page 99 and 100:
NOTE You can also press F9 (with th
- Page 101 and 102:
15 On the Zone toolbar, click Finis
- Page 103 and 104:
The new zone name displays in the Z
- Page 105 and 106:
8 For additional practice, use the
- Page 107 and 108:
View a space 8 In the preview pane,
- Page 109 and 110:
20 Under the list of spaces and zon
- Page 111 and 112:
Mechanical Systems:Air Designing Ai
- Page 113 and 114:
12 On the Mechanical tab of the Des
- Page 115 and 116:
Before you copy the exhaust diffuse
- Page 117 and 118:
Optional: Complete the level 1 supp
- Page 119 and 120:
■ Open the i Air System Schedules
- Page 121 and 122:
This closes all open windows that a
- Page 123 and 124:
5 Click OK twice. 6 Type VG on the
- Page 125 and 126:
Create the ductwork Notice that onl
- Page 127 and 128:
The physical connection composed of
- Page 129 and 130:
IMPORTANT The Duct Sizing dialog di
- Page 131 and 132:
48 Notice that the cursor changes t
- Page 133 and 134:
Modify the layout path and create t
- Page 135 and 136:
Size the duct Notice that the cente
- Page 137 and 138:
Next, you create a low pressure sec
- Page 139 and 140:
The new system named Mechanical Sup
- Page 141 and 142:
The ductwork is created. Remember t
- Page 143 and 144:
Size the duct The system components
- Page 145 and 146:
The completed level 1 secondary sup
- Page 147 and 148:
Create and use a section view to va
- Page 149 and 150:
14 Continue to validate the duct ge
- Page 151 and 152:
27 In the Save As dialog, enter Usi
- Page 153 and 154:
NOTE You must place the cursor over
- Page 155 and 156:
TIP When zooming or reorienting a v
- Page 157 and 158:
The completed level 1 air system la
- Page 159 and 160:
Place an endcap on the level 1 prim
- Page 161 and 162:
The sized left primary is shown bel
- Page 163 and 164:
The completed level 2 primary duct
- Page 165 and 166:
TIP Color names are displayed under
- Page 167 and 168:
Split the main 3 Right-click Supply
- Page 169 and 170:
Tag the main The low pressure secon
- Page 171 and 172:
6 On the System Inspector tab of th
- Page 173 and 174:
Dataset ■ Click File menu ➤ Ope
- Page 175 and 176:
A new section view named Section 2
- Page 177 and 178:
This specifies the AC unit offset l
- Page 179 and 180:
Tile the views Next, you tile the R
- Page 181 and 182:
Notice that the mitered elbow fitti
- Page 183 and 184:
26 Move the cursor over the primary
- Page 185 and 186:
33 Select the right primary duct, r
- Page 187 and 188:
Notice that the endcap snap follows
- Page 189 and 190:
50 Press Tab to check connectivity.
- Page 191 and 192:
Validate the primary supply air sys
- Page 193 and 194:
Notice that the duct riser passes t
- Page 195 and 196:
The completed level 1 primary suppl
- Page 197 and 198:
The red lines represent the default
- Page 199 and 200:
Mechanical Systems: Piping Designin
- Page 201 and 202:
You use this view to create the pip
- Page 203 and 204:
33 In the Visibility Graphics dialo
- Page 205 and 206:
for the boiler pipe connection), du
- Page 207 and 208:
7 Place the cursor over the top ext
- Page 209 and 210:
16 Enter ZR, and sketch a zoom regi
- Page 211 and 212:
IMPORTANT In the System Browser, al
- Page 213 and 214:
Create the return hydronic piping s
- Page 215 and 216:
Notice that all components that are
- Page 217 and 218:
The inset is the distance from the
- Page 219 and 220:
18 Repeat the process to modify the
- Page 221 and 222:
Notice that the pipes and symbolic
- Page 223 and 224:
Remember that although the physical
- Page 225 and 226:
After the pipe run and radiators ar
- Page 227 and 228:
In this exercise, you used the Layo
- Page 229 and 230:
A new section view named Section 3
- Page 231 and 232:
The section view confirms that the
- Page 233 and 234:
Zoom the split and notice that a li
- Page 235 and 236:
34 Draw the pipe 12’ 0" to the le
- Page 237 and 238:
This activates the Draw tool, and a
- Page 239 and 240:
You can either drag the pipe segmen
- Page 241 and 242:
Tile the views 2 With the 3D Piping
- Page 243 and 244:
A green pipe riser symbol displays
- Page 245 and 246:
The boiler is connected to the left
- Page 247 and 248:
28 In the 3D Piping view, select th
- Page 249 and 250:
The right supply pipe run is connec
- Page 251 and 252:
48 Draw the pipe up toward the retu
- Page 253 and 254:
54 Draw the pipe toward the return
- Page 255 and 256:
58 Validate the return pipe geometr
- Page 257 and 258:
The left return pipe is aligned wit
- Page 259 and 260:
The boiler is physically connected
- Page 261 and 262:
Notice that the branch sizing used
- Page 263 and 264:
Notice that a pipe fitting is autom
- Page 265 and 266:
24 Click OK. The circulator pump is
- Page 267 and 268:
31 With the 2 - Piping and the 3D P
- Page 269 and 270:
in the Unassigned folder in the Sys
- Page 271 and 272:
NOTE You can also use System Inspec
- Page 273 and 274:
15 On the System Inspector tab of t
- Page 275 and 276:
The red lines represent the default
- Page 277 and 278:
connections and creating logical sy
- Page 279 and 280:
Electrical Systems In this tutorial
- Page 281 and 282:
Parameter Neutral Multiplier Neutra
- Page 283 and 284:
NOTE Although it is possible to spe
- Page 285 and 286:
Open the provided dataset, as descr
- Page 287 and 288:
Enter a space type in the Key Name
- Page 289 and 290:
Level 1 - Lighting 2 - Lighting 2 -
- Page 291 and 292:
16 Make the 2 - Lighting floor plan
- Page 293 and 294:
8 On the Formatting tab, under fiel
- Page 295 and 296:
4 On the Windows menu, click Close
- Page 297 and 298:
In the Space Lighting Analysis sche
- Page 299 and 300:
21 Again, check the Average Estimat
- Page 301 and 302:
With the exception of the 2 Mechani
- Page 303 and 304:
15 Zoom in on the stairwell at the
- Page 305 and 306:
23 Zoom in on the stairwell at the
- Page 307 and 308:
3 In the Element Properties dialog,
- Page 309 and 310:
2-Power Place floor-hosted receptac
- Page 311 and 312:
28 Draw a pick box around the 2 flo
- Page 313 and 314:
In this exercise you placed wall-ho
- Page 315 and 316:
Open the provided dataset, as descr
- Page 317 and 318:
Add panels and a transformer to sec
- Page 319 and 320:
40 Select the T1 transformer, and c
- Page 321 and 322:
A question mark is displayed for th
- Page 323 and 324:
15 Click Cancel to close the Elemen
- Page 325 and 326:
Open the provided dataset, as descr
- Page 327 and 328:
17 On the Options Bar, click , clic
- Page 329 and 330:
29 For more practice, continue perf
- Page 331 and 332:
2 Select all the lighting fixtures
- Page 333 and 334:
18 On the Switch System toolbar, cl
- Page 335 and 336:
NOTE Do not overwrite the original
- Page 337 and 338:
11 Click in the open area near the
- Page 339 and 340:
number of hot conductors. In the pr
- Page 341 and 342:
Completed 2-Power 20 You can save t
- Page 343 and 344:
The device you selected in the Syst
- Page 345 and 346:
Add a Hot Conductor to the wiring f
- Page 347 and 348:
Check Circuits 29 Using the same me
- Page 349 and 350:
2 In the Mechanical/Electrical spac
- Page 351 and 352:
Verify/adjust wire sizes Now that y
- Page 353 and 354:
Plumbing Systems 7 The most common
- Page 355 and 356:
6 In the Project Browser, expand Fa
- Page 357 and 358:
The men’s room is partitioned for
- Page 359 and 360:
10 Click the center line of the toi
- Page 361 and 362:
29 Move the cursor over the counter
- Page 363 and 364:
The fine setting displays 2-line pi
- Page 365 and 366:
Up to 6 piping layout solutions are
- Page 367 and 368:
32 Examine the piping that was auto
- Page 369 and 370:
38 You can save the open file if yo
- Page 371 and 372:
If you select the pipe, you can ver
- Page 373 and 374:
20 On the Options Bar, enter 0' 6"
- Page 375 and 376:
33 In the Visibility/Graphic Overri
- Page 377 and 378:
Using Routing Solutions to finish t
- Page 379 and 380:
66 Using the same method, specify t
- Page 381 and 382:
76 If you want to save your work, c
- Page 383 and 384:
8 Click Modify. The wye is added to
- Page 385 and 386:
NOTE There is a known issue when co
- Page 387 and 388:
3 Press Delete. 4 Select the pipe c
- Page 389 and 390:
Resize pipes 20 In the Project Brow
- Page 391 and 392:
This will provide the space require
- Page 393 and 394:
4 On the Plumbing tab on the Design
- Page 395 and 396:
13 Double-click the section symbol
- Page 397 and 398:
26 Double-click 3D - Plumbing to ma
- Page 399 and 400:
34 Zoom out to view the vents from
- Page 401 and 402:
5 In the Type Properties dialog, in
- Page 403 and 404:
36 Move the cursor over the cold wa
- Page 405 and 406:
53 Click Modify. 54 Select the left
- Page 407 and 408:
59 On the Options Bar, specify 2" f
- Page 409 and 410:
2 Press F9 to open the System Brows
- Page 411 and 412:
27 Click Modify. 28 On the Plumbing
- Page 413 and 414:
42 While maintaining a 90 degree an
- Page 415 and 416:
Fire Protection Systems In this tut
- Page 417 and 418:
■ For Offset, verify that 9' 0" i
- Page 419 and 420:
31 In the Format dialog, do the fol
- Page 421 and 422:
6 With the view zoomed, place the c
- Page 423 and 424:
A copy of the sprinkler is immediat
- Page 425 and 426:
19 Move the cursor directly down, a
- Page 427 and 428:
20 On the Design Bar, click Modify.
- Page 429 and 430:
The Office 202 sprinklers are place
- Page 431 and 432:
31 Move the cursor directly down al
- Page 433 and 434:
You have now placed the sprinklers
- Page 435 and 436:
44 Move the cursor along the same h
- Page 437 and 438:
The arrays are created, and an erro
- Page 439 and 440:
The sprinkler is added to the space
- Page 441 and 442:
70 In the Project Browser, double-c
- Page 443 and 444:
Explore the System Browser 3 On the
- Page 445 and 446:
NOTE The (Layout Path) button is av
- Page 447 and 448:
27 Drag the parallel movement contr
- Page 449 and 450:
33 Zoom in on the 3 offices at the
- Page 451 and 452:
Continue combining piping 40 Zoom i
- Page 453 and 454:
54 Zoom in on the office in the low
- Page 455 and 456:
An elbow is inserted to complete th
- Page 457 and 458:
6 On the Edit System toolbar, click
- Page 459 and 460:
The layout automatically provides a
- Page 461 and 462:
Check pipe connectivity 21 Highligh
- Page 463 and 464:
4 On the Edit toolbar, click (Copy)
- Page 465 and 466:
20 Click the horizontal pipe direct
- Page 467 and 468:
30 Select the unconnected sprinkler
- Page 469 and 470:
You will work mainly in the floor p
- Page 471 and 472:
Modify the diameter of the main 13
- Page 473 and 474:
The main piping is selected and dis
- Page 475 and 476:
This segment services 4 sprinklers.
- Page 477 and 478:
39 Click the tag to display end con
- Page 479 and 480:
Creating Revit MEP Content This tut
- Page 481 and 482:
Create Shared Parameters 8 On the D
- Page 483 and 484:
Add an electrical connector 36 Elec
- Page 485 and 486:
Dataset: ■ Click File menu ➤ Op
- Page 487 and 488:
■ For Apparent Power Phase 1, ent
- Page 489 and 490:
Flex the family ■ For Apparent Lo
- Page 491 and 492:
68 Click (Layout Paths), and click
- Page 493 and 494:
NOTE Because Flow Factor and Flow C
- Page 495 and 496:
31 On the Options Bar, click Load.
- Page 497 and 498:
51 In the drawing area, select the
- Page 499 and 500:
6 Zoom in, and move the cursor over
- Page 501 and 502:
■ For Flow Configuration, select
- Page 503 and 504:
8 On the Design Bar, click Load int
- Page 505 and 506:
The label is copied. 9 Repeat the p
- Page 507 and 508:
17 Using the same method, modify th
- Page 509 and 510:
planes that define the location of
- Page 511 and 512:
Next you will duplicate the origina
- Page 513 and 514:
23 Click Modify. 24 On the toolbar,
- Page 515 and 516:
Under Electrical Loads ■ For Appa
- Page 517 and 518:
Flange Family 46 Click Finish Sketc
- Page 519 and 520:
12 Click OK. 13 Using the same meth
- Page 521 and 522:
32 Select the dimension between the
- Page 523 and 524:
59 Click Modify. 60 Select the dime
- Page 525 and 526:
Add connectors 92 Click Extrusion P
- Page 527 and 528:
111 Spin the flange to view the bac
- Page 529 and 530:
NOTE Fittings are among the most co
- Page 531 and 532:
24 Click Modify. 25 Right-click the
- Page 533 and 534:
39 On the Design Bar, click Referen
- Page 535 and 536:
While drawing the diagonal referenc
- Page 537 and 538:
Next, you specify values and formul
- Page 539 and 540:
84 On the Family tab of the Design
- Page 541 and 542:
108 Click File ➤ Save, and save t
- Page 543 and 544:
The geometry for the left coupling
- Page 545 and 546:
140 While pressing SHIFT and the mi
- Page 547 and 548:
A model line is created over the re
- Page 549 and 550:
Flex the part 170 On the View Contr
- Page 551 and 552:
Only model lines and reference plan
- Page 553 and 554:
You place 2 dimensions for the righ
- Page 555 and 556:
203 Continue to flex the fitting by
- Page 557 and 558:
The primary connector is placed. Yo
- Page 559 and 560:
IMPORTANT Connector rotation is a c
- Page 561 and 562:
Verify connector arrow direction 23
- Page 563 and 564:
257 Enter ZR, and draw a zoom regio
- Page 565 and 566:
The threaded elbow is ready to be u
- Page 567 and 568:
19 Move the cursor directly up and
- Page 569 and 570:
A chain of 2 lines is drawn. 23 On
- Page 571 and 572:
45 Drag the middle shape handle up
- Page 573 and 574:
Apparent Load Phase 1 Apparent Load
- Page 575 and 576:
Angle Graphics Size on screen Mecha
- Page 577 and 578:
Load Classifications Revit MEP main
- Page 579 and 580:
esult LookupTableName LookupColumn
- Page 581 and 582:
Family Category Sprinklers Light So
- Page 583 and 584:
■ Switchboard: Used to connect de
- Page 585 and 586:
Documenting Your Projects In this s
- Page 587 and 588:
Adding Views and Sheets to a Projec
- Page 589 and 590:
Duplicate the Level 1 floor plan to
- Page 591 and 592:
14 On the View Control Bar, click t
- Page 593 and 594:
South East elevation view Section v
- Page 595 and 596:
Rename and view the new elevation 9
- Page 597 and 598:
19 Click the blue arrows below the
- Page 599 and 600:
Creating Callout Views 25 On the De
- Page 601 and 602:
■ Move the cursor to the lower-le
- Page 603 and 604:
Create a detail view callout 11 In
- Page 605 and 606:
20 Click File menu ➤ Save. Modify
- Page 607 and 608:
Modify the line weight of the secti
- Page 609 and 610:
45 For Line Pattern, select Dash. 4
- Page 611 and 612:
10 Under Visibility, clear: ■ Cal
- Page 613 and 614:
2 In the Project Browser, select Pe
- Page 615 and 616:
11 On the Options Bar, click (Recta
- Page 617 and 618:
18 In the Visibility/Graphics Overr
- Page 619 and 620:
7 On the View menu, click Zoom ➤
- Page 621 and 622:
2 Select the Copy of Unit 18 Plan -
- Page 623 and 624:
19 Select 1 of the chairs around th
- Page 625 and 626:
32 Select one of the lamps, right-c
- Page 627 and 628:
NOTE The vertical time and date sta
- Page 629 and 630:
Create a floor plan sheet 15 In the
- Page 631 and 632:
7 Drag the North elevation to the l
- Page 633 and 634:
View updated annotation on referenc
- Page 635 and 636:
6 Right-click, and click Deactivate
- Page 637 and 638:
8 On the Options Bar, click . 9 In
- Page 639 and 640:
17 Reposition the view on the title
- Page 641 and 642:
Tagging and Scheduling In this tuto
- Page 643 and 644:
6 Using the same method, create a h
- Page 645 and 646:
18 Click the room text label, type
- Page 647 and 648:
30 Click File menu ➤ Save As. Tag
- Page 649 and 650:
9 Using one of the methods you just
- Page 651 and 652:
25 Zoom to the lower-right area of
- Page 653 and 654:
16 Drag the table tag to the center
- Page 655 and 656:
You begin by creating a window inst
- Page 657 and 658:
A schedule is created that contains
- Page 659 and 660:
24 Change the Type Mark for the oth
- Page 661 and 662:
Group headers in the schedule 13 In
- Page 663 and 664:
13 In the Project Browser, click Un
- Page 665 and 666:
Add new rooms to the schedule 9 On
- Page 667 and 668:
8 Draw a vertical separation line f
- Page 669 and 670:
15 Click to place the room in the a
- Page 671 and 672:
32 Using the same method, add 2 mor
- Page 673 and 674:
11 In the Edit Color Scheme dialog,
- Page 675 and 676:
Create a section color diagram 31 I
- Page 677 and 678:
Assign the penthouse room the servi
- Page 679 and 680:
Assign the correct heights to the r
- Page 681 and 682:
2 Zoom in to the roof area of the b
- Page 683 and 684:
Material: Description Wood Joist Ma
- Page 685 and 686:
Adding Shared Parameters to a Famil
- Page 687 and 688:
28 On the Design Bar, click Modify.
- Page 689 and 690: 7 Move the cursor down, through the
- Page 691 and 692: 24 On the Design Bar, click Modify.
- Page 693 and 694: Create a wall schedule 1 On the Vie
- Page 695 and 696: Revit MEP creates 2 tables for the
- Page 697 and 698: Annotating and Dimensioning In this
- Page 699 and 700: Training File ■ Click File menu
- Page 701 and 702: The reported value of the Loft leve
- Page 703 and 704: Linear and multi-segmented dimensio
- Page 705 and 706: 6 Click the lock that displays on t
- Page 707 and 708: Make the dimension segments equal t
- Page 709 and 710: 35 On the Design Bar, click Modify.
- Page 711 and 712: Place an angular dimension 47 Zoom
- Page 713 and 714: Select automatic dimensioning optio
- Page 715 and 716: 3 On the Basics tab of the Design B
- Page 717 and 718: 11 Move the cursor down, and specif
- Page 719 and 720: 20 Click the blue middle grip, drag
- Page 721 and 722: ■ Under Text, for Text Size, type
- Page 723 and 724: Adding Text Notes to the Floor Plan
- Page 725 and 726: Create a text box with leaders 13 O
- Page 727 and 728: Add another note using the Standard
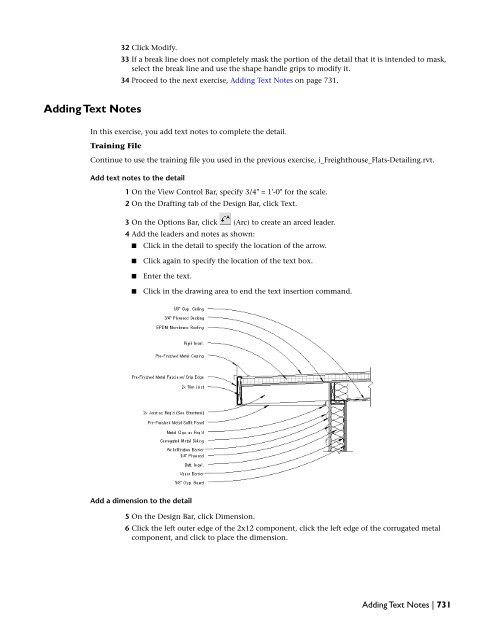
- Page 729 and 730: Detailing In this tutorial, you lea
- Page 731 and 732: 8 Delete the component. Place a rep
- Page 733 and 734: Because you still have several comp
- Page 735 and 736: Add insulation 39 On the Design Bar
- Page 737 and 738: Adding Detail Lines 52 Proceed to t
- Page 739: 17 Draw a horizontal line as shown.
- Page 743 and 744: The selected lines need to be repla
- Page 745 and 746: Adding Keynotes In this exercise, y
- Page 747 and 748: Creating Line-based Detail Componen
- Page 749 and 750: Add a vapor barrier component 51 On
- Page 751 and 752: 69 Select the component, and click
- Page 753 and 754: ■ Click Open. 5 Enter zf to zoom
- Page 755 and 756: 18 Save the file. 19 Proceed to the
- Page 757 and 758: Mirror the region 21 Select the fil
- Page 759 and 760: 37 On the Design Bar, click Finish
- Page 761 and 762: 54 On the Tools toolbar, click (Tri
- Page 763 and 764: Add detail lines 70 On the Design B
- Page 765 and 766: 89 On the Design Bar, click Detail
- Page 767 and 768: Add dimensions 104 On the Design Ba
- Page 769 and 770: 125 Select Modify to end the comman
- Page 771 and 772: Finishing the Sheets In this tutori
- Page 773 and 774: 9 Drag the midpoint of the leader t
- Page 775 and 776: 21 On the Design Bar, click Modify.
- Page 777 and 778: Using Drawing Lists 31 On the Desig
- Page 779 and 780: Using Legends 9 On the Design Bar,
- Page 781 and 782: Add text to the legend 11 In the Ty
- Page 783 and 784: Creating a Component Legend In this
- Page 785 and 786: Add text to the legend 15 On the Op
- Page 787 and 788: 25 On the Design Bar, click Modify
- Page 789 and 790: 35 Optionally, click if you do not
- Page 791 and 792:
8 Click OK. 9 Save the file. Sketch
- Page 793 and 794:
Modify revision cloud style 12 Sele
- Page 795 and 796:
Continue to use the training file y
- Page 797 and 798:
Change the sequencing of revision t
- Page 799 and 800:
The revision schedule is now shown
- Page 801 and 802:
Importing Image Files In this exerc
- Page 803 and 804:
Continue to use the training file y
- Page 805 and 806:
Using Dependent Views In this tutor
- Page 807 and 808:
Using Dependent Views in Documentat
- Page 809 and 810:
8 Click the inside control on the b
- Page 811 and 812:
The outside controls adjust the ann
- Page 813 and 814:
25 Click Settings menu ➤ Object S
- Page 815 and 816:
The Sheet number of the dependent v
- Page 817 and 818:
50 Use the same method to hide Cubi
- Page 819 and 820:
The dependent view opens. 3 In the
- Page 821 and 822:
22 On the Design Bar, click Modify.
- Page 823 and 824:
Using Advanced Features 813
- Page 825 and 826:
Grouping Using the grouping functio
- Page 827 and 828:
3 Draw a selection box (lower-right
- Page 829 and 830:
Place instances of the group 9 In t
- Page 831 and 832:
17 Select the kitchen in the stairw
- Page 833 and 834:
Save the training file Modifying a
- Page 835 and 836:
8 On the Design Bar, click Modify.
- Page 837 and 838:
Nesting Groups 24 On the Design Bar
- Page 839 and 840:
6 Press TAB, select the wall betwee
- Page 841 and 842:
3 On the Drafting tab of the Design
- Page 843 and 844:
18 On the Design Bar, click Modify.
- Page 845 and 846:
7 On the Options Bar, click (Filter
- Page 847 and 848:
Continue using the training file sa
- Page 849 and 850:
Sharing Projects When working with
- Page 851 and 852:
You should take into consideration
- Page 853 and 854:
Tips and common scenarios 1 When wo
- Page 855 and 856:
When you enable worksharing, Revit
- Page 857 and 858:
The Level 1 floor plan should displ
- Page 859 and 860:
16 On the Basics tab of the Design
- Page 861 and 862:
35 Using the following illustration
- Page 863 and 864:
You are now the owner of that works
- Page 865 and 866:
47 On the Modelling tab of the Desi
- Page 867 and 868:
4 In the File Save Options dialog,
- Page 869 and 870:
34 In the Editing Requests dialog,
- Page 871 and 872:
Creating Multiple Design Options Wh
- Page 873 and 874:
3 Select Option 1 (primary), click
- Page 875 and 876:
Notice the 12 columns that you adde
- Page 877 and 878:
Notice that the beams complete the
- Page 879 and 880:
55 On the Basics tab of the Design
- Page 881 and 882:
Three more roof beams are placed at
- Page 883 and 884:
11 On the Basics tab of the Design
- Page 885 and 886:
Add the louvers to the design optio
- Page 887 and 888:
Create sunscreen roof system 32 In
- Page 889 and 890:
Managing Design Options In this exe
- Page 891 and 892:
At this point, all isometric views
- Page 893 and 894:
Project Phasing In any project, you
- Page 895 and 896:
Change the phase of the existing bu
- Page 897 and 898:
31 Under Phase Status, select Demol
- Page 899 and 900:
The composite plan phase filter use
- Page 901 and 902:
4 Click Settings menu ➤ Phases. I
- Page 903 and 904:
Linking Building Models and Sharing
- Page 905 and 906:
■ Auto - Origin to Origin: The or
- Page 907 and 908:
Move the condo complex building mod
- Page 909 and 910:
23 On the Edit toolbar, click (Rota
- Page 911 and 912:
Copy the townhouse The townhouse is
- Page 913 and 914:
38 On the File menu, click Save. NO
- Page 915 and 916:
Notice that the townhouse is now at
- Page 917 and 918:
Apply halftone 12 Using the same te
- Page 919 and 920:
NOTE This exercise requires the com
- Page 921 and 922:
10 In the Save As dialog, navigate
- Page 923 and 924:
4 In the Manage Place and Locations
- Page 925 and 926:
23 Click Save Locations. 24 In the
- Page 927 and 928:
■ Navigate to the Model Linking f
- Page 929 and 930:
Report shared coordinates 8 On the
- Page 931 and 932:
8 Click OK. Sort schedule data In o
- Page 933 and 934:
Customizing Project Settings and Te
- Page 935 and 936:
Modifying Project and System Settin
- Page 937 and 938:
27 Click the General tab, and make
- Page 939 and 940:
The new library displays in the lef
- Page 941 and 942:
6 Under Dimension Snaps, click in t
- Page 943 and 944:
Modifying Project Settings In this
- Page 945 and 946:
14 In the Element Properties dialog
- Page 947 and 948:
TIP If you want to see the material
- Page 949 and 950:
In the Materials dialog, notice tha
- Page 951 and 952:
Notice the exterior frames of all t
- Page 953 and 954:
6 Click OK twice. Now that you have
- Page 955 and 956:
16 Click Settings menu ➤ Object S
- Page 957 and 958:
Modifying Annotations In this exerc
- Page 959 and 960:
The remaining untagged windows are
- Page 961 and 962:
2 In the Project Browser, expand Sh
- Page 963 and 964:
Creating an Office Template In this
- Page 965 and 966:
3 Click the Render Appearance tab.
- Page 967 and 968:
47 Repeat the previous 5 steps for
- Page 969 and 970:
Loading and Modifying Families and
- Page 971 and 972:
11 On the Options Bar, click (Eleme
- Page 973 and 974:
Create 3D views 20 In the Project B
- Page 975 and 976:
2 For each category, specify the fo
- Page 977 and 978:
29 Add shared project parameters as