
You also want an ePaper? Increase the reach of your titles
YUMPU automatically turns print PDFs into web optimized ePapers that Google loves.
1914-19<strong>18</strong> in miniature<br />
Instruction Manual<br />
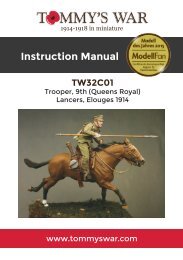
<strong>TW32ART2</strong><br />
<strong>Ordnance</strong> <strong>18</strong> Pounder QF<br />
A PDF of this document is available at tommyswar.com which can<br />
be downloaded and printed in a larger size<br />
www.tommyswar.com
1914-19<strong>18</strong> in miniature<br />
Building your Kits Parts<br />
The first task is to remove molding plugs. Use a sharp craft<br />
knife, pincers or a resin saw (I use a version available from<br />
Games Workshop). Once the plugs are removed each part can<br />
be cleaned-up in detail and any mold lines removed with the<br />
craft knife or a fine sand paper*. Once you are happy with each<br />
of the individual parts then they should be cleaned with soapy<br />
water to remove any grease or fine grain and allowed to dry.<br />
It is important to pre-fit your parts before assembly, once you<br />
are happy with the way each part fits together the pieces can<br />
be affixed using an epoxy glue (generally these come in two<br />
parts, an epoxy and a hardener) or superglue. I generally use<br />
epoxy for larger parts and superglue for small sub-assemblies.<br />
There are some areas (such as fixing wheels) where it is<br />
advisable to pin, this can be achieved by using small pieces of<br />
brass rod (available at hobby stores or craft shops). This adds<br />
strength to the construction.<br />
Once the kit is built, it is advisable to give it another clean in<br />
soapy water to again remove any grease, and then prime in<br />
the colour of your choice prior to painting. Remember, resin is<br />
quite a flexible medium, and if lightly heated can be carefully<br />
manipulated in to shape.<br />
Care must be taken when working with resin as it can be<br />
dangerous if breathed in. When working with resin wear a face<br />
mask or work in a well ventilated room. We recommend a form<br />
of sanding when using resin called ‘wet-sanding’, this involves<br />
putting water on the sand paper so that resin dust is kept in the<br />
water. However, we recommend still wearing a face mask to<br />
cover the mouth area when working in this style.<br />
2<br />
www.tommyswar.com
1914-19<strong>18</strong> in miniature<br />
Parts<br />
www.tommyswar.com<br />
3
1914-19<strong>18</strong> in miniature<br />
Assembly<br />
4<br />
www.tommyswar.com
1914-19<strong>18</strong> in miniature<br />
Assembly<br />
www.tommyswar.com 5
1914-19<strong>18</strong> in miniature<br />
Assembly<br />
6<br />
www.tommyswar.com
1914-19<strong>18</strong> in miniature<br />
Assembly<br />
www.tommyswar.com 7
1914-19<strong>18</strong> in miniature<br />
Assembly<br />
8<br />
www.tommyswar.com
1914-19<strong>18</strong> in miniature<br />
Assembly<br />
www.tommyswar.com 9
1914-19<strong>18</strong> in miniature<br />
Colour schemes and references<br />
Artillery used by both the Royal Field Artillery and Royal<br />
Artillery was a shade of khaki green at the beginning of the war.<br />
Both branches of the service were highly efficient regulars and<br />
took great pride in their guns, so upkeep and appearance was<br />
of prime importance. So, early war guns were polished to a high<br />
standard and kept very clean.<br />
As the war progressed performance took precedence over<br />
appearance and the guns became more weathered and<br />
camouflage from enemy counter-barrage was of vital<br />
importance. Guns were ‘dug-in’ and covered with netting and<br />
elaborate camouflage schemes became more common.<br />
For research purposes I am grateful for the outstanding and<br />
probably definitive guide to early 20th Century British artillery<br />
in the book ‘Early British Quick Firing Artillery’ by Len Trawlin<br />
(Publisher: Nexus Special Interests).<br />
For colour schemes I have referred to images of original artillery<br />
pieces (13 <strong>pounder</strong> at the Imperial <strong>War</strong> Museum,London and<br />
<strong>18</strong> <strong>pounder</strong> at the Fire power Royal Artillery Museum, London).<br />
Useful colour references can be found within the Osprey<br />
Publishing book ‘British Artillery 1914-19’by Dale Clarke and<br />
illustrated by Brian Dell published under their Vanguard range,<br />
including a very interesting pattern on an <strong>18</strong> <strong>pounder</strong> of the<br />
Royal Naval Division in France in 19<strong>18</strong>.<br />
Imperial <strong>War</strong> Museum - www.iwn.org.uk<br />
Firepower Museum, Woolwich, London - www.firepower.org.uk<br />
Osprey Publishing - www.ospreypublishing.com<br />
Colour photographs of our completed kits can be found at<br />
www.tommsywar.com<br />
10<br />
www.tommyswar.com
1914-19<strong>18</strong> in miniature<br />
Replacement Parts<br />
Thank you for purchasing this Tommy’s <strong>War</strong> product, I hope you<br />
are entirely satisfied with it. I do endeavour to inspect each kit<br />
before it is despatched but on the very rare occasion that a part<br />
is missing then I will send that part to you immediately.<br />
Simply email me at Darren@tommyswar.com with a description<br />
of the part required (it may help if you can scan the <strong>instructions</strong><br />
sheet and mark the item) and send with your postal address.<br />
www.tommyswar.com 11
1 9 1 4 - 1 9 1 8 i n m i n i a t u r e<br />
Tommy’s <strong>War</strong> Limited, 5 Athens Close<br />
Hinckley, Leicestershire LE10 1FJ United Kingdom<br />
Registered in England number 9000306<br />
Tel: +44 (0) 7958 626236<br />
Email: darren@tommyswar.com<br />
WWW.TOMMYSWAR.COM