5 FLIGHT TESTS NORTHEAST SAILPLANE PRODUCTS ...
5 FLIGHT TESTS NORTHEAST SAILPLANE PRODUCTS ...
5 FLIGHT TESTS NORTHEAST SAILPLANE PRODUCTS ...

Create successful ePaper yourself
Turn your PDF publications into a flip-book with our unique Google optimized e-Paper software.
TOWER HOBBIES UPROAR 40 ARF<br />
IN THE BOX<br />
With the wide selection of sport-aerobatic,<br />
3D-capable, .40-size ARFs on the market,<br />
selecting the "right" one is a matter of weighing<br />
quality, appearance, performance and<br />
price. Based on these criteria, the Tower<br />
Hobbies Uproar 40 ARF is a winner. The<br />
all-balsa and plywood airframe is expertly<br />
constructed and has been covered with ironon<br />
material in an attractive multicolored<br />
scheme. The kit also features 3/16-inch main<br />
landing-gear wire, 21/2-inch main wheels, a<br />
1-inch tailwheel, an adjustable molded-nylon<br />
engine mount, an 8-ounce fuel tank, CA-style<br />
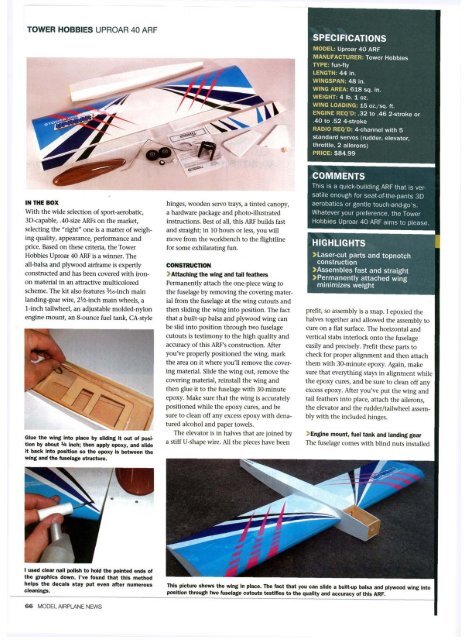
Glue the wing into place by sliding it out of position<br />
by about 1/4 Inch; then apply epoxy, and slide<br />
It back Into position so the epoxy Is between the<br />
wing and the fuselage structure.<br />
I used clear nail polish to hold the pointed ends of<br />
the graphics down. I've found that this method<br />
helps the decals stay put even after numerous<br />
cleanings.<br />
hinges, wooden servo trays, a tinted canopy,<br />
a hardware package and photo-illustrated<br />
instructions. Best of all, this ARF builds fast<br />
and straight; in 10 hours or less, you will<br />
move from the workbench to the flightline<br />
for some exhilarating fun.<br />
CONSTRUCTION<br />
>Attaching the wing and tail feathers<br />
Permanently attach the one-piece wing to<br />
the fuselage by removing the covering material<br />
from the fuselage at the wing cutouts and<br />
then sliding the wing into position. The fact<br />
that a built-up balsa and plywood wing can<br />
be slid into position through two fuselage<br />
cutouts is testimony to the high quality and<br />
accuracy of this ARF's construction. After<br />
you've properly positioned the wing, mark<br />
the area on it where you'll remove the covering<br />
material. Slide the wing out, remove the<br />
covering material, reinstall the wing and<br />
then glue it to the fuselage with 30-minute<br />
epoxy. Make sure that the wing is accurately<br />
positioned while the epoxy cures, and be<br />
sure to clean off any excess epoxy with denatured<br />
alcohol and paper towels.<br />
The elevator is in halves that are joined by<br />
a stiff U-shape wire. All the pieces have been<br />
SPECIFICATIONS<br />
MODEL: Uproar 40 ARF<br />
MANUFACTURER: Tower Hobbies<br />
TYPE: fun-fly<br />
LENGTH: 44 in.<br />
WINGSPAN: 48 in.<br />
WING AREA: 618 sq. in.<br />
WEIGHT: 4 lb. 1 oz.<br />
WING LOADING: 15 oz./sq. ft.<br />
ENGINE REQ'D: .32 to .46 2-stroke or<br />
.40 to .52 4-stroke<br />
RADIO REQ'D: 4-channel with 5<br />
standard servos (rudder, elevator,<br />
throttle, 2 ailerons)<br />
PRICE: $84.99<br />
COMMENTS<br />
This is a quick-building ARF that is versatile<br />
enough for seat-of :<br />
the-pants 3D<br />
aerobatics or gentle touch-and-go's.<br />
Whatever your preference, the Tower<br />
Hobbies Uproar 40 ARF aims to please.<br />
HIGHLIGHTS<br />
>Laser-cut parts and topnotch<br />
construction<br />
>Assembles fast and straight<br />
>Permanently attached wing<br />
minimizes weight<br />
prefit, so assembly is a snap. I epoxied the<br />
halves together and allowed the assembly to<br />
cure on a flat surface. The horizontal and<br />
vertical stabs interlock onto the fuselage<br />
easily and precisely. Prefit these parts to<br />
check for proper alignment and then attach<br />
them with 30-minute epoxy. Again, make<br />
sure that everything stays in alignment while<br />
the epoxy cures, and be sure to clean off any<br />
excess epoxy. After you've put the wing and<br />
tail feathers into place, attach the ailerons,<br />
the elevator and the rudder/tailwheel assembly<br />
with the included hinges.<br />
Engine mount, fuel tank and landing gear<br />
The fuselage comes with blind nuts installed<br />
This picture shows the wing in place. The fact that you can slide a built-up balsa and plywood wing into<br />
position through two fuselage cutouts testifies to the quality and accuracy of this ARF.