6009757_C-Fork Positioner Service Manual - Cascade Corporation
6009757_C-Fork Positioner Service Manual - Cascade Corporation
6009757_C-Fork Positioner Service Manual - Cascade Corporation

Create successful ePaper yourself
Turn your PDF publications into a flip-book with our unique Google optimized e-Paper software.
T<br />
ROUBLESHOOTING<br />
4.3 <strong>Fork</strong> Position<br />
Function<br />
There are six potential problems that could affect the FORK<br />
POSITION function:<br />
• Damaged or bent frame.<br />
• Incorrect load handling. Refer to Operator’s Guide for<br />
suggested procedures.<br />
• Incorrect hydraulic pressure or flow from the lift truck.<br />
• External leaks.<br />
• Defective solenoid coil or valve (if equipped).<br />
• Worn or defective cartridge valves or cylinder seals.<br />
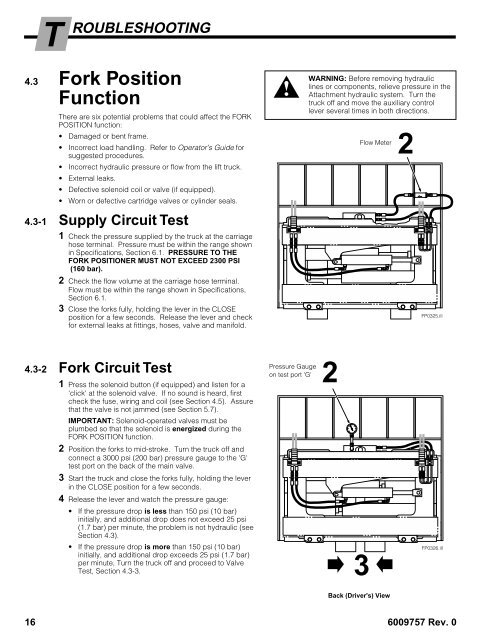
4.3-1 Supply Circuit Test<br />
1 Check the pressure supplied by the truck at the carriage<br />
hose terminal. Pressure must be within the range shown<br />
in Specifications, Section 6.1. PRESSURE TO THE<br />
FORK POSITIONER MUST NOT EXCEED 2300 PSI<br />
(160 bar).<br />
2 Check the flow volume at the carriage hose terminal.<br />
Flow must be within the range shown in Specifications,<br />
Section 6.1.<br />
3 Close the forks fully, holding the lever in the CLOSE<br />
position for a few seconds. Release the lever and check<br />
for external leaks at fittings, hoses, valve and manifold.<br />
4.3-2 <strong>Fork</strong> Circuit Test<br />
1 Press the solenoid button (if equipped) and listen for a<br />
'click' at the solenoid valve. If no sound is heard, first<br />
check the fuse, wiring and coil (see Section 4.5). Assure<br />
that the valve is not jammed (see Section 5.7).<br />
IMPORTANT: Solenoid-operated valves must be<br />
plumbed so that the solenoid is energized during the<br />
FORK POSITION function.<br />
2 Position the forks to mid-stroke. Turn the truck off and<br />
connect a 3000 psi (200 bar) pressure gauge to the 'G'<br />
test port on the back of the main valve.<br />
3 Start the truck and close the forks fully, holding the lever<br />
in the CLOSE position for a few seconds.<br />
4 Release the lever and watch the pressure gauge:<br />
• If the pressure drop is less than 150 psi (10 bar)<br />
initially, and additional drop does not exceed 25 psi<br />
(1.7 bar) per minute, the problem is not hydraulic (see<br />
Section 4.3).<br />
• If the pressure drop is more than 150 psi (10 bar)<br />
initially, and additional drop exceeds 25 psi (1.7 bar)<br />
per minute, Turn the truck off and proceed to Valve<br />
Test, Section 4.3-3.<br />
Pressure Gauge<br />
2<br />
on test port 'G'<br />
WARNING: Before removing hydraulic<br />
lines or components, relieve pressure in the<br />
Attachment hydraulic system. Turn the<br />
truck off and move the auxiliary control<br />
lever several times in both directions.<br />
Flow Meter 2<br />
16 <strong>6009757</strong> Rev. 0<br />
3<br />
Back (Driver's) View<br />
FP0325.ill<br />
FP0326.ill