6009757_C-Fork Positioner Service Manual - Cascade Corporation
6009757_C-Fork Positioner Service Manual - Cascade Corporation
6009757_C-Fork Positioner Service Manual - Cascade Corporation

You also want an ePaper? Increase the reach of your titles
YUMPU automatically turns print PDFs into web optimized ePapers that Google loves.
S<br />
ERVICE<br />
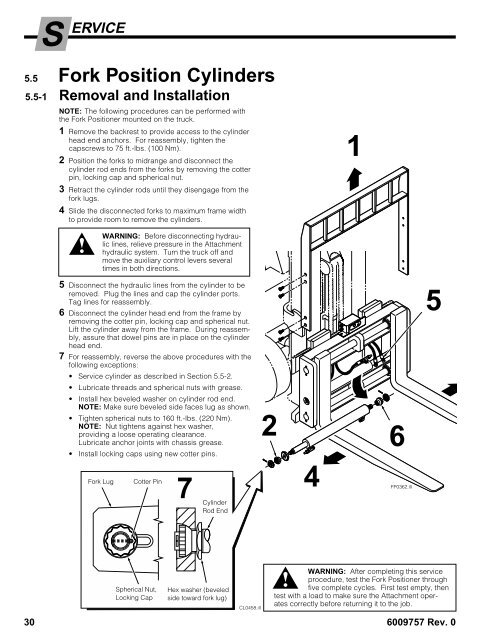
5.5 <strong>Fork</strong> Position Cylinders<br />
5.5-1 Removal and Installation<br />
NOTE: The following procedures can be performed with<br />
the <strong>Fork</strong> <strong>Positioner</strong> mounted on the truck.<br />
1 Remove the backrest to provide access to the cylinder<br />
head end anchors. For reassembly, tighten the<br />
capscrews to 75 ft.-lbs. (100 Nm).<br />
2 Position the forks to midrange and disconnect the<br />
cylinder rod ends from the forks by removing the cotter<br />
pin, locking cap and spherical nut.<br />
3 Retract the cylinder rods until they disengage from the<br />
fork lugs.<br />
4 Slide the disconnected forks to maximum frame width<br />
to provide room to remove the cylinders.<br />
WARNING: Before disconnecting hydraulic<br />
lines, relieve pressure in the Attachment<br />
hydraulic system. Turn the truck off and<br />
move the auxiliary control levers several<br />
times in both directions.<br />
5 Disconnect the hydraulic lines from the cylinder to be<br />
removed. Plug the lines and cap the cylinder ports.<br />
Tag lines for reassembly.<br />
6 Disconnect the cylinder head end from the frame by<br />
removing the cotter pin, locking cap and spherical nut.<br />
Lift the cylinder away from the frame. During reassembly,<br />
assure that dowel pins are in place on the cylinder<br />
head end.<br />
7 For reassembly, reverse the above procedures with the<br />
following exceptions:<br />
• <strong>Service</strong> cylinder as described in Section 5.5-2.<br />
• Lubricate threads and spherical nuts with grease.<br />
• Install hex beveled washer on cylinder rod end.<br />
NOTE: Make sure beveled side faces lug as shown.<br />
• Tighten spherical nuts to 160 ft.-lbs. (220 Nm).<br />
NOTE: Nut tightens against hex washer,<br />
providing a loose operating clearance.<br />
Lubricate anchor joints with chassis grease.<br />
• Install locking caps using new cotter pins.<br />
<strong>Fork</strong> Lug Cotter Pin<br />
Spherical Nut,<br />
Locking Cap<br />
7<br />
Cylinder<br />
Rod End<br />
Hex washer (beveled<br />
side toward fork lug)<br />
CL0458.ill<br />
WARNING: After completing this service<br />
procedure, test the <strong>Fork</strong> <strong>Positioner</strong> through<br />
five complete cycles. First test empty, then<br />
test with a load to make sure the Attachment operates<br />
correctly before returning it to the job.<br />
30 <strong>6009757</strong> Rev. 0<br />
2<br />
4<br />
1<br />
6<br />
FP0362.ill<br />
5