CVS 1000R Electro-Pneumatic Rotary Positioner - CVS Controls
CVS 1000R Electro-Pneumatic Rotary Positioner - CVS Controls
CVS 1000R Electro-Pneumatic Rotary Positioner - CVS Controls

Create successful ePaper yourself
Turn your PDF publications into a flip-book with our unique Google optimized e-Paper software.
6<br />
<strong>CVS</strong> <strong>Controls</strong> Ltd.<br />
Product Manual: <strong>Electro</strong>-<strong>Pneumatic</strong> <strong>Positioner</strong> YT-<strong>1000R</strong><br />
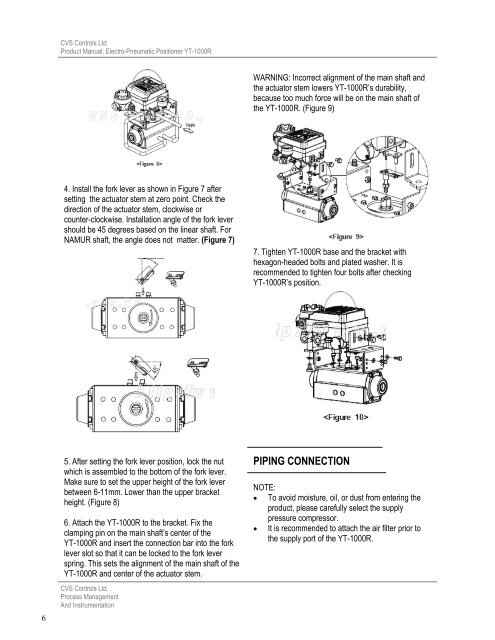
4. Install the fork lever as shown in Figure 7 after<br />
setting the actuator stem at zero point. Check the<br />
direction of the actuator stem, clockwise or<br />
counter-clockwise. Installation angle of the fork lever<br />
should be 45 degrees based on the linear shaft. For<br />
NAMUR shaft, the angle does not matter. (Figure 7)<br />
5. After setting the fork lever position, lock the nut<br />
which is assembled to the bottom of the fork lever.<br />
Make sure to set the upper height of the fork lever<br />
between 6-11mm. Lower than the upper bracket<br />
height. (Figure 8)<br />
6. Attach the YT-<strong>1000R</strong> to the bracket. Fix the<br />
clamping pin on the main shaft’s center of the<br />
YT-<strong>1000R</strong> and insert the connection bar into the fork<br />
lever slot so that it can be locked to the fork lever<br />
spring. This sets the alignment of the main shaft of the<br />
YT-<strong>1000R</strong> and center of the actuator stem.<br />
<strong>CVS</strong> <strong>Controls</strong> Ltd.<br />
Process Management<br />
And Instrumentation<br />
WARNING: Incorrect alignment of the main shaft and<br />
the actuator stem lowers YT-<strong>1000R</strong>’s durability,<br />
because too much force will be on the main shaft of<br />
the YT-<strong>1000R</strong>. (Figure 9)<br />
7. Tighten YT-<strong>1000R</strong> base and the bracket with<br />
hexagon-headed bolts and plated washer. It is<br />
recommended to tighten four bolts after checking<br />
YT-<strong>1000R</strong>’s position.<br />
PIPING CONNECTION<br />
NOTE:<br />
�� To avoid moisture, oil, or dust from entering the<br />
product, please carefully select the supply<br />
pressure compressor.<br />
�� It is recommended to attach the air filter prior to<br />
the supply port of the YT-<strong>1000R</strong>.